Working with Virtual Traffic Managers
Overview: Working with Virtual Traffic Managers
Once you have installed your Pulse Secure Virtual Traffic Managers (vTMs), you manage them from the vTM Instances page of the Services Director VA. From this page, you can:
•View the basic status details for each vTM, including:
•The lifecycle state of each vTM.
•The instance health of each vTM.
•The licensing health for each vTM.
•Show full details for each vTM.
•Change the order in which vTMs are displayed.
•Update the details for each vTM.
•Delete a vTM.
•Filter vTMs based on lifecycle state, instance health and licensing health.
•Change the lifecycle status for vTMs deployed from the Services Director.
To register an externally-deployed vTM, see Adding Virtual Traffic Managers to the Services Director.
The operation of Traffic Management and Load Balancing on individual vTMs is not addressed by the Services Director product. This requires use of the Pulse Secure Virtual Traffic Manager software for each vTM.
Viewing Virtual Traffic Managers
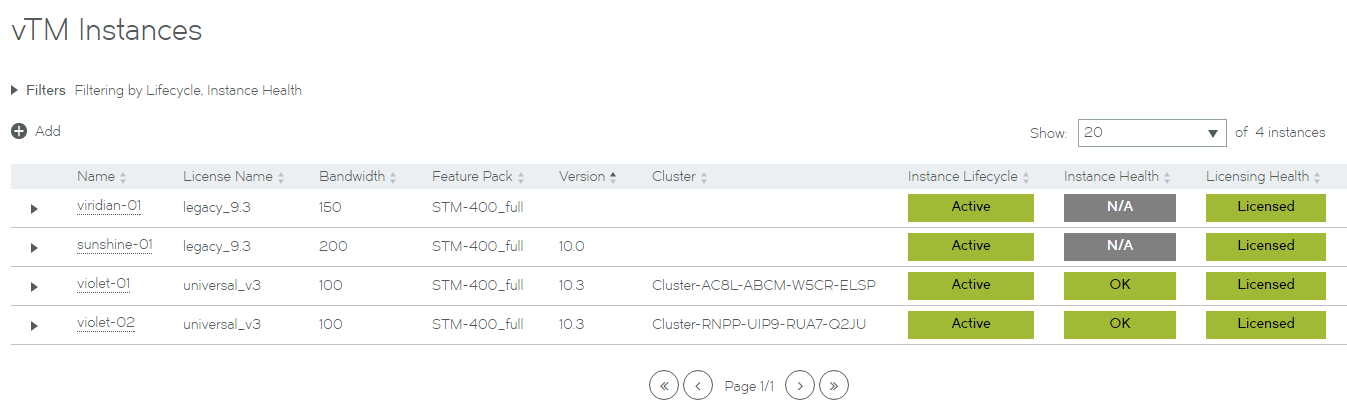
The vTM Instances page shows a table of all vTM instances known by the Services Director.
This page also includes:
•A collapsed list of filters. These filters control which categories of vTM instances are displayed. See Filtering vTMs.
•A count of instances.
•Paging controls for when there are larger numbers of vTM instances.
Understanding Basic Details of a Virtual Traffic Manager
Each entry in the table of vTM instances shows basic details for the vTM.
|
Name |
Description |
|
Name |
The chosen name for the vTM. The name is displayed as a hyperlink, except where the vTM uses Comms Channel, see Working with vTM Communications Channel. Names can be edited, and reused after a vTM is deleted if required. |
|
License Name |
The name of the FLA License for the vTM. This will either be a Universal FLA or a Legacy FLA, depending on the vTM settings. |
|
Bandwidth |
The maximum permitted bandwidth for this vTM (in Mbps). |
|
Feature Pack |
The chosen Feature Pack for the vTM. |
|
Version |
The software version for the vTM. Where the vTM’s REST API is unavailable, this is blank. |
|
Cluster |
The current cluster for the vTM. This is supported when: The vTM is deployed by the Services Director. The vTM is at version 10.2 or later with a REST API enabled. |
|
Instance Lifecycle |
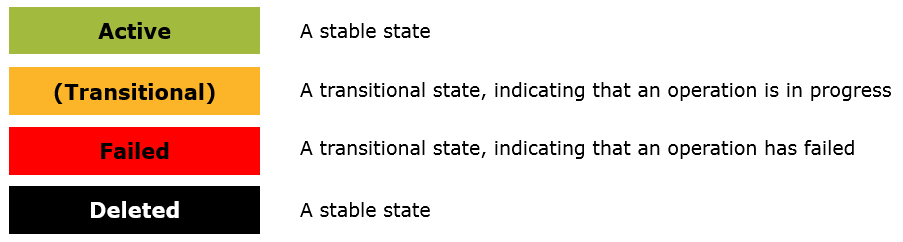
A colored indicator (green, blue, orange, red, black) and description of the vTM’s lifecycle status. See Understanding Lifecycle Status (Externally-Deployed vTMs). |
|
Instance Health |
A colored indicator (green, blue, orange, red, black) and description of the vTM’s current health status, which reflects the health of the cluster to which it belongs. See Understanding the Instance Health of a Virtual Traffic Manager. |
|
License Health |
A colored indicator (green, blue, orange, red, black) and description of the vTM’s current licensing health status. See Understanding the Instance Health of a Virtual Traffic Manager. |
|
Action |
Actions are only available for vTMs deployed by the Services Director. When a vTM is Active, a Stop button is displayed. This enables you to stop the vTM, changing its status to Idle. A status of Stopping is displayed during this process. When a vTM is Idle, a Start button is displayed. This enables you to start the vTM, changing its status to Active. A status of Starting is displayed during this process. |
Understanding Lifecycle Status (Externally-Deployed vTMs)
The Instance Lifecycle state of each vTM is displayed in the vTM Instances page.
When you register an externally-deployed vTM, the lifecycle operations supported by the Services Director VA are as follows:
![]()
For most externally-deployed vTMs, the Instance Lifecycle state will remain Active until the vTM is deleted.
The Lifecycle Status column for an externally-deployed vTM does not display a live monitoring status. As a result, if a vTM fails independently, this will not be indicated.
Note that:
•Where additional information is available, a red triangle is displayed next to the text of the status. Pause over this with your pointer to read the additional information in a dialog box.
•The displayed states are subject to the Instance Status filter. See Filtering vTMs.
You can affect the Lifecycle Status of an externally-deployed vTM as follows:
•By deleting a vTM from its entry in the vTM table. See Deleting a Virtual Traffic Manager.
•Other states are visible during relicensing.
Understanding Lifecycle Status (Deployed vTMs)
The Instance Lifecycle state of each vTM is displayed in the vTM Instances page.
When you deploy a vTM from the Services Director VA, it is deployed into a container on an instance host. This container enables full control of lifecycle operations for the vTM.
Refer to the Pulse Services Director Advanced User Guide for full details.
Understanding the Instance Health of a Virtual Traffic Manager
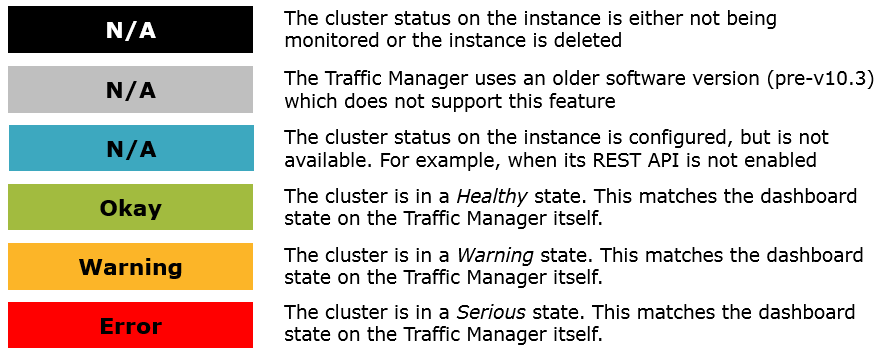
The Instance Health of each vTM is displayed in the vTM Instances page.
The displayed Instance Health of a vTM is a summary status that reflects the health of the cluster to which the vTM belongs. As a result, where cluster health is an issue, all vTMs in a cluster will typically display the same status.
Instance Health is reported as follows:
Note that:
•Instance health checks are only performed for vTMs at version 10.3 or later with an active REST API. For all other cases, the Instance Health is reported as N/A.
•Where additional information is available, a red triangle is displayed next to the text of the status. Pause over this with your pointer to read the additional information in a dialog box.
•The displayed states are subject to the Instance Health filter, see Filtering vTMs.
Understanding the Licensing Health of a Virtual Traffic Manager
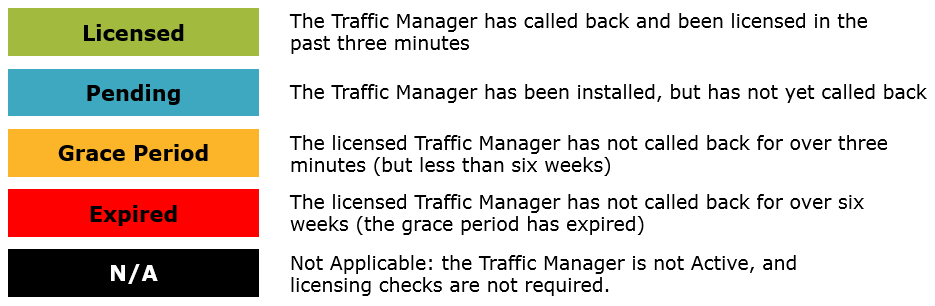
The Licensing Health of each vTM is displayed in the vTM Instances page.
The displayed Licensing Health of a vTM is a summary status, based on a number of licensing checks. Licensing is requested every three minutes using a callback mechanism. The method varies, depending on whether a Universal FLA or Legacy FLA License is in use on a vTM.
Licensing Health is reported as follows:
Note that:
•License checks are only performed for vTMs with an Active Lifecycle Status. For all other lifecycle states, the Licensing Health is reported as N/A.
•Where additional information is available, a red triangle is displayed next to the text of the status. Pause over this with your pointer to read the additional information in a dialog box.
•The displayed states are subject to the Licensing Health filter, see Filtering vTMs.
Viewing Full Details for a Virtual Traffic Manager
The vTM Instances page shows a table of basic details for all vTM instances. To view full details for a vTM, click the arrow on the left side of the vTM’s entry.
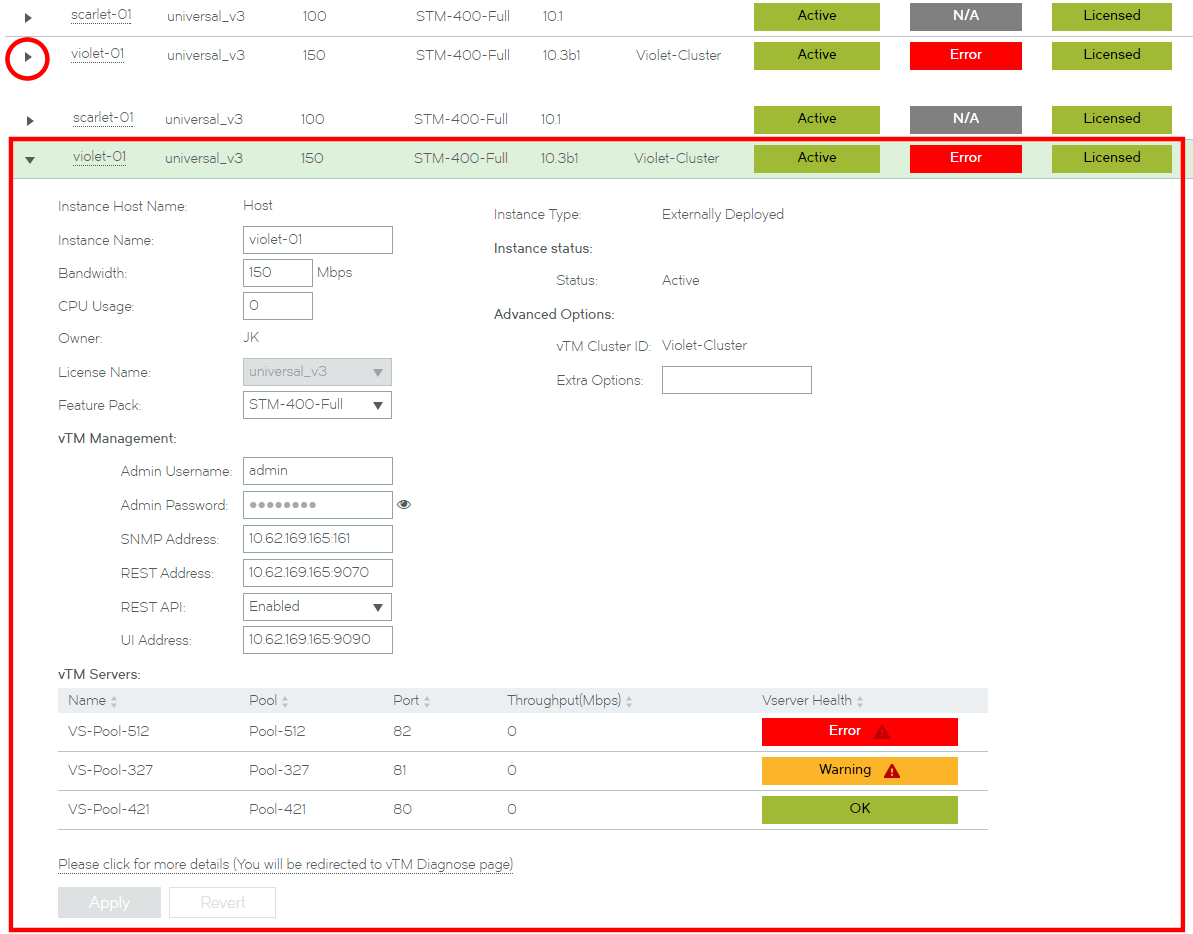
The administration password for the vTM is not displayed by default. To reveal the administration password, click the eye button next to the Password field.
This view shows full details for the vTM, and includes a list of vServers with a status for each. See Understanding vServer Status.
Changing the Display Order of vTMs
The vTM Instances page shows a table of all vTMs known by the Services Director.
The table of vTMs can be sorted according to any of the basic details, including Lifecycle Status and Licensing Health (see Understanding Basic Details of a Virtual Traffic Manager). For example, the table is sorted by default by ascending Name.

To sort the table based on ascending values of any of the basic details, click the relevant column heading. For example, after clicking the Bandwidth heading, the same table is now sorted according to ascending Bandwidth.

Clicking the column heading again will sort the table according to a descending view of the same basic detail. For example, after clicking the Bandwidth heading again, the same table is now sorted according to a descending value of Bandwidth.

Filtering vTMs
You can filter the vTM instances that are included on the vTM Instances page.
By default, the filters are collapsed, and a summary of filters is shown:

You can expand this to show the filters list.

The following filters are supported, which can be used in combination:
•Basic Filters - this filters vTMs by name. This supports regular expressions for search purposes.
•Lifecycle Filter - this filters vTMs by instance lifecycle status. Any of the four lifecycle states can be included/excluded. That is: Active, Idle, Failed, Deleted. You cannot filter using any of the (orange) supported transitional states.
vTMs with the Deleted instance lifecycle state are not included by default.
•Instance Health Filter - this filters vTMs by license health. Any of the four licensing states can be included/excluded. That is: Error, Warning, OK or N/A.
•Licensing Health Filter - this filters vTMs by license health. Any of the licensing states can be included/excluded. That is: Licensed, Pending, Warning, Failed or N/A.
•Cluster Filter - this filters vTMs using a single selected cluster. The list of clusters includes both Discovered and User Created clusters, see Working with Virtual Traffic Manager Clusters.
Perform the following procedure:
1.Click the Services menu, and then click Services Director: vTM Instances.
The vTM Instances page appears.
2.Under Basic Filters, type a Name if required. This supports regular expressions for search purposes. This filter is applied automatically as you type.
When a Name filter is set the summary of filters includes "Name".
3.Under Lifecycle Status, select the check box for each required instance lifecycle state.
Any state that is ticked is included in the table of vTMs.
Deleted vTMs are not included by default. To include these, select the Deleted check box.
4.Under Instance Health, select the check box for any required instance health states.
Any state that is ticked is included in the table of vTMs.
5.Under License Health, select the check box for any required licensing health states.
Any state that is ticked is included in the table of vTMs.
6.Under Cluster, select the required cluster from the drop-down list.
The table of vTMs is limited to vTMs that are in the selected cluster.
Updating Details for a Virtual Traffic Manager
You can update many of the details of a vTM from the vTM Instances page.
1.Click the Services menu, and then click Services Director: vTM Instances. The vTM Instances page appears.
2.Locate the vTM’s entry in the table of vTMs.
3.Click the arrow on the left side of the vTM’s entry. The entry expands to show full details for the vTM.
4.Make the required changes to the vTM’s details.
5.Click Apply.
Understanding vServer Status
Each vTM will have one or more vServers. Each vServer is responsible for balancing incoming traffic across a pool of nodes, as configured on the Pulse Secure Virtual Traffic Manager itself.
A list of vServers is included in the vTM detailed view on the vTM Instances page. The vTM must be at version 10.3 or later with the REST API available. For example:
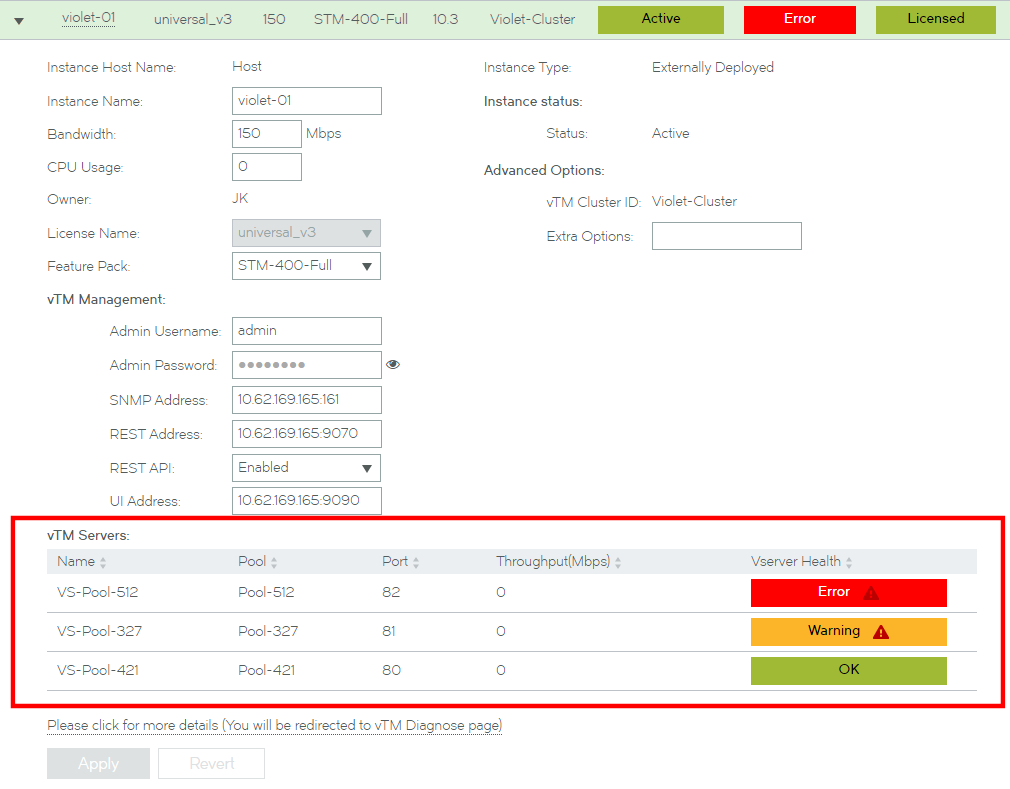
In this example, the vTM Servers list shows three vServers:
•VS-Pool-512 is in an Error state. This indicates that all of its nodes are in error. Pausing the pointer over the warning triangle will list failed pool nodes.
•VS-Pool-327 is in a Warning state. This indicates that some (but not all) of its nodes are in error. Pausing the pointer over the warning triangle will list failed pool nodes.
•VS-Pool-421 is in an OK state. This indicates that all of the vServer pool nodes are working.
The vTM Servers list is limited to ten vServers, but by default this list displays in descending order of severity. That is, vServers showing an Error at the top, then vServers showing warnings, then vServers with no errors.
To investigate any listed errors, click the Please click for more details control. You will be redirected to vTM Diagnose page on the vTM software, outside of the Services Director VA.
Deleting a Virtual Traffic Manager
You can delete a vTM from the vTM Instances page.
When you delete an externally-deployed vTM:
•The vTM itself is not actually deleted. It continues to exist, and remains registered. However, monitoring, metering and licensing checks for the vTM are halted.
•The Lifecycle Status of the vTM changes to Deleted.
•The Licensing Health of the vTM changes to N/A.
•The Name of a Deleted vTM can be reused by a different vTM.
vTMs with the Deleted state are not included in the default filter settings for the vTM Instances page. To include these vTMs in the vTM Instances page, see Filtering vTMs.
When you delete a vTM that was deployed by the Services Director VA:
•The vTM must be in an Idle state.
•The vTM itself is deleted.
•The vTM’s container is deleted.
•The Lifecycle Status of the vTM changes to Deleted.
•The Instance Health of the vTM changes to N/A.
•The Licensing Health of the vTM changes to N/A.
•The Name of a Deleted vTM can be reused by a different vTM.
To delete a vTM:
1.Click the Services menu, and then click Services Director: vTM Instances. The vTM Instances page appears.
2.Locate the vTM’s entry in the table of vTMs.
3.To the right of the vTM’s entry, click the X control. A confirmation control appears.
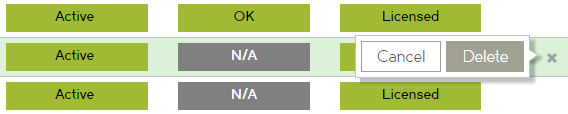
4.Click Delete.
Configuring Auto Cleanup of Virtual Traffic Managers
You can configure Services Director to automatically delete registered vTM instances that have failed. This may be under specific circumstances, such as when a vTM is used to perform a transient service, and that service has ended.
The deletion of a vTM from Services Director does not delete the vTM itself.
There are two configurations supported:
•Services Director deletes any automatically self-registered vTM that has failed. For details of this registration process, see Self-Registering an Externally-Deployed Virtual Traffic Manager.
•Services Director deletes any vTM that has failed.
Both configurations require configuration of all Instance Failure Period and Instance Monitor Interval settings in the Services Director General Settings, see Updating Monitoring Settings.
To configure automatic deletion of failed vTMs:
1.Access the System > General Settings page.
2.Under Monitoring, update the following settings:
•Instance Monitor Interval - the length of the monitoring cycle. That is, the period of time, in seconds, between each Services Director attempt to retrieve monitoring information from each vTM. The default value is 60. When vTM monitoring information cannot be retrieved by Services Director for this period, the Instance Health of a vTM instance will change to Error on the vTM Instances page.
•Instance Failure Period - the period of time, in seconds, after which the instance is considered to have failed if vTM monitoring information cannot be retrieved by Services Director. The default value is 180. When the vTM fails, auto-deletion will be triggered on eligible vTMs.
Typically, the Instance Failure Period will be several times longer than the Instance Monitor Interval.
3.Under Auto Cleanup vTMs, choose the required setting:
•To delete only automatically self-registered vTMs that fail, click Self Registered Auto Accepted.
The Auto Cleanup vTMs Status changes to Self Registered Auto-Accepted.

•To delete all vTMs that fail, click All.
The Auto Cleanup vTMs Status changes to All.

•(Optional) To disable Auto Cleanup, click Off.
The Auto Cleanup vTMs Status changes to Off.
Once the configuration process is complete, vTMs of the selected type will be deleted from the Services Director in the event of a vTM failure. See also Example of Auto Cleanup.
Example of Auto Cleanup
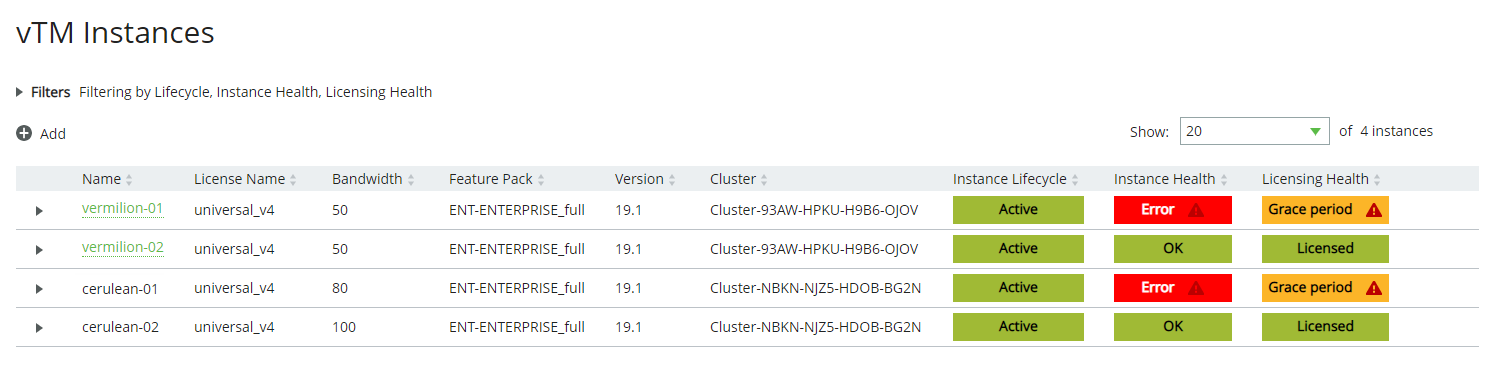
In the following example:
•The vTMs vermilion-01 and vermilion-02 were manually registered on Services Director.
•The vTMs cerulean-01 and cerulean-02 were automatically self-registered on Services Director.
•Auto Cleanup is configured so that automatically self-registered vTMs will be automatically deleted from Services Director in the event of failure.
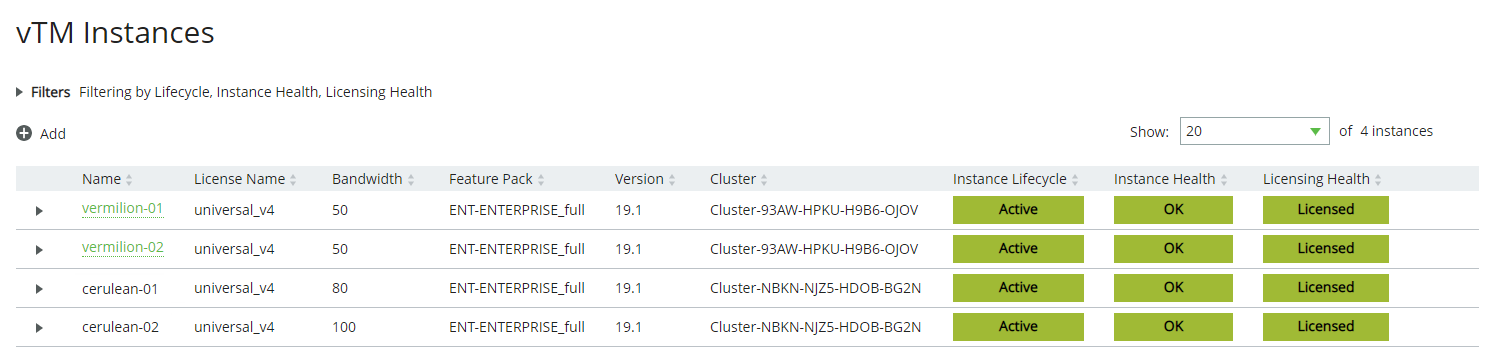
After a monitoring cycle, if monitoring information cannot be retrieved from Vermilion-01 and Cerulean-01, their Instance Health and Licensing Health update to indicate this.
Once the failure period is reached without monitoring information being retrieved, auto cleanup triggers:
•Vermilion-01 is not deleted, as it was not automatically self-registered.
•Cerulean-01 is deleted, as it was automatically self-registered.
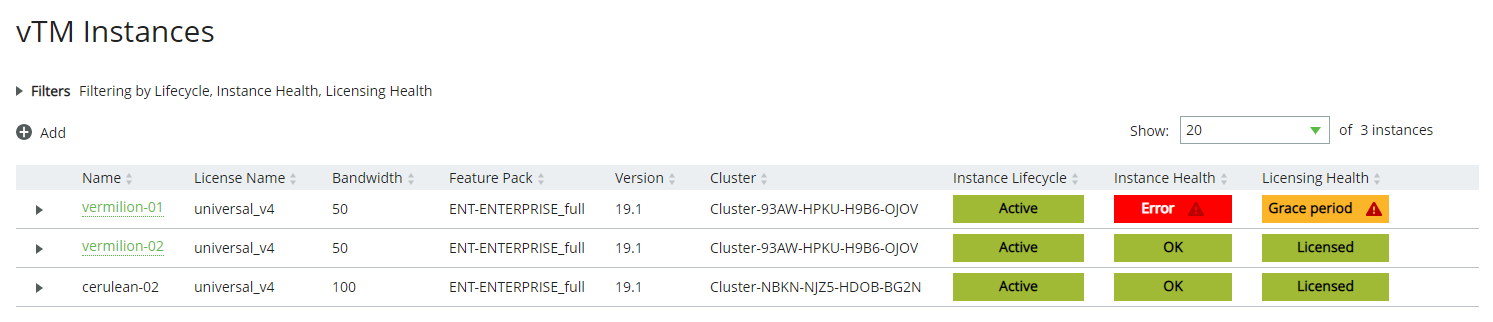
To confirm the deletion, expand the Filters and view Deleted vTMs to see the deleted Cerulean-01 vTM:

Deleted vTMs are purged from Services Director after a default period of 42 days. This period can only be set from the REST API, see the Services Director Advanced User Guide.
Working with Application Templates (Enterprise Feature Tier)
Once a clustered vTM is registered on vTM, the vTM can be configured to support the use of one or more applications. This can be achieved either by manually configuring the vTM using its GUI (see the Virtual Traffic Manager documentation) or by using application templates.
•Overview of Application Templates and Template Instances.
•Adding an Application Template to Services Director.
•Creating and Applying a Template Instance.
•Removing a vTM Application By Deleting a Template Instance.
Application templates are only available to customers whose license includes the Enterprise Feature Tier.
Overview of Application Templates and Template Instances
A default configuration of resources and settings for a vTM application can be stored as an application template and uploaded into Services Director.
Application templates are only available to customers whose license includes the Enterprise Feature Tier.
To use an application template on a registered vTM, Services Director creates a template instance from the application template. The exposed properties for the template instance are then previewed by the user, who can change any of the properties if required. These changes finalize the template instance.
The vTM-specific template instance is stored on the Services Director, and then applied automatically to the vTM cluster to create all required resources and settings for the application on all vTMs in the cluster.
An application template can be used multiple times on a single vTM to create the resources and settings required for additional instances of the same application.
Example: Web Server Application Template
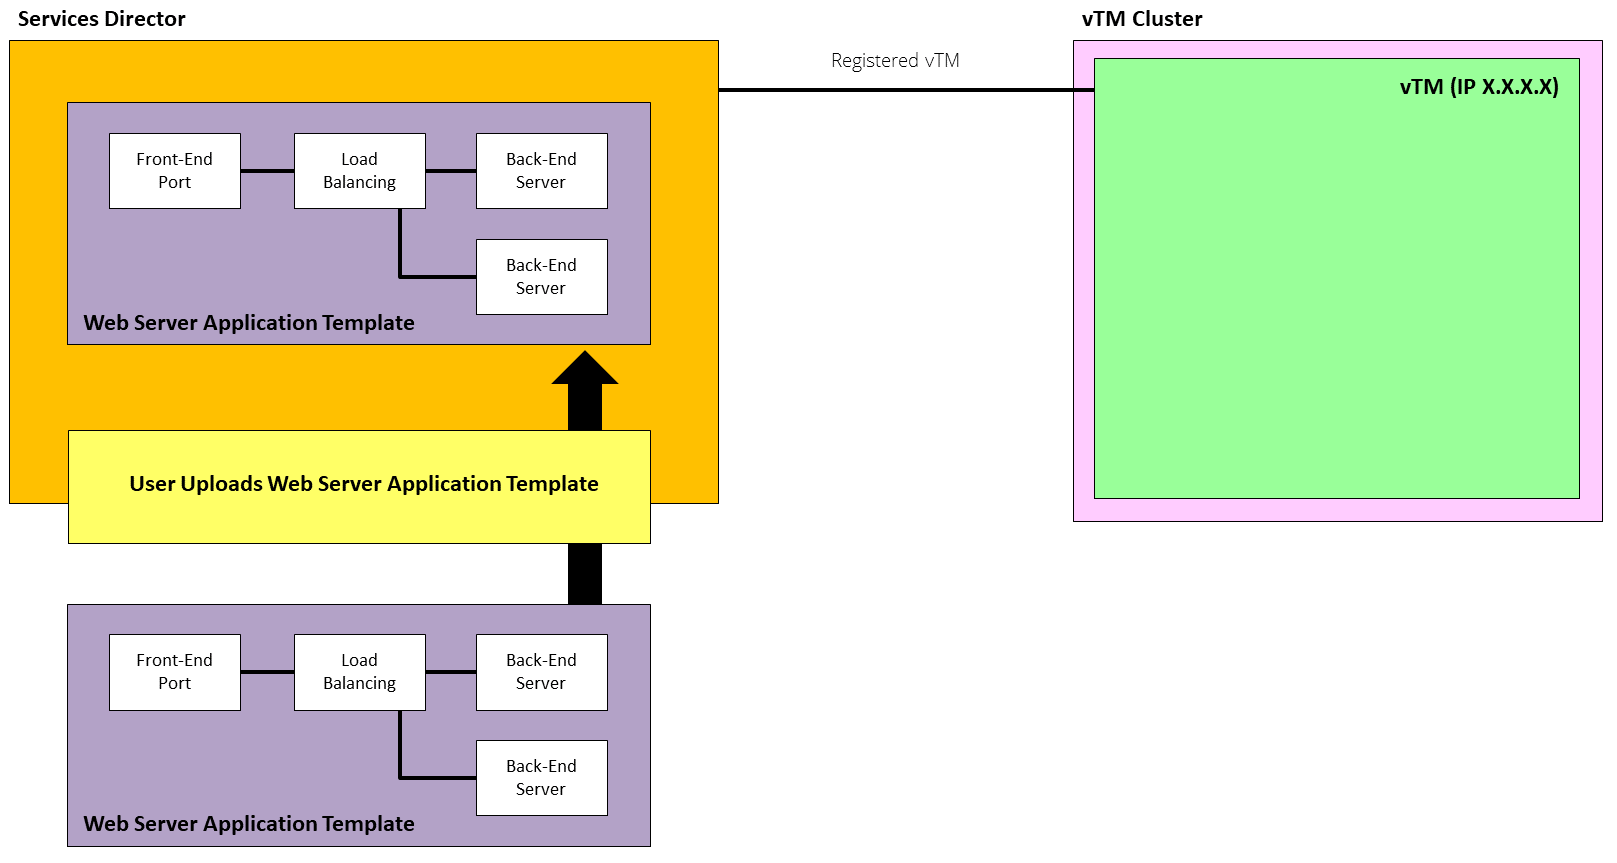
Services Director is supplied with an application template for a web server, which contains all required default information for a vTM-based web server application.
For this application template, a web server application requires:
•A port to receive incoming requests on the front-end IP address of the (clustered) vTM.
•Two back-end server pools to process the requests.
In this example:
•Two separate web servers are required on a single vTM.
•There is only one vTM in the cluster.
Where multiple vTMs exist in the cluster, all vTMs in the cluster are configured for the application.
First, the web server template file (a .ZIP file) must be uploaded to the Services Director. For example:

After the application template is loaded into the Services Director, the user selects a vTM cluster to host the application. Services Director then creates a template instance from the application template. The exposed properties for the template instance are then previewed by the user, who can change any of the properties if required. These changes finalize the template instance. For example:
Services Director then applies the configuration from the template instance to the clustered vTM to create the first required web server application. For example:

In this example, the back-end servers are implemented as vServers and Pools on the vTM.
For the second web server, the process can be repeated. A new template instance is always created. In this example, the template instance requires a different front-end port to the first template instance. For example:
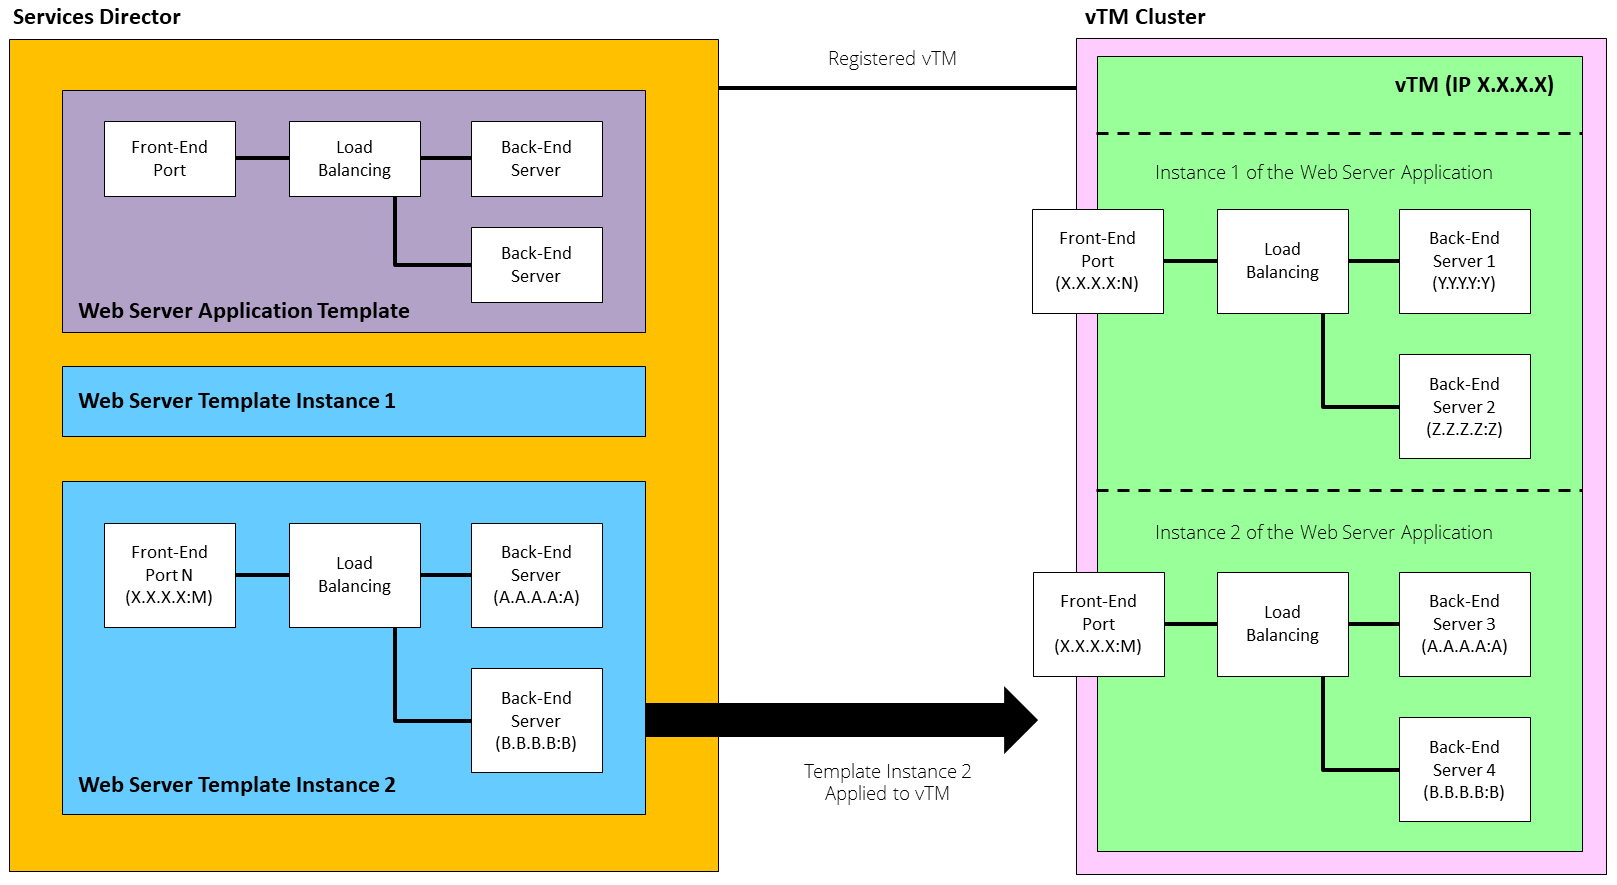
In this example:
•The Services Director has one application template and two template instances.
•The vTM cluster contains a single vTM.
Where multiple vTMs exist in the cluster, all vTMs in the cluster are configured for the application.
•The vTM has two web server applications.
Adding an Application Template to Services Director
Services Director is supplied with application templates, which contain all required information to configure and create an instance of an application on a vTM. These are:
•Web server application template.
•SSL-based web server template.
Contact Pulse Secure to get these files.
To add an application template to Services Director:
1.Click the Catalogs menu, and then click Application Templates.
The Application Templates page appears. On its first use, this contains no entries. For example.
![]()
2.Click the plus symbol above the application template table.
The Import a Template dialog box appears.
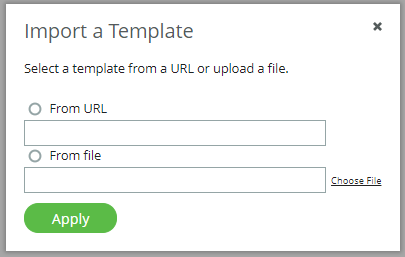
3.Select one of the following options:
•From URL. Then, enter the URL for the application template.
•From File. Then, click Choose File to locate the file.
4.Click Apply.
The application template is uploaded. After this completes, it is added to the Application Templates page. For example:

The uploaded application template is ready for use, see Creating and Applying a Template Instance.
5.(Optional) Expand the application template to see its full details. For example:
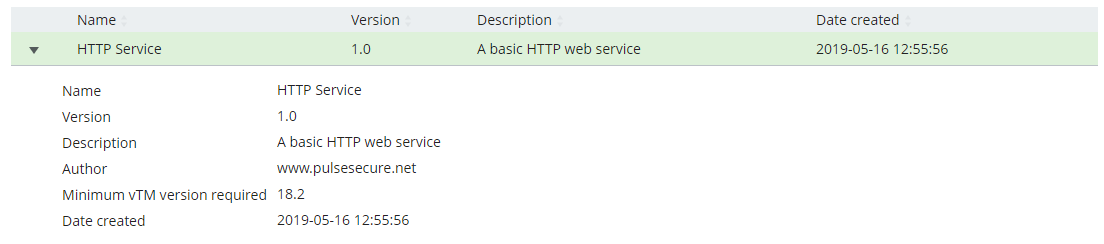
6.(Optional) Repeat steps 2 - 5to add additional application templates.
After you have uploaded all required application templates, you can use them to create applications on vTMs in the estate of the Services Director, see Creating and Applying a Template Instance.
Creating and Applying a Template Instance
After you have uploaded one (or more) application templates to Services Director, you can create a template instance from an application template and apply the configuration to a vTM cluster.
To create and apply a template instance:
1.Click the Services menu, and then click Application Templates: Template Instances.
The Template Instances page appears. On its first use, this contains no entries. For example.
![]()
2.Click the plus symbol above the template instances table.
The first page of the Instantiate a template wizard appears.
This page enables you to identify the required application template, and the required vTM cluster.
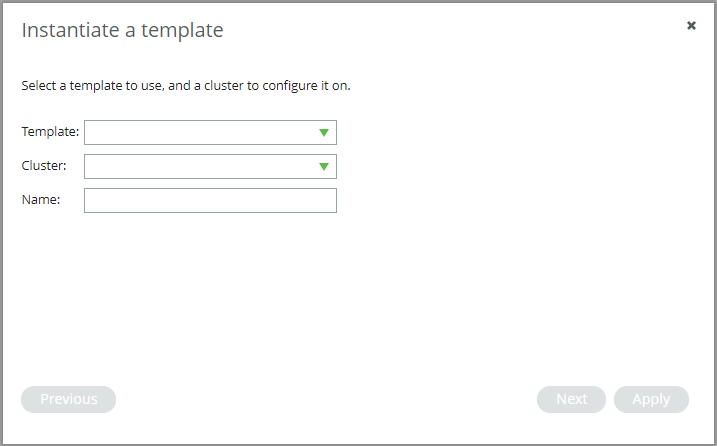
3.Select an application Template for the template instance.
4.Select a vTM Cluster for the template instance.
5.Enter a Name for the template instance.
6.Click Next.
The second page of the Instantiate a template wizard appears.
This page displays all properties that can be changed, as defined inside the template. Their default values for those properties are also displayed. For example:
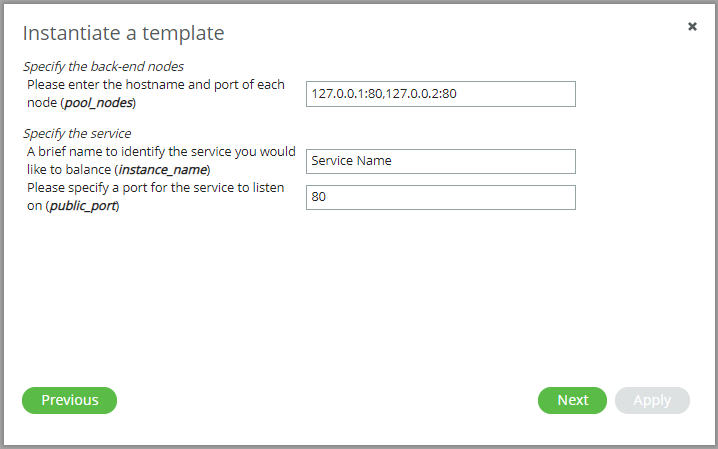
This page of the wizard will vary between different application templates. For this reason, no property-specific instructions are given in this procedure.
7.(Optional) Update any of the displayed values.
8.Click Next.
The third page of the Instantiate a template wizard appears.
This page summarizes the final values for each parameter. For example:
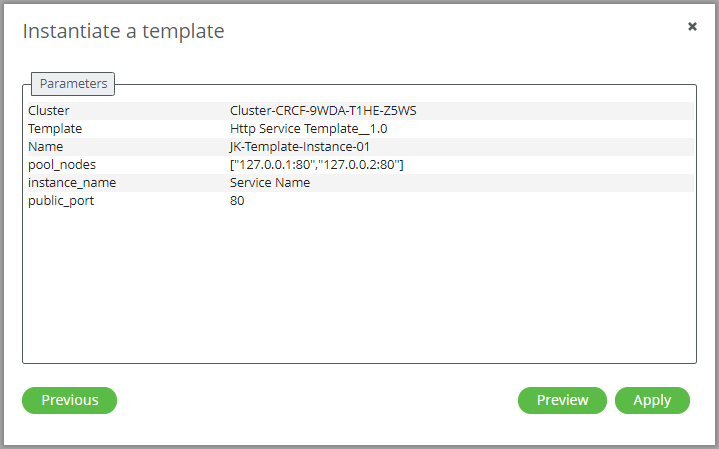
9.(Optional) Click Preview to test the template against the vTM settings for the cluster.
•If the preview succeeds, the following message appears, and a Results tab is added.
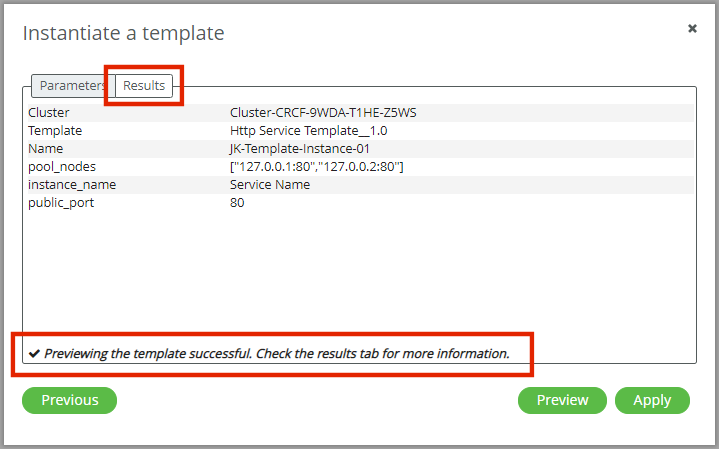
(Optional) Click the Results tab to view the output of the preview operation. For example:
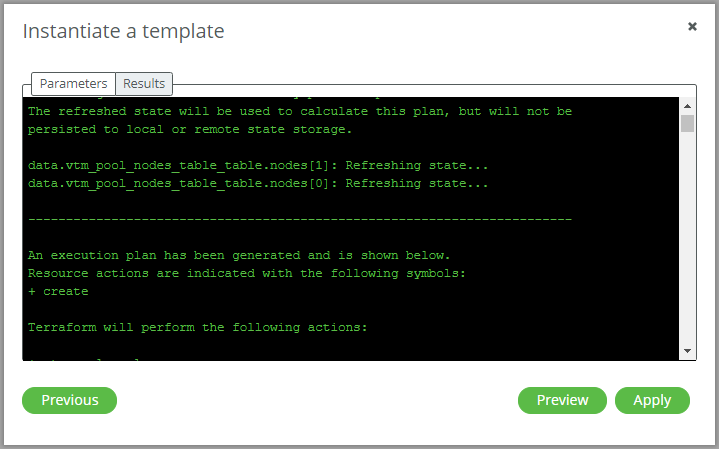
•If the preview fails, analyze the output in the Results tab and click Previous until you can change the properties for the template instance. Repeat as required.
10.Click Apply.
The template instance is created and the configuration is applied to all vTMs in the cluster.
11.Click the Services menu, and then click Application Templates: Template Instances.
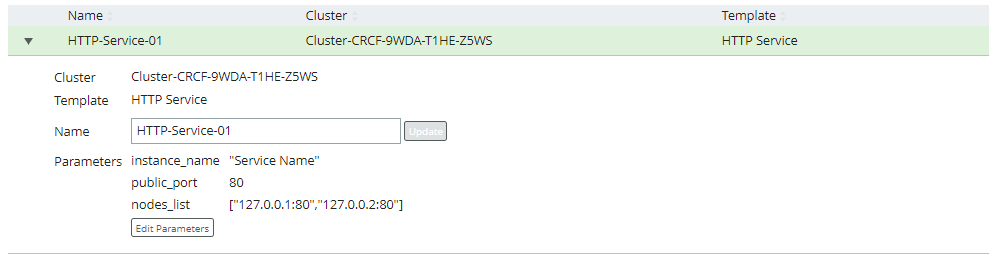
The new template instance appears on the Template Instances page. For example:

12.(Optional) To view details for the template instance, expand its entry.
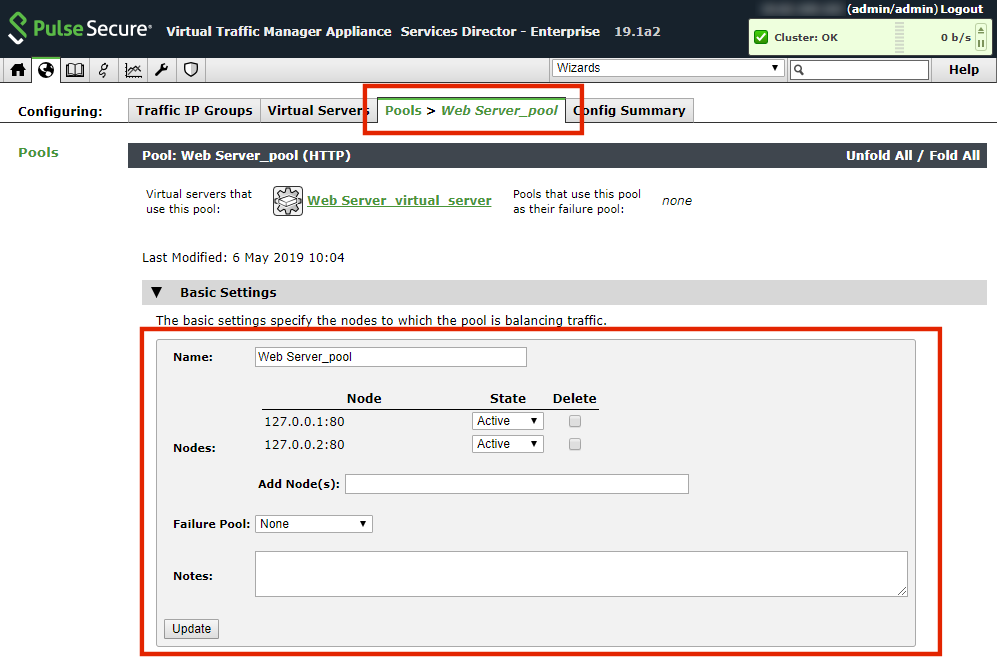
13.(Optional) To confirm the application has been created correctly, log into a vTM in the cluster after a few minutes. For example, for a web server application:
•The Services summary on the Home page shows new vServers and pools.
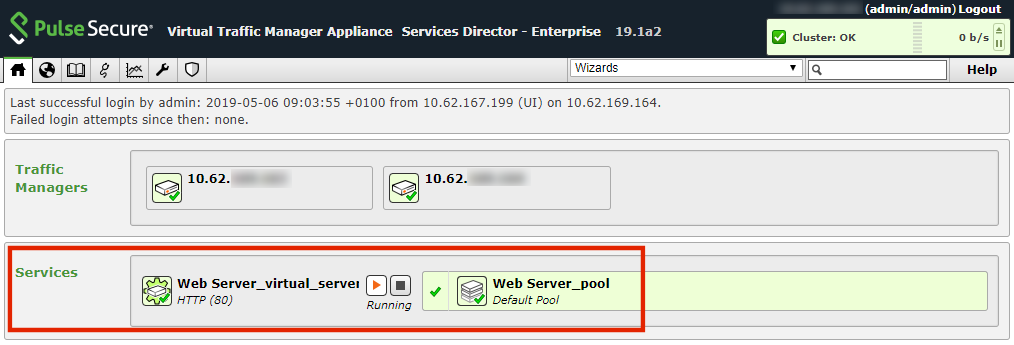
•Click the virtual server Service to view the Virtual Servers tab. This tab shows the vServer properties specified in the template instance wizard.
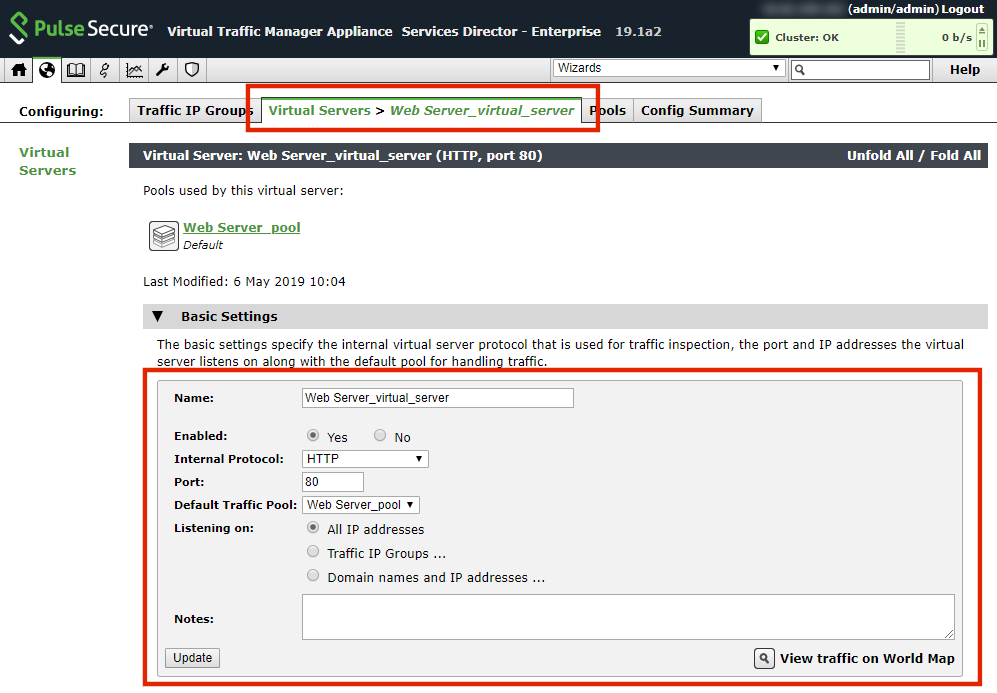
•The Pools tab shows the pool properties specified in the template instance wizard.
The creation of an application from an application template is complete.
Editing a Template Instance
After a application has been created, you can edit its properties in the Template Instances page:
1.Click the Services menu, and then click Application Templates: Template Instances.
The list of template instances appears on the Template Instances page. For example:

2.(Optional) To view details for a template instance, expand its entry.

3.Click Edit Parameters.
The Update template instance parameters wizard appears. For example:
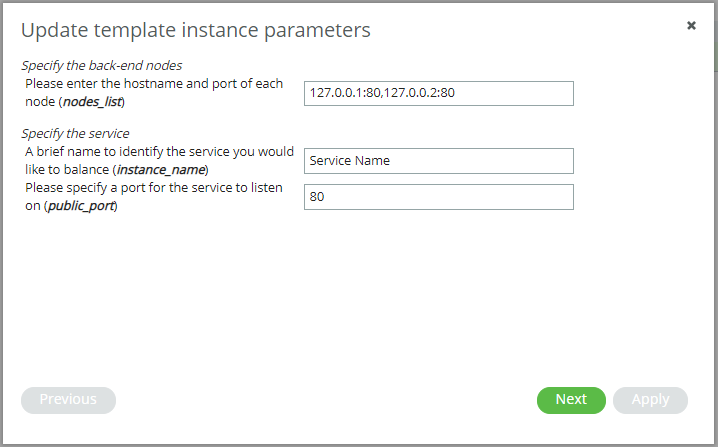
4.Update the required values and continue with the wizard. This is the same as described in Creating and Applying a Template Instance.
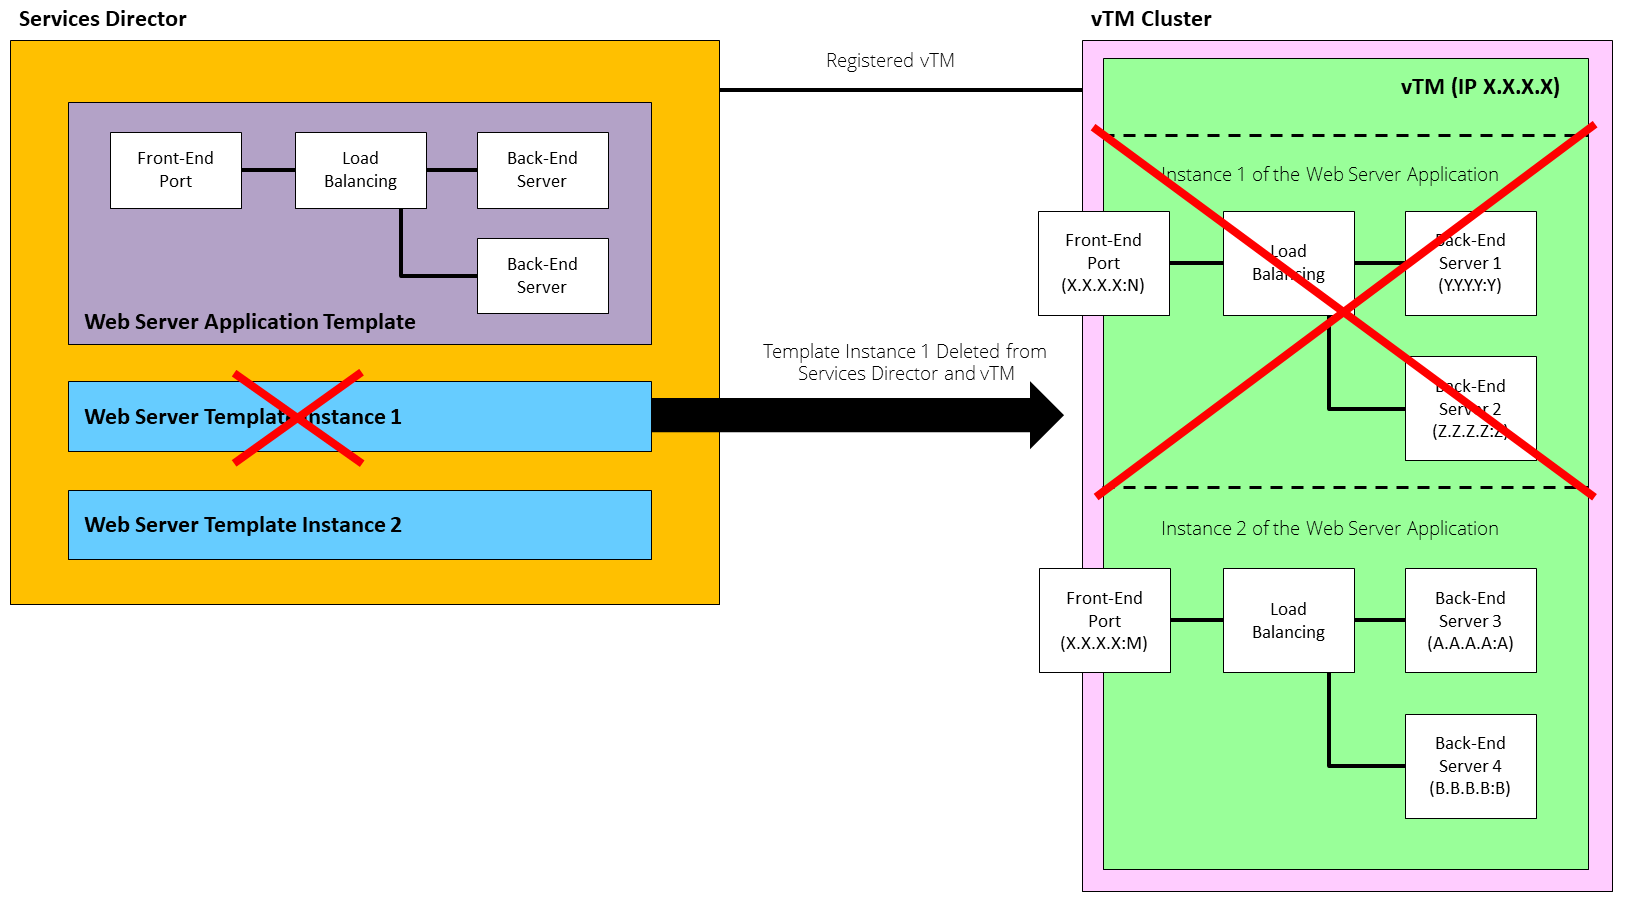
Removing a vTM Application By Deleting a Template Instance
When you no longer require an application on a vTM that was configured from an application template, you can delete it. To do this, delete the matching application instance from the Services Director. Services Director automatically reconfigures the vTM, removing resources and resetting properties on the vTM so that the application is removed.
For example, where two web server applications exist on a vTM, if the first web server is no longer required, delete its matching template instance on the Services Director. Services Director automatically removes the resources and settings that were added for the first web server, but leaves the second web server intact. For example:
To remove a vTM Application:
1.Click the Services menu, and then click Application Templates: Template Instances.
The list of template instances appears on the Template Instances page. For example:

2.Ensure that no entries are expanded.
3.Hover the pointer over the template instance that you want to delete.
4.To the right of the template instance entry, click the X control. A confirmation control appears.
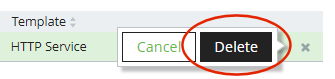
5.Click Delete.
The template instance is removed. Services Director automatically reconfigures the vTM, removing resources and resetting properties on the vTM so that the application is removed.
6.(Optional) To confirm the application has been deleted correctly, log into a vTM in the cluster after a few minutes and confirm that the removal is complete. For example, after the removal of a vTM’s only web server application, ensure that the Services summary on the Home page shows the correct information. For example:

The removal of an application from a vTM is complete.
Relicensing Virtual Traffic Managers
Under a number of circumstances, you may need to relicense a vTM. For example:
•A Legacy FLA License is about to expire.
•The Service Endpoint Address of your Services Director changes. This affects vTMs that are licensed using either Universal FLA or Legacy FLA Licensing.
•A vTM is updated from version 10.0 (or earlier) to version 10.1 (or later). You can replace the Legacy FLA licensing with Universal FLA licensing.
See Preparing to Relicense a Virtual Traffic Manager (Legacy FLA to Universal FLA) before starting this process.
•A new version of the Universal FLA License is released.
•The existing FLA License has been damaged in some way.
If you are applying a new license to vTM that has no active REST API, you will need to add the Legacy FLA License to the vTM directly; this cannot be achieved through the Services Director.
Preparing to Relicense a Virtual Traffic Manager (Legacy FLA to Universal FLA)
You may have a vTM that you used on an earlier release of the Services Director, which is now at version 10.1 or later. You can change its current Legacy FLA Licensing to Universal FLA Licensing. Before you can do this, you must enable its REST API setting.
1.Click the Services menu, and then click Services Director: vTM Instances.
The vTM Instances page appears.
2.Locate the vTM’s entry in the table of vTMs.
3.Click the arrow on the left side of the vTM’s entry to show its details.
4.Under vTM Management, change Rest API to Enabled.
5.Click Apply to confirm the change.
You can then continue with the relicensing process.
Relicensing a Virtual Traffic Manager Instance
1.Access your Services Director VA from a browser, using its Service Endpoint IP Address.
2.Log in as the administration user. The Home page appears.
3.Click the Catalogs menu, and then click Licensing: FLA Licenses. The FLA Licenses page appears.
![]()
4.(Optional) Add any new flexible licenses. See Adding a Legacy FLA License to the Services Director.
5.Locate the license you wish to use.
This can be either a Universal FLA License or a Legacy FLA License.
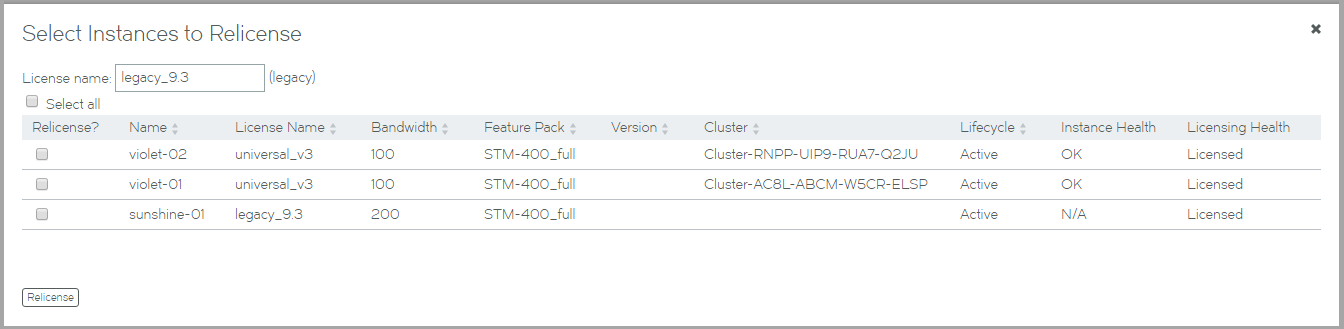
6.For this license, click Relicense.
The Select Instances To Relicense dialog box appears. This indicates the selected FLA License, and lists all current vTMs with an enabled REST API. For example:
7.Select the required vTMs for the selected FLA License. For example:
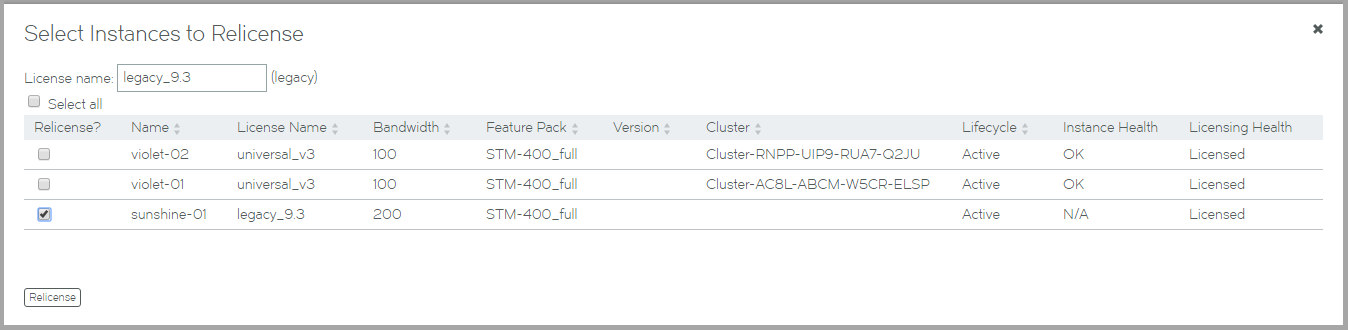
You may have a vTM that you used on an earlier release of the Services Director, which is now at version 10.1 or later. You can change its current Legacy FLA Licensing to Universal FLA Licensing. See Preparing to Relicense a Virtual Traffic Manager (Legacy FLA to Universal FLA).
8.Click Relicense. A confirmation dialog box appears.
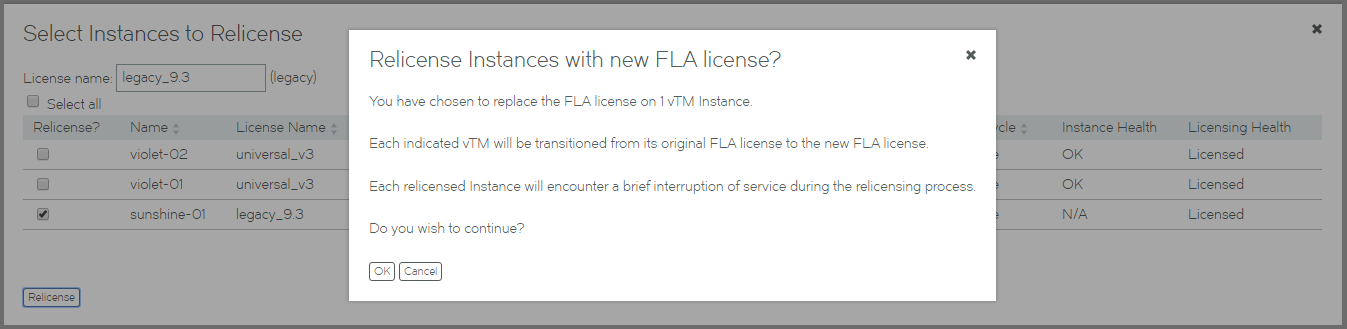
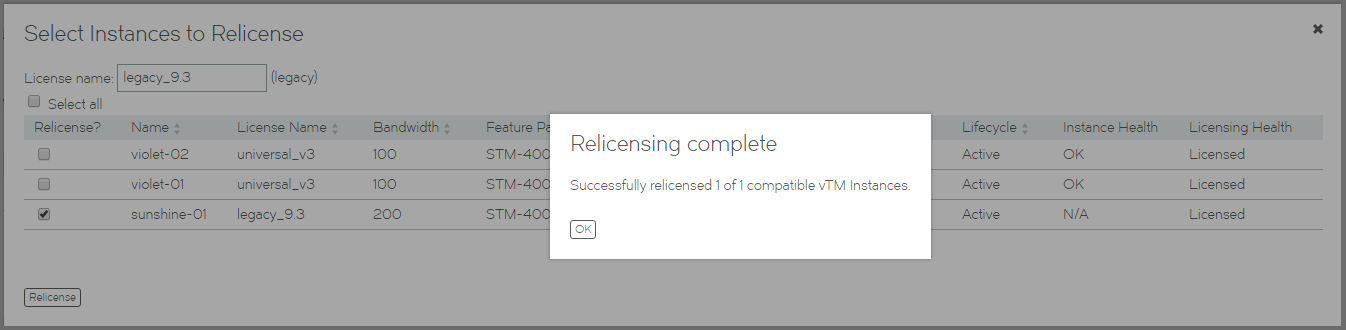
9.Click OK. The relicensing process begins, and displays progress. There are two possible outcomes:
•The process completes successfully. For example:
•The process completes, but is only partially successful. Using a different example:
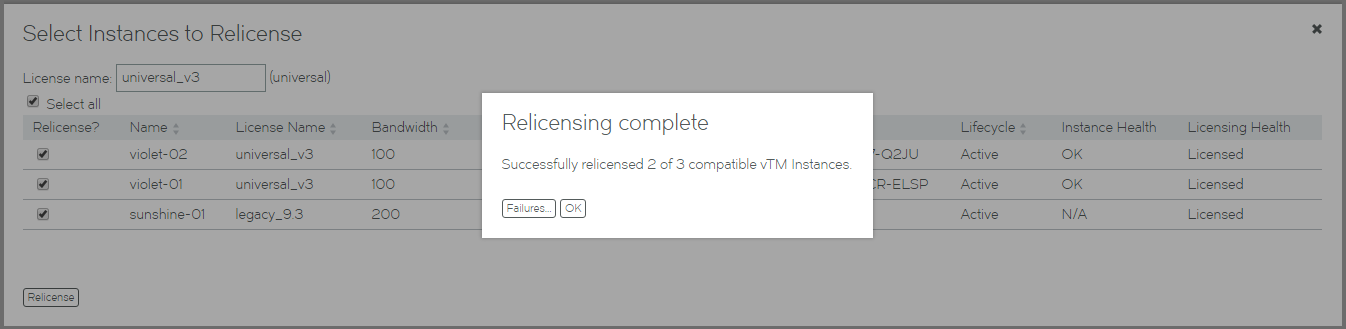
Click Failures to list the vTMs that could not be relicensed. For example:
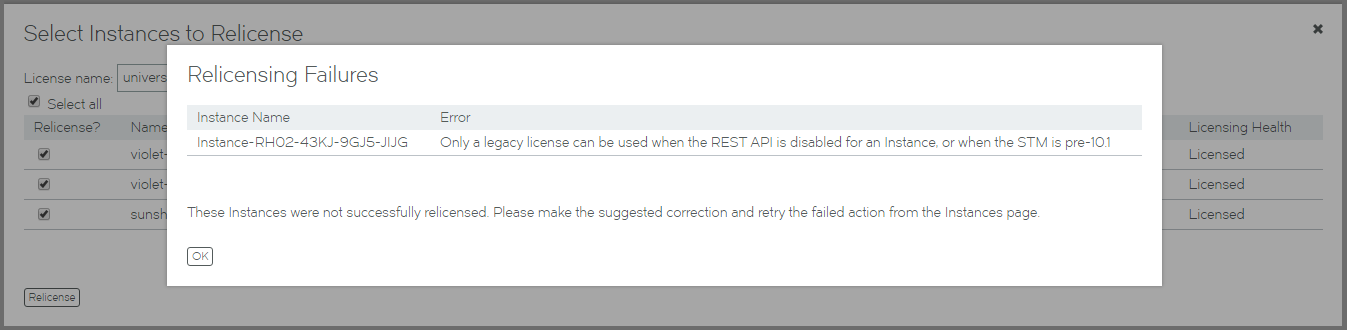
You may need to investigate the licensing of these vTMs further.
10.Click OK to finish this process.
Processing Virtual Traffic Manager Metering Discrepancy Warnings
The accurate billing for Cloud Service Provider customers relies on:
•Accurate record-keeping for registered vTMs.
•Availability of metering information from each vTM.
The Services Director monitors the operation of each vTM to detect scenarios that may give rise to billing discrepancies. For example:
•A vTM was registered with the Services Director, but then decommissioned later without marking the vTM as Deleted. In this case, the decommissioned vTM will still be being charged on an uptime basis. This will result in over-accounting of uptime and a larger CSP bill than should have been charged.
•A vTM was registered with the Services Director, but the Services Director has been unable to retrieve metered throughput metrics from the vTM using its REST API or SNMP. In this case, the vTM will not have been charged for throughput at all. This is likely to result in under-metering and a smaller CSP bill than should have been charged.
Where no metering discrepancies are detected, the Services Director VA displays a green metering symbol in the header:

Where metering discrepancies are detected, the Services Director VA displays an orange metering warning symbol in the header:

You can then inspect any metering warnings in the Services Director VA and resolve them. See Understanding Metering Discrepancy Warnings.
Monitoring that gives rise to metering alerts and notifications is enabled by default. You can change this setting if required from the System > General Settings page, see Updating Metering Alerts and Notifications Settings.
Understanding Metering Discrepancy Warnings
Virtual Traffic Manager metering discrepancy warnings are displayed as a table in the Metering Warnings page.
To access this page, click the metering warning symbol in the header, see Processing Virtual Traffic Manager Metering Discrepancy Warnings.
Alternatively, click the Diagnose menu and then click Metering Warnings.
In the Metering Warnings page, each line of the metering warnings table shows a potential billing discrepancy for a vTM. This includes:
•Timestamps for metering, licensing and monitoring.
•A summary reason for its inclusion.
•A potential solution, and the controls to access the solution.
For example:
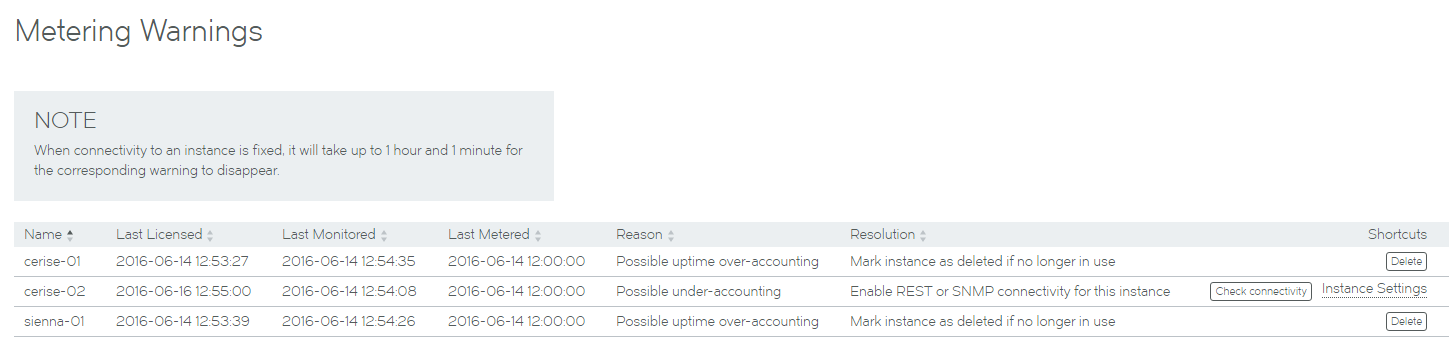
In this example:
•There are two vTMs that are flagged as potentially being over-billed.
If a vTM is no longer in use, it is likely that it has not requested FLA licensing for over 24 hours, and cannot be contacted using REST API or SNMP. In this case, you can delete it to prevent over-billing for uptime. See Processing Potentially Over-Accounted Virtual Traffic Managers.
•There is a vTM that is flagged as potentially being under-billed.
It is likely that this vTM is still requesting FLA licensing, but is uncontactable using REST API or SNMP. If you enable the REST API or SNMP for this vTM, this will re-enable metering and prevent under-billing for its use. See Processing Potentially Under-Accounted Virtual Traffic Managers.
Once these situations are resolved, the warnings and the warning symbol remain in place until the Services Director re-evaluates them. This may take up to one hour and one minute, and cannot be triggered from the interface.
Processing Potentially Over-Accounted Virtual Traffic Managers
If you are no longer using a vTM, but have not yet deleted it from the estate of the Services Director VA, you may see a metering discrepancy warning. This warning indicates that there is a possibility of the billing for the vTM being over-accounted. You can resolve this by deleting the vTM from the estate of the Services Director VA.
1.In the header for the Services Director VA, click the metering warning symbol.

Alternatively, click the Diagnose menu and then click Metering Warnings.
The Metering Warnings page appears. This displays a table, with an entry for each vTM for which there is a metering discrepancy warning (see Understanding Metering Discrepancy Warnings).
2.Locate the entry for the required vTM.
3.Examine the registered details for the vTM.
To do this, visit the vTM Instances page and/or examine the user interface of the vTM itself.
4.If you decide to delete the vTM, click Delete in the Shortcuts column.
The entry is marked as Deleted in the Shortcuts column. Then, after a short time, the entry is removed from the table.
Processing Potentially Under-Accounted Virtual Traffic Managers
The Services Director VA uses the REST API to collect metering information. If the REST API is not enabled, SNMP is then attempted if your configuration supports it. If you are using a vTM without either its REST API or SNMP active, you may see a metering discrepancy warning. This warning indicates that there is a possibility of the billing for the vTM being under-accounted. You can resolve this by enabling the REST API or SNMP for the vTM.
1.In the header for the Services Director VA, click the metering warning symbol.

Alternatively, click the Diagnose menu and then click Metering Warnings.
The Metering Warnings page appears. This displays a table, with an entry for each vTM for which there is a metering discrepancy warning (see Understanding Metering Discrepancy Warnings).
2.Locate the entry for the required vTM.
3.Click Instance Setting for the entry.
The vTM Instances page appears.
4.In the table of vTMs on the vTM Instances page, expand the vTM to show its detailed view.
5.Check the REST API, REST Address and SNMP Address settings in the detailed view.
6.If the REST API is Disabled, the REST API has been disabled from the Services Director VA. Set this to Enabled and Apply the change.
Once the REST API for the vTM shows as Enabled on the Metering Warnings page, it is not guaranteed that the REST API is enabled on the vTM itself. You must continue with this procedure to the end to ensure its operation.
7.In the detail view for the vTM, click Please click for more details.
You are redirected to the vTM's login page.
8.If you want to use the REST API to gather metering information, enable it on the vTM. Refer to the Virtual Traffic Manager documentation for details.
9.If you want to use SNMP to gather metering information, enable it on the vTM. Refer to the Virtual Traffic Manager documentation for details.
10.Return to the Metering Warnings page on the Services Director VA.
11.For the required vTM, click Check connectivity.
The connectivity between the Services Director VA and the vTM is tested. If this test succeeds, Check successful appears.
The vTM entry is not removed from the table immediately. This can take up to one hour and one minute.