Adding Virtual Traffic Managers to the Services Director
Overview: Adding Virtual Traffic Managers to the Services Director
The Services Director supports several methods for adding a Virtual Traffic Manager (vTM) to the estate of the Services Director:
•By registering an externally-deployed vTM from the Services Director. See Registering an Externally-Deployed Virtual Traffic Manager.
This method is not supported for vTMs that use vTM Communications Channel, see Working with vTM Communications Channel.
•By processing a self-registration request that was received from an externally-deployed vTM by the Services Director. See Self-Registering an Externally-Deployed Virtual Traffic Manager.
This method is required for all vTMs that use vTM Communications Channel, including those that are behind a NAT device, see Working with vTM Communications Channel.
•By deploying a vTM from the Services Director VA using an instance host. See the Pulse Services Director Advanced User Guide for full details.
Before you perform any of these methods, you must create any required resources, see Adding Resources Required for Virtual Traffic Managers.
The communication between the vTM and the Services Director depends on whether vTM Communications Channel is enabled, see Working with vTM Communications Channel.
Working with vTM Communications Channel
The method of communication between the vTM and the Services Director depends on whether vTM Communications Channel (Comms Channel) is enabled.
Comms Channel is an update of the (pre-19.1) mechanism that enabled communication between each vTM and the Services Director. Comms Channel is only supported on vTMs at v19.1 or later.
The use of Comms Channel only affects the communication between the vTM and the Services Director. When Comms Channel is enabled on a vTM:
•The vTM and the Services Director always use a mutually-authenticated, TLS-based link initiated by the vTM.
•The vTM can be located in a private network behind a NAT device, see Enabling a vTM Cluster To Operate Behind a NAT Device.
•The vTM will always communicate with the Active node of an HA pair only.
•The vTM must be self-registered, see Self-Registering an Externally-Deployed Virtual Traffic Manager.
Use of the Comms Channel is the default for self-registered vTMs of 19.1 or later. However, Comms Channel can be disabled if required, see Disabling Comms Channel on a vTM.
Comms Channel configuration is replicated across all vTMs in a cluster (with the exception of per-vTM identifying cryptographic material). Therefore, it is important that all vTMs in a cluster should be registered consistently, to either use or not use the Comms Channel. A failure to do so can lead to bogus error messages in the vTM log, connection failures, or both.
Enabling a vTM Cluster To Operate Behind a NAT Device
For vTMs running v19.1 (and later), vTMs may be located in a private network behind a NAT device.
To set up a vTM cluster behind a NAT device:
•All vTMs in the cluster must have Comms Channel enabled, see Working with vTM Communications Channel.
•The vTM cluster must be formed on each vTM using its user interface.
•Each vTM in the cluster must be added to the estate of the Services Director using self-registration from the vTM user interface. Both manual and automatic self-registration methods are supported. See Self-Registering an Externally-Deployed Virtual Traffic Manager.
Disabling Comms Channel on a vTM
When you perform the vTM configuration wizard, if the vTM is at v19.1 or later, it will automatically be configured to use Comms Channel. If required, you can later change the configuration of the vTM so that it does not use Comms Channel. This requires you to re-register the vTM.
If you want to disable Comms Channel:
1.Log into the vTM.
2.Go to System > Licenses > Services Director Registration.
3.Set remote_licensing!comm_channel_enabled to NO.
4.Enable the Force re-registration check box.
5.Click Save and Register.
The vTM will reconfigure to disable Comms Channel, and re-connect to the Services Director in that mode.
The Comms Channel configuration of a vTM is not replicated to all vTMs in a cluster.
You can enable Comms Channel at any point by repeating this process, and setting remote_licensing!comm_channel_enabled to YES.
Adding Resources Required for Virtual Traffic Managers
Before you attempt to register any vTM, you must ensure that all required resources are present on the Services Director. The tasks required will vary according to your specific configuration.
•Add any additional licenses. For example, a Resource License to support vTM analytics or additional bandwidth. See Adding a License to the Services Director.
•Create any required Feature Packs, see Adding a Feature Pack to the Services Director.
•Create any required Owner entries, see Adding an Owner to the Services Director.
•Create any required Legacy licenses, see Adding a Legacy FLA License to the Services Director.
•Create any required Access Profiles, see Creating an Access Profile (vTM User Authentication Only).
Adding a License to the Services Director
The functionality of the Services Director is determined by three kinds of licenses, and the Stock Keeping Units (SKUs) identified by these licenses:
•The Services Director License. This major license enables the use of the Services Director.
The SKU identified by this license defines the customer type (Enterprise or CSP), the Feature Tier and the individual functions that are available in the Services Director. The SKU is central to the creation of a Feature Pack for use on external vTMs.
•Resource Licenses. These secondary licenses enable the use of limited resources on the Services Director by an Enterprise customer.
The SKU identified by a Resource License is typically for Bandwidth allocation or vTM Analytics features, and is added to a Feature Pack to make the resource available to any vTM that uses the Feature Pack.
•Add-on Licenses. These are historical licenses associated with “old style” Services Director licenses. They were used on the Services Director by Enterprise customers only.
Add-On Licenses are incompatible with “new style” Services Director licenses.
Universal FLA Licensing and Legacy FLA Licensing are also supported, but these are used by the vTMs for licensing purposes only. See Adding a Legacy FLA License to the Services Director.
To create a Feature Pack, see Adding a Feature Pack to the Services Director.
You add and view licenses from the Licenses page.
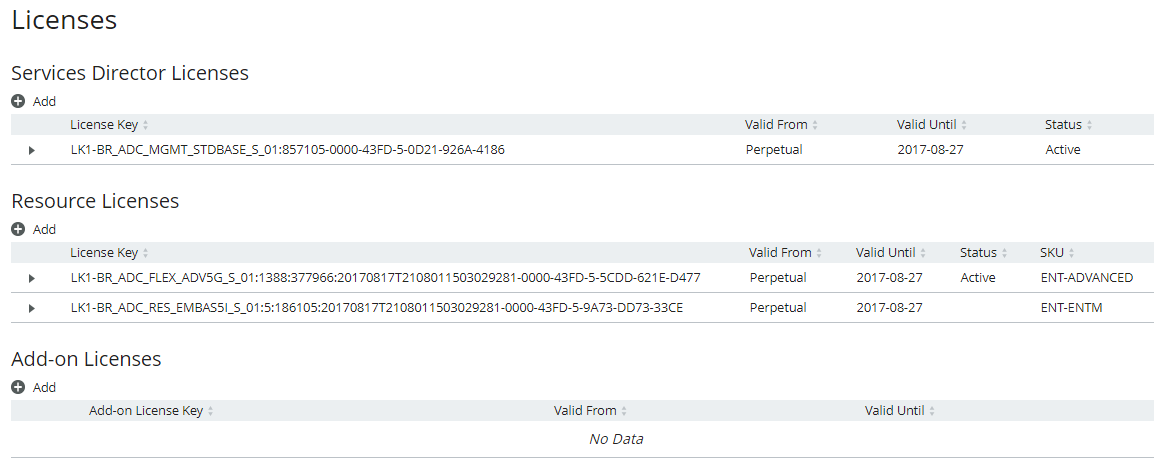
The process for adding additional licenses is similar for all license types:
1.Access your Services Director VA from a browser, using its Service Endpoint IP Address.
2.Log in as the administration user. The Home page appears.
3.Click the Catalogs menu, and then click Licensing: Licenses. The Licenses page appears.
4.Click the Add plus symbol for your required license type. A licensing dialog box window appears. For example, for Resource Licenses:
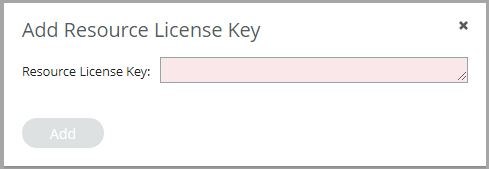
5.Enter the license number and click Add.
The new license is added in its category in the Licenses page.
After all new licenses are added, create one or more Feature Packs that include them. See Adding a Feature Pack to the Services Director.
Existing Feature Packs cannot be updated.
Adding a Feature Pack to the Services Director
Before you register any vTM instances, you must define one or more Feature Packs.
A Feature Pack defines the Services Director features that are available to a vTM instance once you have registered it on the Services Director.
The total set of features that are available in a Feature Pack is defined by its selected Feature Tier.
•Each Feature Tier is a subset of the tier above it.
•Feature Tiers include features that are relevant to your license type: Enterprise or Cloud Service Provider (CSP).
•Enterprise licenses have access to Advanced and Enterprise tiers only.
•CSP licenses have access to Basic, Standard, Advanced and Enterprise tiers.
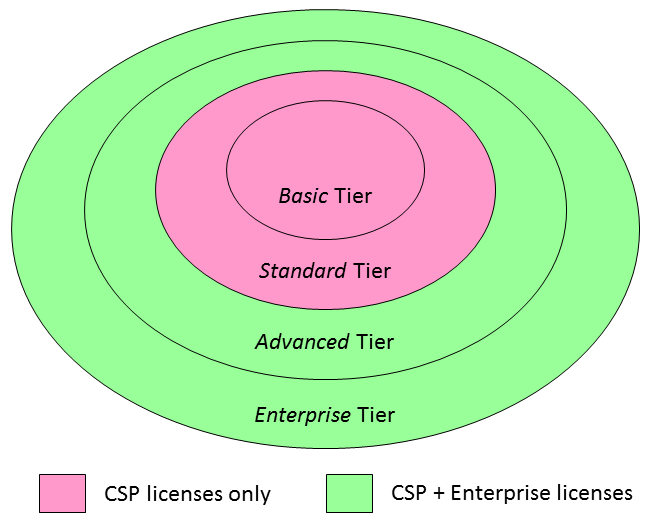
The Enterprise feature tier should not be confused with the Enterprise customers/licenses, or Analytics Resource Pack Licenses.
For CSP licenses only, a Feature Pack also requires:
•A bandwidth, expressed as either Mbps or Gbps.
•A pricing model - Fixed Price Monthly, Fixed Price Weekly, or Hourly plus Data Transfer.
Once all Feature Pack properties are defined, the system is able to identify the Stock-Keeping Unit (SKU) that is required for the Feature Pack. You can exclude any of the SKU's features from the Feature Pack if required.
Enterprise customers can include extra SKUs from one or more Resource Licenses to augment the base SKU. For example, to add vTM Analytics features. See Adding a License to the Services Director.
A list of features for a SKU can be seen on the expanded view of a SKU in the SKUS and Feature Packs page.
A default Feature Pack (typically a SKU with no exclusions) is created automatically when you install the Services Director VA based on an Enterprise license.
The procedure for creating a Feature Pack is dependent on your license type.
•For current Enterprise licenses, see Adding a Feature Pack for an Enterprise License.
•For current Cloud Service Provider (CSP) licenses, see Adding a Feature Pack for a CSP License.
•For older Enterprise/CSP licenses, see Adding a Feature Pack for an Older License.
Adding a Feature Pack for a CSP License
1.Access your Services Director VA from a browser, using its Service Endpoint IP Address.
2.Log in as the administration user. The Home page appears.
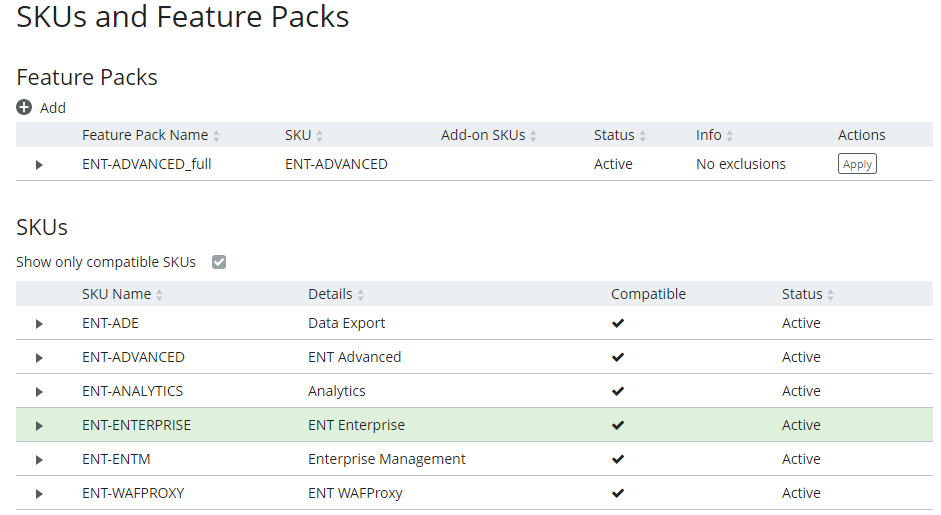
3.Click the Catalogs menu, and then click SKUS and Feature Packs.
The SKUS and Feature Packs page appears.
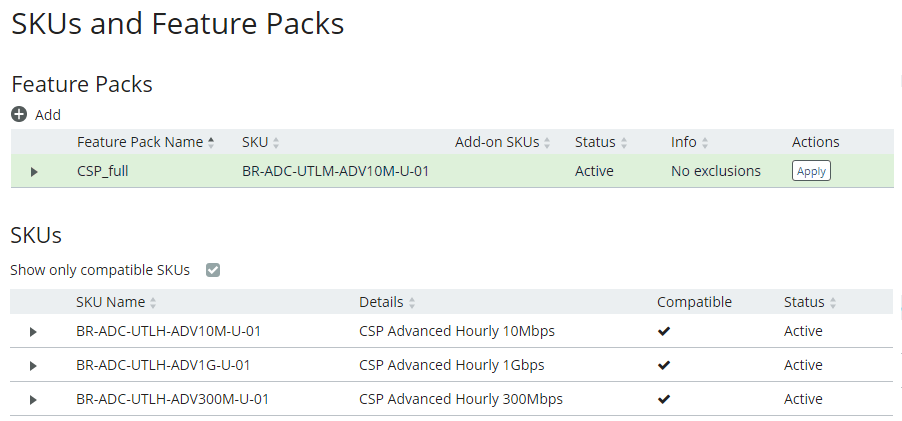
4.Select the Show only compatible SKUs check box to ensure that only SKUs that are compatible with your license are displayed.
5.In the table of SKUs, locate the SKU from which you wish to create a Feature Pack.
6.Expand this SKU to view its supported features. For example, the BR-ADC-UTLM-ADV100M-U-01 SKU:
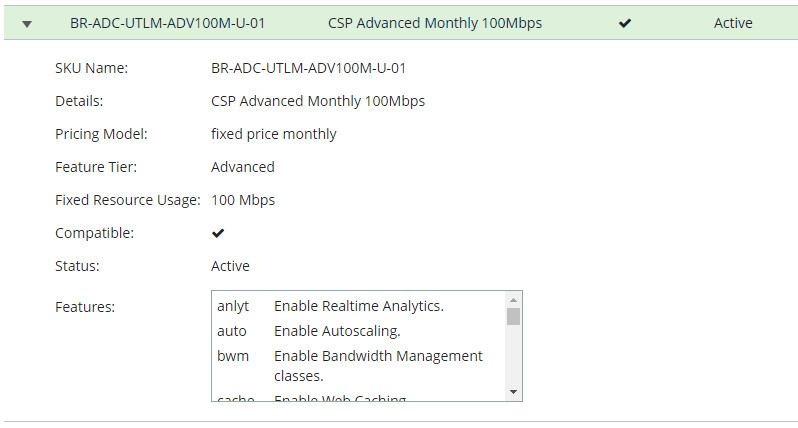
7.Locate the feature(s) that you wish to exclude, and make a note of the feature name. For example, the auto (Autoscaling) feature. That is, this Feature Pack will not support the Autoscaling feature. All other features will still be supported.
8.Collapse the SKU in the table.
9.Click the Add button above the table of feature packs.
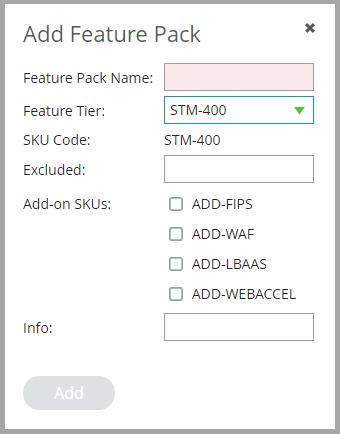
The Add Feature Pack dialog box appears.

10.Enter a Feature Pack Name.
This name will appear in the table of Feature Packs.
11.Select a Pricing Model.
12.Select the required Feature Tier.
13.Select a Bandwidth.
The displayed SKU Code updates automatically to reflect your choices.
14.Enter a space-separated list of Excluded features.
15.Enter a description for the Feature pack as Info.
This name will appear in the table of Feature Packs.

16.Click Add. The new Feature Pack is added to the table of Feature Packs.

17.(Optional) Expand the Feature Pack to see its full details.
18.(Optional) You can apply this new Feature Pack to one or more registered instances, see Applying a Feature Pack to Registered Instances.
19.Repeat this process to create all required Feature Packs.
Adding a Feature Pack for an Enterprise License
1.Access your Services Director VA from a browser, using its Service Endpoint IP Address.
2.Log in as the administration user. The Home page appears.
3.Click the Catalogs menu, and then click SKUS and Feature Packs.
The SKUS and Feature Packs page appears.
4.Select the Show only compatible SKUs check box to ensure that only SKUs that are compatible with your license are displayed.
5.In the table of SKUs, locate the SKU from which you wish to create a Feature Pack.
6.Expand this SKU to view its supported features. For example, the ENT-ADVANCED SKU:
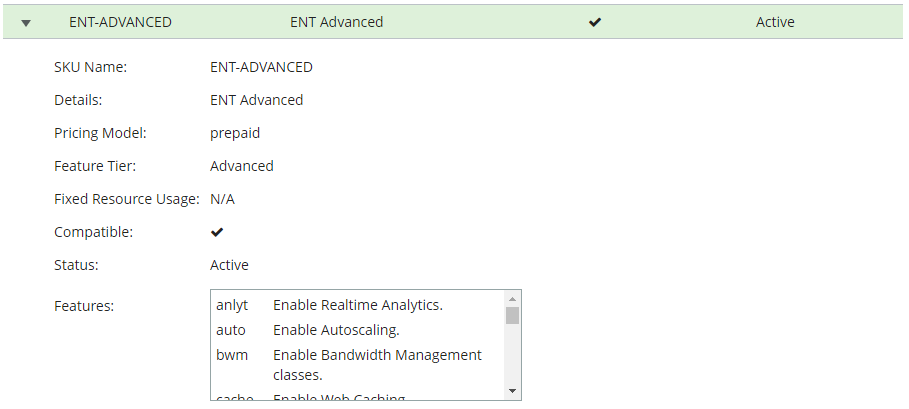
7.Locate the feature(s) that you wish to exclude, and make a note of the feature name. For example, the cache (Web Caching) feature. That is, this Feature Pack will not support the Web Caching feature. All other features will still be supported.
8.Collapse the SKU in the table.
9.Click the Add button above the table of feature packs.
The Add Feature Pack dialog box appears.

10.Enter a Feature Pack Name.
This name will appear in the table of Feature Packs.
11.Select the required Feature Tier.
12.Enter a space-separated list of Excluded features.
13.Optionally, select one or more Add-on SKUs. Each such SKU adds an additional resource (such as Analytics) to the base SKU Code.
In this example, an Analytics Resource Pack license has already been added to the Services Director to enable the use of vTM Analytics (see Working with vTM Analytics). The ENT-ANALYTICS SKU is made available by the Analytics Resource Pack license, and you can add this add-on SKU to the Feature Pack to augment the base SKU with analytics capability.

14.Optionally, enter a description for the Feature Pack as Info.
This name will appear in the table of Feature Packs.
15.Click Add. The new Feature Pack is added to the table of Feature Packs.

16.(Optional) Expand the Feature Pack to see its full details.
17.(Optional) You can apply this new Feature Pack to one or more registered instances, see Applying a Feature Pack to Registered Instances.
18.Repeat this process to create all required Feature Packs.
Adding a Feature Pack for an Older License
1.Access your Services Director VA from a browser, using its Service Endpoint IP Address.
2.Log in as the administration user. The Home page appears.
3.Click the Catalogs menu, and then click SKUS and Feature Packs.
The SKUS and Feature Packs page appears.
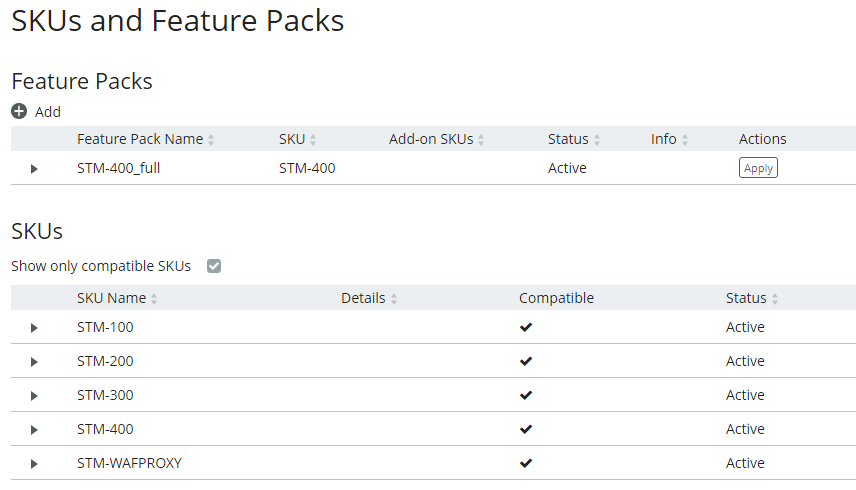
4.Select the Show only compatible SKUs check box to ensure that only SKUs that are compatible with your license are displayed.
5.In the table of SKUs, locate the SKU from which you wish to create a Feature Pack.
6.Expand this SKU to view its supported features. For example, the STM-400 SKU:

7.Locate the feature(s) that you wish to exclude, and make a note of the feature name. For example, the Lbrnd (Random Load Balancing) feature. That is, this Feature Pack will not support the Random load balancing feature. Other load balancing features, such as Round Robin, will still be supported.
8.Collapse the SKU in the table.
9.Click the Add button above the table of feature packs.
The Add Feature Pack dialog box appears.
10.Enter a Feature Pack Name.
This name will appear in the table of Feature Packs.
11.Select the required Feature Tier.
This list is defined by the bandwidth packs added to the Services Director.
12.Enter a space-separated list of Excluded features.
13.Select any required Add-on SKUs.
14.Enter a description for the Feature pack as Info.
This description will appear in the table of Feature Packs.
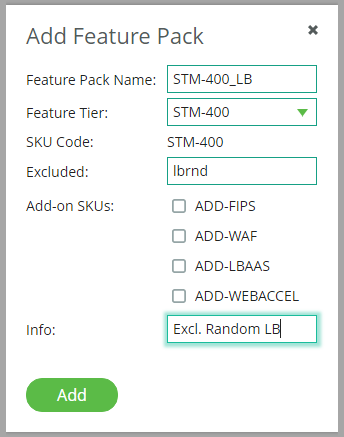
15.Click Add. The new Feature Pack is added to the table of Feature Packs.

16.(Optional) Expand the Feature Pack to see its full details.
17.(Optional) You can apply this new Feature Pack to one or more registered instances, see Applying a Feature Pack to Registered Instances.
18.Repeat this process to create all required Feature Packs.
Once you have created all required Feature Packs, you can use these to register and deploy vTM instances.
Applying a Feature Pack to Registered Instances
Once you have added a Feature Pack, you may want to apply it to one or more registered instances.
1.Access your Services Director VA from a browser, using its Service Endpoint IP Address.
2.Log in as the administration user. The Home page appears.
3.Click the Catalogs menu, and then click SKUS and Feature Packs.
The SKUS and Feature Packs page appears. For example:
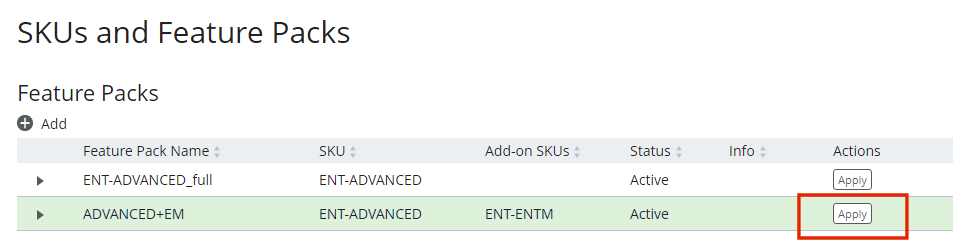
4.For the required Feature Pack, click the Apply action.
A selection dialog appears. For example:
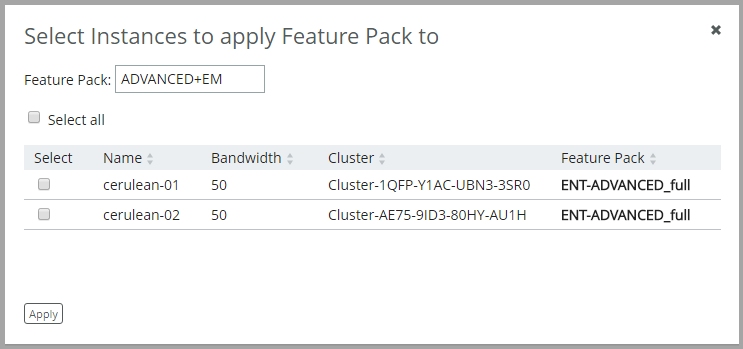
5.Click the Select check box for each vTM to which you want to apply the Feature Pack.
6.Click Apply.
7.A completion message appears. For example:
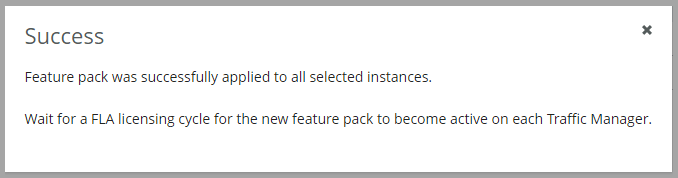
8.Close the dialog.
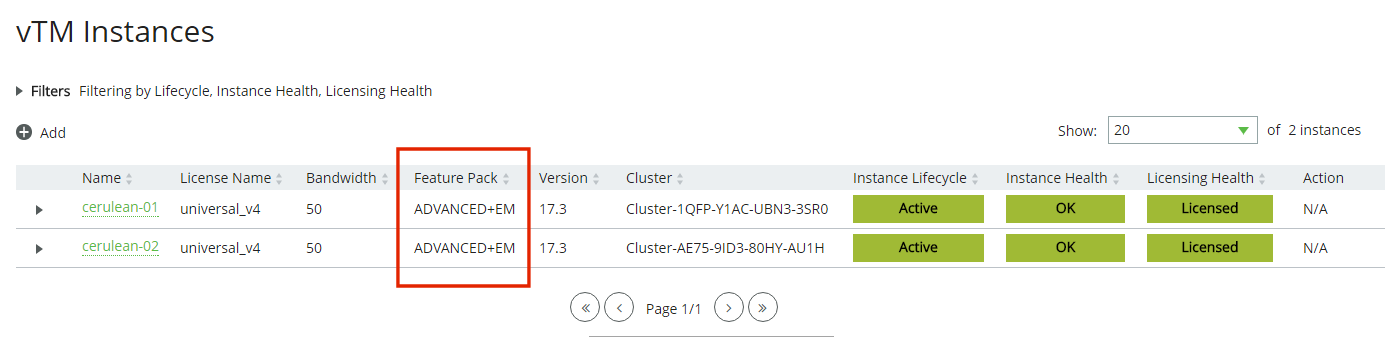
9.(Optional) Confirm the result in the vTM Instances page.
Adding an Owner to the Services Director
There are several Services Director resources that require an owner. This property identifies a person or organization that is associated with a resource, and optionally includes contact information.
For example, a single owner entry can be used for all resources owned by a Enterprise customer. Alternatively, an owner entry can be created to identify individual customers for resources supplied by a Cloud Service Provider.
The following resources require an owner:
•An externally-deployed vTM instance. See Registering an Externally-Deployed Virtual Traffic Manager.
•A vTM instance that is deployed using an instance host. Refer to the Pulse Services Director Advanced User Guide.
•A vTM Cluster. See Creating a Virtual Traffic Manager Cluster.
Creating an Owner
1.Access your Services Director VA from a browser, using its Service Endpoint IP Address.
2.Log in as the administration user. The Home page appears.
3.Click the Catalogs menu, and then click Owners. The Owners page appears.
4.Click the Add button above the table of Owners. The Add an Owner dialog appears.
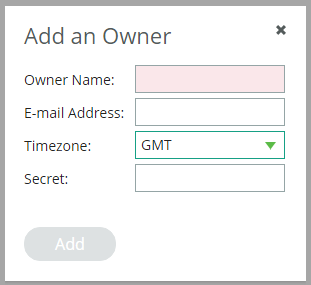
5.Enter an Owner Name for the new entry.
6.(Optional) Enter an E-mail Address for the owner.
7.Select the required timezone for the owner.
8.(Optional) Enter a Secret password for the owner. This is used during self-registration.
9.Click Add. The new Owner is added to the table of Owners.
10.Expand an Owner to view its full details, see Viewing Full Details for an Owner.
11.Repeat this process to create all required Owners.
Once you have created all required Owners, you can use these to register and deploy vTMs and vTM clusters.
Viewing Full Details for an Owner
1.Access your Services Director VA from a browser, using its Service Endpoint IP Address.
2.Log in as the administration user. The Home page appears.
3.Click the Catalogs menu, and then click Owners. The Owners page appears.
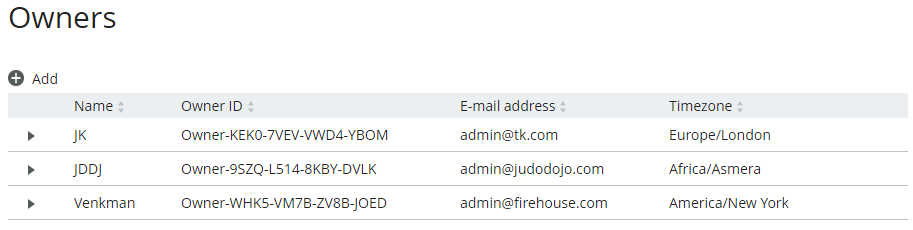
4.Locate and expand an Owner to view its full details. For example:
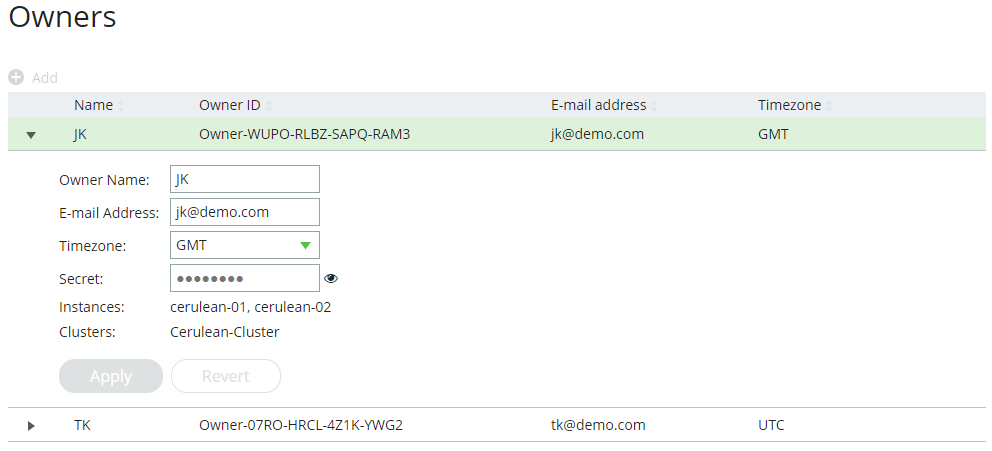
The properties of the Owner are as follows:
•Owner Name: The name of the Owner.
•E-mail Address: (Optional) The e-mail address for a point of contact (typically, the admin user) for the Owner.
•Timezone: The selected timezone for the Owner.
•Secret: (Optional) The password for the Owner. This is used during self-registration.
•Instances: A list of vTM instances that are associated with the Owner. This is empty if the Owner is not in use.
•Clusters: A list of vTM clusters that are associated with the Owner. This is empty if the Owner is not in use.
5.(Optional) Change the Owner's properties and click Apply to update the Owner.
Adding a Legacy FLA License to the Services Director
The Pulse Secure Services Director comes with a pre-installed Universal FLA License. This is suitable for any vTM at version 10.1 or later with an active REST API. In all other cases, a Legacy FLA License is required. That is:
•The vTM version is 10.0 or earlier.
•The vTM (any version) has its REST API disabled.
You can install a Legacy FLA License using the Services Director VA, after which you can install either of these vTM types. This procedure can also be used to update a Legacy FLA license to a Universal FLA License.
1.Access your Services Director VA from a browser, using its Service Endpoint IP Address.
2.Log in as the administration user. The Home page appears.
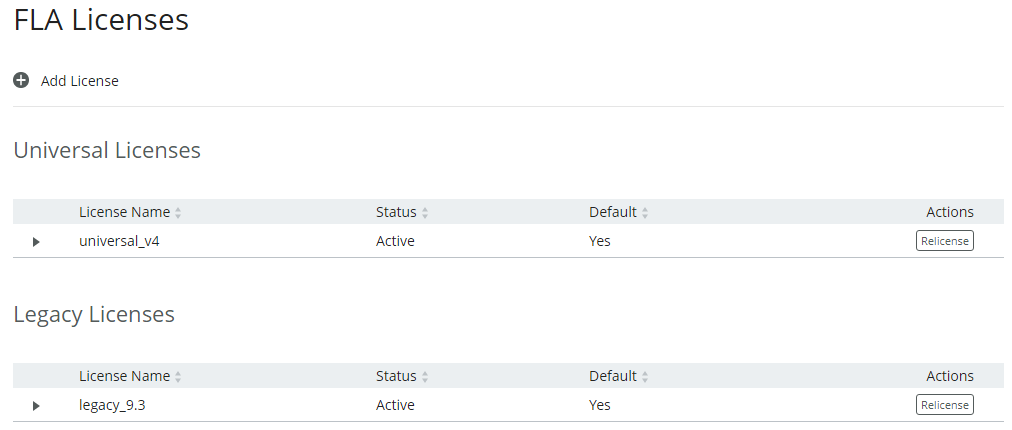
3.Click the Catalogs menu, and then click Licensing: FLA Licenses. The Flexible Licenses page appears.
When the Services Director is first installed, only the pre-installed Universal FLA License is shown on this page; no Legacy FLA Licenses are present.
![]()
4.Click the Add License plus symbol. A licensing dialog box window appears.
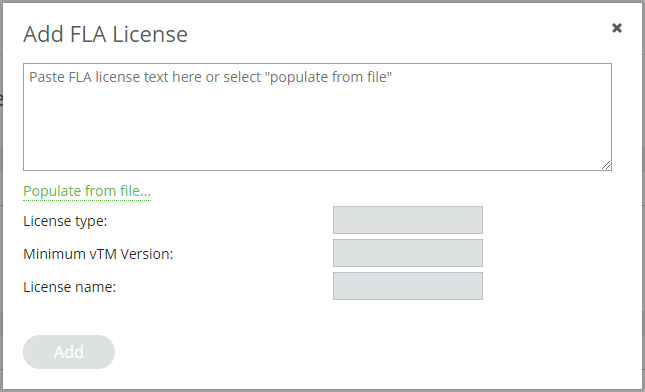
5.Then, either:
•Paste the text of the Legacy FLA License into the text box, OR
•Click Populate from File, select the file and then click Upload. This will populate the text box.
The remainder of the fields in the dialog box will then update to provide license information:
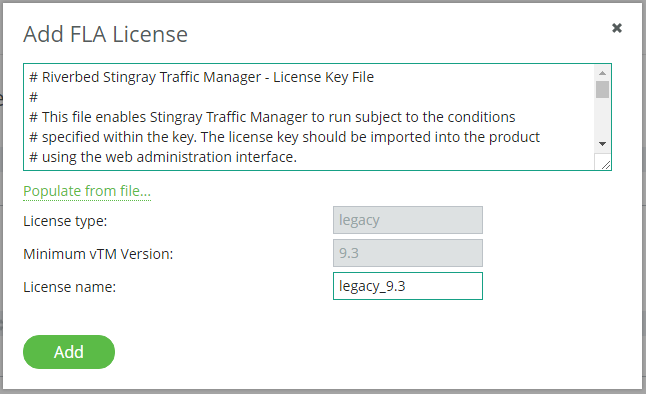
6.Click Add.
A relicensing dialog box appears. This enables you to apply the new Legacy FLA License to vTM instances that are currently using a different Legacy FLA License.
See Relicensing Virtual Traffic Managers for details of the FLA relicensing mechanism.
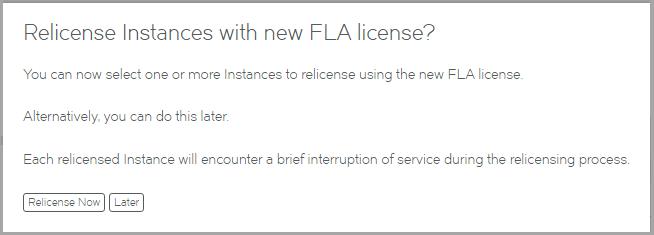
7.Click Later.
You can perform relicensing operations from the FLA Licenses page.
The new license is added to the FLA Licenses page.
8.Repeat this procedure if you require additional licenses.
9.Both Legacy FLA Licenses and Universal FLA Licenses have a default FLA. If you have more than one FLA license for either type, and want to make it the default license for that type, click Make Default.
Adding an Auto-Accept Policy to the Services Director
If you want to configure vTMs for automatic self-registration, you will need to create one or more auto-accept policies.
1.Access your Services Director VA from a browser, using its Service Endpoint IP Address.
2.Log in as the administration user. The Home page appears.
3.Click the Catalogs menu, and then click Auto-Accept Policies. The Auto-Accept Policies page appears.

4.Click the Add button above the table of auto-accept policies. The Add an Auto Accept Policy dialog appears.
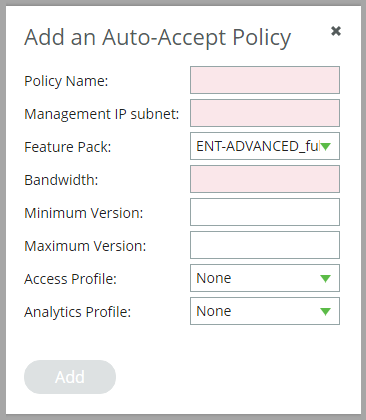
5.Enter a unique Policy Name for the auto-accept policy.
6.Enter a Management IP subnet for the auto-accept policy. This identifies the subnet to which a vTM must belong to be accepted by this policy.
If a vTM that is evaluated by this policy is from outside this subnetwork, the auto-acceptance of the vTM is rejected by the auto-accept policy.
7.Select a Feature Pack for the auto-accept policy. This is the feature pack that will be assigned to a vTM that is successfully evaluated using this policy.
This is not an acceptance condition, but the evaluation of the Bandwidth property refers to this property.
8.Enter the Bandwidth for the auto-accept policy. This is the required bandwidth for a vTM that is evaluated using this policy.
If there is insufficient bandwidth in the specified Feature Pack for a vTM, the auto-acceptance of the vTM is rejected by the auto-accept policy.
9.(Optional) Select a Minimum Version for the vTM software. This takes the form X.Y. Examples: 10.0, 10.3.
R1 releases are included automatically for any base version. For example, 10.0 includes 10.0r1.
If a vTM that is evaluated by this policy does not meet this condition, the auto-acceptance of the vTM is rejected by the auto-accept policy.
Where a Minimum Version is not specified for a policy, the version will be displayed as "Any" in the Accepted Versions property in the table of policies.
10.(Optional) Select a Maximum Version for the vTM software. This takes the form X.Y. Examples: 10.4, 11.0.
R1 releases are included automatically for any base version. For example, 10.3 includes 10.3r1.
If a vTM that is evaluated by this policy does not meet this condition, the auto-acceptance of the vTM is rejected by the auto-accept policy.
Where a Maximum Version is not specified for a policy, the version will be displayed as "Any" in the Accepted Versions property in the table of policies.
11.(Optional) Select an Access Profile.
This access profile identifies the authenticator and permission groups that will be applied to any vTM that is accepted using this policy.
All cluster members are affected by this change. See Working with User Authentication.
12.(Optional) Select an Analytics Profile.
This analytics profile identifies the vTM analytics settings that will be applied to any vTM that is accepted using this policy.
All cluster members are affected by this change. See Working with vTM Analytics.
13.Click Add. The new auto-accept policy is added to the table of policies.
14.Expand an auto-accept policy to view its full details.
15.Repeat this process to create all required auto-accept policies.
Once you have created all required auto-accept policies, you can use these to automatically register vTMs, see Requesting Self-Registration During vTM Installation.
Adding a Cloud Registration Resource to the Services Director
If you want to create a cloud-based vTM that will self-register automatically on the Services Director, you must first create a Cloud Registration resource on the Services Director. This process requires you to have AWS login credentials.
Before you create a Cloud Registration resource, you must also create:
•The required Owner on the Services Director, see Adding an Owner to the Services Director.
•The required Auto-Accept Policy on the Services Director, see Adding an Auto-Accept Policy to the Services Director.
You can create a Cloud Registration resource without either an Owner or a Self-Registration Policy property, but the resulting vTM will not contain sufficient information to register automatically on the Services Director. When this happens, you must process the self-registration manually, see Processing Self-Registration Requests Manually.
Once you have created a Cloud Registration resource, you can:
•View the user data text block that is required for the creation of the first cloud-based vTM in a cluster, see Viewing User Data Text for a Cloud Registration Resource.
•Create the first cloud-based vTM in a cluster, see Creating a Cloud-Based Virtual Traffic Manager.
Adding a Cloud Registration Resource
1.Access your Services Director VA from a browser, using its Service Endpoint IP Address.
2.Log in as the administration user. The Home page appears.
3.Click the Catalogs menu, and then click Cloud Registration.
The Cloud Registration page appears.
4.Click the Add button above the table of Cloud Registration resources.
The Create a New Cloud Registration dialog appears.

5.Enter a unique Name for the Cloud Registration resource.
6.(Optional) Select an Owner for the Cloud Registration resource.
If you do not specify an owner before registration, you cannot perform an automatic self-registration of the cloud-based vTM. However, this information can be added in the AWS system before registration.
You can disable the mandatory validation of this property from the General Settings page, see Updating Instance Registration Settings.
7.(Optional) Select an Auto-Accept Policy for the Cloud Registration resource. This is the auto-accept policy that will be used during the evaluation of a cloud-based vTM's self-registration.
If you do not specify an auto-accept policy before registration, you cannot perform an automatic self-registration of the cloud-based vTM. However, this information can be added in the AWS system before registration.
8.Click Add. The new Cloud Registration resource is added to the table of Cloud Registration resources. For example:

9.Expand a Cloud Registration resource to view the user data text block that is required for cloud-based registration, see Viewing User Data Text for a Cloud Registration Resource.
10.Repeat this process to create all required Cloud Registration resources.
Once you have created a required Cloud Registration resource, you can use it to create the first cloud-based vTM in a cluster, see Creating a Cloud-Based Virtual Traffic Manager.
Viewing User Data Text for a Cloud Registration Resource
The Cloud Registrations page enables you to view and copy the user data text block for individual Cloud Registration resources. This text is required when creating a cloud-based vTM, see Creating a Cloud-Based Virtual Traffic Manager.
1.Access your Services Director VA from a browser, using its Service Endpoint IP Address.
2.Log in as the administration user. The Home page appears.
3.Click the Catalogs menu, and then click Cloud Registration. The Setup Cloud Registration page appears.
4.In the table of AWS Cloud Registrations, locate the required Cloud Registration entry.
5.Expand the Cloud Registration entry to view the user data text block. By default, this uses base64 encoding. For example:
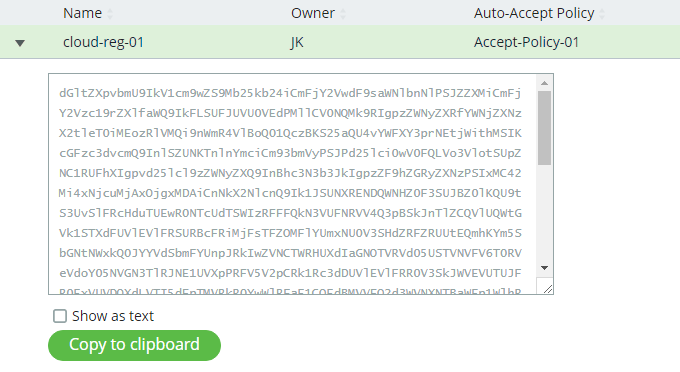
6.If either the Owner or Auto-Accept Policy fields are not specified in the summary entry for the Cloud Registration entry, you must enable the Show as text check box.
The lines relating to the unspecified Owner or the unspecified Auto-Accept Policy are then included with placeholder text that you can complete manually in the AWS system. See Creating the First vTM in a Cluster.
7.Click Copy to Clipboard to copy the displayed user data text block.
Once you have copied the user data text block, you can paste it directly into the AWS creation wizard, see Creating a Cloud-Based Virtual Traffic Manager.
Registering an Externally-Deployed Virtual Traffic Manager
The Services Director VA enables you to manually register one or more externally-deployed vTM. This adds the vTM to the estate of the Services Director, from where it can be licensed, monitored and metered.
You cannot manually register a vTM that uses vTM Communications Channel, including vTMs that are behind a NAT device. Instead, you must self-register the vTMs, see Self-Registering an Externally-Deployed Virtual Traffic Manager.
You can register/license a vTM that is in a cluster. This process does not register other vTMs in the cluster, nor does it license them; you must independently register and license each node in a cluster.
Before you register an externally-deployed vTM, ensure that all required Services Director objects exist:
•The required Feature Pack. This lists the functions supported by the vTM, see Adding a Feature Pack to the Services Director.
•The required Owner. This identifies the customer/owner for the vTM, see Adding an Owner to the Services Director.
•The required Access Profile (optional). This identifies the authentication mechanism for the vTM, see Creating an Access Profile (vTM User Authentication Only).
The Services Director VA also enables you to deploy vTM. Each is deployed into an container using an existing instance host. The Services Director VA can then manage the lifecycle states of these vTMs, which is not supported for externally-deployed vTMs. For details, refer to the Pulse Services Director Advanced User Guide.
Preparing to Register a Virtual Traffic Manager (Universal FLA)
After you have completed the initial configuration of a Services Directors HA pair (see Preparing to Install the Services Director Virtual Appliance, you can add one or more externally-deployed vTMs to the estate of the Services Director.
One method for achieving this is by manual registration of each vTM. Typically, these will use a Universal FLA License.
You cannot manually register a vTM that uses vTM Communications Channel, including vTMs that are behind a NAT device. Instead, you must self-register the vTMs, see Self-Registering an Externally-Deployed Virtual Traffic Manager.
You can register an externally-deployed vTM using a Universal FLA when:
•The vTM is installed and running.
•The vTM is at version 10.1 or later.
•You know the vTM’s hostname (in DNS-enabled networks) or IP address.
•The vTM’s REST API is enabled.
If any vTM is running an earlier version of the vTM software, or has its REST API disabled, you must manually install a Legacy FLA License onto the Services Director. See Preparing to Register a Virtual Traffic Manager (Legacy FLA License).
To minimize delays in licensing, ensure that the clocks of your Services Directors and your vTMs are aligned.
Registering a Virtual Traffic Manager (Universal FLA)
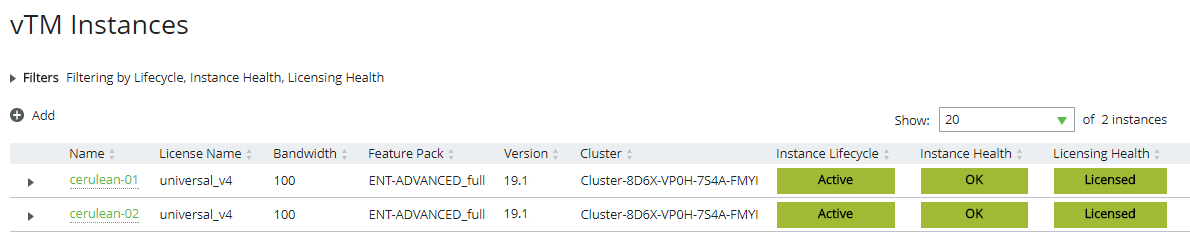
The Services Director VA supports the registration and management of vTM instances from its vTM Instances page. After you have completed all initial setup operations, no vTM instances are registered.
You can use this procedure to manually register an AWS vTM instance that has an elastic management IP address.
You cannot manually register a vTM that is behind a NAT device. This process requires the vTM to be self-registered, see Self-Registering an Externally-Deployed Virtual Traffic Manager.
If you wish to register a vTM whose REST API is disabled, see Registering a Virtual Traffic Manager (Inactive REST API).
To minimize delays in licensing, ensure that the clocks of your Services Director(s) and your vTM instances are aligned.
1.Access your Services Director VA from a browser, using its Service Endpoint IP Address.
2.Log in as the administration user.
The Home page appears.
3.Click the Services menu, and then click Services Controller: vTM Instances.
The vTM Instances page appears. After you have completed the Setup Wizard, this page contains no entries.
![]()
4.Click the plus symbol above the empty table.
If there is an instance host present on the Services Director, the following dialog box appears:
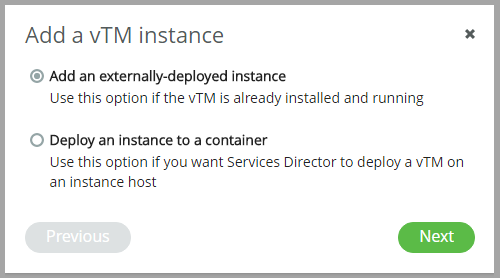
5.Click Add an externally-deployed instance, and then click Next.
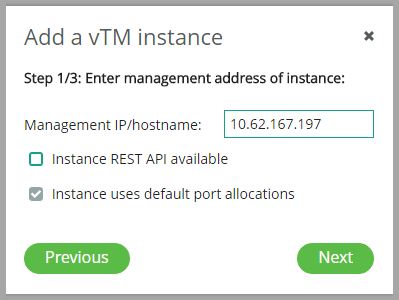
After this (or if there is no instance host), a registration wizard appears:

6.Enter the hostname or IP address for the instance.
From this wizard page, you can manually register an AWS vTM instance by specifying its elastic management IP address. In this instance, you must ensure that the AWS Security Groups for both the Services Director and the vTM are configured to support traffic flows, see Preparing an AWS Security Group.
7.Click Next.
The next page of the wizard appears.
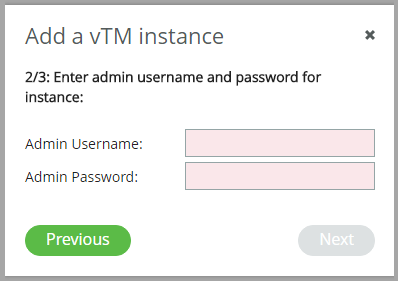
8.Enter the administration username and password, and click Next.
The next page of the wizard appears.
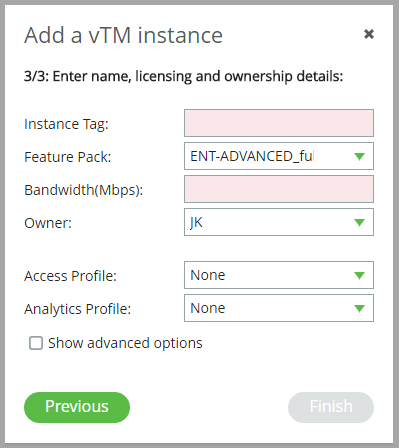
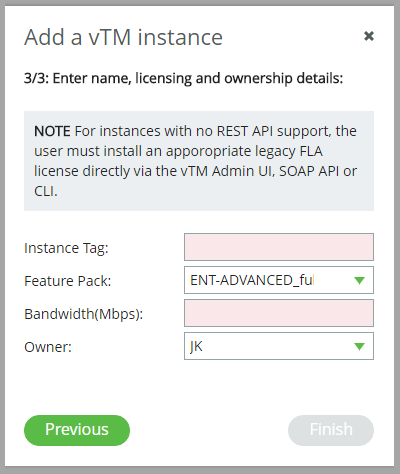
9.Enter an Instance Tag for the vTM instance.
This is a user-facing name for the instance that will be used throughout the Services Director VA user interface. This tag can be changed at any time. It must be unique among non-deleted vTM instances registered on the Services Director, but can be reused as required.
That is, if an instance is deleted, its tag can be reused for a different instance.
10.Select a Feature Pack for the vTM instance.
This feature pack must be supported by your Services Director’s License.
If the required Feature Pack is not defined on your Services Director, see Adding a Feature Pack to the Services Director.
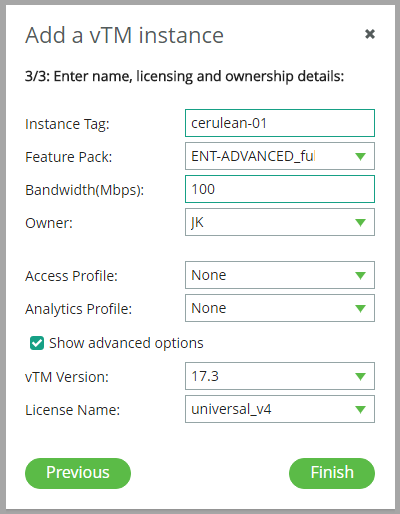
11.Enter a numeric Bandwidth (in Mbps) for the vTM instance.
This bandwidth must be available within your Services Director’s Bandwidth License.
12.Either:
•Select an Owner for the vTM instance. See Adding an Owner to the Services Director. OR
•Select <create new> from the Owner list, and type the name of a new owner. The Services Director will create a new Owner resource automatically when the registration completes. You can fully populate the Owner resource afterwards, see Viewing Full Details for an Owner.
13.(Optional) Select an Access Profile.
This access profile identifies the authenticator and permission groups required for the user authentication on this vTM instance.
Access profile is a cluster-level configuration property, and is typically set from the vTM Cluster page (see Creating a Virtual Traffic Manager Cluster). The current cluster-level setting is displayed in this dialogue. If you provide a new value for this property, the access profile will be applied to the vTM, and all other vTM instances in its cluster.
14.(Optional) Select an Analytics Profile.
This analytics profile identifies the vTM analytics settings for this vTM instance.
Analytics profile is a cluster-level configuration property, and is typically set from the vTM Cluster page (see Creating a Virtual Traffic Manager Cluster). The current cluster-level setting is displayed in this dialogue. If you provide a new value for this property, the analytics profile will be applied to the vTM, and all other vTM instances in its cluster.
15.Click Show advanced options to view additional settings.
This access profile identifies the authenticator and permission groups required for the user authentication on this vTM instance.
Access profile is a cluster-level configuration property, and is typically set on the vTM Cluster (see Creating a Virtual Traffic Manager Cluster). If selected, the access profile will be applied to the vTM, and all other vTM instances in its cluster.
 o
o
The vTM Version will automatically be the software version of your vTM.
16.Select the License Name of your Universal FLA License.
17.Click Finish.
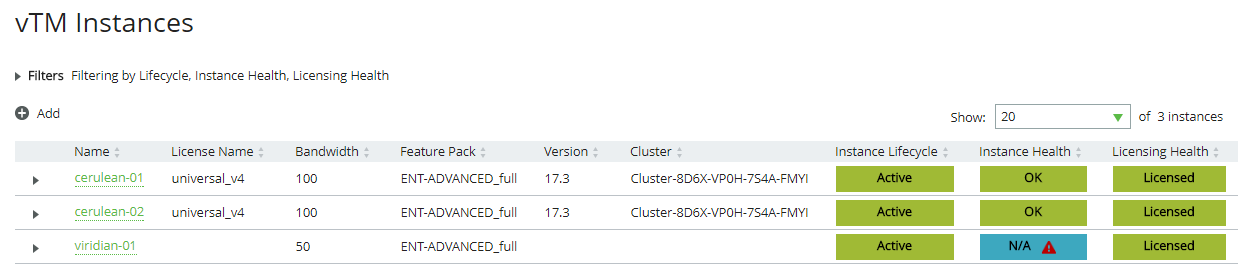
The vTM is added to the vTM Instances table.
If this vTM is at version 10.1 or earlier, no cluster information is displayed.
If this vTM is at version 10.2 or later, its cluster is considered:
•If the vTM is in a cluster, the cluster is displayed as a Discovered cluster. The other vTMs in the cluster remain unregistered and unlicensed; you must independently register and license each node in a cluster.
•If this vTM is not in a cluster, a new cluster is created. This cluster has an automatically-generated name, and is a Discovered cluster.
See Working with Virtual Traffic Manager Clusters.

This new entry shows basic details for the vTM instance. This includes a color-coded Instance Lifecycle status, Instance Health status, and License Health status. See Viewing Virtual Traffic Managers.
The Instance Health status is supported on all vTMs at version 10.3 or later with a REST API enabled. Where it is not supported, it will be shown as N/A.
The License Health status will be Pending (blue) until the licensing is confirmed. This then changes to Licensed (green).
18.Click the arrow to the left of the entry. The entry then expands to show the full details of the vTM instance.
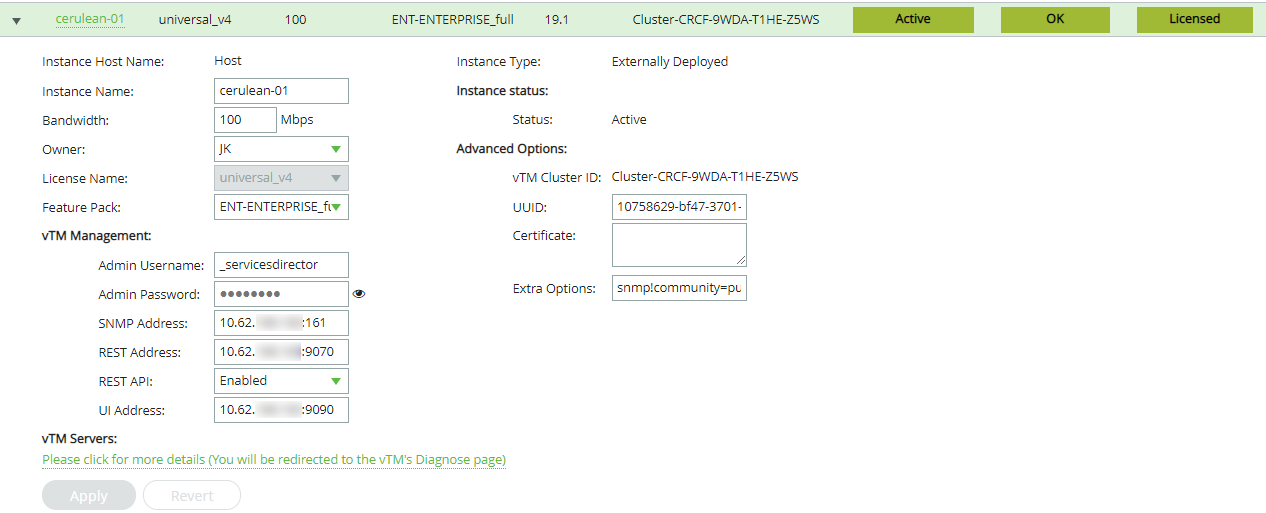
On this detailed view:
•The UUID property is a unique identifier for the vTM. This property is only populated when the vTM registration request originates on the vTM.
•The Certificate property is only populated when the vTM Communications Channel feature is in use, see Working with vTM Communications Channel.
•The Extra Options property lists advanced settings. For more information, refer to Configuration Options (config_options) in the Pulse Services Director Advanced User Guide.
19.Repeat this procedure to add other vTM instances.
Preparing to Register a Virtual Traffic Manager (Legacy FLA License)
When you register an externally-deployed vTM, typically it is at version 10.1 (or later) and its REST API is enabled. See Registering a Virtual Traffic Manager (Universal FLA).
However, you can also add a vTM that has:
•A disabled REST API. See Registering a Virtual Traffic Manager (Inactive REST API).
•A software version of 10.0 (or earlier). See Registering a Virtual Traffic Manager (Pre-10.1 vTM Software Version).
You can register these vTM instances when:
•The vTM is installed and running.
•You know the management address for the vTM. The management address that you specify when registering the vTM should always match the hostname of the vTM being registered. That is:
•If the vTM has been configured with a resolvable hostname, that same hostname should be used as the management address when registering.
•If the vTM has been configured without a resolvable hostname (and an IP address used instead), that IP address should be used as the management address when registering.
Where no DNS-system is configured, the use of hostnames should be avoided in the product.
•You have already installed a Legacy FLA License onto the Services Director. See Adding a Legacy FLA License to the Services Director.
•You have manually installed a Legacy FLA License onto the vTM. Refer to the manuals for the Pulse Secure Virtual Traffic Manager. This is not required when the REST API is active.
Ivanti recommends that you use vTM 10.1 or later and universal licensing wherever possible.
Registering a Virtual Traffic Manager (Inactive REST API)
The Services Director VA supports the registration and management of vTMs from its vTM Instances page. This process requires:
•A valid Legacy FLA License, keyed to the Service Endpoint Address of your Services Directors. If you do not have this, see Adding a Legacy FLA License to the Services Director.
•A Feature Pack that identifies the supported features for the vTM. If you do not have this, see Adding a Feature Pack to the Services Director.
You cannot specify an access profile for a vTM when its REST API is disabled.
To register a vTM with an inactive REST API:
1.Access your Services Director VA from a browser, using its Service Endpoint IP Address.
2.Log in as the administration user. The Home page appears.
3.Click the Services menu, and then click Services Controller: vTM Instances.
The vTM Instances page appears.
4.Click the plus symbol above the empty table.
If there is an instance host present on the Services Director, the following dialog box appears:

Click Add an externally-deployed instance, and then click Next.
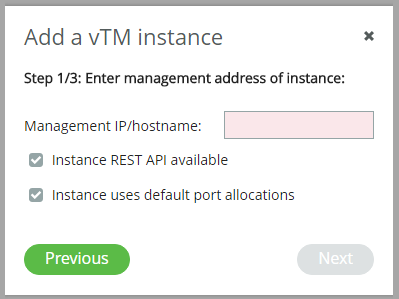
After this (or if there is no instance host), a registration wizard appears:

5.Enter the management address for the vTM.
The management address that you specify when registering the vTM should always match the hostname of the vTM being registered. That is:
•If the vTM has been configured with a resolvable hostname, that same hostname should be used as the management address when registering.
•If the vTM has been configured without a resolvable hostname (and an IP address used instead), that IP address should be used as the management address when registering.
Where no DNS-system is configured, the use of hostnames should be avoided in the product.
6.Clear the Instance REST API available check box.
7.Click Next.
This option bypasses the second page of the wizard, and delivers you directly to the final page.
8.Enter an Instance Tag for the vTM instance.
This is a user-facing name for the instance that will be used throughout the Services Director VA user interface. This tag can be changed at any time. It must be unique among non-deleted vTM instances registered on the Services Director, but can be reused as required.
That is, if an instance is deleted, its tag can be reused for a different instance.
9.Select a Feature Pack for the vTM instance.
This feature pack must be supported by your Services Director’s License.
If the required Feature Pack is not defined on your Services Director, see Adding a Feature Pack to the Services Director.
10.Enter a numeric Bandwidth (in Mbps) for the vTM instance.
This bandwidth must be available within your Services Director’s Bandwidth License.
11.Select an Owner for the vTM instance. See Adding an Owner to the Services Director.
Alternatively, select <create new> from the Owner list, and type the name of a new owner. The Services Director will create a new Owner resource automatically when the registration completes. You can fully populate the Owner resource afterwards, see Viewing Full Details for an Owner.
12.Click Finish.
The vTM is added to the vTM Instances table.
The Cluster and software Version for this vTM are not shown, as the REST API is required to retrieve this information from the vTM.
If this vTM is not already in a cluster (and is at version 10.2 or later with the REST API enabled), a new cluster is created. This cluster has an automatically-generated name, and is a Discovered cluster. See Working with Virtual Traffic Manager Clusters.
This new entry shows basic details for the vTM instance. This includes a color-coded Instance Lifecycle status, Instance Health status, and License Health status.
The Instance Health status is always N/A for vTMs using a Legacy FLA. This feature is only supported on vTMs at version 10.3 or later with a REST API enabled.
The License Health status will be Pending (blue) until the licensing is confirmed. This then changes to Licensed (green).
If the Pending status does not clear after a few minutes, log in to the affected vTM and investigate further.
Registering a Virtual Traffic Manager (Pre-10.1 vTM Software Version)
The Services Director VA supports the registration and management of vTM instances from its vTM Instances page. This process requires:
•A valid Legacy FLA License, keyed to the Service Endpoint Address of your Services Director instances. If you do not have this, see Adding a Legacy FLA License to the Services Director.
•A Feature Pack that identifies the supported features for the vTM. If you do not have this, see Adding a Feature Pack to the Services Director.
1.Access your Services Director VA from a browser, using its Service Endpoint IP Address.
2.Log in as the administration user. The Home page appears:
3.Click the Services menu, and then click Services Controller: vTM Instances. The vTM Instances page appears.
4.Click the plus symbol above the empty table.
If there is an instance host present on the Services Director, the following dialog box appears:

Click Add an externally-deployed instance, and then click Next.
After this (or if there is no instance host), a registration wizard appears:
5.Enter the management address for the vTM.
The management address that you specify when registering the vTM should always match the hostname of the vTM being registered. That is:
•If the vTM has been configured with a resolvable hostname, that same hostname should be used as the management address when registering.
•If the vTM has been configured without a resolvable hostname (and an IP address used instead), that IP address should be used as the management address when registering.
Where no DNS-system is configured, the use of hostnames should be avoided in the product.
6.Click Next. The next page of the wizard appears.

7.Enter the administration username and password.
8.Click Next. The next page of the wizard appears.
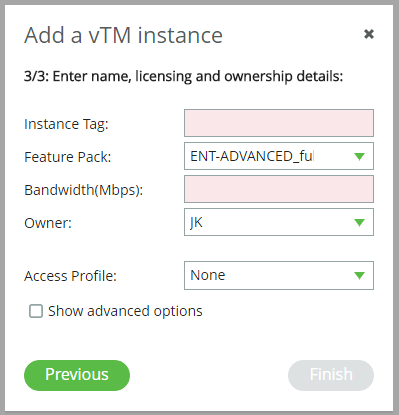
9.Enter an Instance Tag for the vTM instance.
This is a user-facing name for the instance that will be used throughout the Services Director VA user interface. This tag can be changed at any time. It must be unique among non-deleted vTM instances registered on the Services Director, but can be reused as required.
That is, if an instance is deleted, its tag can be reused for a different instance.
10.Select a Feature Pack for the vTM instance.
This feature pack must be supported by your Services Director’s License.
If the required Feature Pack is not defined on your Services Director, see Adding a Feature Pack to the Services Director.
11.Enter a numeric Bandwidth (in Mbps) for the vTM instance.
This bandwidth must be available within your Services Director’s Bandwidth License.
12.Select an Owner for the vTM instance. See Adding an Owner to the Services Director.
Alternatively, select <create new> from the Owner list, and type the name of a new owner. The Services Director will create a new Owner resource automatically when the registration completes. You can fully populate the Owner resource afterwards, see Viewing Full Details for an Owner.
13.(Optional) Select an Access Profile.
This access profile identifies the authenticator and permission groups required for the user authentication on this vTM instance.
Access profile is a cluster-level configuration property, and is typically set from the vTM Cluster page (see Creating a Virtual Traffic Manager Cluster). The current cluster-level setting is displayed in this dialogue. If you provide a new value for this property, the access profile will be applied to the vTM, and all other vTM instances in its cluster.
14.Click Show advanced options to view additional settings.
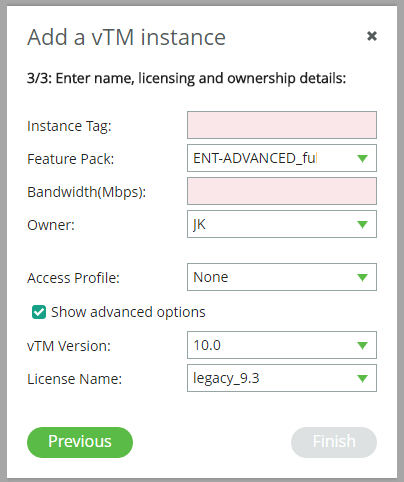
The vTM Version will automatically be the software version of your vTM.
15.Select the License Name for your Legacy FLA License.
If the required Legacy FLA License is not listed, you must add it before you can register this vTM. See Adding a Legacy FLA License to the Services Director.
16.Click Finish.
The vTM is added to the vTM Instances table.
The Cluster and software Version for this vTM are not shown, as version 10.2 and an active REST API are required to retrieve this information from the vTM.

This new entry shows basic details for the vTM instance. This includes a color-coded Instance Lifecycle status, Instance Health status and a License Health status. See Viewing Virtual Traffic Managers.
The Instance Health status is always N/A for vTMs using a Legacy FLA. This feature is only supported on vTMs at version 10.3 or later with a REST API enabled.
The License Health status will be Pending (blue) until the licensing is confirmed. This then changes to Licensed (green).
If the Pending status does not clear after a few minutes, log in to the affected vTM and investigate further.
Self-Registering an Externally-Deployed Virtual Traffic Manager
The Services Director VA supports the self-registration of externally-deployed vTM. This adds vTMs to the estate of the Services Director, from where it can be licensed, monitored and metered.
This section describes the principles of vTM self-registration, and outlines the processing of self-registration requests on the Services Director.
You must use self-registration for all vTMs that use the vTM Communications Channel, including vTMs that are behind a NAT device.
Overview: vTM Self-Registration (VMware)
After you have completed the initial configuration of the Services Director, you can add one or more externally-deployed vTMs to the estate of the Services Director.
One method for achieving this is by self-registration of the vTMs.
Self-registration on the Services Director VA is also supported for cloud-based vTMs on AWS installations, see Overview: vTM Self-Registration (Cloud).
Self-registration of vTMs that are in a private network behind a NAT requires the use of vTM Communications Channel on each vTM, see Working with vTM Communications Channel.
Self-registration is initially configured from the vTM user interface. An Administrator configures the vTM so that it will request self-registration on a specified Services Director. Typically, this is done during the installation wizard for the vTM, see Requesting Self-Registration During vTM Installation. However, this can also be done during later configuration of the vTM. See Requesting Self Registration on a Configured vTM.
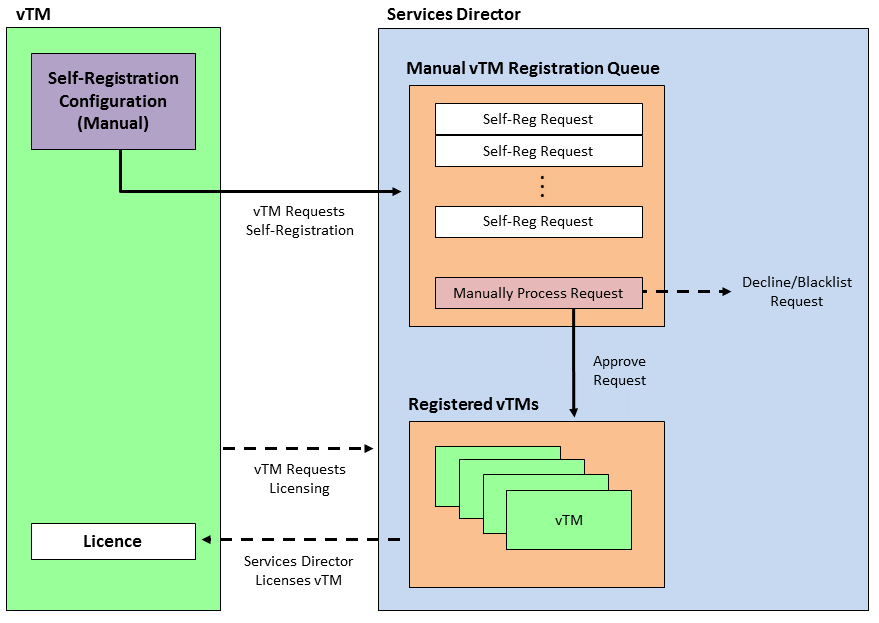
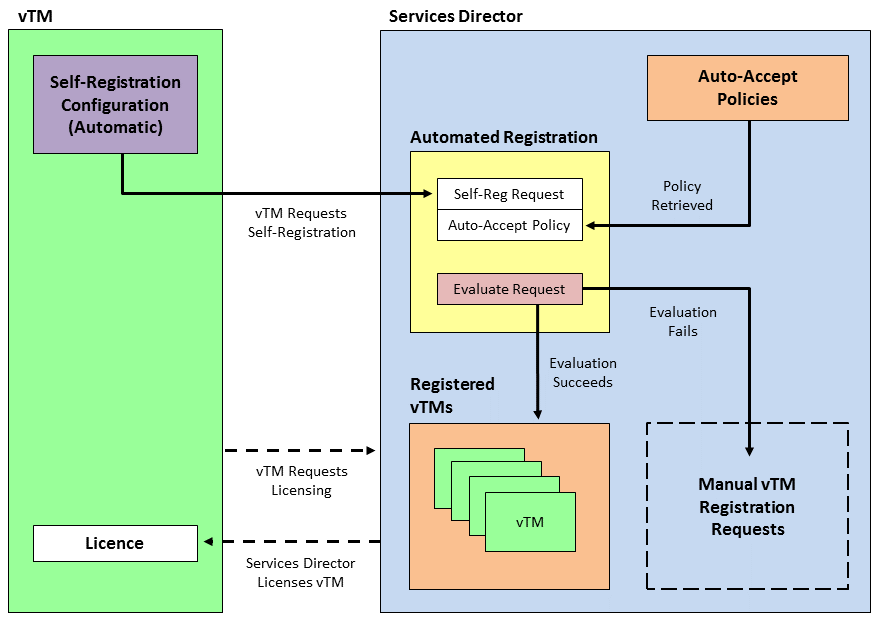
Self-registration can be either manual or automatic:
•Manual self-registration requires configuration of the vTM so that it requests self-registration on the Services Director.
When the request is received, the Services Director adds it to a queue of self-registration requests. The Administrator processes these manually as required, and can accept, decline or blacklist a request (see Processing Self-Registration Requests Manually).
Once a request is accepted, the vTM is added to the list of vTMs known to the Services Director. Licensing of the vTM can then occur as a separate process.
•Automatic self-registration requires configuration on both the vTM and the Services Director. An auto-accept policy must exist on the Services Director. This policy (one of many, potentially) defines the acceptance conditions and some fixed values for vTMs that use the policy. A policy must be referenced during the configuration of self-registration on the vTM.
When the request is received, the Services Director evaluates the request against the specified auto-accept policy, and will either accept or reject the vTM automatically.
Once accepted, the vTM is added to the list of vTMs known to the Services Director, and licensing of the vTM can then occur as a separate process. When rejected (for example, when there is insufficient bandwidth remaining, or the vTM is from outside the subnetwork), the vTM is added to the queue for manual self-registration requests instead, and the Administrator can process this in the usual way (see above).
Once a vTM is configured for self-registration, it will make a self-registration request every time it restarts. The Services Director will assess this request, but will not process it if the vTM is already registered, blacklisted, or there is a pending self-registration request for the vTM.
Once a self-registration request is received by the Services Director from a vTM, you must not change the cluster to which the vTM belongs until the registration request is accepted.
Requesting Self-Registration During vTM Installation
When you install the vTM VA, you can configure it for self-registration on the Services Director VA. Both manual and automatic self-registrations are supported.
For a vTM at v19.1 or later, vTM Communications Channel (Comms Channel) is always enabled during the vTM’s configuration wizard. To disable Comms Channel on an installed vTM at v19.1 or later, see Disabling Comms Channel on a vTM.
Once self-registration is requested by the vTM to the Services Director, you must not change the cluster to which a vTM belongs until the registration request is accepted.
Requesting Manual Self-Registration During the Installation of a vTM
This procedure enables you to configure a vTM for manual self-registration.
For a vTM at v19.1 or later, vTM Communications Channel (Comms Channel) is always enabled during the vTM’s configuration wizard. To disable Comms Channel on an installed vTM at v19.1 or later, see Disabling Comms Channel on a vTM.
For automatic self-registration, see Requesting Automatic Self-Registration During the Installation of a vTM.
1.Install the vTM VA.
2.Log in to the vTM VA to start its installation wizard.
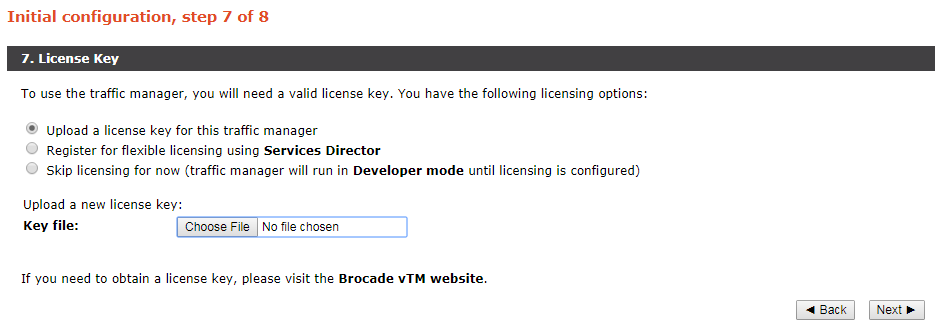
3.Progress through the Setup Wizard until the following page appears:

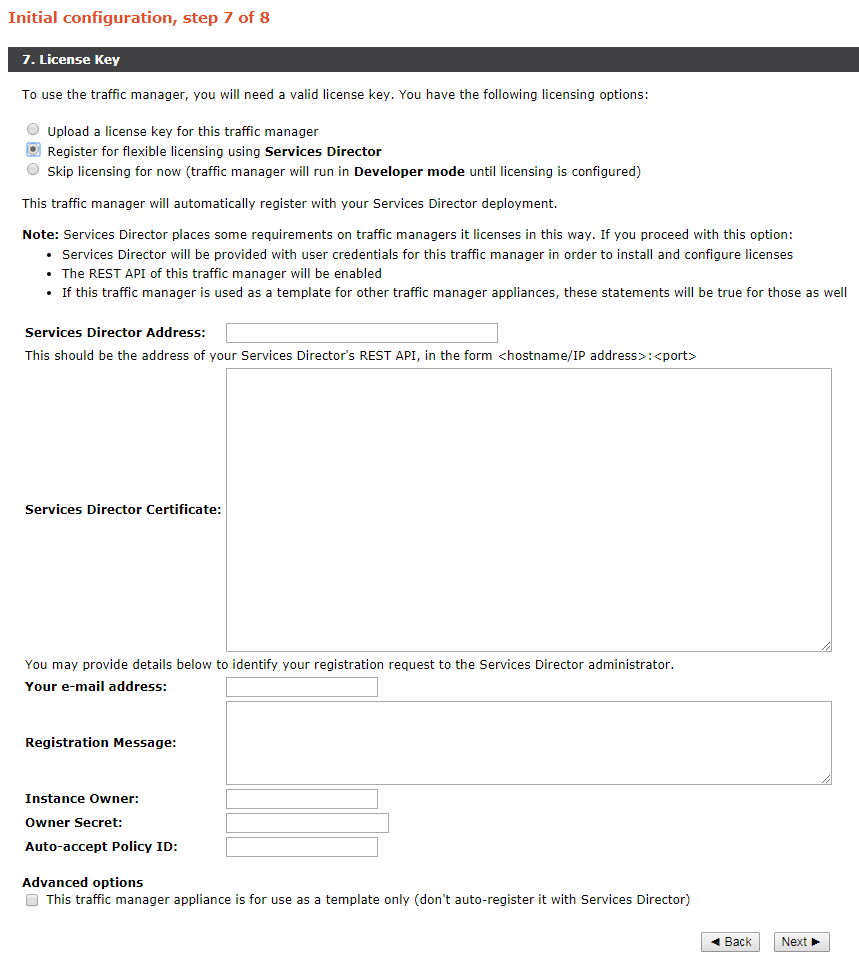
4.Select Register for flexible licensing using Services Director. The page updates to include fields for self-registration:

5.Specify the Services Director Address. This is the management address of the REST API port for the Services Director, as an <ip_address/host>:<port> pair.
6.Paste the Services Director’s REST API SSL certificate as the Services Director Certificate. Contact the Services Director Administrator to obtain this.
7.(Optional) Specify Your e-mail address. If you provide this, the Services Director Administrator will receive a notification email when the self-registration request is received by the Services Director.
8.(Optional) Specify a Registration Message. This is seen by the Services Director Administrator when they view the self-registration request.
9.(Optional) Select an Owner for the vTM instance.
The owner entry was created in the Services Director, see Adding an Owner to the Services Director.
10.Where you have selected an Owner, enter the Owner Secret password.
The password for the owner was created in the Services Director, see Adding an Owner to the Services Director.
11.Do not enter an Auto-accept Policy ID. This is required for automatic self-registration only.
12.Ensure that the Advanced Options check box is clear. This is only required when creating a template vTM, see Working with vTM Templates.
13.Click Next to go to the final wizard page and complete the wizard.
After the wizard completes, the vTM restarts.
The Services Director will receive a self-registration request from the vTM after the vTM restarts. The request is added to the queue of vTM self-registration requests, and can then be processed manually, see Accepting a Pending Self-Registration Request.
Once a vTM is configured for self-registration, it will make a self-registration request every time it restarts. The Services Director will assess this request, but will not process it if the vTM is already registered, or there is a Pending self-registration request for the vTM.
Once a self-registration request is received by the Services Director from a vTM, you must not change the cluster to which the vTM belongs until the registration request is accepted.
Requesting Automatic Self-Registration During the Installation of a vTM
This procedure enables you to configure a vTM for automatic self-registration.
For a vTM at v19.1 or later, vTM Communications Channel (Comms Channel) is always enabled during installation. To disable Comms Channel on an installed vTM at v19.1 or later, see Disabling Comms Channel on a vTM.
For manual self-registration, see Requesting Manual Self-Registration During the Installation of a vTM.
1.Install the vTM VA.
2.Log in to the vTM VA to start its installation wizard.
3.Progress through the Setup Wizard until the following page appears:
4.Select Register for flexible licensing using Services Director. The page updates to include fields for self-registration:
5.Specify the Services Director Address. This is the management address of the REST API port for the Services Director, as an <ip_address/host>:<port> pair.
6.Paste the Services Director’s REST API SSL certificate as the Services Director Certificate. Contact the Services Director Administrator to obtain this.
7.(Optional) Specify Your e-mail address. If you provide this, the Services Director Administrator will receive a notification email when the self-registration request is received by the Services Director.
8.(Optional) Specify a Registration Message. This is seen by the Services Director Administrator when they view the self-registration request.
9.Select an Owner for the vTM instance. The owner entry was created in the Services Director, see Adding an Owner to the Services Director.
10.Enter the Owner Secret password for the selected Owner. The password for the owner was created in the Services Director, see Adding an Owner to the Services Director.
11.Enter the Auto-accept Policy ID of the auto-accept policy required for this vTM instance. The auto-accept policy was created in the Services Director, see Adding an Auto-Accept Policy to the Services Director.
12.Ensure that the Advanced Options check box is clear. This is only required when creating a template vTM, see Working with vTM Templates.
13.Click Next to go to the final wizard page and complete the wizard. After the wizard completes, the vTM restarts. The Services Director will receive a request for automatic self-registration the vTM after the vTM restarts. Either:
•If the request can be processed automatically using the specified auto-accept policy, the vTM is added to the estate of the Services Director immediately, and subsequently licensed.
•If the request cannot be processed automatically using the specified auto-accept policy, the request is added to the queue of vTM self-registration requests, and can then be processed manually, see Accepting a Pending Self-Registration Request.
Once a vTM is configured for self-registration, it will make a self-registration request every time it restarts. The Services Director will assess this request, but will not process it if the vTM is already registered, or there is a Pending self-registration request for the vTM. note: Once a self-registration request is received by the Services Director from a vTM, you must not change the cluster to which the vTM belongs until the registration request is accepted.
Requesting Self Registration on a Configured vTM
You can configure an existing vTM to request self-registration.
To request self-registration on a configured vTM:
1.Log into the Services Director.
2.Click the System menu, and then click Service SSL Certificate.
The Service SSL Certificate page appears.
3.Click the PEM tab to view the SSL certificate in text form.
4.Copy the entire SSL certificate into your clipboard.
5.Log into the vTM.
6.Go to System > Licenses.
7.Under Services Director Registration:
•Set remote_licensing!registration_server to the public Services Director SEA and port. For example: 10.11.12.13: 8100.
•Paste the Services Director SSL certificate from Step 4 into remote_licensing!server_certificate.
•Set remote_licensing!owner to the required Services Director Owner tag.
•Set remote_licensing!owner_secret to the secret/password for the Owner.
•(Optional) Set remote_licensing!policy_id to the UUID of the Services Director Self-Registration Policy. This is required for automatic self-registration only.
•Ensure that remote_licensing!comm_channel_port is set to 8102.
•Set remote_licensing!comm_channel_enabled to the required value:
•If it is set to Yes, Comms Channel will be enabled on the vTM.
•If it is set to No, Comms Channel will be disabled on the vTM.
The Comms Channel configuration on a vTM is not replicated to all vTMs in a cluster.
•(Optional) Set remote_licensing!email_address to an email address for system messages regarding the registration request.
•(Optional) Set remote_licensing!message to a registration message that will be visible on the Services Director vTM Instance Registrations page.
8.Click Save and Register.
The vTM will register with the Services Director using the requested Comms Channel setting.
For a vTM at v19.1 or later, vTM Communications Channel (Comms Channel) is always enabled during the vTM’s configuration wizard. To disable Comms Channel on an installed vTM at v19.1 or later, see Disabling Comms Channel on a vTM.
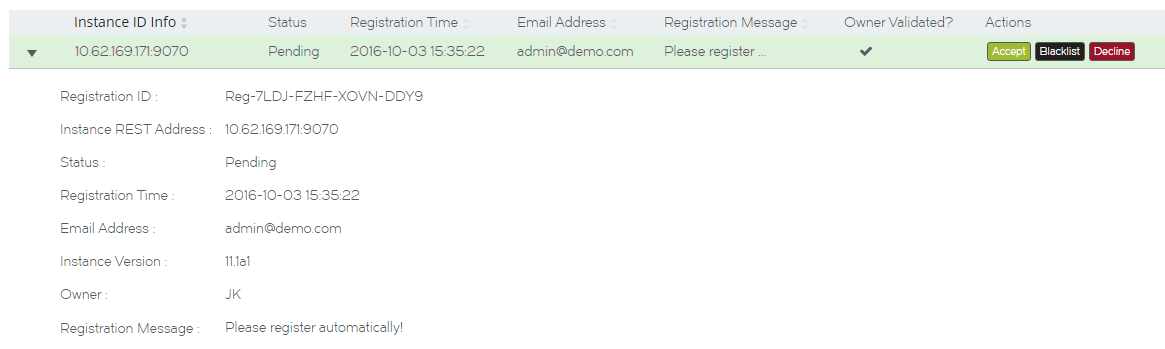
Viewing vTM Instance Registration Requests
The vTM Instance Registrations page lists all self-registration requests (both manual and automatic) that have been received by the Services Director from vTMs.
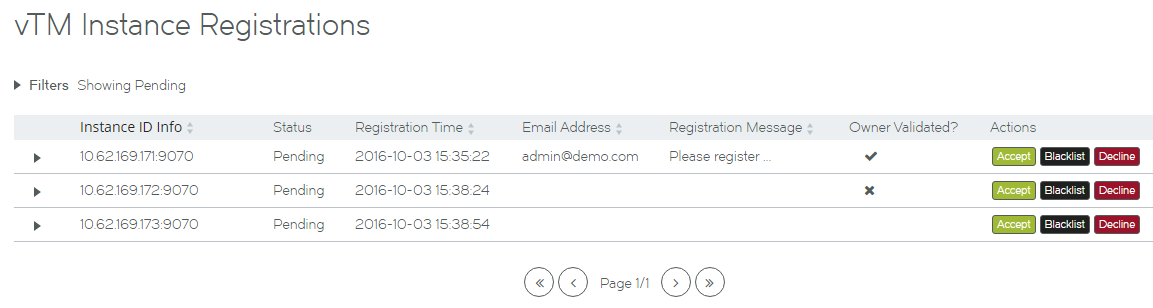
See Understanding vTM Registration Requests for details of the headings.
You can Accept, Blacklist and Decline individual registrations from this list, see Processing Self-Registration Requests Manually.
Expand a registration request to view its full details. For example:
This page also includes:
•A collapsed list of filters. These filters control which request state categories are displayed. See Filtering Self-Registration Requests. Typically, you will view Pending requests only.
To view all requests for automatic self-registration, ensure you set the filter to include Accepted registrations.
•Paging controls for when there are larger numbers of registration requests.
Understanding vTM Registration Requests
Each entry in the table of vTM registration requests shows properties for a single self-registration request. Both automatic and manual self-registration requests are included. To view successful automatic self-registration requests, ensure that you have Accepted requests included, see Filtering Self-Registration Requests.
|
Property |
Description |
|
Instance ID Info |
The information presented here depends on the use of vTM Communications Channel (Comms Channel): Where a registration request has come from a vTM that is using Comms Channel, the UUID of the vTM is displayed. Where a registration request has come from a vTM that is not using Comms Channel, REST API address/port is displayed. |
|
Status |
The current state of the self-registration request. This determines the Actions that are supported for the request. See Understanding Registration Status. |
|
Registration Time |
The time at which the Services Director received the self-registration request. |
|
Email Address |
The e-mail address of the administrator who configured the self-registration request on the vTM. |
|
Registration Message |
A text field. Typically, this will provide information for the Administrator who will process the self-registration request. |
|
Owner Validated? |
Indicates whether owner information was received from the vTM, and whether it was valid: A tick indicates that owner/password information was received from the vTM, and that these have been validated against the Services Director's known owners. A cross indicates that owner/password information was received from the vTM, but that it failed validation. A blank column indicates that no owner/password information was received from the vTM. |
|
Actions |
A list of state transition actions that are valid from the current state. See Understanding Registration Status. |
Understanding Registration Status
The status of each self-registration request is displayed in the vTM Instance Registration page. See Viewing vTM Instance Registration Requests.
Once self-registration is requested by the vTM to the Services Director, you must not change the cluster to which a vTM belongs until the registration request is accepted.
The lifecycle of a self-registration request is as follows:
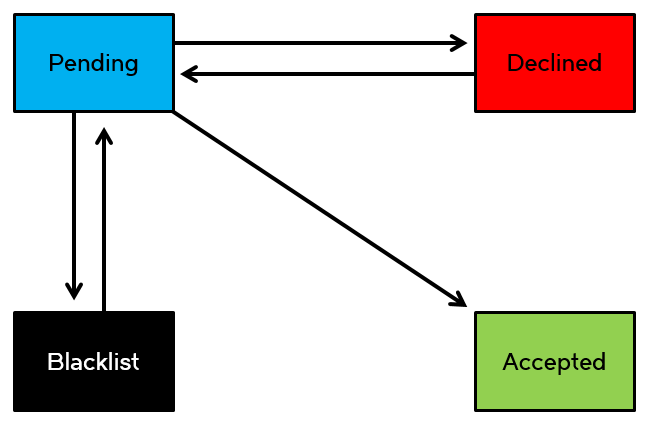
When a self-registration request is received, it is given a Pendin0g status.
For an automatic self-registration request, the auto-accept policy is then evaluated. Either:
•The evaluation of the auto-accept policy is successful. The request transitions automatically to Accepted, and the vTM is registered.
•The evaluation of the auto-accept policy is unsuccessful. The request retains its Pending status, and must then be resolved manually (see below).
For manual self-registration requests, you can transition it to:
•Accepted. You can manually transition a Pending request to Accepted, which completes the registration. See Accepting a Pending Self-Registration Request.
•Declined. You can manually transition a Pending request to Declined if you do not wish to accept the request. See Declining a Pending Self-Registration Request. You can transition a Declined request back to Pending if required.
•Blacklisted. You can manually transition a Pending request to Blacklisted if you do not wish to accept the request. See Blacklisting a Pending Self-Registration Request. You can transition a Blacklisted request back to Pending if required.
A Pending request will transition to Blacklisted automatically after a defined timeout period. This defaults to 24 hours. See Updating Instance Registration Settings.
The displayed states are subject to a status filter. By default, only Pending requests are shown. See Filtering Self-Registration Requests.
To view automatic self-registration requests, you will need the Accepted requests to be visible.
Filtering Self-Registration Requests
You can filter the self-registration requests that are included on the vTM Instance Registration page. By default, only Pending requests are shown. When the filters are collapsed, a summary of the filter settings is shown:

Click the arrow on the left side of the filters to expand the Status Filter list.

To view automatic self-registration requests that have been processed, the Accepted requests must be visible.
1.Click the Catalogs menu, and then click Licensing: Instance Registrations.
The vTM Instance Registration page appears.
2.Click the left arrow next to Filters to expand the Status Filter list.
3.Under Status Filter, select the check box for each required self-registration state.
Any state that is ticked is included in the table of self-registration requests.
Processing Self-Registration Requests Manually
All manual self-registrations and all failed automatic self-registrations are initially given a status of Pending. Each Pending request must be processed manually:
•Accepting a Pending Self-Registration Request.
•Declining a Pending Self-Registration Request.
•Blacklisting a Pending Self-Registration Request.
•Returning a Declined/Blacklisted Self-Registration Request to Pending.
Accepting a Pending Self-Registration Request
You can manually transition a Pending self-registration request to Accepted. You have the opportunity to review, change and confirm registration details before completing the process.
Once a vTM is registered, you cannot change the Accepted state of self-registration request.
1.Access your Active Services Director VA user interface from a browser, using the Service Endpoint Address of your Services Director.
2.Log in as the admin user. The Home page appears.
3.Click the Catalogs menu, and then click Licensing: Instance Registrations.
The vTM Instance Registration page appears.
4.Expand the filters, and ensure that Pending requests are included.
5.Locate the required Pending request.
6.Examine the information presented for the request, see Understanding vTM Registration Requests.
If additional information is required, expand the entry to view all details for the request, see Viewing vTM Instance Registration Requests.
7.In the Actions column for the request, click Accept.
The Accept Registration dialog box appears.
8.Enter an Instance Name for the vTM.
This is a user-facing name for the vTM that will be used throughout the Services Director VA user interface. This tag can be changed at any time. It must be unique among non-deleted vTM instances registered on the Services Director, but can be reused as required.
That is, if an instance is deleted, its tag can be reused for a different instance.
9.Enter an Owner for the vTM.
10.Select a Feature Pack for the vTM.
This feature pack must be supported by your Services Director’s License. If the required Feature Pack is not defined on your Services Director, see Adding a Feature Pack to the Services Director.
11.Enter a numeric Bandwidth (in Mbps) for the vTM.
This bandwidth must be available within your Services Director’s Bandwidth License.
12.(Optional) Select an Access Profile.
This access profile identifies the authenticator and permission groups required for the user authentication on this vTM. See Working with User Authentication.
13.Click Accept.
The state of the request changes to Accepted. The authenticator and permission groups in the access profile are applied to the vTM. Existing authenticators and permission groups may be overwritten, but none will be deleted. All members of a cluster are affected.
The vTM then appears as a registered vTM on the vTM Instances page.
If the vTM uses Comms Channel, hyperlinks to the vTM will not be used, see Working with vTM Communications Channel.
Declining a Pending Self-Registration Request
You can manually transition a Pending self-registration request to Declined. You can provide a reason for this decision if required.
You can exclude Declined requests from the vTM Instance Registration page if required by changing the Status Filter. See Filtering Self-Registration Requests.
You can transition a Declined self-registration request back to Pending. See Returning a Declined/Blacklisted Self-Registration Request to Pending.
1.Active Services Director VA user interface from a browser, using the Service Endpoint Address of your Services Director.
2.Log in as the admin user. The Home page appears.
3.Click the Catalogs menu, and then click Licensing: Instance Registrations.
The vTM Instance Registration page appears.
4.Expand the filters, and ensure that Pending requests are included.
5.Locate the required Pending request.
6.Examine the information presented for the request, see Understanding vTM Registration Requests.
If additional information is required, expand the entry to view all details for the request, see Viewing vTM Instance Registration Requests.
7.In the Actions column for the request, click Decline.
The Decline Registration dialog box appears.
8.(Optional) Enter your reasons for declining the request.
This information will be accessible to the vTM’s Administrator.
9.Click Decline to close the dialog box. The state of the request changes to Declined.
Blacklisting a Pending Self-Registration Request
You can manually transition a Pending self-registration request to Blacklisted.
You can exclude Blacklisted requests from the vTM Instance Registration page if required by changing the Status Filter, see Filtering Self-Registration Requests.
A Pending request will transition to Blacklisted automatically after a defined timeout period. This defaults to 24 hours. See Updating Instance Registration Settings.
You can transition a Blacklisted self-registration request back to Pending. See Returning a Declined/Blacklisted Self-Registration Request to Pending.
1.Access the Services Director VA user interface from a browser, using the Service Endpoint Address of your Services Director.
2.Log in as the admin user.
The Home page appears.
3.Click the Catalogs menu, and then click Licensing: Instance Registrations.
The vTM Instance Registration page appears.
4.Expand the filters, and ensure that Pending requests are included.
5.Locate the required Pending request.
6.Examine the information presented for the request, see Understanding vTM Registration Requests. If additional information is required, expand the entry to view all details for the request, see Viewing vTM Instance Registration Requests.
7.In the Actions column for the request, click Blacklist.
The state of the request changes to Blacklisted.
Returning a Declined/Blacklisted Self-Registration Request to Pending
You can transition a Declined/Blacklisted self-registration request back to Pending. For example, you can choose to do this after an issue with a Declined request is resolved, or when a request that was Blacklisted automatically (see Updating Instance Registration Settings) still needs to be processed.
1.Active the Services Director VA user interface from a browser, using the Service Endpoint Address of your Services Director.
2.Log in as the admin user.
The Home page appears.
3.Click the Catalogs menu, and then click Licensing: Instance Registrations.
The vTM Instance Registration page appears.
4.Expand the filters, and ensure that Declined/Blacklisted requests are included.
5.Locate the required request.
6.In the Actions column for the request, click Set to Pending.
The state of the request changes to Pending.
Requesting Re-Registration of a vTM
After you have successfully self-registered a vTM, you may need to re-register it. For example, if the authorization credentials on the vTM change.
This process is performed entirely in the vTM user interface, under System > Licenses > Services Director Registration.
To force re-registration, update the registration details as required. Then, enable the Force Re-Registration check box and click Save and Register.
See the Virtual Traffic Manager documentation for full details of the vTM VA software.
Self-Registering a Cloud-Based Virtual Traffic Manager
The Services Director VA supports the automatic self-registration of cloud-based vTM instances. This adds cloud-based vTMs to the estate of the Services Director, from where it can be licensed, monitored and metered.
This section describes the principles of automatic self-registration for cloud-based vTMs.
Self-registration of vTMs that are in a private network behind a NAT requires the use of vTM Communications Channel on each vTM, see Working with vTM Communications Channel.
Overview: vTM Self-Registration (Cloud)
After you have completed the initial configuration of theServices Director, you can add one or more externally-deployed vTM to the estate of the Services Director.
One method for achieving this is by automatic self-registration a cloud-based vTM.
Currently, cloud-based vTMs are supported on the Amazon Web Services (AWS) EC2 platform.
Self-registration of vTMs that are in a private network behind a NAT requires the use of vTM Communications Channel on each vTM, see Working with vTM Communications Channel.
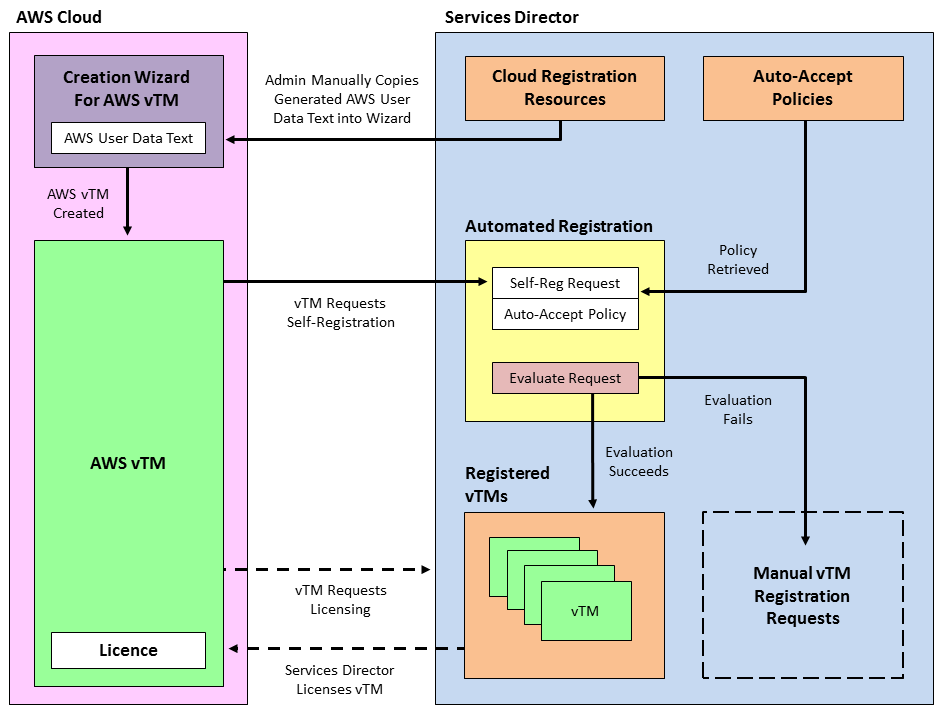
Cloud-based automatic registration begins on the Services Director, where a Cloud Registration resource must be created for one or more required deployments, see Adding a Cloud Registration Resource to the Services Director. This resource identifies a number of properties that will be used by a cloud-based vTM, such as its Owner and the Self-Registration Policy that the Services Director will use to evaluate it.
Once a Cloud Registration resource has been created, a block of automatically-generated text becomes available on the Services Director. This text encapsulates the user data required by the AWS system to create the first cloud-based vTM in a cluster, and this vTM can automatically self-register on the Services Director. To do this, the administrator first manually copies this text into the AWS vTM creation wizard. Then, after the administrator specifies all other required network-specific details, the cloud-based AWS vTM is created. This process is described in Creating the First vTM in a Cluster.
Self-registration of a cloud-based vTMs is intended to be automatic. The vTM makes a self-registration request to the Services Director. When the self-registration request is received, the Services Director evaluates the request against the specified self-registration policy, and will either accept or reject the vTM automatically.
When accepted, the vTM is added to the list of vTMs known to the Services Director. When rejected (for example, when there is insufficient bandwidth remaining, or the self-generated text does not include both an Owner and a Self-Registration Policy), the vTM is added to the queue of manual self-registration requests instead, and the Administrator can process manually, see Processing Self-Registration Requests Manually.
See Creating a Cloud-Based Virtual Traffic Manager for a full description of this process.
If you want to create additional cloud-based vTMs in the same cluster, you replace the user data text block for the Cloud Registration resource with the user data text block from the vTM's cluster, see Creating the Second vTM in a Cluster.
Once a self-registered vTM is known to the Services Director, the Services Director will respond to valid licensing requests by licensing the vTM, in the same way as for any other registered vTM.
Once a vTM is configured for self-registration, it will make a self-registration request every time it restarts. The Services Director will assess this request, but will not process it if the vTM is already registered, blacklisted, or there is a pending self-registration request for the vTM.
Once a self-registration request is received by the Services Director from a vTM, you must not change the cluster to which the vTM belongs until the registration request is accepted.
A detailed description of the creation of an AWS cloud-based vTM can be found in the Virtual Traffic Manager documentation, refer to the Pulse Virtual Traffic Manager Cloud Services Installation and Getting Started Guide.
Creating a Cloud-Based Virtual Traffic Manager
You create one or more cloud-based vTM instances from the Amazon Web Services (AWS) system. To do this, you use a block of user data text that is created automatically by the Services Director, see Overview: vTM Self-Registration (Cloud) for details.
You must create each cloud-based instance individually. There are separate processes for:
•Creating the first cloud-based vTM in a cluster, see Creating the First vTM in a Cluster.
•Creating the second cloud-based vTM in a cluster, see Creating the Second vTM in a Cluster.
•All subsequent cloud-based vTMs in a cluster, see Creating Subsequent vTMs in a Cluster.
Creating the First vTM in a Cluster
The creation of a cloud-based vTM that is the first in a cluster is described below as a high-level process. Specific implementation choices will depend on your network configuration.
Before you perform this process, you must:
•Create the required Cloud Registration resource, see Adding a Cloud Registration Resource to the Services Director.
•Have the user data text block for this resource in your clipboard, see Viewing User Data Text for a Cloud Registration Resource.
Then, perform the following procedure.
1.On the Services Director, access the required Cloud Registration resource, and copy its user data text block to the clipboard. See Viewing User Data Text for a Cloud Registration Resource.
2.Access the Amazon Web Services (AWS) system and log in using your AWS credentials.
3.Access the EC2 dashboard.
4.Launch the process to create a new instance.
This starts a wizard that will lead you through the creation process.
5.On page 1 of the wizard (Choose AMI), locate and select the Amazon Machine Image (AMI) for the vTM from the AWS Marketplace.
6.On page 2 of the wizard (Choose Instance Type), select the required instance type.
7.On page 3 of the wizard (Configure Instance):
•Ensure the number of instances is 1. You can add more cloud-based instances to the cluster later, see Creating the Second vTM in a Cluster.
•Select your network and subnetwork.
•You can choose to automatically assign a public IP for the new instance if required. By default, a public IP address is not assigned to a new instance. Your need to do this will depend on your specific networking configuration.
•Expand the advanced details, and paste in the AWS user data from your Cloud Registration resource.
•If your user data is plain text, add any incomplete properties, such as owner or auto-accept policy. If these are not specified, automatic self-registration will be unable to complete.
If you do not intend to complete the owner or auto-accept policy properties, you must remove the incomplete entries from the pasted user data text block before continuing.
•Configure all other settings to your requirement.
8.On page 4 of the wizard (Add Storage), configure settings to match your network and requirement.
9.On page 5 of the wizard (Tag Instance), create a tag with Key set to “Name”, and Value set to the unique required name for your instance.
10.On page 6 of the wizard (Configure Security Group), either create a new security group, or select an existing one.
11.On page 7 of the wizard (Review):
•Review your choices and confirm. This effectively closes the wizard, but further configuration information is required.
•Create a new key pair. This key pair is used for this instance and all others that join its cluster.
•Download the key pair and save it in a safe location for future reference and use.
•Launch the instance.
The wizard closes and you are informed that the instance is being created.
Once the instance is created, it appears on the list of instances that is accessible from the EC2 dashboard.
When the Services Director receives the auto-registration request from the new cloud-based vTM, it will process the request:
•If automatic self-registration succeeds, the vTM will appear on the vTM Instances page, see Viewing Virtual Traffic Managers. The vTM uses a new Discovered cluster. The name of the vTM is the private IP assigned by AWS to the vTM.
If the vTM uses Comms Channel, hyperlinks to the vTM will not be used, see Working with vTM Communications Channel.
•If automatic self-registration is unable to complete (for example, because of a missing owner or auto-accept policy), the registration request will appear as a Pending self-registration request on the Instance Registrations page. From there, you can manually process the request, see Processing Self-Registration Requests Manually. Once you have accepted this self-registration request, you can create a second cloud-based vTM to the cluster, see Creating the Second vTM in a Cluster.
Creating the Second vTM in a Cluster
The creation of a cloud-based vTM that is the second in a cluster is described below as a high-level process. Specific implementation choices will depend on your network configuration.
Before you perform this process, you must create the first vTM in a cluster (refer to Creating the First vTM in a Cluster), and then access the user data text block from its vTM Cluster resource. This user data text block replaces the one that was used to create the first cloud-based vTM.
1.On the Services Director, access the vTM Cluster for the first vTM instance in the cluster, and copy its cluster text block to the clipboard. See Understanding Virtual Traffic Manager Cluster Details.
2.Access the Amazon Web Services (AWS) system and log in using your AWS credentials.
3.Access the EC2 dashboard.
4.Launch the process to create a new instance.
This starts a wizard that will lead you through the creation process.
5.On page 1 of the wizard (Choose AMI), locate and select the Amazon Machine Image (AMI) for the vTM from the AWS Marketplace.
6.On page 2 of the wizard (Choose Instance Type), select the required instance type.
7.On page 3 of the wizard (Configure Instance):
•Ensure the number of instances is 1. You can add more cloud-based instances to the cluster later, see Creating Subsequent vTMs in a Cluster.
•Select your network and subnetwork.
•You can choose to automatically assign a public IP for the new instance if required. By default, a public IP address is not assigned to a new instance. Your need to do this will depend on your specific networking configuration.
•Expand the advanced details, and paste in the AWS user data from your vTM cluster.
•Configure all other settings to your requirement.
8.On page 4 of the wizard (Add Storage), configure settings to match your network and requirement.
9.On page 5 of the wizard (Tag Instance), enter a name for your instance.
10.On page 6 of the wizard (Configure Security Group), select the existing security group that you used for the first instance in the cluster.
11.On page 7 of the wizard (Review):
•Review your choices and confirm. This effectively closes the wizard, but further configuration information is required.
•Select the key pair that you created for the first vTM in the cluster. This key pair is used for all instances in the cluster.
•Launch the instance.
The wizard closes and you are informed that the instance is being created.
Once the instance is created, it appears on the list of instances that is accessible from the EC2 dashboard.
When the Services Director receives the auto-registration request from the new cloud-based vTM, it will process the request:
•If successful, the vTM will appear on the vTM Instances page, see Viewing Virtual Traffic Managers. This vTM shares its Discovered cluster with the first vTM in the cluster. The name of the vTM is the private IP assigned by AWS to the vTM.
If the vTM uses Comms Channel, hyperlinks to the vTM will not be used, seeWorking with vTM Communications Channel.
•If unsuccessful, the registration request will appear as a Pending self-registration request on the Instance Registrations page. From there, you can manually process the request, see Processing Self-Registration Requests Manually. Once you have accepted this self-registration request, you can create additional cloud-based vTMs in the cluster, see Creating Subsequent vTMs in a Cluster,
Creating Subsequent vTMs in a Cluster
Once you have created the first and second cloud-based vTMs in a cluster, creating additional vTMs in the cluster can be performed by duplicating the second vTM from the EC2 dashboard.
You do not need to access and copy any user data text blocks during this process.
The creation of additional cloud-based vTMs in a cluster is described below as a high-level process. Specific implementation choices will depend on your network configuration.
1.Access the Amazon Web Services (AWS) system and log in using your AWS credentials.
2.Access the EC2 dashboard and view your instances.
3.Select the second instance in the cluster and issue a new action to create another instance like the one selected.
The instance creation wizard starts, and you are taken to page 7.
4.On page 7 of the wizard (Review):
•Edit the tag for the new instance, so that it is unique. By default, it uses the same tag name as the duplicated instance.
•Review your choices and confirm. This effectively closes the wizard, but further configuration information is required.
•Select the key pair that you created for the first vTM in the cluster. This key pair is used for all instances in the cluster.
•Launch the instance.
The wizard closes and you are informed that the instance is being created.
Once the instance is created, it appears on the list of instances that is accessible from the EC2 dashboard.
When the Services Director receives the auto-registration request from the new cloud-based vTM, it will process the request:
•If successful, the vTM will appear on the vTM Instances page, see Viewing Virtual Traffic Managers. This vTM shares its Discovered cluster with the first vTM in the cluster. The name of the vTM is the private IP assigned by AWS to the vTM.
•If unsuccessful, the registration request will appear as a Pending self-registration request on the Instance Registrations page. From there, you can manually process the request, see Processing Self-Registration Requests Manually.