Installing the Services Director VA on Amazon Web Services
Overview: Services Director VA on Amazon Web Services
Services Director instances can be launched from Amazon Machine Images (AMIs) on Amazon Web Services (AWS). AWS supports HA pairing of two Services Director nodes. Each Services Director is launched from a separate AMI and then configured and joined.
To create an HA pair of Services Director nodes on AWS:
1.Obtain the Services Director license from your Pulse Secure account team. For details about obtaining your license keys, see Obtaining Services Director Licenses.
2.Create the Primary Services Director node, see Launching and Configuring the Primary Services Director on AWS.
3.Create the Secondary Services Director node, see Launching and Configuring the Secondary Services Director on AWS.
4.Review and configure the Settings for the Services Director VA, see Installing the Services Director VA on Amazon Web Services.
Obtaining Services Director Licenses
License tokens are automatically emailed to you when you order your product. If you have not received your license tokens, contact your Ivanti sales representative.
You must redeem your license tokens at the Ivanti License Redemption Portal. To redeem a license token you must have a support site login and password, and a self-signed SSL certificate.
You cannot use a CA-signed certificate.
All licenses are emailed to you as attachments.
Launching and Configuring the Primary Services Director on AWS
Perform the following procedure to launch and configure a Primary Services Director VA on AWS:
1.Prepare the required infrastructure (VPCs and Subnets) in the AWS network, see Preparing AWS Infrastructure.
2.Prepare an AWS Security Group, see Preparing an AWS Security Group.
3.Launch a Services Director instance on AWS from the Services Director AMI, see Launching a Services Director AMI Instance on AWS.
4.(Optional) Add and configure elastic IP addresses for the Primary Services Director instance, see Creating Elastic IP Addresses for the Services Director Instance.
5.Update your AWS Security Group to include all allocated IP addresses for the Primary Services Director instance, see Updating Security Rules for Services Director Instance IP Addresses.
6.Retrieve the password for the Primary Services Director from AWS, see Retrieving the Default Password for a Services Director Instance.
7.Access the Primary Services Director instance using a browser, see Accessing your Services Director Instance for the First Time.
8.Use the Setup Wizard (which starts automatically) to create your Primary Services Director node. See Running the Services Director VA Setup Wizard.
Preparing AWS Infrastructure
Before you can launch a pair of Services Director VA nodes into AWS, you must prepare any required AWS infrastructure elements within the AWS Network. This requires:
•Understanding AWS Infrastructure.
•Determining IP Address Requirements.
•Creating an AWS Virtual Private Cloud.
Understanding AWS Infrastructure
The following diagram shows AWS infrastructure concepts and relationships.
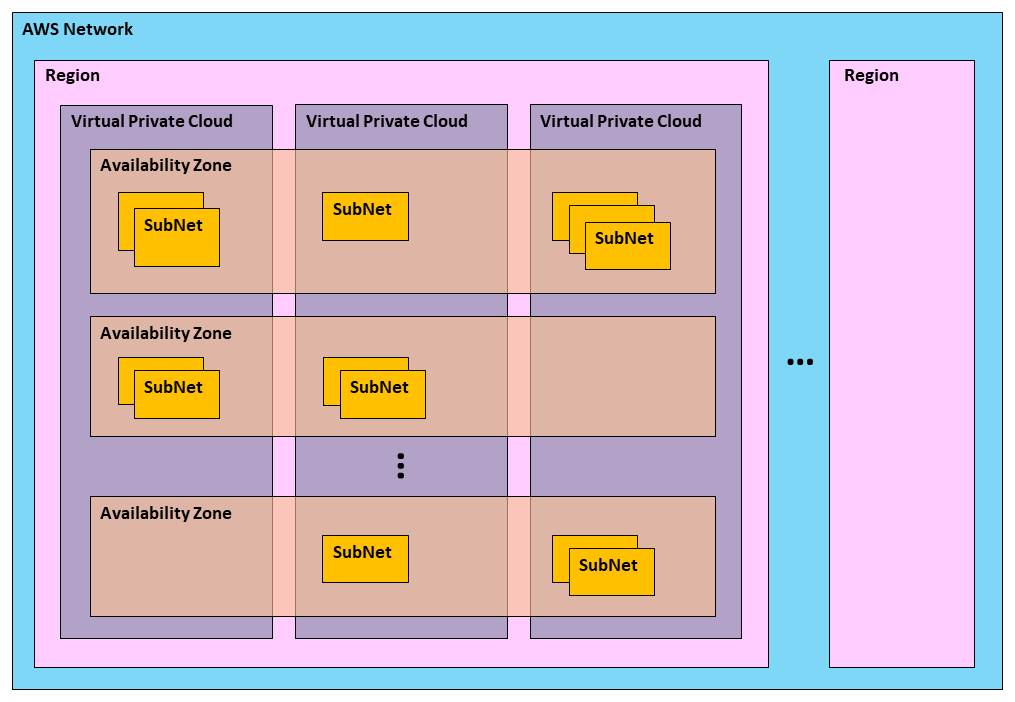
The AWS infrastructure and the relationships between each type are as follows:
•The AWS Network is a secure cloud services platform.
The AWS Network has many AWS Regions.
•A Region is a named set of AWS resources based in the same geographical area, such as a country.
Every Region has at least two AWS Availability Zones.
•An Availability Zone is a geographical location entirely within a Region. The geographic nature of an Availability Zone insulates it from service failures in other Availability Zones.
Each Availability Zone supports network access to all other Availability Zones in the Region.
Each Availability Zone is accessible by every AWS Virtual Private Cloud in a Region.
•A Virtual Private Cloud (VPC) is a virtual network. It is populated by AWS infrastructure elements that share network security and connectivity.
A VPC can access all Availability Zones in the Region.
A VPC requires one or more AWS Subnets.
VPCs are created and managed by the customer.
The required VPC (and its Subnets) must be in place before a Services Director pair can be launched, see Creating an AWS Virtual Private Cloud.
•A Subnet is a subdivision of the IP address range of a VPC.
Subnets are created by the customer to group application instances according to security and operational needs. A Subnet is entirely contained within a single Availability Zone. Each Services Director is launched into a Subnet. Any required Subnet(s) must be in place before Services Director can be launched, see Creating AWS Subnets.
Additional Subnets may also be required for vTM instances.
Determining IP Address Requirements
The use of IP address types on AWS (private, elastic and public) are determined by your general networking requirements, but in Services Director terms the following contribute to this choice:
•The relative placement of the Services Director nodes.
•The placement of vTMs relative to the Services Directors.
•Your access requirements for your individual Services Director nodes.
A Secondary Services Director node must be in the same VPC as the Primary node. That is:
•In the same Subnet as the Primary node, OR
•In a different Subnet to the Primary node, but in the same Availability Zone as the Primary node's Subnet, OR
•In a different Subnet to the Primary node, but in a different Availability Zone to the Primary node's Subnet.
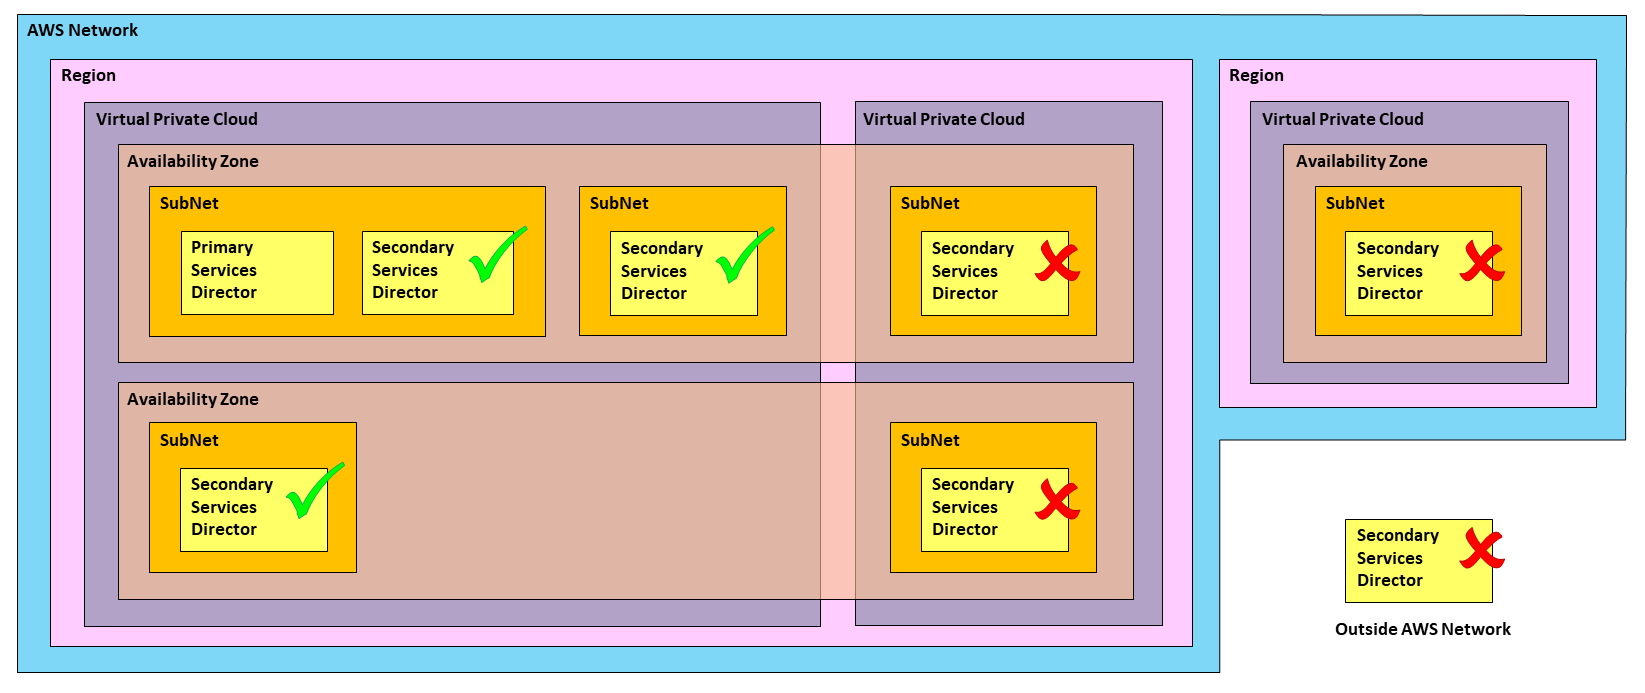
All other Services Director placements (shown above) are not supported.
The specifics of an AWS deployment determine whether private IP addresses or elastic IP addresses are used:
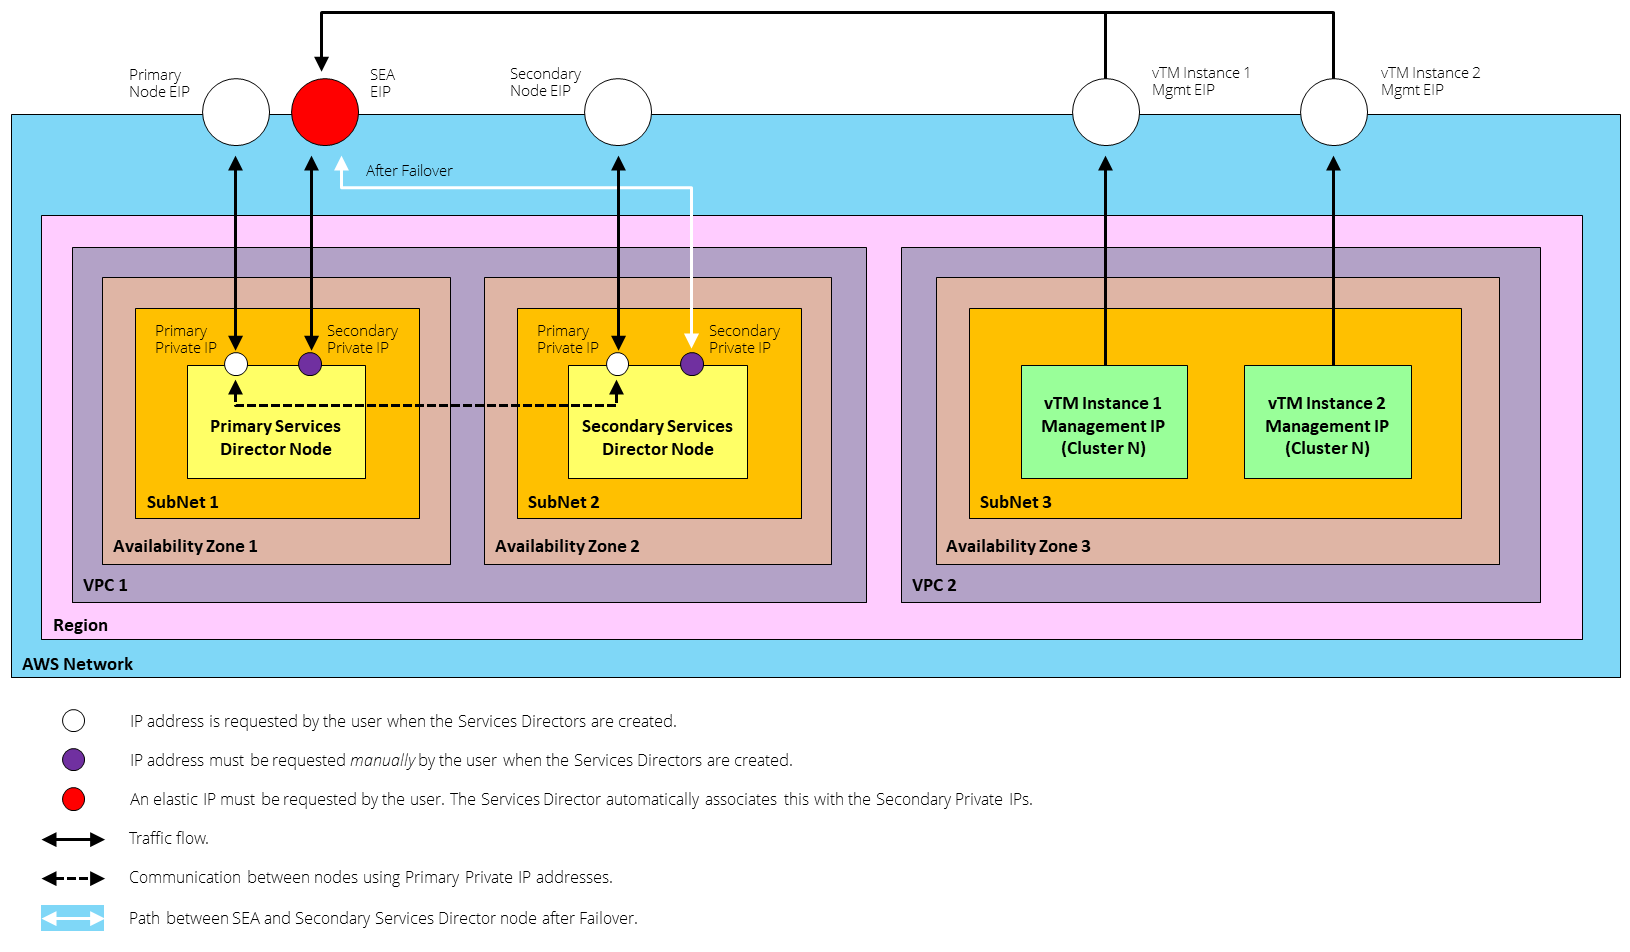
•The use of an Elastic Service Endpoint Address (SEA) is mandatory where the Primary and Secondary Services Directors are in different Subnets. For example, when the vTMs are in the same Availability Zone (or Subnet) of the VPC:

The placement of vTMs in this example is illustrative; each vTM can be in any Subnet within the VPC containing the Services Director nodes.
Alternatively, when the vTMs are in a different VPC:
The placement of vTMs in this example is illustrative; they can be in any Subnet outside the Services Directors VPC, or outside AWS completely.
In both cases:
•The Primary Private IP address of each Services Director node is used for inter-node communications. Typically, this communication is direct within the VPC, but for inter-node database access and replication the communication will normally be directed via the external SEA.
•The SEA directs traffic to the Active Services Director node at all times, using the Secondary Private IP Address of the node. Each Services Director node requires an additional Secondary Private IP Address. You must request that AWS auto-assigns an additional Secondary Private IP Address during creation of the Services Director instance.
•You will typically configure Elastic IP addresses for each individual Services Director node, and then associate the Elastic IP for each node with that node’s Primary Private IP address.
•Additionally, each vTM will typically have an Elastic IP address that communicates with the Services Director via the SEA.
An elastic SEA may also be used when the Primary and Secondary SDs are in the same Subnet, but whether this is necessary depends on your external connectivity requirements. For example, when your VPCs are external to the VPC, and will need to access the Services Director for licensing.
Once an Elastic IP address for the SEA is defined, you must configure your network accordingly to ensure connectivity of all components. This is outside the scope of this document, see the Virtual Traffic Manager documentation.
The placement of vTMs is only restricted by your networking configuration. All vTMs must connect to the Services Director using the SEA. This is outside the scope of this document.
•Where the Services Director pair are in a single Subnet, and all vTMs in its estate are inside a single VPC, you can use Private IP addresses for the Services Director nodes and for the SEA. For example:
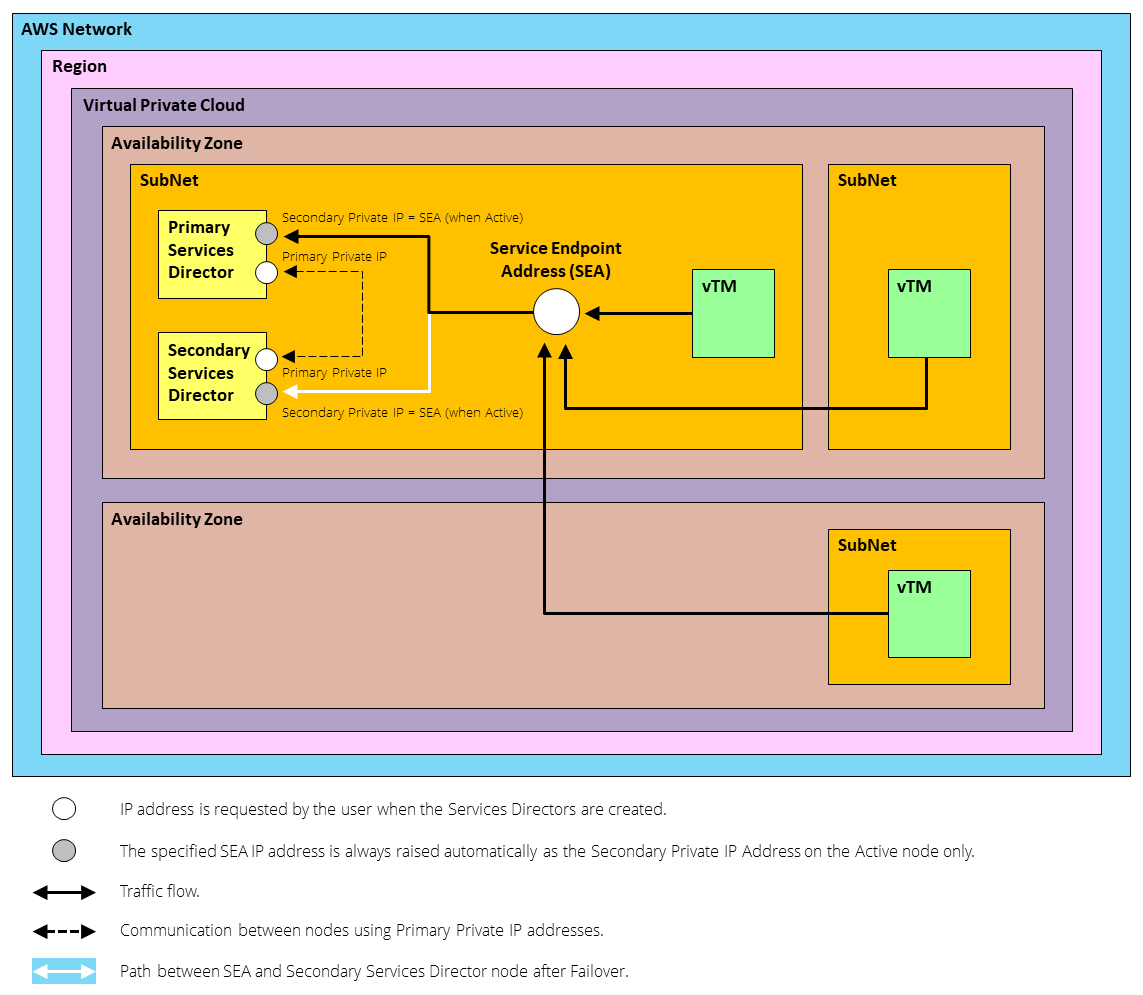
The Primary Private IP address of each Services Director node is used for inter-node communications. Typically, this communication is direct within the VPC, but for inter-node database access and replication the communication will normally be directed via the SEA.
The SEA directs traffic to the Active Services Director node at all times. This uses a Secondary Private IP address that is raised on the Active node only. When failover occurs, this IP address is removed from one node and raised on the other node.
This is standard Services Director behaviour. You do not have to raise a Secondary Private IP address on either node.
The vTMs inside the VPC connect (call back) to the Services Directors using the Private IP Address SEA.
If you want to access your individual Services Director nodes from outside the VPC, you can allocate a Public IP address or Elastic IP address to each node.
All IP addresses are required for the definition of an AWS Security Group, see Preparing an AWS Security Group.
Once you have prepared the required VPC and Subnet(s), you can launch a Services Director VA using an AMI on AWS, see Launching a Services Director AMI Instance on AWS.
Creating an AWS Virtual Private Cloud
The required AWS Virtual Private Cloud (VPC) must exist before you can launch the Services Director VA on AWS. You create a VPC from the Amazon Web Services platform.
There can be several VPCs within an AWS Region.
The IP range of a VPC is defined by a CIDR block. For example, 10.0.0.0/16.
The VPC will contain both nodes of a Services Director HA pair, though the two nodes can be in different Availability Zones within the VPC, see Determining IP Address Requirements.
A VPC can access all AWS Availability Zones in an AWS Region.
To create a VPC:
1.Login to the AWS Management Console.
2.On the top bar of the AWS Management Console, select the required Region. For example, EU (Ireland).

3.On the AWS top bar, click Services and then locate the Network & Content Delivery options.
4.Under Network & Content Delivery, select VPC.
The VPC Dashboard appears. For example:
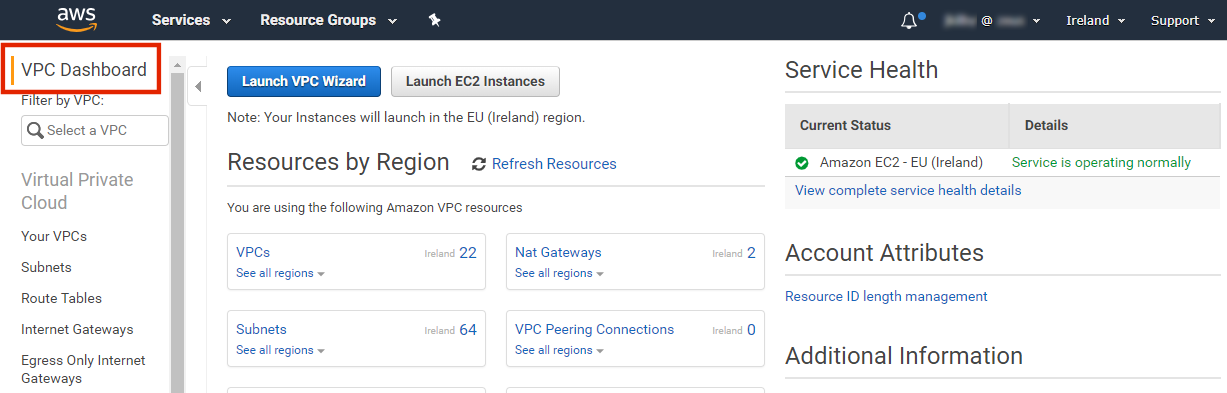
5.Under Virtual Private Cloud, click Your VPCs.
A list of your existing VPCs appears.
6.Examine your VPCs and decide if an existing one matches your networking requirements for your Services Director. If there is a suitable VPC, no further actions is required, and this process is complete.
7.Click Create VPC.
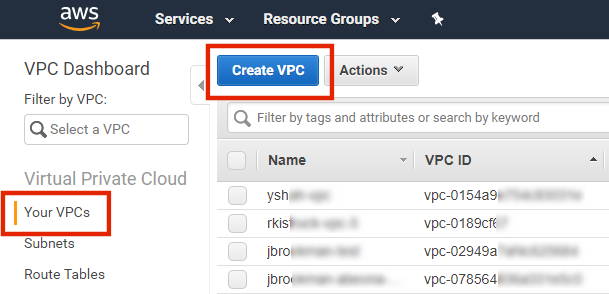
The Create VPC page appears.
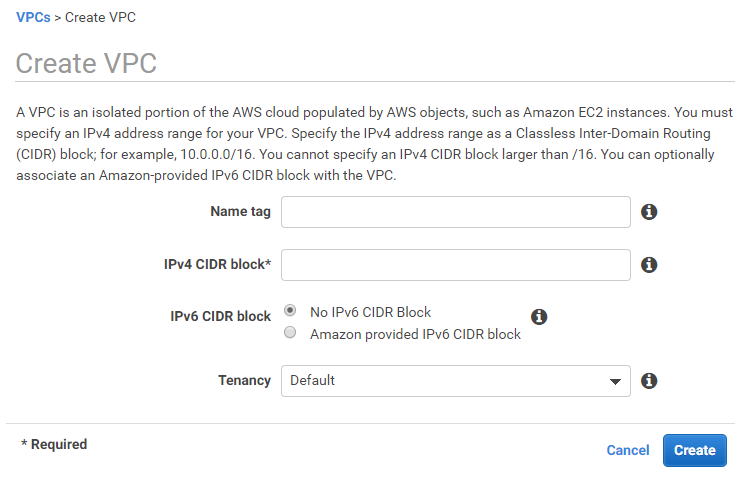
8.Specify your required networking details and click Create.
A confirmation message appears.
9.Click Close.
The new VPC is added to the Your VPCs list.
Once you have a suitable VPC, you can create any required Subnets inside the VPC, see Creating AWS Subnets.
Creating AWS Subnets
The required AWS Subnets must exist inside your chosen VPC before you can launch the Services Director VA on AWS. You create Subnets from the Amazon Web Services platform.
Each Subnet has an IP address range that is a subdivision of the VPC’s total range. The range is that is defined by a CIDR block. For example, 10.0.0.0/24.
The Subnet will contain either one or both of the Services Director nodes, see Determining IP Address Requirements.
The Subnet can be inside any AWS Availability Zone within the VPC.
To create a Subnet:
1.Login to the AWS Management Console.
2.On the top bar of the AWS Management Console, select the required Region.
3.On the AWS top bar, click Services and then locate the Network & Content Delivery options.
4.Under Network & Content Delivery, select VPC.
The VPC Dashboard appears.
5.Under Virtual Private Cloud, click Subnets.
A list of your existing Subnets appears.
6.Examine your Subnets and decide if you have a Subnet(s) that match your networking requirements for your Services Director nodes. If there is a suitable Subnet(s), no further actions is required, and this process is complete.
7.Click Create subnet.
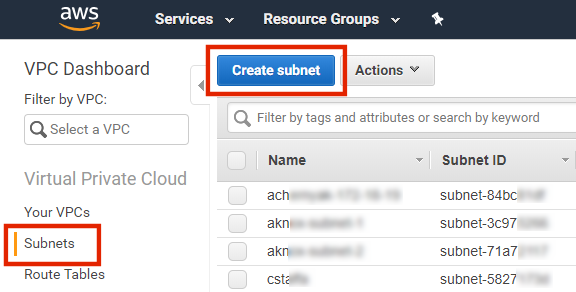
The Create subnet page appears.
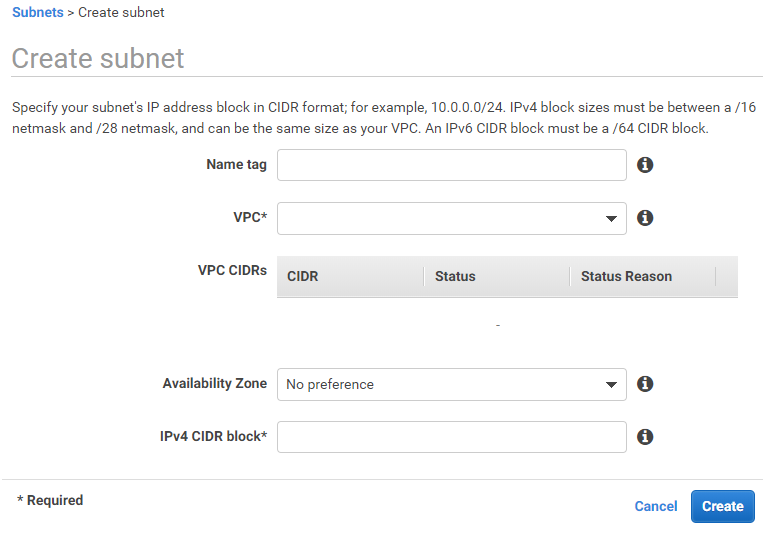
8.Specify your required networking details and click Create.
A confirmation message appears.
9.Click Close.
The new Subnet is added to the Subnets list.
10.Repeat steps 7 - 9 if a second Subnet is required for your Secondary Services Director node.
The relative positions of your Subnets for the Services Director nodes will influence your choice of IP address, see Determining IP Address Requirements.
Once you have a suitable Subnet(s), you can prepare your AWS Security Group, see Preparing an AWS Security Group.
Preparing an AWS Security Group
Before you launch a Services Director from an AMI on AWS, you must define an AWS Security Group.
An AWS Security Group is a named set of permitted inbound network connections that apply to one or more AWS AMI instances. Each Security Group consists of a list of rules. Each rule identifies a protocol, a port, and an IP address (or IP address range) from which inbound requests can be received.
Rules can reference the Security Group itself. This represents all traffic from any IP address hosted on a AWS instance that uses the Security Group.
All received requests that are not permitted by a rule are refused.
In Services Director terms, each Services Director node is an AWS AMI instance, and the assigned Security Group will control which inbound connections can reach the Services Director node via its SEA.
Security Groups also optionally support rules to govern permitted outbound connections. This guide does not specify suitable rules to govern permitted outbound connections from Services Director.
There are three general deployment scenarios for your Services Directors and vTMs. Your chosen scenario determines the required rules for your Security Group:
•Using elastic IP addresses for the Services Director nodes and the SEA, with the vTMs in the same VPC as the Services Directors, see Scenario 1 - Elastic IPs with vTMs in the Same VPC.
•Using elastic IP addresses for the Services Director nodes and the SEA, with the vTMs in a different VPC or outside AWS completely, see Scenario 2 - Elastic IPs with vTMs in Different VPCs.
•Using private IPs for the Services Director nodes, see Scenario 3 - Private IPs Only.
Once you have identified your network configuration and the required rules, you can create your AWS Security Group. see Creating an AWS Security Group.
After you launch the AMI for each Services Director node, you must create additional rules:
•In your Security Group used by the Services Directors, you add Security Group rules for the IP addresses used by each Services Director. This enables the Services Directors to communicate with each other Updating Security Rules for Services Director Instance IP Addresses.
•In any Security Groups used by the vTMs that will be in the estate of the Services Director, you add Security Group rules for the Internet-facing IP SEA. This enables the vTMs to communicate with the Services Director.
Scenario 1 - Elastic IPs with vTMs in the Same VPC
In this scenario:
•AWS Elastic IPs (EIPs) are used for the Primary and Secondary nodes, and for the Services Endpoint Address (SEA).
•The Services Director nodes are in the same AWS VPC, although they can be in separate Subnets or availability zones.
•The vTMs in the estate of the Services Director pair are in the same VPC.
•The self-registration feature of vTM is supported when the vTM is provided with the SEA EIP of the Services Director.
The flow of requests through the defined IP addresses is as follows:
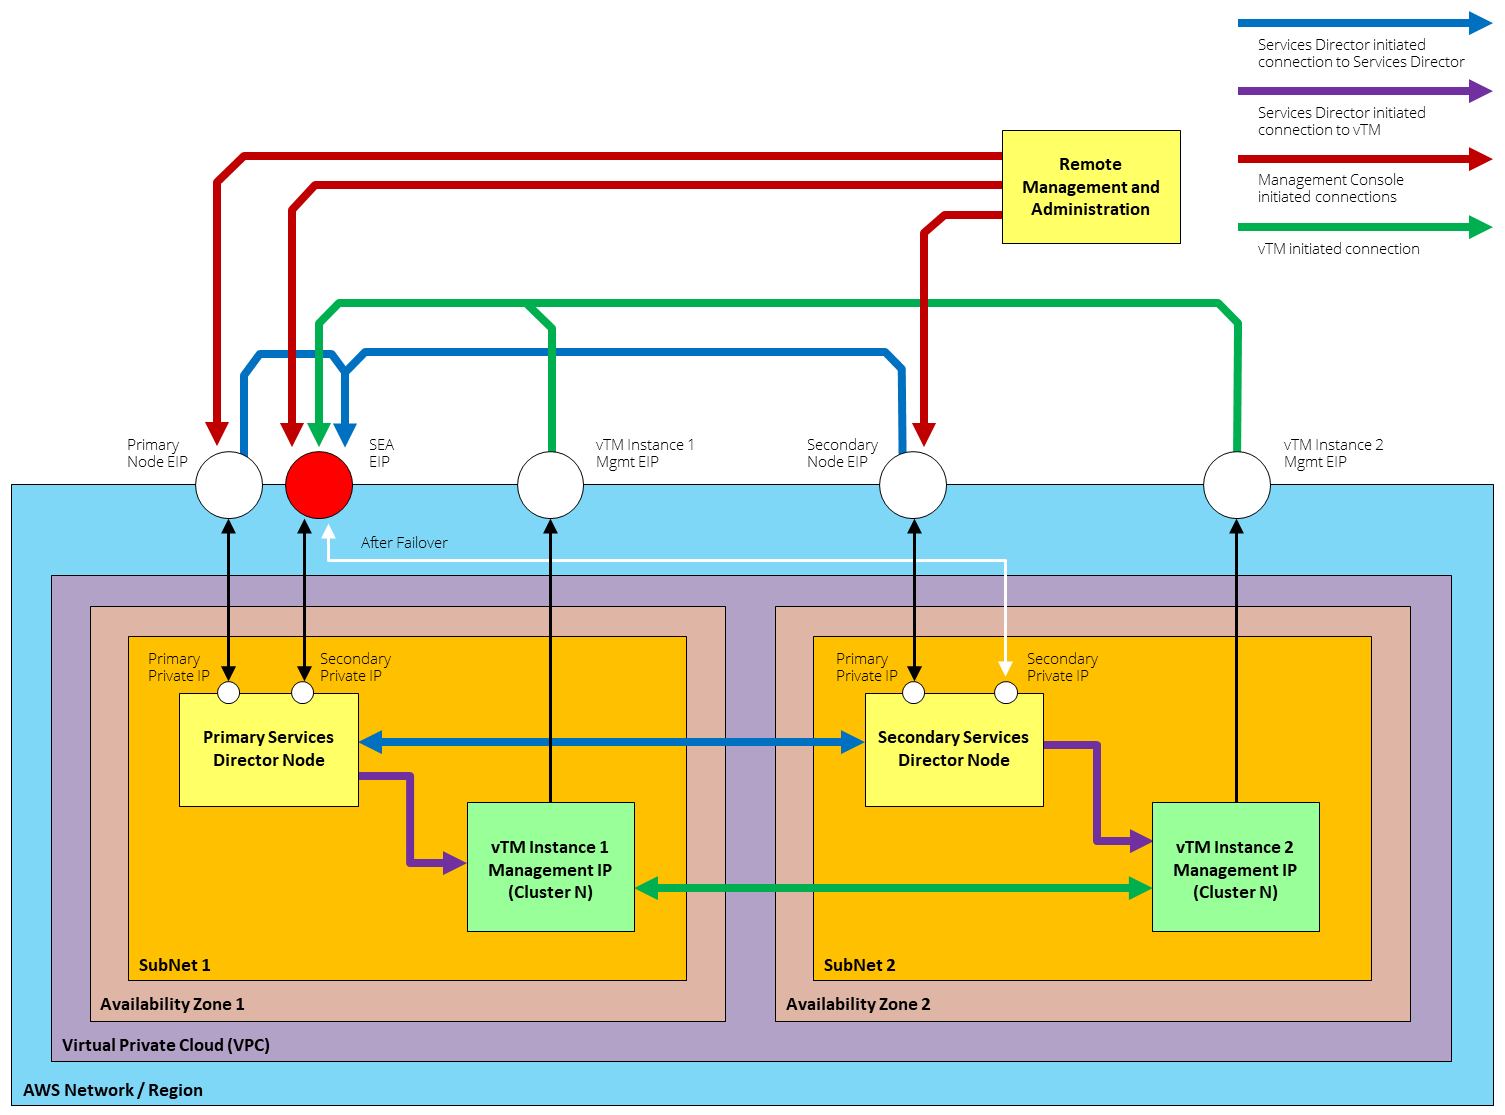
When vTM Communications Channel (Comms Channel) is in use, there are minor differences in the scenario diagram above. All Services Director-initiated connections to the vTM (purple in the diagram) are replaced by vTM-initiated connections to the Services Director (green in the diagram). See Using Scenario 1 with vTM Communications Channel.
When you join a Secondary Services Director to a Primary Services Director, always specify the Primary Private IP Address of the Primary Services Director. This allows the majority of traffic between the Services Director nodes to be routed within the VPC and not over the public Internet.
To set up the required AWS Security Group for this scenario, you must create the rules listed in the following sections:
•Services Director Security Group: Remote Management and Administration.
•Services Director Security Group: Services Director Peer.
•Services Director Security Group: vTM Estate.
•vTM Security Group: Remote Management and Administration.
•vTM Security Group: vTM Peers.
•vTM Security Group: Services Director Estate Manager.
For all rules, CIDR format must be used for each IP address range. This takes the form xx.xx.xx.xx/nn, where nn is the size of the subnet mask. The subnet mask size cannot be omitted, even when you specify a single IP address. That is, if you require 10.11.12.13 as an IP address, you must specify 10.11.12.13/32.
Using Scenario 1 with vTM Communications Channel
When vTM Communications Channel (Comms Channel) is in use, there are minor differences from the scenario described above. All Services Director-initiated connections to the vTM (purple in the diagram) are replaced by vTM-initiated connections to the Services Director (green in the diagram).
If you are using Comms Channel, you should not attempt to connect to the Services Director from the vTM until you have its Elastic IP address. That is, you must perform the following tasks in order:
1.Create the vTM in AWS. Refer to the Virtual Traffic Manager (VTM) documentation.
2.Run the Configuration Wizard for the vTM, but do not specify Services Director details for the vTM.
3.Associate an Elastic IP address to the vTM’s Private IP address. Creating Elastic IP Addresses for the Services Director Instance.
4.Configure Security Groups on the Services Director, using the Elastic IP for the vTM (refer to the sections that follow).
5.Log into the vTM and self-register the vTM with the Services Director, see Requesting Self Registration on a Configured vTM.
Services Director Security Group: Remote Management and Administration
You must add the following rules to the Security Group used by the Services Director.
The following rules support flows from Remote Management and Administration.
In these rules, the IP address of the device from which you will perform remote management is required.
For all rules, CIDR format must be used for any IP address range. This takes the form xx.xx.xx.xx/nn, where nn is the size of the subnet mask. The subnet mask size cannot be omitted, even when you specify a single IP address. That is, if you require 10.11.12.13 as an IP address, you must specify 10.11.12.13/32.
|
Type |
Protocol |
Port Range |
Source |
|
Description |
|
SSH |
TCP |
22 |
Custom |
Remote Management IP Address. |
Administrative shell access to Services Director. |
|
HTTPS |
TCP |
443 |
Custom |
Remote Management IP Address. |
Administrative GUI access to Services Director. |
|
Custom TCP Rule |
TCP |
8100 |
Custom |
Remote Management IP Address. |
Administrative REST API access to Services Director. |
|
Custom TCP Rule |
TCP |
8000 |
Custom |
Remote Management IP Address. |
Administrative GUI access to the Analytics Application |
Services Director Security Group: Services Director Peer
You must add the following rules to the Security Group used by the Services Director.
The following rules support flows from the Services Director peer.
In these rules, the ID of the Services Director Security Group is required. This opens the specified ports to all instances that use the Security Group.
|
Type |
Protocol |
Port Range |
Source |
|
Description |
|
Custom UDP Rule |
UDP |
9090 |
Custom |
Security Group ID |
Internal Services Director cluster communication. |
|
Custom TCP Rule |
TCP |
9070 |
Custom |
Security Group ID |
Internal Services Director cluster communication (REST API). |
|
Custom UDP Rule |
UDP |
9080 |
Custom |
Security Group ID |
Internal Services Director cluster communication. |
|
Custom TCP Rule |
TCP |
9080 |
Custom |
Security Group ID |
Internal Services Director cluster communication. |
|
Custom TCP Rule |
TCP |
9090 |
Custom |
Security Group ID |
Internal Services Director cluster communication (GUI). |
|
Custom UDP Rule |
UDP |
9091 |
Custom |
Security Group ID |
Internal Services Director cluster communication. |
|
Custom TCP Rule |
TCP |
8100 |
Custom |
Security Group ID |
Services Director Web Service (REST API) for peer monitoring. |
|
HTTP |
TCP |
80 |
Custom |
Security Group ID |
Internal Services Director cluster communication. |
|
HTTPS |
TCP |
443 |
Custom |
Security Group ID |
Internal Services Director cluster communication. |
|
All ICMP - IPv4 |
All |
N/A |
Custom |
Security Group ID |
Ping (for monitoring). |
|
MySQL/Aurora |
TCP |
3306 |
Custom |
Security Group ID |
MySQL internal (required for monitoring and failover). |
The following rules are also required, but you cannot add these until after you have created the Elastic IPs required the Primary and Secondary Services Director instances and the SEA, see Updating Security Rules for Services Director Instance IP Addresses
|
Type |
Protocol |
Port Range |
Source |
|
Description |
|
Custom TCP Rule |
TCP |
3306 |
Custom |
EIP of the Primary Services Director instance. |
MySQL inventory database access. |
|
Custom TCP Rule |
TCP |
3306 |
Custom |
EIP of the Secondary Services Director instance. |
MySQL inventory database access. |
|
Custom TCP Rule |
TCP |
3306 |
Custom |
EIP of the Services Director SEA. |
MySQL inventory database access. |
Services Director Security Group: vTM Estate
You must add the following rules to the Security Group used by the Services Director.
Create the following rules for each vTM in the estate of the Services Director. You may be able to use a suitable IP address range that covers multiple vTMs to minimize the number of rules required.
|
Type |
Protocol |
Port Range |
Source |
|
Description |
|
Custom TCP Rule |
TCP |
8100 |
Custom |
EIP of the vTM. |
vTM self-registration requests. |
|
Custom TCP Rule |
TCP |
8101 |
Custom |
EIP of the vTM. |
vTM Universal FLA licensing request. |
|
Custom TCP Rule |
TCP |
8102 |
Custom |
EIP of the vTM. |
Required for vTM Communications Channel, see Working with vTM Communications Channel. |
vTM Security Group: Remote Management and Administration
You must add the following rules to the Security Group used by individual vTMs.
The following rules support flows from Remote Management and Administration.
In these rules, the IP address of the device from which you will perform remote management is required.
For all rules, CIDR format must be used for any IP address range. This takes the form xx.xx.xx.xx/nn, where nn is the size of the subnet mask. The subnet mask size cannot be omitted, even when you specify a single IP address. That is, if you require 10.11.12.13 as an IP address, you must specify 10.11.12.13/32.
|
Type |
Protocol |
Port Range |
Source |
|
Description |
|
SSH |
TCP |
22 |
Custom |
Remote Management IP Address. |
Administrative shell access to the vTM. |
|
Custom TCP Rule |
TCP |
9090 |
Custom |
Remote Management IP Address. |
Administrative GUI access to the vTM. |
|
Custom TCP Rule |
TCP |
9070 |
Custom |
Remote Management IP Address. |
Administrative REST API access to the vTM. |
vTM Security Group: vTM Peers
You must add the following rules to the Security Group used by individual vTMs.
The following rules support flows from the vTM peers in the same cluster.
This is a minimum suggested set of rules to support vTM clustering. See the Virtual Traffic Manager documentation for additional advice on AWS Security Groups.
In these rules, the ID of the vTM Security Group is required. This opens the specified ports to all vTMs that use the Security Group.
|
Type |
Protocol |
Port Range |
Source |
|
Description |
|
Custom UDP Rule |
UDP |
9080 |
Custom |
Security Group ID |
vTM internal cluster communication. |
|
Custom UDP Rule |
UDP |
9090 |
Custom |
Security Group ID |
vTM internal cluster communication. |
|
Custom TCP Rule |
TCP |
9080 |
Custom |
Security Group ID |
vTM internal cluster communication. |
|
Custom TCP Rule |
TCP |
9090 |
Custom |
Security Group ID |
vTM GUI. |
vTM Security Group: Services Director Estate Manager
These rules are not required when vTM Communications Channel is active on the vTM.
You must add the following rule to the Security Group used by individual vTMs.
The following rule supports flows from the Services Director Estate Manager.
In this rule, the ID of the Services Director Security Group is required.
This rule is not required when vTM Communications Channel is active on the vTM.
|
Type |
Protocol |
Port Range |
Source |
|
Description |
|
Custom TCP Rule |
TCP |
9070 |
Custom |
Services Director Security Group ID |
vTM REST API access for configuration, backup and restore, API proxy, and so on. |
Scenario 2 - Elastic IPs with vTMs in Different VPCs
In this scenario:
•AWS Elastic IPs (EIPs) are used for the Primary and Secondary nodes, and for the Services Endpoint Address (SEA).
•The Services Director nodes are in the same AWS VPC, although they can be in separate Subnets or Availability Zones.
•The vTMs in the estate of the Services Director pair are in a different VPC (or Region).
•The self-registration feature of vTM will not work. However, manual registration of vTMs can be achieved from the Services Director by specifying a vTM’s management EIP in the Add a vTM instance dialog, see Registering a Virtual Traffic Manager (Universal FLA).
The flow of requests through the defined IP addresses is as follows:
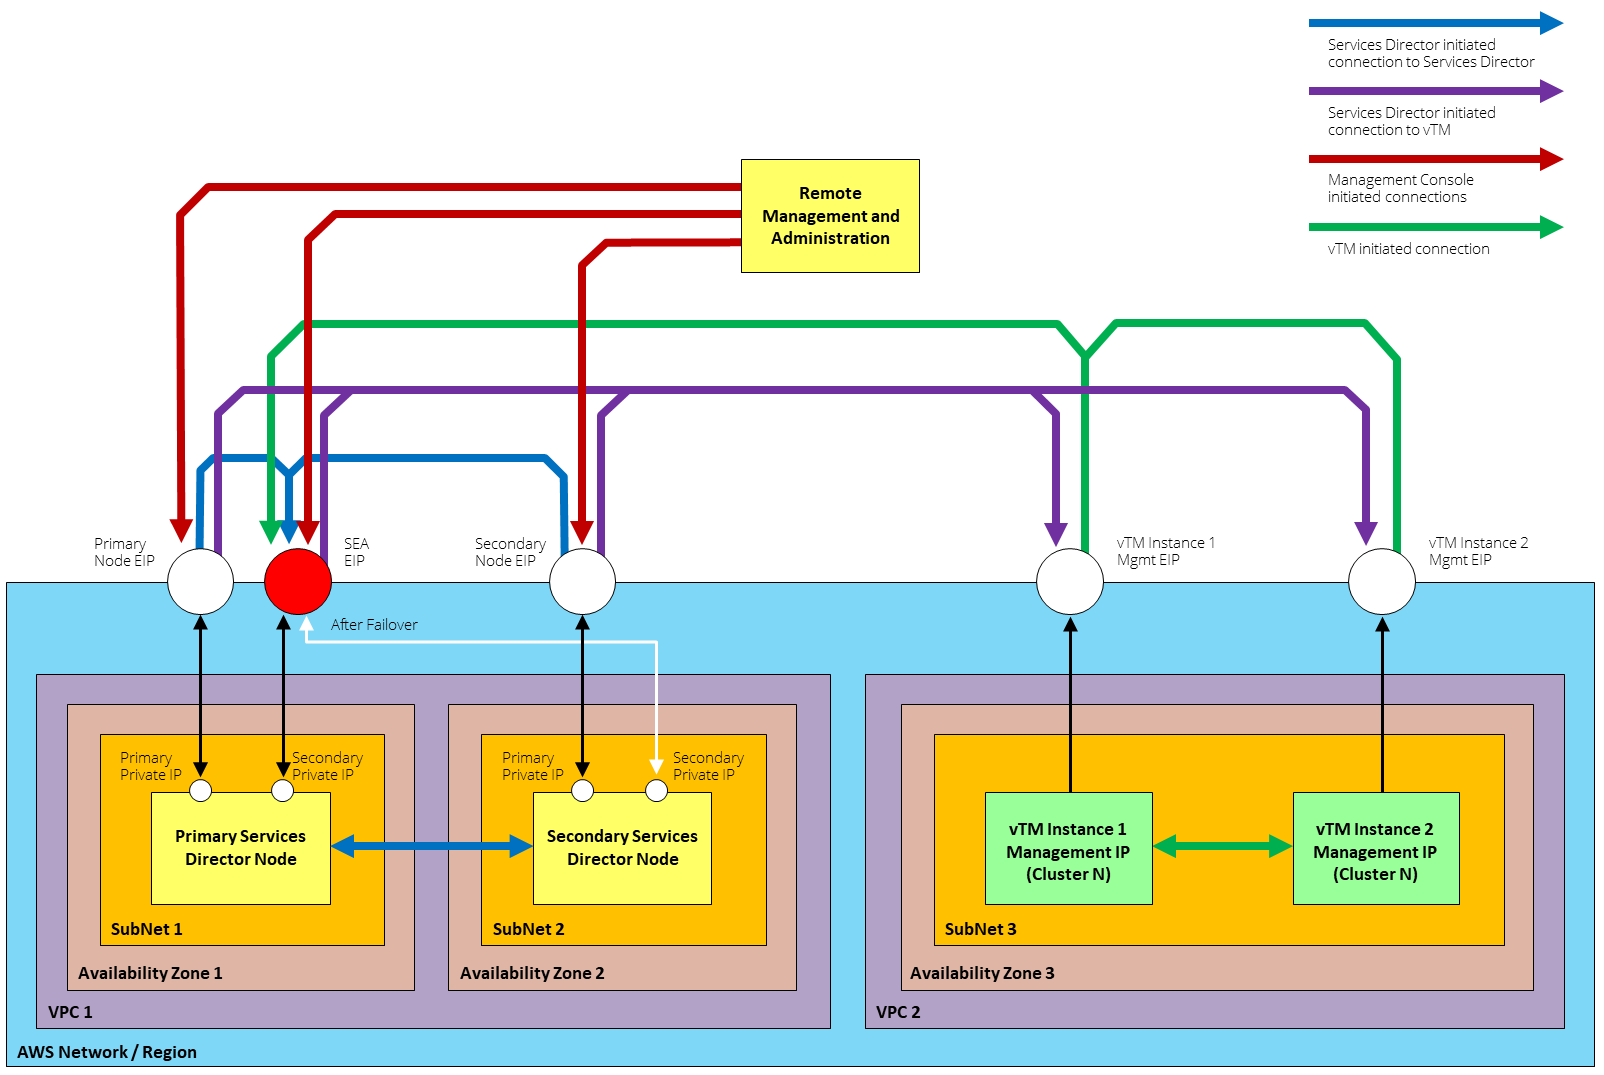
When vTM Communications Channel (Comms Channel) is in use, there are minor differences in the scenario diagram above. All Services Director-initiated connections to the vTM (purple in the diagram) are replaced by vTM-initiated connections to the Services Director (green in the diagram). See Using Scenario 2 with vTM Communications Channel.
When you join a Secondary Services Director to a Primary Services Director, always specify the Primary Private IP Address of the Primary Services Director. This allows the majority of traffic between the Services Director nodes to be routed within the VPC and not over the public Internet.
To set up the required AWS Security Group for this scenario, you must create the rules listed in the following sections:
•Services Director Security Group: Remote Management and Administration.
•Services Director Security Group: Services Director Peer.
•Services Director Security Group: vTM Estate.
•vTM Security Group: Remote Management and Administration.
•vTM Security Group: vTM Peers.
•vTM Security Group: Services Director Estate Manager.
For all rules, CIDR format must be used for each IP address range. This takes the form xx.xx.xx.xx/nn, where nn is the size of the subnet mask. The subnet mask size cannot be omitted, even when you specify a single IP address. That is, if you require 10.11.12.13 as an IP address, you must specify 10.11.12.13/32.
Using Scenario 2 with vTM Communications Channel
When vTM Communications Channel (Comms Channel) is in use, there are minor differences from the scenario described above. All Services Director-initiated connections to the vTM (purple in the diagram) are replaced by vTM-initiated connections to the Services Director (green in the diagram).
If you are using Comms Channel, you should not attempt to connect to the Services Director from the vTM until you have its Elastic IP address. That is, you must perform the following tasks in order:
1.Create the vTM in AWS. Refer to the Virtual Traffic Manager (VTM) documentation.
2.Run the Configuration Wizard for the vTM, but do not specify Services Director details for the vTM.
3.Associate an Elastic IP address to the vTM’s Private IP address. Creating Elastic IP Addresses for the Services Director Instance.
4.Configure Security Groups on the Services Director, using the Elastic IP for the vTM (refer to the sections that follow).
5.Log into the vTM and self-register the vTM with the Services Director, see Requesting Self Registration on a Configured vTM.
Services Director Security Group: Remote Management and Administration
You must add the following rules to the Security Group used by the Services Director.
The following rules support flows from Remote Management and Administration.
In these rules, the IP address of the device from which you will perform remote management is required.
For all rules, CIDR format must be used for any IP address range. This takes the form xx.xx.xx.xx/nn, where nn is the size of the subnet mask. The subnet mask size cannot be omitted, even when you specify a single IP address. That is, if you require 10.11.12.13 as an IP address, you must specify 10.11.12.13/32.
|
Type |
Protocol |
Port Range |
Source |
|
Description |
|
SSH |
TCP |
22 |
Custom |
Remote Management IP Address. |
Administrative shell access to Services Director. |
|
HTTPS |
TCP |
443 |
Custom |
Remote Management IP Address. |
Administrative GUI access to Services Director. |
|
Custom TCP Rule |
TCP |
8100 |
Custom |
Remote Management IP Address. |
Administrative REST API access to Services Director. |
|
Custom TCP Rule |
TCP |
8000 |
Custom |
Remote Management IP Address. |
Administrative GUI access to the Analytics Application |
Services Director Security Group: Services Director Peer
You must add the following rules to the Security Group used by the Services Director.
The following rules support flows from the Services Director peer.
In these rules, the ID of the Services Director Security Group is required. This opens the specified ports to all instances that use the Security Group.
|
Type |
Protocol |
Port Range |
Source |
|
Description |
|
Custom UDP Rule |
UDP |
9090 |
Custom |
Security Group ID |
Internal Services Director cluster communication. |
|
Custom TCP Rule |
TCP |
9070 |
Custom |
Security Group ID |
Internal Services Director cluster communication (REST API). |
|
Custom UDP Rule |
UDP |
9080 |
Custom |
Security Group ID |
Internal Services Director cluster communication. |
|
Custom TCP Rule |
TCP |
9080 |
Custom |
Security Group ID |
Internal Services Director cluster communication. |
|
Custom TCP Rule |
TCP |
9090 |
Custom |
Security Group ID |
Internal Services Director cluster communication (GUI). |
|
Custom UDP Rule |
UDP |
9091 |
Custom |
Security Group ID |
Internal Services Director cluster communication. |
|
Custom TCP Rule |
TCP |
8100 |
Custom |
Security Group ID |
Services Director Web Service (REST API) for peer monitoring. |
|
HTTP |
TCP |
80 |
Custom |
Security Group ID |
Internal Services Director cluster communication. |
|
HTTPS |
TCP |
443 |
Custom |
Security Group ID |
Internal Services Director cluster communication. |
|
All ICMP - IPv4 |
All |
N/A |
Custom |
Security Group ID |
Ping (for monitoring). |
|
MySQL/Aurora |
TCP |
3306 |
Custom |
Security Group ID |
MySQL internal (required for monitoring and failover). |
The following rules are also required, but you cannot add these until after you have created the Elastic IPs required the Primary and Secondary Services Director instances and the SEA, see Updating Security Rules for Services Director Instance IP Addresses
|
Type |
Protocol |
Port Range |
Source |
|
Description |
|
Custom TCP Rule |
TCP |
3306 |
Custom |
EIP of the Primary Services Director instance. |
MySQL inventory database access. |
|
Custom TCP Rule |
TCP |
3306 |
Custom |
EIP of the Secondary Services Director instance. |
MySQL inventory database access. |
|
Custom TCP Rule |
TCP |
3306 |
Custom |
EIP of the Services Director SEA. |
MySQL inventory database access. |
Services Director Security Group: vTM Estate
You must add the following rules to the Security Group used by the Services Director.
Create the following rules for each vTM in the estate of the Services Director. You may be able to use a suitable IP address range that covers multiple vTMs to minimize the number of rules required.
There is no rule for self-registration in this category, as self-registration is not supported in this scenario.
|
Type |
Protocol |
Port Range |
Source |
|
Description |
|
Custom TCP Rule |
TCP |
8101 |
Custom |
EIP of the vTM. |
vTM Universal FLA licensing request. |
|
Custom TCP Rule |
TCP |
8102 |
Custom |
EIP of the vTM. |
Required for vTM Communications Channel, see Working with vTM Communications Channel. |
vTM Security Group: Remote Management and Administration
You must add the following rules to the Security Group used by individual vTMs.
The following rules support flows from Remote Management and Administration.
In these rules, the IP address of the device from which you will perform remote management is required.
For all rules, CIDR format must be used for any IP address range. This takes the form xx.xx.xx.xx/nn, where nn is the size of the subnet mask. The subnet mask size cannot be omitted, even when you specify a single IP address. That is, if you require 10.11.12.13 as an IP address, you must specify 10.11.12.13/32.
|
Type |
Protocol |
Port Range |
Source |
|
Description |
|
SSH |
TCP |
22 |
Custom |
Remote Management IP Address. |
Administrative shell access to the vTM. |
|
Custom TCP Rule |
TCP |
9090 |
Custom |
Remote Management IP Address. |
Administrative GUI access to the vTM. |
|
Custom TCP Rule |
TCP |
9070 |
Custom |
Remote Management IP Address. |
Administrative REST API access to the vTM. |
vTM Security Group: vTM Peers
You must add the following rules to the Security Group used by individual vTMs.
The following rules support flows from the vTM peers in the same cluster.
This is a minimum suggested set of rules to support vTM clustering. See the Virtual Traffic Manager documentation for additional advice on AWS Security Groups.
In these rules, the ID of the vTM Security Group is required. This opens the specified ports to all vTMs that use the Security Group.
|
Type |
Protocol |
Port Range |
Source |
|
Description |
|
Custom UDP Rule |
UDP |
9080 |
Custom |
Security Group ID |
vTM internal cluster communication. |
|
Custom UDP Rule |
UDP |
9090 |
Custom |
Security Group ID |
vTM internal cluster communication. |
|
Custom TCP Rule |
TCP |
9080 |
Custom |
Security Group ID |
vTM internal cluster communication. |
|
Custom TCP Rule |
TCP |
9090 |
Custom |
Security Group ID |
vTM GUI. |
vTM Security Group: Services Director Estate Manager
You must add the following rule to the Security Group used by individual vTMs.
The following rule supports flows from the Services Director Estate Manager.
You can only add these rules after you have created the Services Director AMI nodes and assigned elastic IP addresses to each and the SEA.
These rules are not required when vTM Communications Channel is active on the vTM.
|
Type |
Protocol |
Port Range |
Source |
|
Description |
|
Custom TCP Rule |
TCP |
9070 |
Custom |
EIP of Primary Services Director Node. |
vTM REST API access for configuration, backup and restore, API proxy, and so on. |
|
Custom TCP Rule |
TCP |
9070 |
Custom |
EIP of Secondary Services Director Node. |
vTM REST API access for configuration, backup and restore, API proxy, and so on. |
|
Custom TCP Rule |
TCP |
9070 |
Custom |
EIP of Services Director SEA. |
vTM REST API access for configuration, backup and restore, API proxy, and so on. |
Scenario 3 - Private IPs Only
In this scenario:
•Private IP addresses are used for the Primary and Secondary nodes.
•The Services Director SEA is a private IP that can be raised on either Services Director node.
•The Primary and Secondary nodes must exist within the same Subnet as the SEA.
•The vTMs in the estate of the Services Director pair are in the same VPC, but can be in different Availability Zones or Subnets. Each uses private IP addresses only, with no elastic IP assigned for management purposes.
•All management traffic flows are directed to private IPs.
•The management console is either:
•Inside the AWS network, within the same VPC as the Services Director nodes (as shown in the diagram), OR
•Outside the AWS network, but able to route traffic directly to the private IP addresses within the VPC. For example, by using a peer-to-peer VPN connection from a local data centre.
•The self-registration feature is fully supported.
•The use of vTM Communications Channel is fully supported.
The flow of requests through the defined IP addresses is as follows:
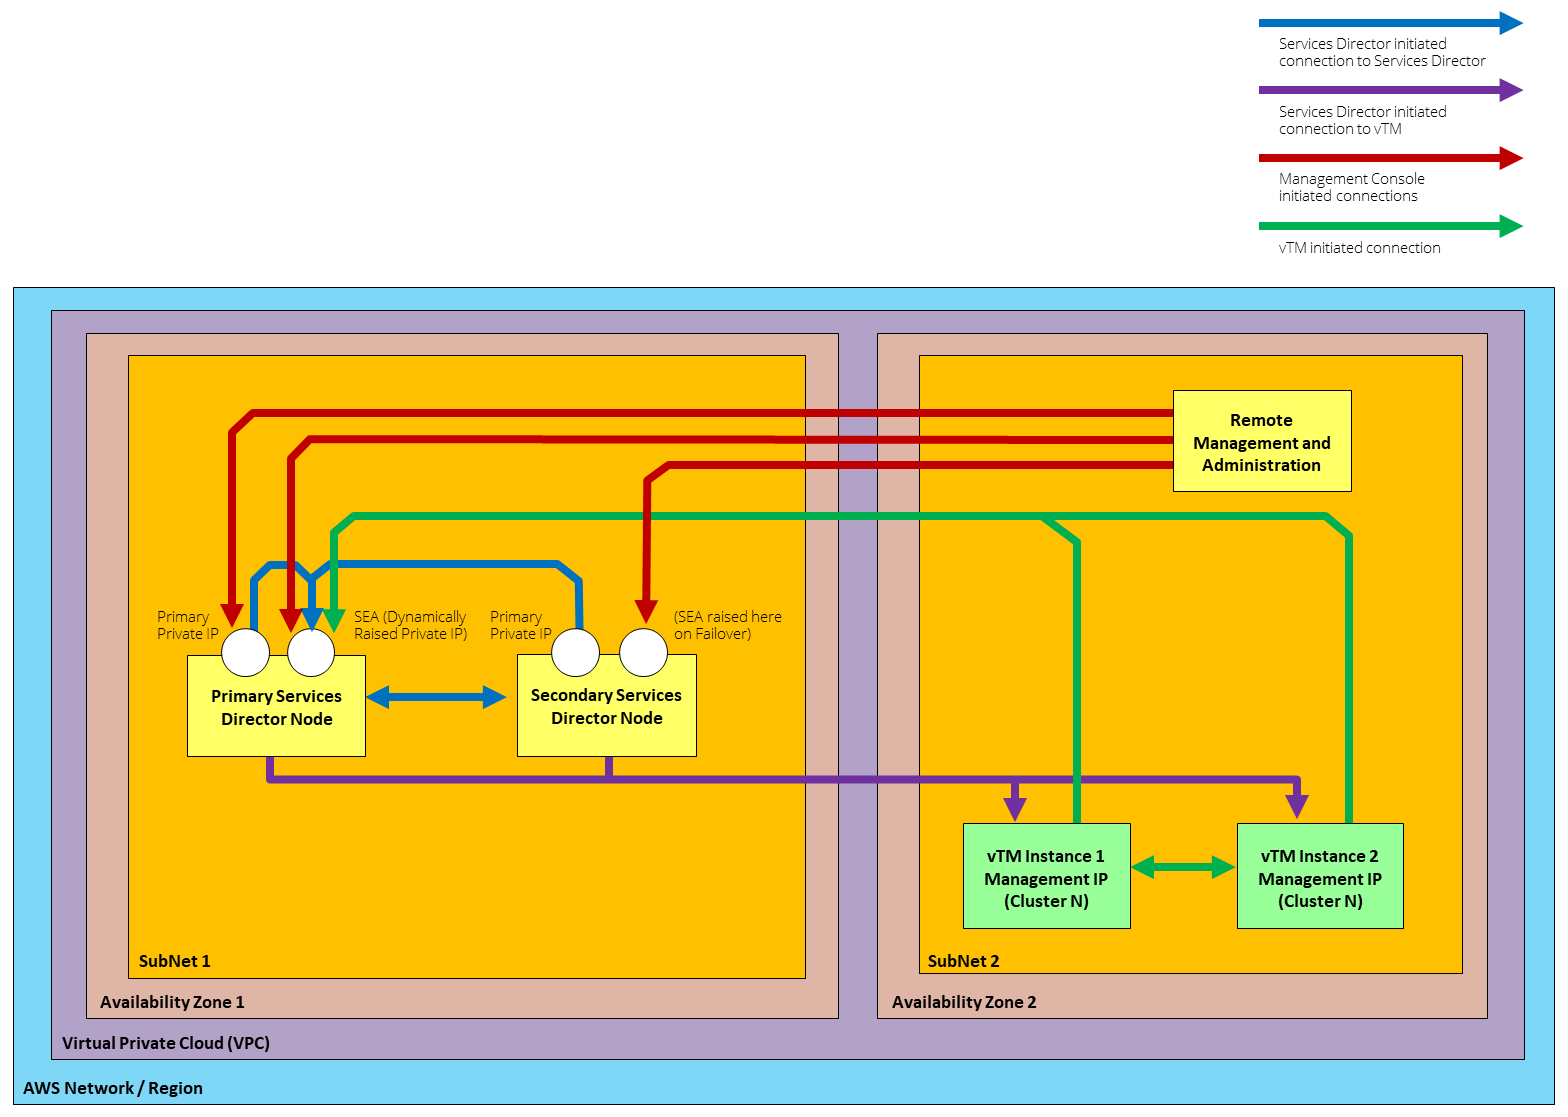
When vTM Communications Channel (Comms Channel) is in use, there are minor differences in the scenario diagram above. All Services Director-initiated connections to the vTM (purple in the diagram) are replaced by vTM-initiated connections to the Services Director (green in the diagram).
To set up the required AWS Security Group for this scenario, you must create the rules listed in the following sections:
•Services Director Security Group: Remote Management and Administration.
•Services Director Security Group: Services Director Peer.
•Services Director Security Group: vTM Estate.
•vTM Security Group: Remote Management and Administration.
•vTM Security Group: vTM Peers.
•vTM Security Group: vTM Peers.
For all rules, CIDR format must be used for each IP address range. This takes the form xx.xx.xx.xx/nn, where nn is the size of the subnet mask. The subnet mask size cannot be omitted, even when you specify a single IP address. That is, if you require 10.11.12.13 as an IP address, you must specify 10.11.12.13/32.
Services Director Security Group: Remote Management and Administration
You must add the following rules to the Security Group used by the Services Director.
The following rules support flows from Remote Management and Administration. There is no prescribed location for Remote Management.
In these rules, the IP address(es) or IP range(s) that can validly access the Services Director administration interfaces are required.
For all rules, CIDR format must be used for any IP address range. This takes the form xx.xx.xx.xx/nn, where nn is the size of the subnet mask. The subnet mask size cannot be omitted, even when you specify a single IP address. That is, if you require 10.11.12.13 as an IP address, you must specify 10.11.12.13/32.
|
Type |
Protocol |
Port Range |
Source |
|
Description |
|
SSH |
TCP |
22 |
Custom |
Remote Management IP Address. |
Administrative shell access to Services Director. |
|
HTTPS |
TCP |
443 |
Custom |
Remote Management IP Address. |
Administrative GUI access to Services Director. |
|
Custom TCP Rule |
TCP |
8100 |
Custom |
Remote Management IP Address. |
Administrative REST API access to Services Director. |
|
Custom TCP Rule |
TCP |
8000 |
Custom |
Remote Management IP Address. |
Administrative GUI access to the Analytics Application |
Services Director Security Group: Services Director Peer
You must add the following rules to the Security Group used by the Services Director.
The following rules support flows from the Services Director peer.
In these rules, the ID of the Services Director Security Group is required. This opens the specified ports to all instances that use the Security Group.
|
Type |
Protocol |
Port Range |
Source |
|
Description |
|
Custom UDP Rule |
UDP |
9090 |
Custom |
Security Group ID |
Internal Services Director cluster communication. |
|
Custom TCP Rule |
TCP |
9070 |
Custom |
Security Group ID |
Internal Services Director cluster communication (REST API). |
|
Custom UDP Rule |
UDP |
9080 |
Custom |
Security Group ID |
Internal Services Director cluster communication. |
|
Custom TCP Rule |
TCP |
9080 |
Custom |
Security Group ID |
Internal Services Director cluster communication. |
|
Custom TCP Rule |
TCP |
9090 |
Custom |
Security Group ID |
Internal Services Director cluster communication (GUI). |
|
Custom UDP Rule |
UDP |
9091 |
Custom |
Security Group ID |
Internal Services Director cluster communication. |
|
Custom TCP Rule |
TCP |
8100 |
Custom |
Security Group ID |
Services Director Web Service (REST API) for peer monitoring. |
|
HTTP |
TCP |
80 |
Custom |
Security Group ID |
Internal Services Director cluster communication. |
|
HTTPS |
TCP |
443 |
Custom |
Security Group ID |
Internal Services Director cluster communication. |
|
All ICMP - IPv4 |
All |
N/A |
Custom |
Security Group ID |
Ping (for monitoring). |
|
MySQL/Aurora |
TCP |
3306 |
Custom |
Security Group ID |
MySQL internal (required for monitoring and failover). |
Services Director Security Group: vTM Estate
You must add the following rules to the Security Group used by the Services Director.
Create the following two rules for each vTM in the estate of the Services Director. You may be able to use a suitable IP address range that covers multiple vTMs to minimize the number of rules required.
In these rules, the ID of the vTM Security Group for is required. This opens the specified ports to all vTMs that use the Security Group.
|
Type |
Protocol |
Port Range |
Source |
|
Description |
|
Custom TCP Rule |
TCP |
8100 |
Custom |
vTM Security Group ID |
vTM self-registration requests. |
|
Custom TCP Rule |
TCP |
8101 |
Custom |
vTM Security Group ID |
vTM Universal FLA licensing request. |
|
Custom TCP Rule |
TCP |
8102 |
Custom |
vTM Security Group ID |
Required for vTM Communications Channel, see Working with vTM Communications Channel. |
vTM Security Group: Remote Management and Administration
You must add the following rules to the Security Group used by individual vTMs.
The following rules support flows from Remote Management and Administration.
In these rules, the IP address of the device from which you will perform remote management is required.
For all rules, CIDR format must be used for any IP address range. This takes the form xx.xx.xx.xx/nn, where nn is the size of the subnet mask. The subnet mask size cannot be omitted, even when you specify a single IP address. That is, if you require 10.11.12.13 as an IP address, you must specify 10.11.12.13/32.
|
Type |
Protocol |
Port Range |
Source |
|
Description |
|
SSH |
TCP |
22 |
Custom |
Remote Management IP Address. |
Administrative shell access to the vTM. |
|
Custom TCP Rule |
TCP |
9090 |
Custom |
Remote Management IP Address. |
Administrative GUI access to the vTM. |
|
Custom TCP Rule |
TCP |
9070 |
Custom |
Remote Management IP Address. |
Administrative REST API access to the vTM. |
vTM Security Group: vTM Peers
You must add the following rules to the Security Group used by individual vTMs.
The following rules support flows from the vTM peers in the same cluster.
This is a minimum suggested set of rules to support vTM clustering. See the Virtual Traffic Manager documentation for additional advice on AWS Security Groups.
In these rules, the ID of the vTM Security Group is required. This opens the specified ports to all vTMs that use the Security Group.
|
Type |
Protocol |
Port Range |
Source |
|
Description |
|
Custom UDP Rule |
UDP |
9080 |
Custom |
Security Group ID |
vTM internal cluster communication. |
|
Custom UDP Rule |
UDP |
9090 |
Custom |
Security Group ID |
vTM internal cluster communication. |
|
Custom TCP Rule |
TCP |
9080 |
Custom |
Security Group ID |
vTM internal cluster communication. |
|
Custom TCP Rule |
TCP |
9090 |
Custom |
Security Group ID |
vTM GUI. |
vTM Security Group: Services Director Estate Manager
These rules are not required when vTM Communications Channel is active on the vTM.
You must add the following rule to the Security Group used by individual vTMs.
The following rule supports flows from the Services Director Estate Manager.
In this rule, the ID of the Services Director Security Group is required.
|
Type |
Protocol |
Port Range |
Source |
|
Description |
|
Custom TCP Rule |
TCP |
9070 |
Custom |
Services Director Security Group ID |
vTM REST API access for configuration, backup and restore, API proxy, and so on. This rule is not required when vTM Communications Channel is active on the vTM. |
Creating an AWS Security Group
Once you have gathered all required information or your Services Director scenario, you can create the required AWS Security Group.
To create an AWS Security Group:
1.Login to the AWS Management Console.
2.On the top bar of the AWS Management Console, select the required Region.
3.On the AWS top bar, click Services and then locate the Network & Content Delivery options.
4.Under Network & Content Delivery, select VPC.
The VPC Dashboard appears.
5.In the left menu, Under Security, click Security Groups.
A list of your existing Security Groups appears.
6.Examine your Security Groups and decide if you have one that matches your networking requirements for your Services Director nodes. If there is a Security Group, no further actions is required, and this process is complete.
7.Click Create security group.

The Create security group page appears.
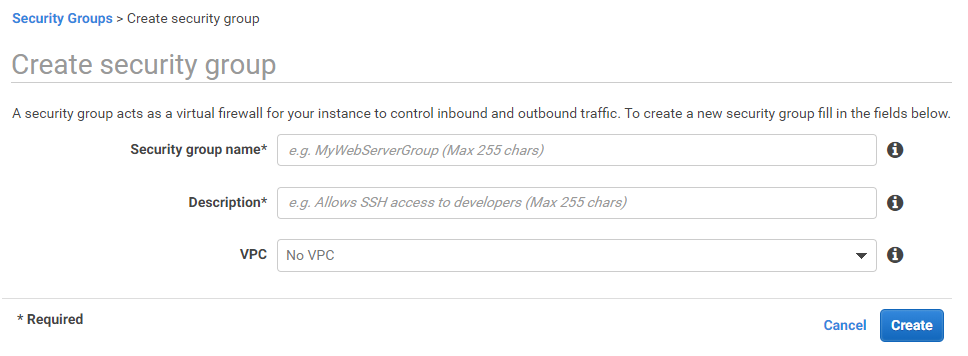
8.Specify your required details and click Create.
A confirmation message appears. For example:
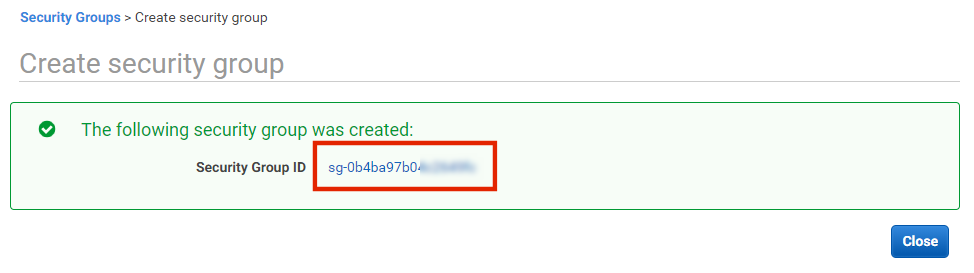
Click the Security Group ID link to show the new Security Group in the Security Groups list. There are no inbound rules defined on this new Security Group. For example:

9.Record the Group ID for the Security Group. This is required when adding rules to the group.
10.Click the Inbound Rules tab.
An empty list of inbound rules appears. For example:
![]()
11.Click Edit Rules.
The Edit inbound rules page appears. For example:
![]()
12.Click Add Rule.
A new entry is added to the list of rules. For example:

The required rules for your Security Group are described in one of the following three scenarios:
•Scenario 1 - Elastic IPs with vTMs in the Same VPC.
•Scenario 2 - Elastic IPs with vTMs in Different VPCs.
•Scenario 3 - Private IPs Only.
13.In the new entry, specify a required inbound rule and click Add Rule.
The new rule is added.
14.Repeat step 13 until you have recorded all required rules.
For example:

15.Once you have added all rules, click Save Rules.
A confirmation message appears.
16.Click Close.
The rules are shown in the Inbound Rules tab.
Once you have a Security Group with all required rules, you can launch a Services Director instance, see Launching a Services Director AMI Instance on AWS.
You will need to add additional rules to the Security Group for any elastic IP addresses requested/assigned to each Services Director node and to the SEA, see Updating Security Rules for Services Director Instance IP Addresses.
Launching a Services Director AMI Instance on AWS
Once you have made all required preparations, you can launch a Services Director AMI instance on AWS.
The processes for Primary and Secondary Services Directors are the same.
To launch a Services Director AMI instance:
1.Login to the AWS Management Console.
2.On the top bar of the AWS Management Console, select the required Region.
3.On the AWS top bar, click Services and then locate the Compute options.
4.Under Compute, select EC2.
The EC2 Dashboard appears. For example:
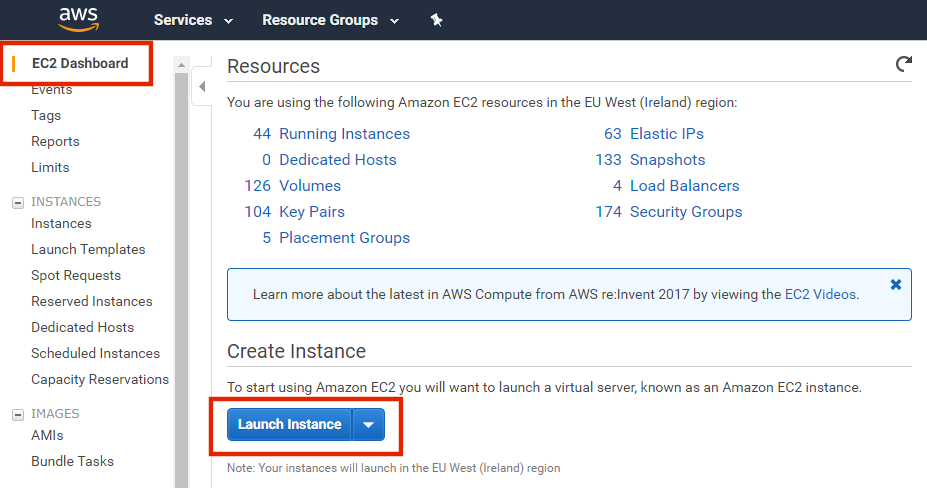
5.Under Create Instance, click Launch Instance.
The first panel of the AMI Launch Wizard appears. For example:
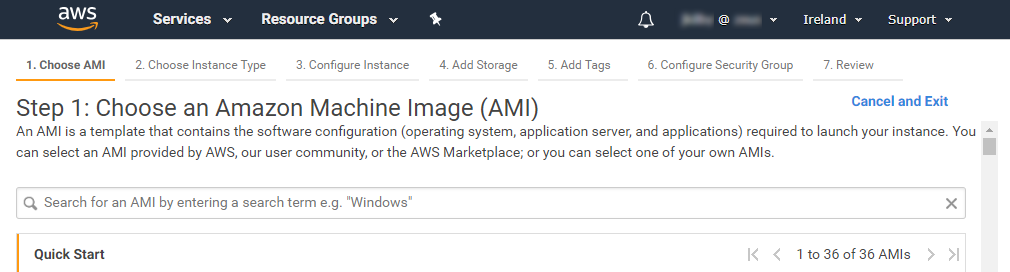
6.In the Launch Wizard, locate the Services Director AMI and click Select.
The next panel of the AMI Launch Wizard (Choose Instance Type) appears.
7.On the Choose Instance Type panel, select a General Purpose T2.large Services Director AMI, or a better specification.
8.Click Configure Instance Details.
The next panel of the AMI Launch Wizard (Configure Instance) appears.
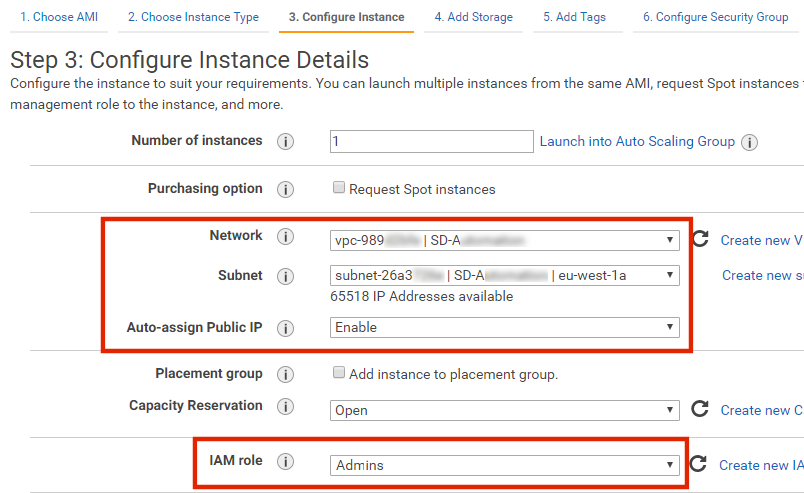
9.On the Configure Instance panel, set the following properties:
•Number of Instance: Select 1.
•Network: Select the required AWS VPC for your Services Director. You prepared this earlier, see Creating an AWS Virtual Private Cloud.
•Subnet: Select the required AWS Subnet from your selected VPC. You prepared this earlier, see Creating AWS Subnets.
•Auto-assign Public IP: Select Enable.
•IAM Role: Select your IAM role. This must have the following minimum permissions for EC2:
•DescribeNetworkInterfaces
•AssignPrivateIpAddresses
•UnassignPrivateIpAddresses
•DescribeAddresses
•AssociateAddress
•DisassociateAddress
The IAM role property is not mandatory in AWS but it is required for Services Director. The Services Director Setup Wizard cannot complete unless you specify IAM Role.
For example:
10.Click Add Storage.
The next panel of the AMI Launch Wizard (Add Storage) appears.
By default, there are no required changes on the Add Storage panel.
11.On the Add Storage panel, change the storage options as required.
12.Click Add Tags.
The next panel of the AMI Launch Wizard (Add Tags) appears.
13.(Optional) On the Add Tags panel, create any tags that are required.
14.Click Configure Security Group.
The next panel of the AMI Launch Wizard (Configure Security Group) appears.
15.On the Configure Security Group panel, for Assign a security group, select the Select an existing security group option.
A list of available AWS Security Groups appears.
16.Select the Security Group that you prepared for your Services Director nodes, see Preparing an AWS Security Group.
17.Click Review and Launch.
The final panel of the AMI Launch Wizard (Review Instance Launch) appears.
18.On the Review Instance Launch panel, confirm all details for your AMI instance and (optionally) go back through the wizard to make any final changes.
19.Click Launch.
The Select an existing key pair or create a new key pair dialog appears. For example:
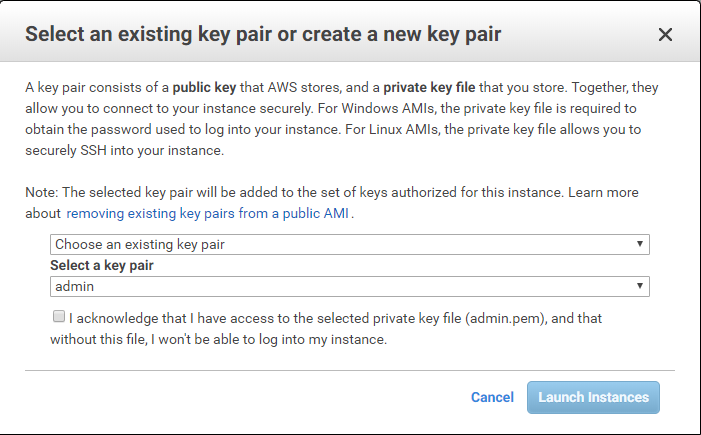
20.In this dialog, either:
•Select an existing key pair for which you have the private key.
•Create a new key pair. Once you have created the pair, you will need to download the private key.
The public key will be embedded in the Services Director instance.
The private key must be retained for reference. It is required to retrieve the default password for the Services Director instance, see Retrieving the Default Password from the Services Director Instance Using SSH .
21.Click Launch Instances.
The Services Director instance launches, and a confirmation appears. For example:

22.Click the instance ID link.
23.The new Services Director instance is listed on the Instances panel of the EC2 Dashboard.

You do not have to wait for the instance to complete its initialization.
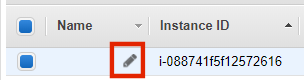
24.(Optional) Add a Name for the Services Director instance by hovering the mouse pointer over the empty Name property and clicking the Edit icon. For example:
25.Right click on the Services Director instance, and select Networking and then click Manage IP Addresses.
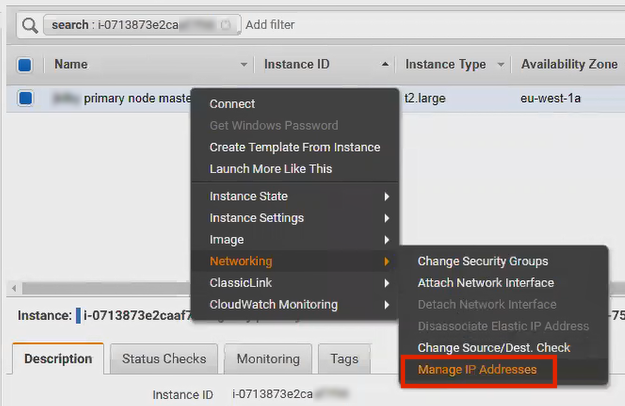
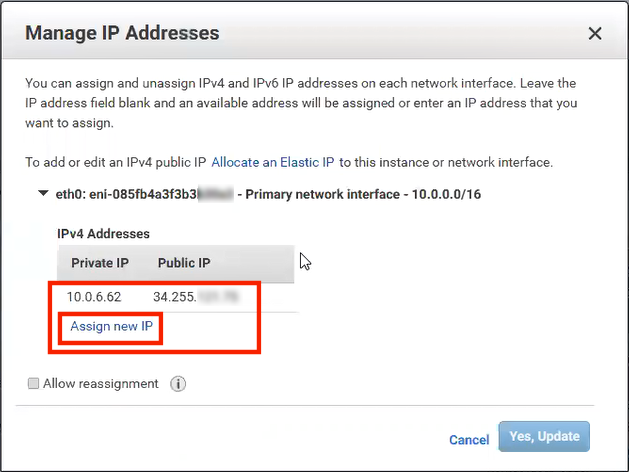
The Manage IP Addresses dialog appears. This shows:
•The Primary Private IP assigned to the Services Director instance.
•The Public IP (non-elastic) address requested during Step 3 of the AMI Launch Wizard.
For example:
Once you have launched the Services Director instance, you can optionally configure elastic IP addresses for the Services Director node and its SEA, see Creating Elastic IP Addresses for the Services Director Instance.
If you intend to use Private IP Addresses only (for example, to access your Services Directors via a VPN tunnel from your local network to the AWS Network), you can continue from Retrieving the Default Password for a Services Director Instance.
Creating Elastic IP Addresses for the Services Director Instance
This section describes an optional process to add elastic IP addresses to the Services Director instance. This process is required if you need Internet-facing IP addresses for the Services Director node and its SEA.
The processes for Primary and Secondary Services Director instances are very similar. You do not create the elastic SEA on the Secondary instance (see below).
If you intend to use Private IP Addresses only for example, to access your Services Directors via a VPN tunnel from your local network to the AWS Network), you can continue from Retrieving the Default Password for a Services Director Instance.
You must create either one or two elastic IP addresses:
•The first elastic IP address will be the Internet-facing IP address of the Services Director node. You must associate this with the Primary Private IP address of the node.
•The second elastic IP address will be the SEA for the Services Director pair.
You only need to create the elastic IP address for the SEA from the Primary instance, as a single SEA will be shared by your Primary and Secondary nodes. This is the only difference between the processes for the Primary and Secondary Services Director instances.
•To use an elastic SEA, you must also prepare a Secondary Private IP address on both Primary and Secondary instances, but you do not associate this to the elastic SEA. In operation, the elastic SEA always directs requests to the Secondary Private IP of the Active node automatically.
To configure this, perform the following steps:
1.Login to the AWS Management Console.
2.On the top bar of the AWS Management Console, select the required Region.
3.On the AWS top bar, click Services and then locate the Compute options.
4.Under Compute, select EC2. The EC2 Dashboard appears.
5.In the left menu, under Instances, select Instances. A list of your instances appears.
6.Locate your Services Director instance.
7.Right click on the Services Director instance, and select Networking and then click Manage IP Addresses.
The Manage IP Addresses dialog appears. This shows:
•The Primary Private IP assigned to the Services Director instance.
•The Public IP (non-elastic) address requested during Step 3 of the AMI Launch Wizard.
For example:

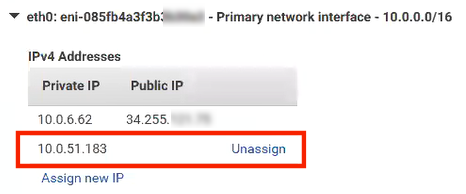
8.Click Assign new IP below the Private IP to create a Secondary Private IP address.
9.Click Yes, Update.
The Secondary Private IP Address appears. For example:
10.Click Allocate an Elastic IP.
The Allocate new address page appears.
11.Select a Scope of VPC and click Allocate.
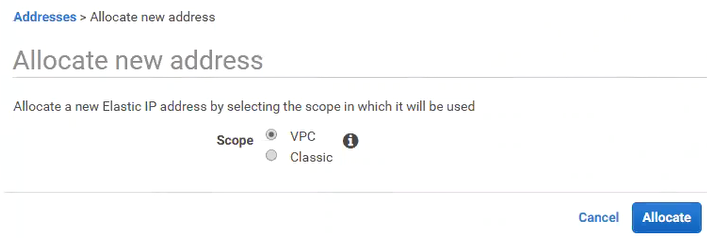
A confirmation message of the new elastic IP address appears.

12.Click the Elastic IP link, and (optionally) on the list of elastic IPs, add a name to the new elastic IP.
The elastic IP now exists, but is not yet associated with the Services Director instance.
13.Right click on the elastic IP, and click Associate Address.

The Instance and Public IP address properties for the elastic IP are not yet set.
14.On the Associate Address page:
•Select the Services Director Instance you have just created.
•Select the Primary Private IP address for the selected Services Director instance.
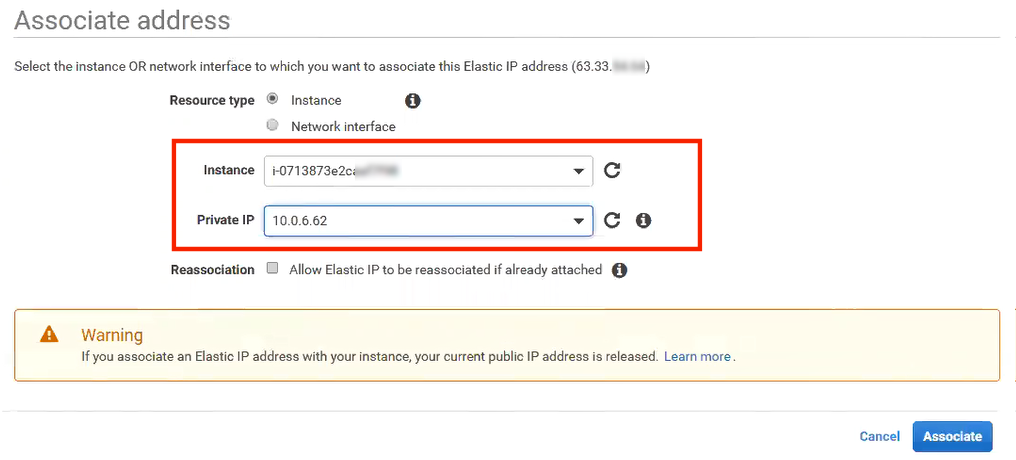
15.Click Associate.
A confirmation message appears.
16.Click Close and return to the list of elastic IPs.

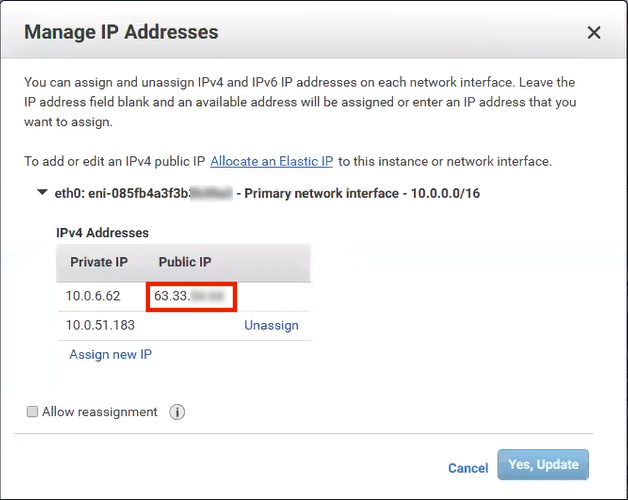
17.Return to the Manage IP Addresses dialog.
This dialog now contains all required IP addresses, including the elastic IP address associated with the Primary Private IP, which is listed as the Public IP. For example:
18.On the Primary Services Director instance only, click Allocate an Elastic IP again to create a second elastic IP. This will be used as the SEA when you use the Setup Wizard to install and configure the Primary Services Director node.
Do not associate this second elastic IP with the Secondary Private IP address. Services Director will perform this automatically to always direct requests to the Active node.
19.Close the dialog to conclude the creation and association of elastic IP addresses for the Services Director instance.
Once you have launched the Services Director instance and configured its IP addresses, you must update your Security Group to add rules for these IP addresses, see Updating Security Rules for Services Director Instance IP Addresses.
Updating Security Rules for Services Director Instance IP Addresses
Once you have configured the IP addresses on the Primary Services Director instance, you must add these IP addresses as rules in the Security Group assigned to the Services Director.
For all rules, CIDR format must be used for each IP address range. This takes the form xx.xx.xx.xx/nn, where nn is the size of the subnet mask. The subnet mask size cannot be omitted, even when you specify a single IP address. That is, if you require 10.11.12.13 as an IP address, you must specify 10.11.12.13/32.
The additional rules you must add are shown below:
|
Type |
Protocol |
Port Range |
Source |
|
Description |
|
MySQL/Aurora |
TCP |
3306 |
Custom |
The Public IP address (typically an elastic IP) for the Services Director. |
Public IP address of the Primary node. |
|
MySQL/Aurora |
TCP |
3306 |
Custom |
The intended SEA (typically an elastic IP) for the Services Director instance. |
SEA of the primary node/pair. Only add for Primary Services Director instance. |
The general process for adding rules is described in Preparing an AWS Security Group.
Once you have updated the security rules to include the IP addresses of the Services Director instance, you must retrieve its default password, see Retrieving the Default Password for a Services Director Instance.
You will also need to add the Services Director IP addresses as rules in the Security Group used for each vTM in the estate of your Services Director pair.
Retrieving the Default Password for a Services Director Instance
Before you can access a Services Director instance and run the Setup Wizard, you must retrieve the password for the instance.
You can do this in two ways:
•On the AWS management console, examine the startup logs for the Services Director instance. The default password is recorded in this log, see Retrieving the Default Password from AWS Startup Logs.
•On another machine, SSH into the Services Director instance, using the default user and the private key that you have stored on the machine. From there, the password can be retrieved using the CLI for the machine, see Retrieving the Default Password from the Services Director Instance Using SSH .
After you have recorded the default password, you can access the Services Director instance for the first time from your browser, see Accessing your Services Director Instance for the First Time.
Retrieving the Default Password from AWS Startup Logs
You can retrieve the default password for a Services Director instance by examining its startup logs in AWS. The password will be present in the system log after the Services Director instance fully initializes.
To do this:
1.Login to the AWS Management Console.
2.On the top bar of the AWS Management Console, select the required Region.
3.On the AWS top bar, click Services and then locate the Compute options.
4.Under Compute, select EC2. The EC2 Dashboard appears.
5.In the left menu, under Instances, select Instances. A list of your instances appears.
6.Locate your Services Director instance.
7.Right click on the Services Director instance, and select Instance Settings and then click Get System Log.
8.Search the system log until you locate the following section:
---------------------------------------------------------------------
Pulse Secure Services Director, version 18.3.0
---------------------------------------------------------------------
Welcome to Pulse Secure Services Director.
The appliance has now booted. To manage, please use a web browser
to access this URL:
Administration interface: https://xx.xx.xx.xx
Username: admin
Temporary Password: 4PGTd1dzn9AwZn7
9.Record the Temporary Password value. This is the required default password.
10.Close the System Log.
After you have recorded the default password, you can access the Services Director instance for the first time from your browser, see Accessing your Services Director Instance for the First Time.
Retrieving the Default Password from the Services Director Instance Using SSH
You can retrieve the default password from a Services Director instance directly. This requires the use of SSH and the private key for the Service Director instance.
The public key for the selected key pair was embedded in the Services Director instance during the launch of the instance, see Launching a Services Director AMI Instance on AWS.
Ensure that the permissions on your private key file conform to the instructions on the AWS Management Console.
To retrieve the default password from the Services Director instance:
1.Log into the machine where you have the private key stored.
2.Using your preferred SSH tool, SSH into the Services Director instance.
ssh -i <path/file> admin@<ip_address>
In this example:
•path is the relative path from the current directory to the directory containing the private key file.
•file is the name of the private key file, which typically uses a .pem suffix.
•ip_address is the IP address for the Services Director instance. Typically, this is the elastic IP address associated with the Services Director instance.
You are then logged into the admin user on the Services Director instance.
Pulse Secure Services Director
Last Login: <timestamp>
Pulse Secure Services Director configuration wizard
Do you want to use the wizard for initial configuration?
3.Either:
•Respond no to bypass the configuration wizard and go straight to the command line.
•Respond yes to run the initial configuration. For AWS, this enables you to set the hostname for the instance. For example:
Do you want to use the wizard for initial configuration? yes
Step 1. Hostname? [current-hostname] <new-hostname>
You have entered the following information:
1. Hostname: <example-hostname>
To change an answer, enter the step number to return to.
Otherwise hit <enter> to save changes and exit.
To continue setup, navigate your web browser to the address configured above
Choice: <enter>
Configuration changes saved.
To return to the wizard from the CLI, use the "configuration jump-start"
command in configure mode. Enter configuration mode using commands "enable"
and "configure terminal". Launching CLI...
After the CLI launches, the CLI prompt appears.
4.From the <hostname> command prompt, start configuration mode:
<hostname> > enable
<hostname> # configure terminal
<hostname> (config) #
5.Run the following CLI command:
<hostname> (config) # support show default-password
This command is not listed in the command directory, and must be typed in full.
The password is then displayed.
6.Record the default password.
7.Close the SSH session.
After you have recorded the default password, you can access the Services Director instance for the first time from your browser, see Accessing your Services Director Instance for the First Time.
Accessing your Services Director Instance for the First Time
Once you have the retrieved the default password for a Services Director instance, you can log into the instance for the first time.
To access your Services Director instance:
1.In a browser window, access the IP address for the Services Director instance.
Typically, this will be the elastic IP address assigned to the instance.
Do not use your intended SEA, as this is not associated with the instance at this point.
2.Accept the End User License Agreement (EULA).
The Services Director login page appears.
3.Log into the Services Director.
The default administration user name is admin, and the password is the default password you retrieved earlier, see Retrieving the Default Password for a Services Director Instance.
Once you are logged in, the Services Director Setup Wizard starts automatically, see Running the Services Director VA Setup Wizard.
Once you have completed the Setup Wizard, the creation of the Services Director node is complete.
Launching and Configuring the Secondary Services Director on AWS
Perform the following procedure to launch and configure a Secondary Services Director VA on AWS:
The preparatory stages that were required for the Primary Services Director do not need to be repeated.
1.Launch a Services Director instance on AWS from the Services Director AMI, see Launching a Services Director AMI Instance on AWS.
2.(Optional) Add and configure elastic IP addresses for the Secondary Services Director instance, see Creating Elastic IP Addresses for the Services Director Instance.
3.Update your AWS Security Group to include all allocated IP addresses for the Secondary Services Director instance, see Updating Security Rules for Services Director Instance IP Addresses.
4.Retrieve the password for the Secondary Services Director from AWS, see Retrieving the Default Password for a Services Director Instance.
5.Access the Secondary Services Director instance using a browser, see Accessing your Services Director Instance for the First Time.
6.Use the Setup Wizard (which starts automatically) to create your Secondary Services Director node. During this process you will join the Secondary node to the existing Primary node, see Running the Services Director VA Setup Wizard.
Once this process is complete, your Services Director HA pair is complete.