Working with Virtual Traffic Manager Clusters
Overview: Working with Virtual Traffic Manager Clusters
The vTM Cluster page displays a list of all Virtual Traffic Manager (vTM) clusters known to the Services Director VA.
The vTM Cluster page also enables you to:
•Assign an analytics profile to the cluster, which enables vTM analytics on all vTMs in the cluster. See Configuring vTM Analytics on the Services Director.
•Assign a backup schedule to each cluster.
•Inspect the details of the cluster backups taken.

There are two types of clusters used by the Services Director VA:
•Discovered - this is a cluster present on one or more externally-deployed vTMs. When an externally-deployed vTM is registered, a cluster name is displayed automatically.
Registering a clustered vTM does not register other vTMs in the cluster, nor does it license them; you must independently register and license each node in a cluster.
You cannot create a Discovered cluster from the vTM Clusters page.
Services Director’s awareness of Discovered clusters is limited to vTMs at version 10.2 or later with an enabled REST API.
•User Created - this is a cluster that you create manually on the vTM Clusters page. This cluster type can only be used for vTMs that you deploy from the Services Director VA. Refer to the Pulse Services Director Advanced User Guide for details.
You can rename a cluster of either type from the vTM Clusters page, see Updating a Virtual Traffic Manager Cluster.
Services Director supports backup and restore for cluster configurations, see Working with vTM Cluster Backups.
Understanding Virtual Traffic Manager Cluster Details
The vTM Cluster page displays a table of clusters known to the Services Director VA.
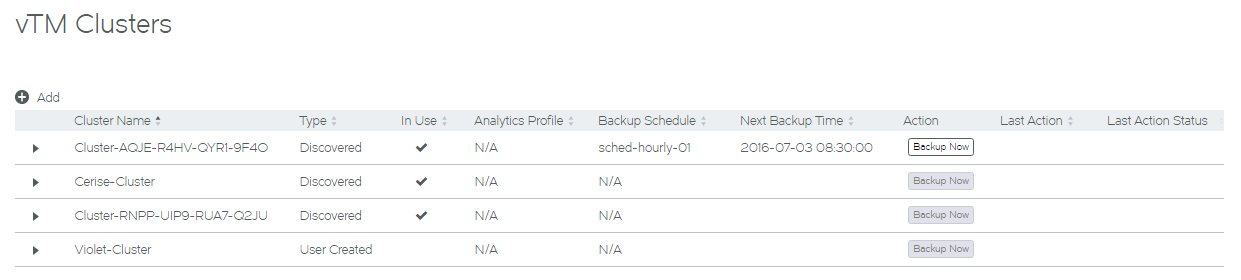
Each entry in the table of clusters on the vTM Clusters page shows basic details for each cluster, and provides controls for backup operations where supported by the cluster.
|
Name |
Description |
|
Cluster Name |
The unique name of the cluster. If required, you can rename a cluster. See Updating a Virtual Traffic Manager Cluster. |
|
Type |
There are two cluster types used by the Services Director: Discovered - this is a cluster present on one or more externally-deployed vTMs. When an externally-deployed vTM is registered (version 10.2 or later with an active REST API), a cluster name is displayed automatically. Registering a clustered vTM does not register other vTMs in the cluster, nor does it license them; you must independently register and license each node in a cluster. You cannot create a Discovered cluster from the vTM Clusters page. Services Director’s awareness of Discovered clusters is limited to vTMs at version 10.2 or later with an enabled REST API. User Created - this is a cluster that you create manually on the vTM Clusters page. This cluster type can only be used for vTMs that are deployed from the Services Director VA. Refer to the Pulse Services Director Advanced User Guide for details. |
|
In Use |
This indicates whether any vTMs are currently in the cluster. |
|
Analytics Profile |
(Optional) The assigned analytics profile for the cluster. See Configuring vTM Analytics on the Services Director. |
|
Backup Schedule |
(Optional) The selected schedule for the cluster backup. The configured number of backups for this cluster and the most recent backups are displayed in the detail view for the cluster. See Creating a Cluster Backup Schedule. Where no Backup Schedule is selected, this property is displayed as N/A. This column is only supported on vTMs at version 11.0 and later. The number of backups for this cluster is visible in the detail view for the cluster. |
|
Next Backup Time |
The time of the next scheduled cluster backup. Where no Backup Schedule is selected, this property is blank. This column is only supported on vTMs at version 11.0 and later. This column is blank for all other vTMs. |
|
Action |
This column displays buttons that activate (or report on) supported cluster backup activities. This includes: Backup Now. When clicked, a backup is performed immediately. Retry. This appears after a user-triggered Backup Now action fails. When clicked, the Backup Now action is re-attempted. See Retrying An Immediate Backup After a Failure. Clear Failed Action. This appears after a user-triggered Backup Now action fails. When clicked, both the named Last Action and the Failed Last Action Status are removed. See Retrying An Immediate Backup After a Failure. This column is only supported on vTMs at version 11.0 and later. Where the vTM does not support backups, the Backup Now button is displayed but remains unavailable. |
|
Last Action |
The most recent manually-performed Action for a cluster backup (see above). This can be: Backup Now. This appears after a Backup Now action is attempted (see above). Restore. This appears after a restore operation is attempted for a listed cluster backup. See Restoring a Backup to a Cluster. Upload. This appears after an upload operation is attempted for a listed cluster backup. See Uploading a Cluster Backup to a Virtual Traffic Manager. The result of the displayed action is shown in the Last Action Status column (see below). Scheduled backups are not included in this column. This column is only supported on vTMs at version 11.0 and later. This column is blank for all other vTMs. |
|
Last Action Status |
The outcome of the Last Action operation (see above). This is blank, In Progress (blue), Complete or Failed (red). The results of scheduled backups are not included in this column. A failed flag can be cleared from the Action column (see above). This column is only supported on vTMs at version 11.0 and later. This column is blank for all other vTMs. |
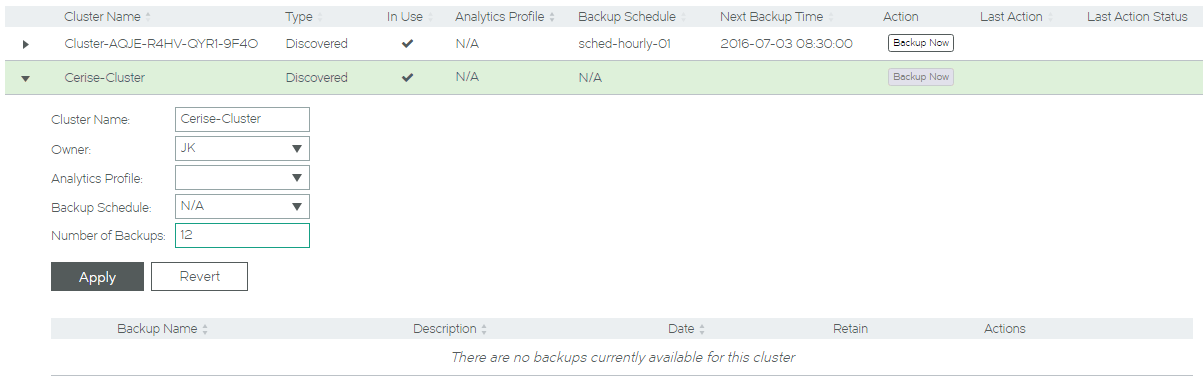
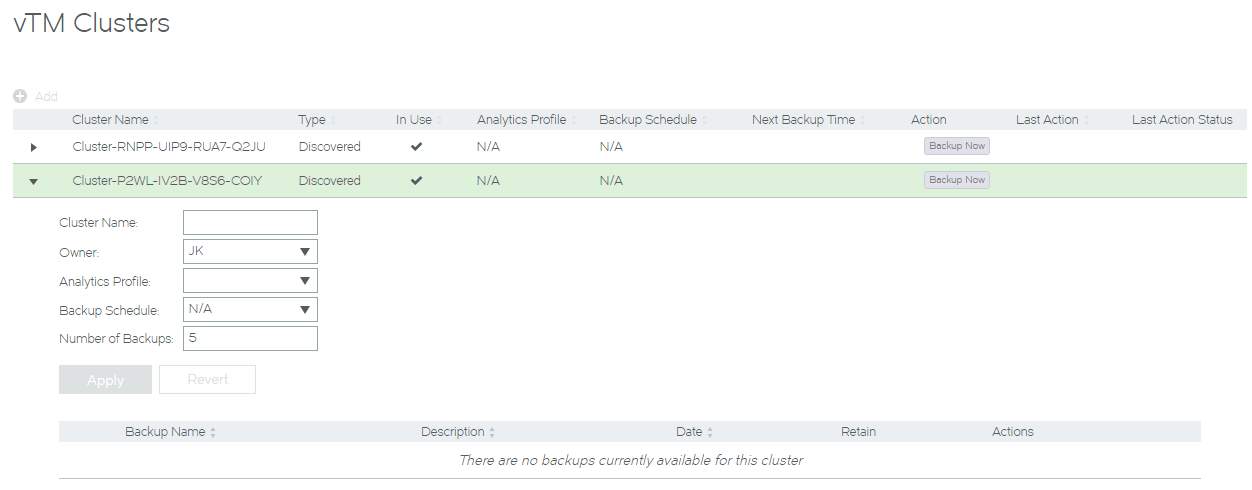
To view the full details for a cluster, expand the required cluster. This includes:
•a Cluster Name that you can update, see Updating a Virtual Traffic Manager Cluster.
•an Owner for the cluster.
•the Analytics Profile for the cluster. See Configuring vTM Analytics on the Services Director.
•the Backup Schedule and Number of Backups that define the backup schedule for the cluster, where one is used. See Overview: vTM Cluster Backups.
For example, when no cluster backup is in use:
Where a cluster was created for a cloud-based vTM, an additional field containing an AWS user data block is included.
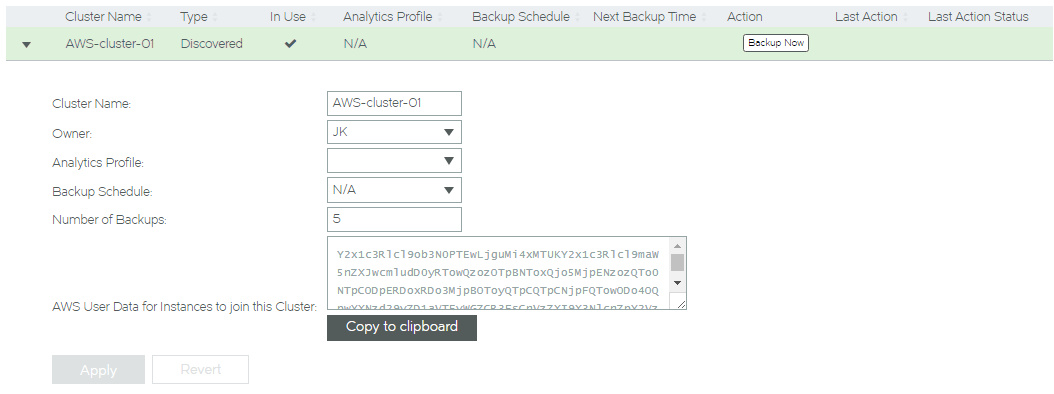
This AWS user data text block is required when you create additional cloud-based vTM cluster members, see Creating the Second vTM in a Cluster.
Use Copy to clipboard before performing this task.
Where a backup schedule for the cluster is in use, a list of backups is included. For example:
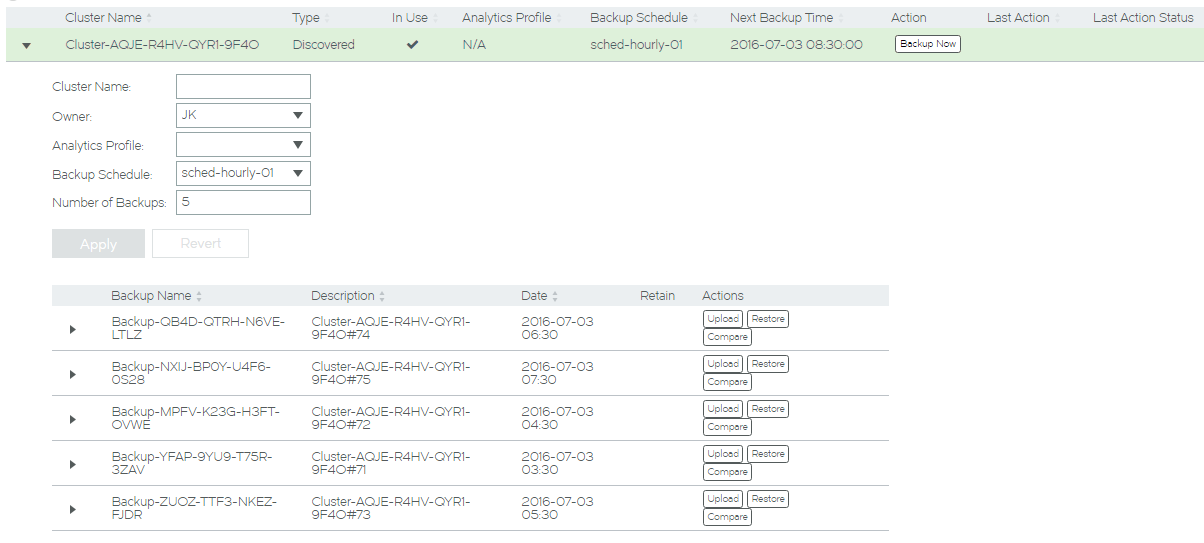
To make use of any listed backups, see Working with vTM Cluster Backups.
Creating a Virtual Traffic Manager Cluster
You can create a User Created vTM cluster from the vTM Clusters page.
You cannot create a Discovered cluster using the Services Director.
1.Access your Services Director VA from a browser, using its Service Endpoint IP Address.
2.Log in as the administration user. The Home page appears.
3.Click the Services menu, and then click Services Director: vTM Clusters. The vTM Clusters page appears.
4.Click the plus symbol above the vTM cluster table.
The Add vTM Cluster dialog box appears.
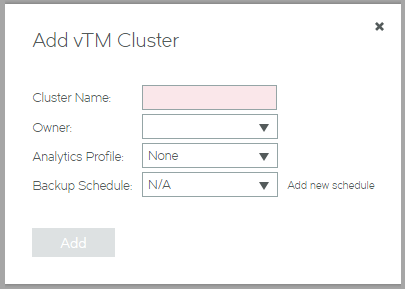
5.Specify the following:
•Cluster Name - specify the unique name for the cluster.
•Owner - select an owner for the cluster.
If there are no owner entries, see Adding an Owner to the Services Director.
•Analytics Profile - (Optional) Specify an analytics profile for the cluster. See Configuring vTM Analytics on the Services Director.
•Backup Schedule - (Optional) Select an existing backup schedule. If you want to create a new schedule, click Add new schedule. When you do this, this page is replaced by the Instances Backup Schedule page. See Creating a Cluster Backup Schedule.
6.Click Add.
The User Created cluster is added to the table of clusters.
Updating a Virtual Traffic Manager Cluster
You can update a vTM cluster from the vTM Clusters page.
1.Access your Services Director VA from a browser, using its Service Endpoint IP Address.
2.Log in as the administration user. The Home page appears.
3.Click the Services menu, and then click Services Director: vTM Clusters. The vTM Clusters page appears.
4.Expand the required cluster.
5.Update the Cluster Name. For example:
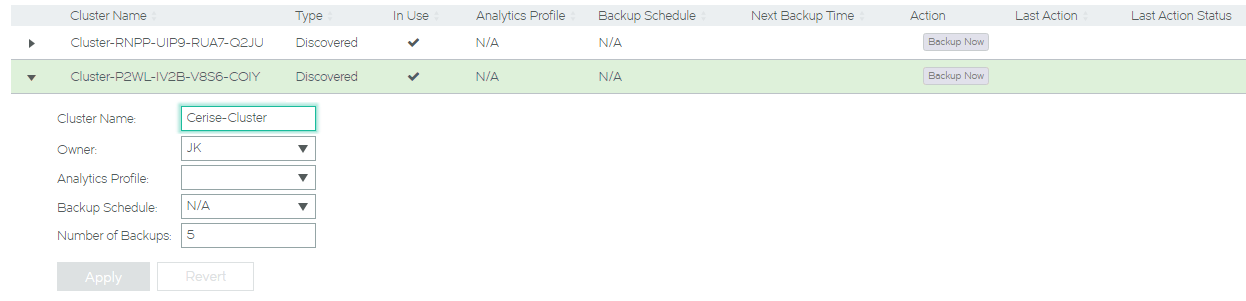
6.(Optional) Select both a new Backup Schedule and a Number of Backups. See Working with vTM Cluster Backups.
The Number of Backups property is only used when there is a Backup Schedule selected.
7.Click Apply. The cluster is updated.

To view updated Backup Schedule and Number of Backups settings, expand the cluster.
You can also confirm the name change from the vTM Instances page. For example:
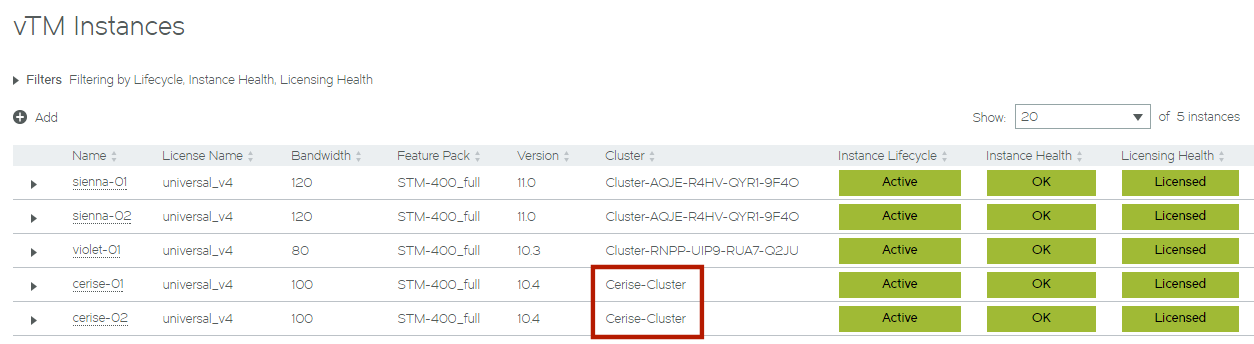
In this example, the Cerise-Cluster name is shown for both vTMs that are in the cluster.
Working with vTM Cluster Backups
All of the vTMs in a cluster share a cluster configuration. To ensure that the cluster configuration is preserved, you can schedule a regular cluster backup for each cluster. This preserves the cluster configuration only, and not the individual configuration of each vTM.
The use of Cluster Backups is optional, and is only available to customers who license analytics features.
Cluster Backups are not the same as Services Director backups. Services Director backups enable you to recover from a Services Director failure, see Recovering from a Services Director Failure.
Overview: vTM Cluster Backups
A vTM cluster gathers vTMs together and operates them under a shared cluster configuration.
The configuration of the cluster can be backed up automatically on a regular basis according to a backup schedule.
The following provides an overview of automatic cluster backup operations.
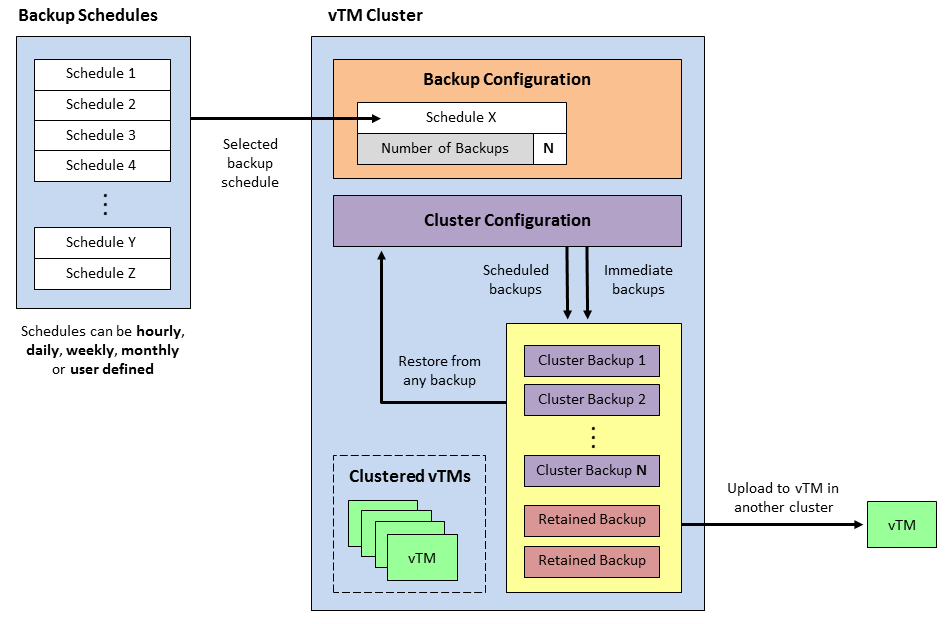
Before you set up automatic backups for a cluster's configuration, you must create one or more backup schedules, see Creating a Cluster Backup Schedule. Backup schedules define the frequency and times at which a backup will be taken. Each can be applied to one or more clusters.
Once you have backup schedules, you can configure the cluster to create backups automatically using a backup schedule. To do this, you select a backup schedule for the cluster, and indicate the number of backups that you want the cluster to store, see Adding a Backup Schedule to a Cluster.
Once the cluster has an assigned cluster backup schedule, the cluster accumulates scheduled backups automatically. You can also manually request an immediate backup at any time. See Performing an Immediate Backup for a Cluster.
You can also request an immediate backup when there is no assigned backup schedule.
Once the maximum number of cluster backups is reached, older cluster backups are deleted automatically whenever newer cluster backups are created.
You can also choose to retain one or more backups if required, see Updating Details for a Cluster Backup. Retained backups do not count towards the maximum number of backups for the cluster, and are not deleted automatically.
The cluster's configuration can be restored from an existing backup at any time, see Restoring a Backup to a Cluster.
To support the selection of the correct cluster backup, you can compare any two cluster backups to identify the differences, see Comparing Two Cluster Backups.
Also, you can upload a cluster backup to any vTM known to the Services Director, see Uploading a Cluster Backup to a Virtual Traffic Manager. The uploaded configuration file is stored by the vTM, but not restored. This enables you to perform additional analysis and comparison using the vTM's graphical user interface.
Creating a Cluster Backup Schedule
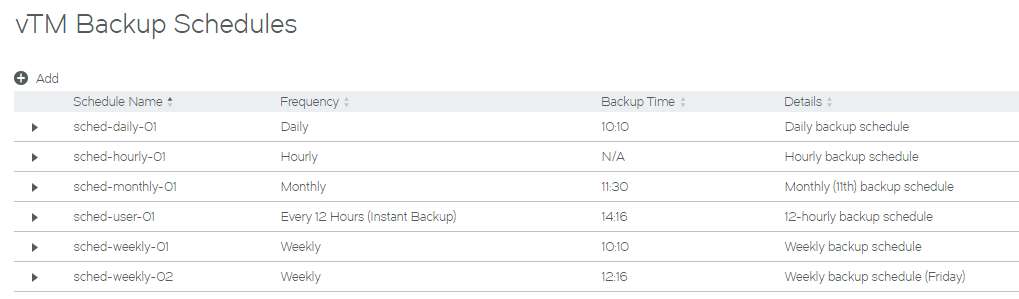
A cluster backup schedule is a definition of when a cluster backup will be created. This includes general frequency (hourly, daily, weekly, monthly, and instant backups) and information to specify an exact backup time.
Defined schedules are displayed in the vTM Backup Schedules page. For example:
Once you have created a schedule, it can be applied to any clusters that require the specified backup schedule, see Adding a Backup Schedule to a Cluster.
1.Access your Services Director VA from a browser, using its Service Endpoint IP Address.
2.Log in as the administration user. The Home page appears.
3.Click the Services menu, and then click Services Director: vTM Backup Schedules. The Instances Backup Schedule page appears.
4.Click the plus sign above the table of backup schedules.
The Add vTM Backup Schedule dialog box appears.
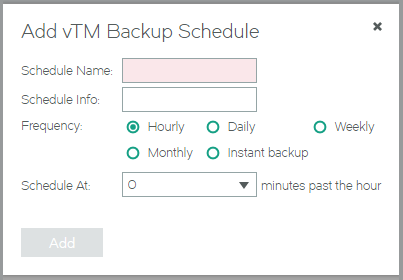
5.Specify the required Schedule Name for the backup schedule.
6.(Optional) Enter a description for the backup schedule as its Schedule Info.
This will be displayed as Details in the table of schedules.
7.Select the required Frequency for the backup schedule:
•Hourly - this schedule will be performed once every hour. By default, this is on the hour. You can also choose to Schedule At 15, 30 and 45 minutes past the hour.
•Daily - this schedule will be performed once per day. By default, this is at midnight. Alternatively, you can choose to Schedule At a specific time (hh:mm).
•Weekly - this schedule will be performed once per week. By default, this is on Monday at midnight. Alternatively, you can choose to Schedule On the required day (Monday - Sunday) and Schedule At a specific time (hh:mm).
•Monthly - this schedule will be performed once per month. By default, this is on Monday at midnight. Alternatively, you can choose to Schedule On the required day (typically, 1-28) and Schedule At a specific time (hh:mm).
•Instant Backup - this schedule will be performed at a custom frequency. Instead of specifying an exact time, the first backup will be taken immediately when the schedule is applied to a cluster, and then at the defined Schedule Every frequency: every 15 minutes, hourly, every 12 hours, every week, every month).
8.Click Add.
The new schedule is added to the table of backup schedules.
Once you have created a schedule, it can be applied to any clusters that require the specified backup schedule, see Adding a Backup Schedule to a Cluster.
Updating a Cluster Backup Schedule
Once a cluster backup schedule is created, you can change it at any time. The schedule can be renamed, and any of the schedule details can be changed.
Any cluster that uses the backup schedule will automatically make use of the revised updated schedule.
1.Access your Services Director VA from a browser, using its Service Endpoint IP Address.
2.Log in as the administration user. The Home page appears.
3.Click the Services menu, and then click Services Director: vTM Backup Schedules. The vTM Backup Schedules page appears.
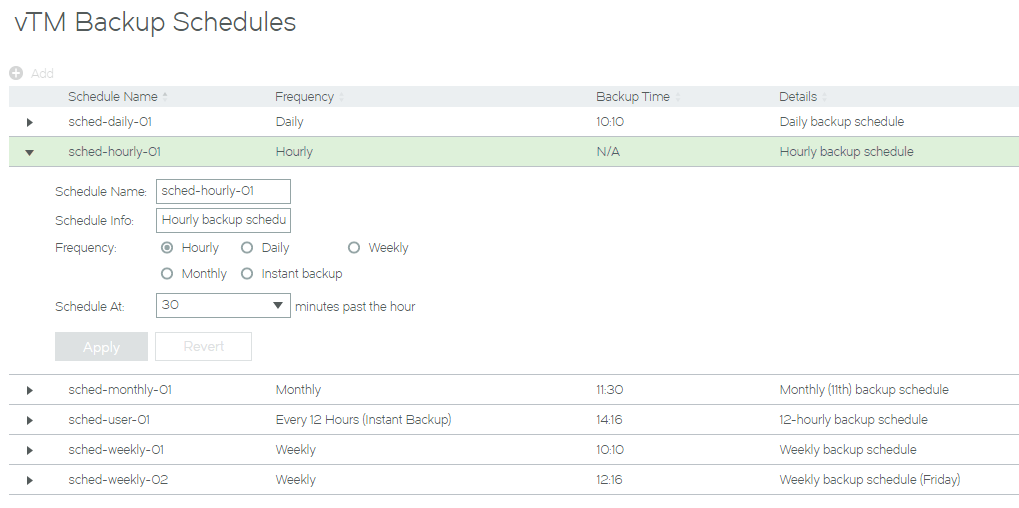
4.Expand the required cluster backup schedule. For example:
5.(Optional) Specify a new Schedule Name for the backup schedule.
6.(Optional) Enter a new description for the backup schedule as its Schedule Info.
This will be displayed as Details in the table of schedules.
7.(Optional) Select a new Frequency for the backup schedule:
•Hourly - this schedule will be performed once every hour. By default, this is on the hour. You can also choose to Schedule At 15, 30 and 45 minutes past the hour.
•Daily - this schedule will be performed once per day. By default, this is at midnight. Alternatively, you can choose to Schedule At a specific time (hh:mm).
•Weekly - this schedule will be performed once per week. By default, this is on Monday at midnight. Alternatively, you can choose to Schedule On the required day (Monday - Sunday) and Schedule At a specific time (hh:mm).
•Monthly - this schedule will be performed once per month. By default, this is on Monday at midnight. Alternatively, you can choose to Schedule On the required day (typically, 1-28) and Schedule At a specific time (hh:mm).
•Instant Backup - this schedule will be performed at a custom frequency. Instead of specifying an exact time, the first backup will be taken immediately when the schedule is applied to a cluster, and then at the defined Schedule Every frequency: every 15 minutes, hourly, every 12 hours, every week, every month).
If your Schedule Name and Schedule Info include references to the Frequency, remember to update these also.
8.Click Apply.
The schedule is updated in the table of backup schedules.
Any cluster that uses the backup schedule will automatically make use of the revised updated schedule.
Adding a Backup Schedule to a Cluster
Once you have created a cluster backup schedule (see Creating a Cluster Backup Schedule), it can be applied to one or more clusters. This ensures that the required cluster backup schedule is performed for all of those clusters.
1.Access your Services Director VA from a browser, using its Service Endpoint IP Address.
2.Log in as the administration user. The Home page appears.
3.Click the Services menu, and then click Services Director: vTM Clusters. The vTM Clusters page appears.
4.Expand the required cluster.
![]()
5.Select the required Backup Schedule.
6.Specify the required Number of Backups. The default is 5.
Retained backups are not included in this number. See Overview: vTM Cluster Backups.
7.Click Apply.
The required backup schedule is added to the cluster.

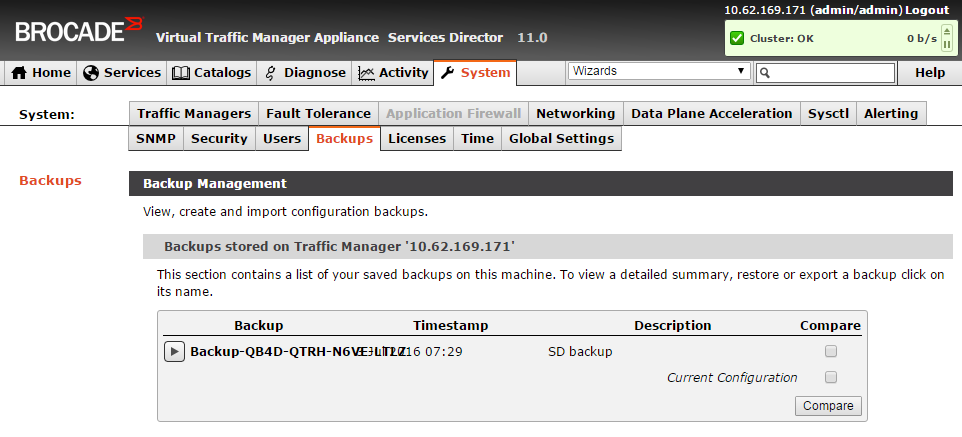
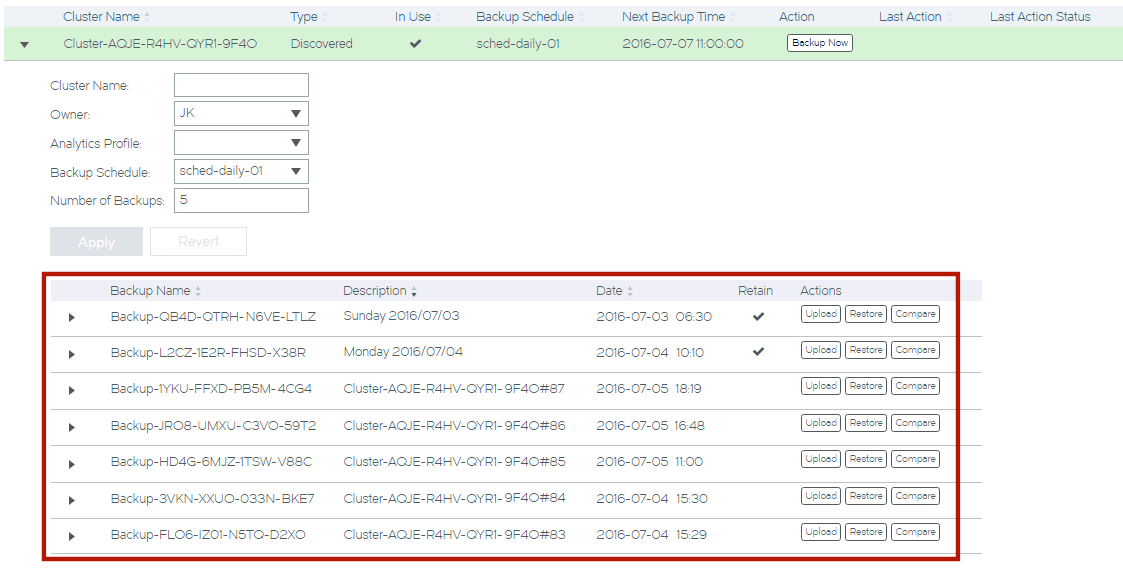
Viewing Backups for a Cluster
Once you have added a backup schedule to a cluster (see Adding a Backup Schedule to a Cluster), backups will begin to accumulate.
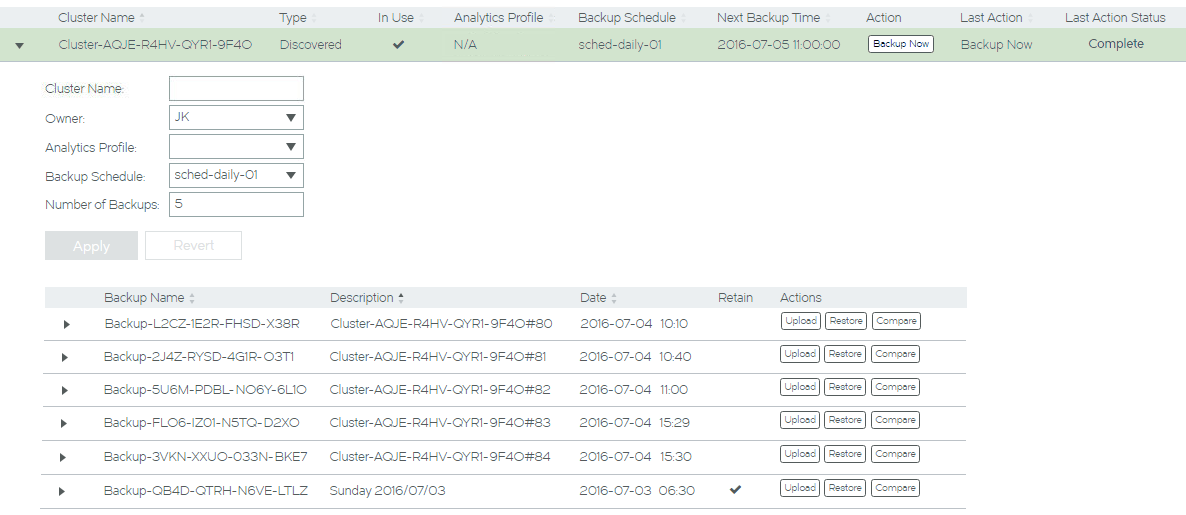
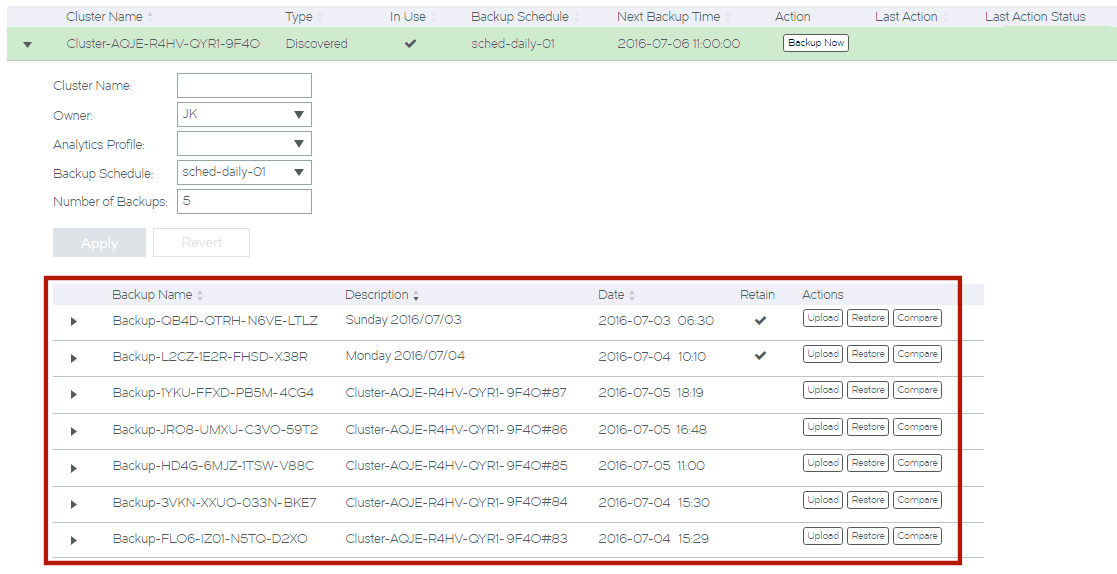
Backups are listed in the detailed view of the cluster. For example:
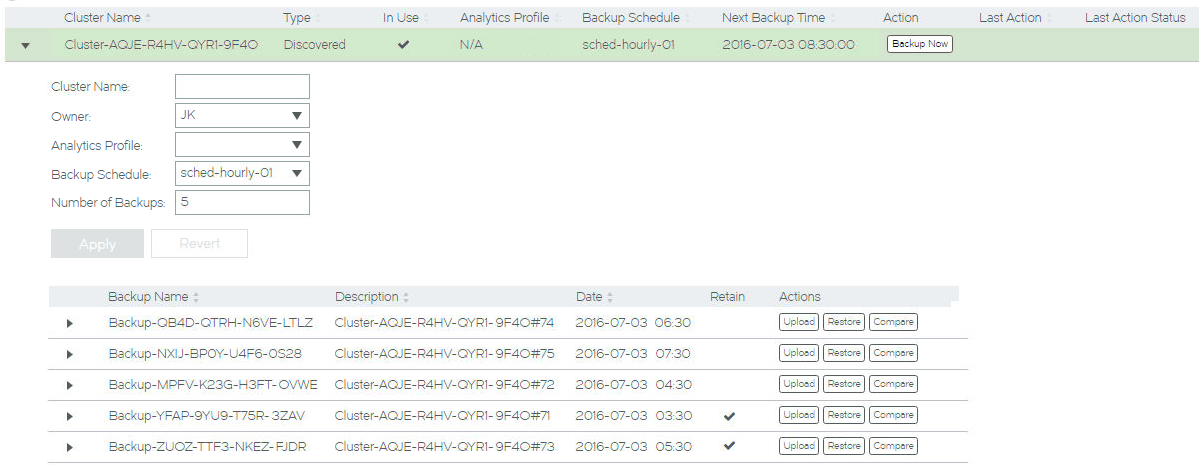
In this cluster:
•The cluster Type is Discovered. See Understanding Virtual Traffic Manager Cluster Details.
•The cluster is In Use. That is, the cluster contains one or more vTMs.
When a cluster is not In Use, you can delete it, see Deleting an Empty Virtual Traffic Manager Cluster.
•The cluster does not have an assigned Analytics Profile. That is, analytics is not enabled on the vTMs in the cluster. See Configuring vTM Analytics on the Services Director.
•There is a Backup Schedule in use on this cluster: sched-hourly-01
•The Next Backup Time for the cluster is displayed.
•The Backup button in the Action column enables you to take an immediate backup without disrupting the schedule. See Performing an Immediate Backup for a Cluster.
•There is a listed Owner for the cluster.
•The maximum Number of Backups is 5.
•The cluster contains the three most recent backups, plus two backups that have been retained for future use. The retained backup will not be replaced by the addition of newer cluster backups. See Overview: vTM Cluster Backups.
For each listed backup file:
•The default Description for a cluster backup is the cluster name plus a sequence number. You can update this if required, along with other details, see Updating Details for a Cluster Backup.
•You can compare any backup to any other backup using the Compare button in the Actions column. See Comparing Two Cluster Backups.
•You can restore any of the backups to this (or another) cluster using the Restore button in the Actions column. See Restoring a Backup to a Cluster.
•You can upload any of the backups to any vTM using the Upload button in the Actions column. The destination vTM can be either inside or outside the cluster. You can then compare the cluster backup to either a running cluster configuration, or to another cluster backup on that vTM. See Uploading a Cluster Backup to a Virtual Traffic Manager.
To update details for a cluster backup, see Updating Details for a Cluster Backup.
Updating Details for a Cluster Backup
Each cluster that has an assigned backup schedule will accumulate backups over time. These backups are displayed in the detailed view of a cluster on the vTM Clusters page.
You cannot change the Backup Name, but you can update the Description to provide memorable information. This is useful when you choose to Retain a backup. See Overview: vTM Cluster Backups.
You update details for a cluster backup from the vTM Clusters page.
1.Access your Services Director VA from a browser, using its Service Endpoint IP Address.
2.Log in as the administration user. The Home page appears.
3.Click the Services menu, and then click Services Director: vTM Clusters. The vTM Clusters page appears.
4.Expand the required cluster. For example:
5.Expand the required backup. For example:

6.Update the details for the backup as required:
•(Optional) Enter a new Description.
•(Optional) Select the Retain check box.
When a backup is retained, it is not deleted as newer backups are created, and does not count towards the number of backups stored by the cluster. Refer to the Number of Backups in step 4 and also Overview: vTM Cluster Backups.
For example:
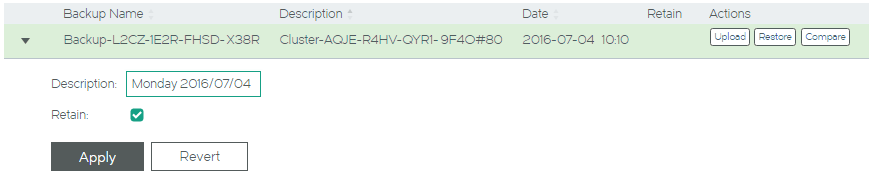
7.Click Apply.
The table of backups updates to reflect the changes.

Performing an Immediate Backup for a Cluster
When a cluster has an assigned backup schedule, over time it accumulates backups automatically.
However, you can also create a cluster backup at any time as an immediate manual operation.
Performing an Immediate Backup
1.Access your Services Director VA from a browser, using its Service Endpoint IP Address.
2.Log in as the administration user. The Home page appears.
3.Click the Services menu, and then click Services Director: vTM Clusters.
The vTM Clusters page appears.

4.Locate the required cluster and click the Backup Now button for its entry.

The Services Director attempts an immediate backup, and indicates this.
If the immediate backup succeeds, the Last Action and Last Action Status columns are updated:

If the immediate backup fails, the Action, Last Action and Last Action Status columns are updated:

To re-attempt a failed immediate backup, see Retrying An Immediate Backup After a Failure.
Retrying An Immediate Backup After a Failure
1.Access your Services Director VA from a browser, using its Service Endpoint IP Address.
2.Log in as the administration user. The Home page appears.
3.Click the Services menu, and then click Services Director: vTM Clusters. The vTM Clusters page appears.
4.Locate the required cluster. Any cluster with an immediate backup failure will show the Action, Last Action and Last Action Status columns as follows:

5.Pause the pointer over the Failure warning triangle to view more information about the failure. For example:

6.Investigate and resolve the issue. This may require you to log in to one of the vTMs in the cluster. Refer to the Virtual Traffic Manager documentation for details of vTM operations.
7.(Optional) Click the Clear Failed Action button for the cluster.
This action clears the Last Action and Last Action Status columns before you re-attempt the immediate backup. It is not required.
8.Once the issue is resolved, click the Retry button for the cluster:

If the immediate backup succeeds, the failure is cleared, and the status becomes Complete:

If the immediate backup fails again, repeat this procedure from step 5.
Comparing Two Cluster Backups
When a cluster has an assigned backup schedule, over time it accumulates backups. Before choosing a cluster backup from which to perform a restore, it may be useful to compare two backups from the same cluster.
The resulting differences are grouped by resource type and individual resource differences.
Analyzing the differences between cluster backups supports you making an informed decision about which backup is required for a given situation.
You are also able to upload a cluster backup file to a vTM, so that you can compare it to either a running cluster configuration, or to another backup on that vTM. See Uploading a Cluster Backup to a Virtual Traffic Manager.
1.Access your Services Director VA from a browser, using its Service Endpoint IP Address.
2.Log in as the administration user. The Home page appears.
3.Click the Services menu, and then click Services Director: vTM Clusters. The vTM Clusters page appears.
4.Expand the required cluster. The backups taken for the cluster are listed. For example:
5.Identify the first backup for the comparison and click its Compare button.

The Compare Backups (<cluster_id>) dialog box appears. For example:
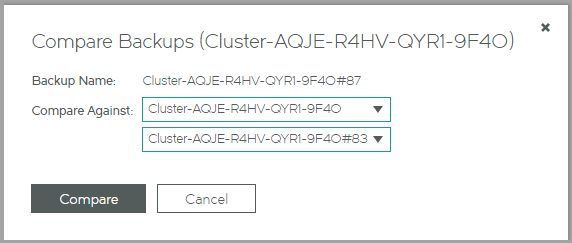
6.Select the required Compare Against values to identify the second backup:
•The top Compare Against field lists all clusters known to the Services Director. Select the current cluster (the default) or a different cluster.
•The bottom Compare Against field lists all backups within the selected cluster. Select the required backup for the comparison.
7.Click Compare to perform a comparison of the two backups.
The Compare Backups dialog box displays the results of the comparison. For example:
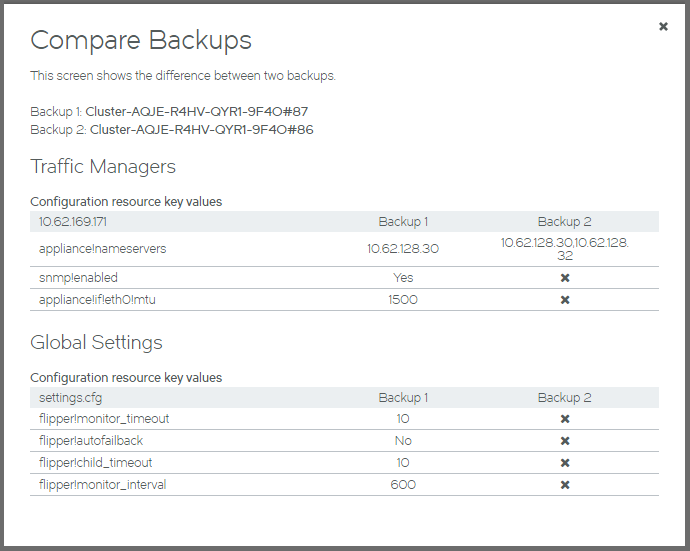
Backup 1 and Backup 2 identify settings that have changed between the two backups.
Refer to the Virtual Traffic Manager documentation for details of these settings.
Restoring a Backup to a Cluster
At any point, you can restore the configuration of a cluster from a cluster backup.
Typically, the backup will be one that was generated for the cluster. However, it is possible to restore a backup from any cluster to any other cluster.
Restoring a Cluster Backup
1.Access your Services Director VA from a browser, using its Service Endpoint IP Address.
2.Log in as the administration user. The Home page appears.
3.Click the Services menu, and then click Services Director: vTM Clusters. The vTM Clusters page appears.
4.Expand the required cluster to view its accumulated backups. For example:
5.Locate the required backup. This can be any of the listed cluster backups: scheduled, immediate or retained.
If you are unsure which is required, you can compare any two backups to identify the differences, see Comparing Two Cluster Backups.
6.Click the Restore button for the required backup.

The Restore Backup dialog box appears.
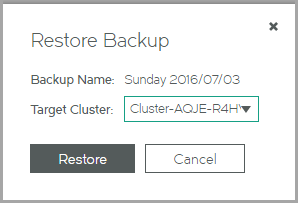
7.Select the Target Cluster from the list of clusters known to the Services Director.
8.Click Restore.
The Services Director begins the restore process.

When this completes, the selected backup has been restored to the selected cluster.

If the restore fails, the following is displayed:

To resolve a failed restore, see Retrying A Cluster Restore After a Failure.
Retrying A Cluster Restore After a Failure
1.Access your Services Director VA from a browser, using its Service Endpoint IP Address.
2.Log in as the administration user. The Home page appears.
3.Click the Services menu, and then click Services Director: vTM Clusters. The vTM Clusters page appears.
4.Locate the required cluster. Any cluster with a restore failure will show the Action, Last Action and Last Action Status columns as follows:

5.Pause the pointer over the Failure warning triangle to view more information about the failure. For example:

6.Investigate and resolve the issue. This may require you to log in to one of the vTMs in the cluster. Refer to the Virtual Traffic Manager documentation for details of vTM operations.
7.(Optional) Click the Clear Failed Action button for the cluster.
This action clears the Last Action and Last Action Status columns before you re-attempt the cluster restore. It is not required.
8.Once the issue is resolved, click the Retry button for the cluster:

If the restore succeeds, the failure is cleared, and the status becomes Complete:

If the restore fails again, repeat this procedure from step 5.
Uploading a Cluster Backup to a Virtual Traffic Manager
In addition to cluster backup comparisons (see Comparing Two Cluster Backups), you can upload a cluster backup file to a vTM. The uploaded cluster backup file is stored by the vTM, but not restored. This enables you to perform a comparison of the cluster backup with a running cluster configuration, or to another backup on the vTM.
After you have uploaded a cluster backup file, it is visible in the vTM's graphical user interface:
Refer to the Virtual Traffic Manager documentation for a description of supported activities with this backup.
Uploading a Cluster Backup
1.Access your Services Director VA from a browser, using its Service Endpoint IP Address.
2.Log in as the administration user. The Home page appears.
3.Click the Services menu, and then click Services Director: vTM Clusters. The vTM Clusters page appears.
4.Expand the required cluster to view its accumulated backups. For example:
5.Locate the required backup. This can be any of the listed cluster backups: scheduled, immediate or retained.
If you are unsure which is required, you can compare any two backups to identify the differences, see Comparing Two Cluster Backups.
6.Click the Upload button for the required backup.

The Upload Step 1 dialog box appears.
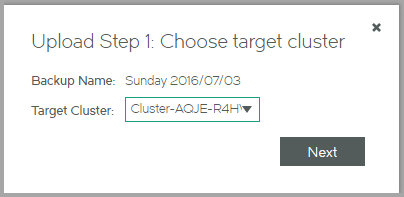
7.Select the Target Cluster from the list of clusters known to the Services Director.
8.Click Next.
The Upload Step 2 dialog box appears.
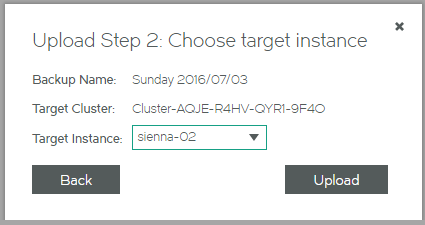
9.Select the Target Instance from the list of vTMs for the cluster.
10.Click Upload to start the upload process.
When this completes, the selected cluster backup has been uploaded to the selected vTM.

If the upload fails, the following is displayed:

To resolve a failed upload, see Retrying A Cluster Backup Upload After a Failure.
Retrying A Cluster Backup Upload After a Failure
1.Access your Services Director VA from a browser, using its Service Endpoint IP Address.
2.Log in as the administration user. The Home page appears.
3.Click the Services menu, and then click Services Director: vTM Clusters. The vTM Clusters page appears.
4.Locate the required cluster. Any cluster with an upload failure will show the Action, Last Action and Last Action Status columns as follows:

5.Pause the pointer over the Failure warning triangle to view more information about the failure. For example:

6.Investigate and resolve the issue. This may require you to log in to one of the vTMs in the cluster. Refer to the Virtual Traffic Manager documentation for details of vTM operations.
7.(Optional) Click the Clear Failed Action button for the cluster.
This action clears the Last Action and Last Action Status columns before you re-attempt the cluster upload. It is not required.
8.Once the issue is resolved, click the Retry button for the cluster:

If the upload succeeds, the failure is cleared, and the status becomes Complete:

If the upload fails again, repeat this procedure from step 5.
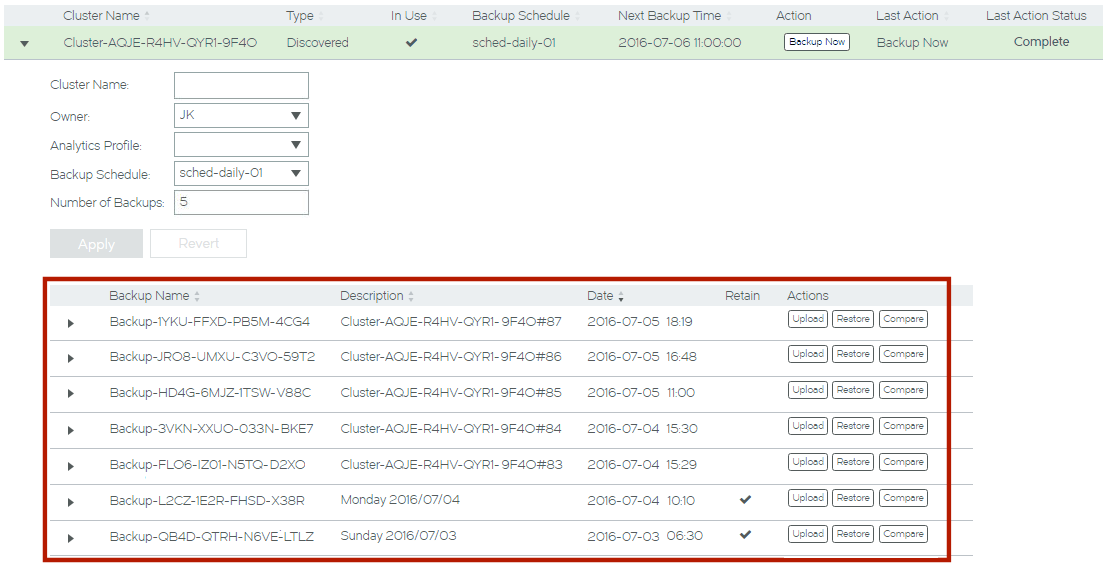
Deleting a Cluster Backup
The Services Director stores the most recent cluster backups, subject to a maximum number that you can you can define on a per-cluster basis. Older backups beyond this maximum are deleted automatically. You can choose to mark one or more cluster backups as retained. Retained backups are not deleted automatically, and do not count towards the maximum number of backups for the cluster. See Updating a Virtual Traffic Manager Cluster.
You can delete any cluster backup manually. To do this, expand a cluster on the vTM Clusters page, and locate the required cluster backup. Then, click its delete (X) button:

If you attempt to delete a retained cluster backup, you must confirm the deletion.
Moving a vTM Between Clusters
You cannot change a vTM's cluster from the Services Director. This is true for both registered vTMs (in Discovered clusters) and deployed vTMs (in User Created clusters).
However, you can change a VTM’s cluster from the user interface of the vTM software itself. Refer to the Virtual Traffic Manager docs for information.
After you move a vTM between clusters, the existing administration credentials for the vTM in the Services Director VA will be wrong. As a result, the Instance Health for the vTM will change to N/A, and its software version will show as Unknown.
To fix this:
1.Access the detailed view for the vTM in the vTM Instances page.
2.Update the administration credentials for the vTM to those of the new cluster.
After a short time, the Instance Health will change to reflect the state of its new cluster, and the displayed software version will return to its usual setting.
Deleting an Empty Virtual Traffic Manager Cluster
The vTM Clusters page displays all clusters known to the Services Director. This page can include clusters that are not flagged as In Use, such as one that remains after a vTM joins another cluster, leaving its original cluster empty.
You can delete any cluster that is not flagged as In Use, and which does not contain cluster backups.
To delete a cluster, pause the pointer over it in the table of clusters, and then click the delete (X) button that appears at the end of the row.
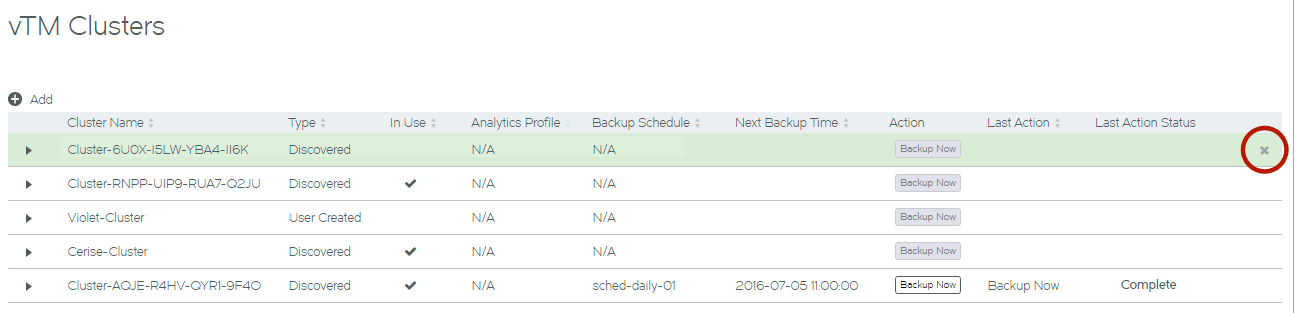
Select the Delete option to remove the empty cluster from the table.
A dialog box appears if the empty cluster had ever contained a vTM that is now Deleted. This indicates that any Deleted vTMs will be purged from the database. For example:
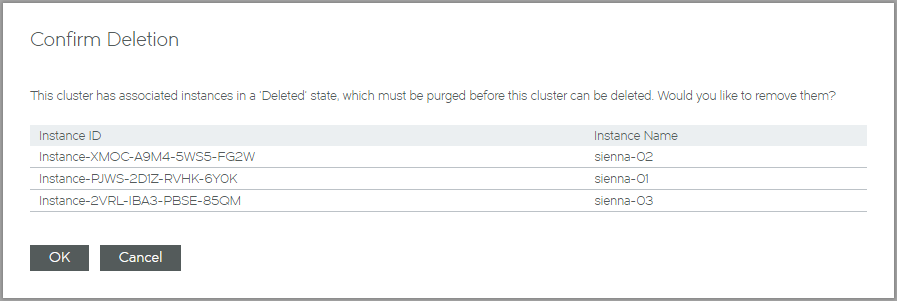
Click OK to purge the Deleted vTMs and remove the cluster from the database.