Updating Services Director VA Settings
Overview: Services Director VA Settings
Once your Services Director VA is installed on your chosen platform, you can configure the VA-specific settings.
Many of the configuration settings for the Services Director VA can be updated from the Services Director VA System menu.
Updating General Settings
You can change a variety of general settings for Services Director VA from the System > General Settings page. Defaults are applied automatically when the Services Director VA is created. You only need to update these settings to fine-tune the Services Director VA to your specific requirements.
Apply any changes to put them into use immediately.
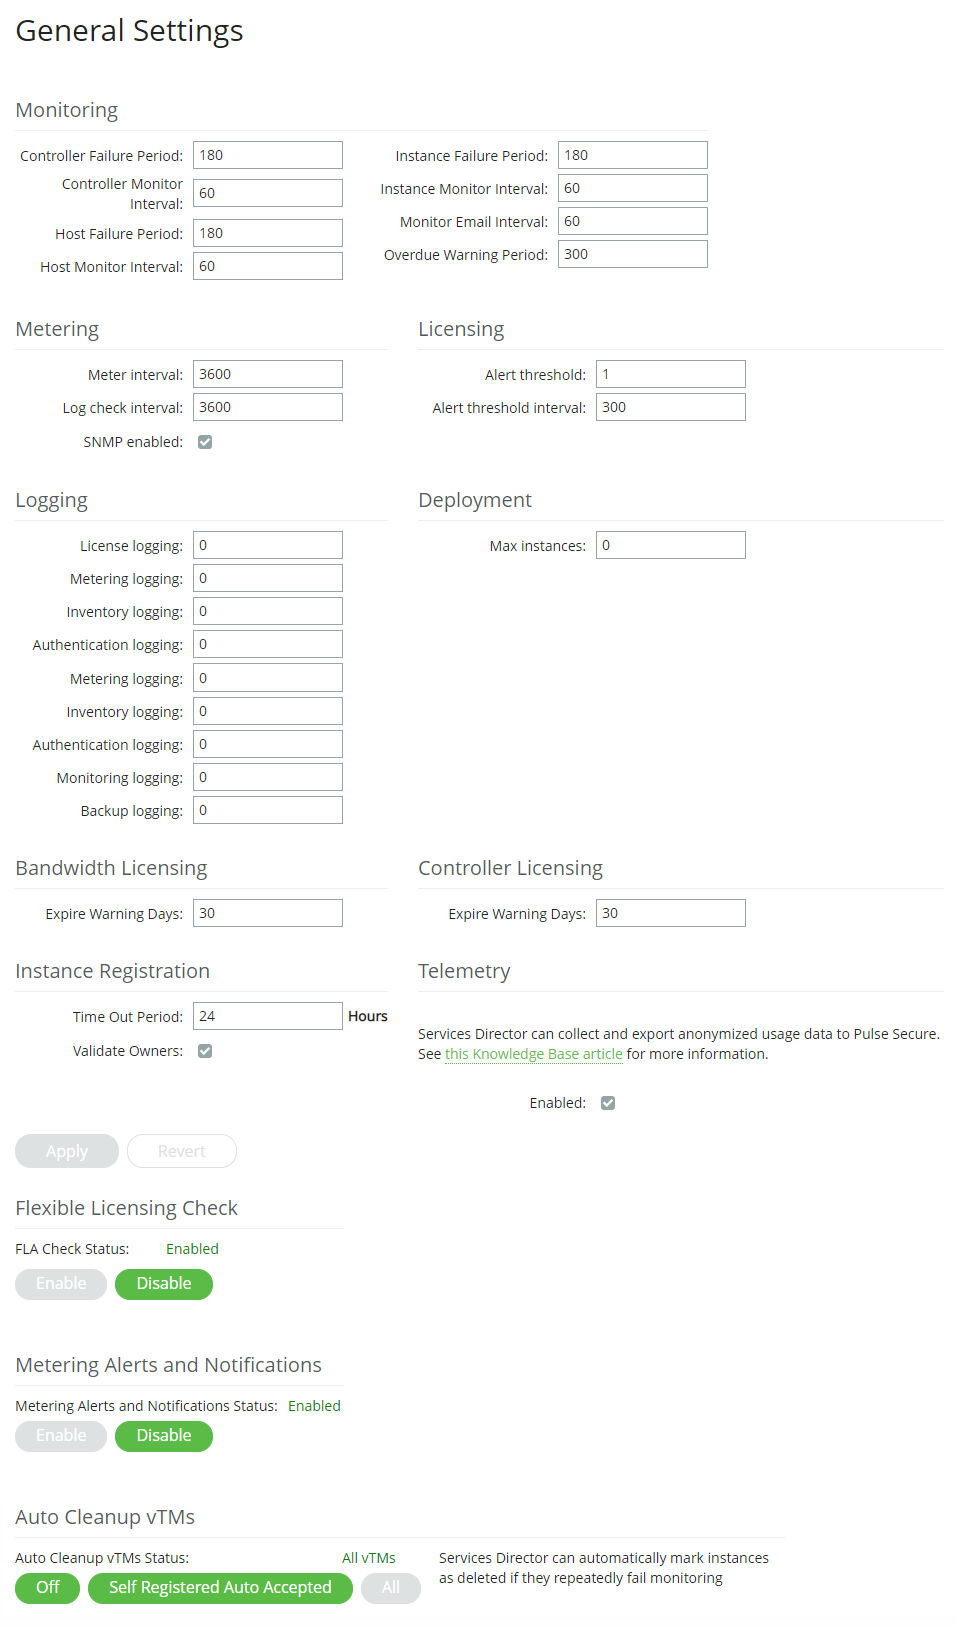
Updating Monitoring Settings
The following settings enable you to configure monitoring.
•Controller Failure Period - the period of time, in seconds, after which a Services Director is considered to have failed. The default value is 180.
•Controller Monitor Interval - the period of time, in seconds, between monitoring the Services Director. The default value is 60.
•Host Failure Period - the period of time, in seconds, after which a host is considered to have failed. The default value is 180.
•Host Monitor Interval - the period of time, in seconds, between monitoring hosts. The default value is 60.
•Instance Failure Period - the period of time, in seconds, after which the instance is considered to have failed. The default value is 180.
This period is also used by the automatic deletion of self-registered vTMs, see Configuring Auto Cleanup of Virtual Traffic Managers.
•Instance Monitor Interval - the length of the monitoring cycle. That is, the period of time, in seconds, between each Services Director attempt to retrieve monitoring information from each vTM. The default value is 60.
This interval is also used by the automatic deletion of self-registered vTMs, see Configuring Auto Cleanup of Virtual Traffic Managers.
•Monitor Email Interval - the period of time, in seconds, between monitoring alert emails. The default value is 60.
•Overdue Warning Period - the period of time, in seconds, to consider monitoring overdue. The default value is 300.
Updating Metering Settings
The following settings enable you to configure metering.
•Meter Interval - the period of time, in seconds, between metering actions. The range is from 1-3600. The default value is 3600 seconds (1 hour).
•Log Check Interval - the period of time, in seconds, between checks for log space. The range is from 1-3600. The default value is 3600 seconds (1 hour).
•SNMP enabled - this check box is used to enable/disable the use of SNMP. SNMP is used to gather certain types of information (such as metering) from the Virtual Traffic Managers (vTMs) in the estate of the Services Director.
You can monitor the capacity of the /data partition that is used for the storage of metering logs. See Monitoring the Storage Capacity of Metering Logs.
Updating Licensing Settings
The following settings enable you to configure licensing.
•Alert Threshold - the number of alerts that sent. The range is from 1-3600. The default is 1.
•Alert Threshold Interval - the period of time, in seconds, between alerts. The range is from 1-3600. The default value is 3600 seconds (1 hour).
The threshold and interval settings enable you to determine how many requests have to be received by a non-primary license server in the specified interval before an alert email is sent. After the threshold and interval is reached, an alert message is sent. At most, one message is sent per hour, to protect against a flood of messages being sent in the case of complete failure of the primary license server on a busy system.
Updating Logging Settings
The following settings enable you to configure logging.
•License Logging - a license value. The range is from 0-10.
•The default value is 0, which equals no logging.
•A log level of 3 or higher causes responses to license server requests to be logged in full, including the feature values set by the feature pack and bandwidth associated with the instance making the request.
•Metering Logging - the metering logging value. The range is from 0-10.
•The default value is 0, which equals no logging.
•A log level of 5 or higher gives a summary of the activities of the metering thread (that is, starting metering, stopping metering, and so forth)
•A log level of 9 or higher provides a detailed logging of each instance being metered.
You can monitor the capacity of the /data partition that is used for the storage of metering logs. See Monitoring the Storage Capacity of Metering Logs.
•Inventory Logging - the metering logging value. The range is 0-10.
•The default value is 0, which equals no logging.
•A log level of 1 or higher will cause inventory changes to be logged (the equivalent of the audit records).
•A log level of 3 or higher causes logging of all deployment and action commands.
•A log level of 8 or higher causes logging of the output from all deployment and actions.
Updating Deployment Settings
The following setting enables you to configure deployment.
•Max Instances - the maximum number of vTM instances that can be deployed. The default value is 0, which equals no limit. Typically, this is the correct value for most deployments. Note that:
•Instances that have been deleted do not count towards the limit.
•Instances that have been deployed but are not active (that is, have not been started) do count towards the limit.
•If you create a new instance in excess of this number, the instance is rejected with an error message.
•If this property is set to a lower number than the number of currently deployed instances then there is no immediate effect but subsequent deployment requests are rejected.
Updating Bandwidth Licensing Settings
The following setting enables you to configure bandwidth licensing.
•Expire Warning Days - the number of days to warn you before the bandwidth license expires. The default value is 30.
Updating Controller Licensing Settings
The following setting enables you to configure controller licensing.
•Expire Warning Days - the number of days to warn you before the controller license expires. The default value is 30.
Updating Instance Registration Settings
The following settings enables you to configure self-registration.
•Time Out Period - the number of hours before a Warning self-registration request will transition automatically to Blacklisted. The default is 24.
•Validate Owners - enables/disables the mandatory validation of the Owner property during the automatic self-registration of vTMs.
Updating Telemetry Settings
Services Director can collect and export usage data to Pulse Secure. The initial setting for this feature is chosen during the Setup Wizard. However, this setting can be changed at any time.
•To enable this feature, enable the Enable check box.
•To disable this feature, clear the Enable check box.
Updating Metering Alerts and Notifications Settings
The following setting enables you to configure the reporting of metering issues.
•Metering Alerts and Notifications - enables/disables the reporting of metering alerts and notifications. See Processing Virtual Traffic Manager Metering Discrepancy Warnings.
You can monitor the capacity of the /data partition that is used for the storage of metering logs. See Monitoring the Storage Capacity of Metering Logs.
Configuring the FLA Checker
The Services Director VA uses an automatic FLA checker. Refer to the Pulse Services Director Advanced User Guide for details. To configure the global Flexible Licensing Check, click Enable or Disable. This selection is applied automatically.
Updating Auto Cleanup of Failed vTMs
The following setting enables you to configure the auto-deletion of failed vTMs:
•Auto Cleanup vTMs - enables you to set the required behaviour for the deletion of failed vTMs, see Configuring Auto Cleanup of Virtual Traffic Managers.
Updating Date and Time Settings
You can change the date and time settings for the Services Director VA from the System > Date and Time Settings page. Settings are in three categories:
•Basic date and time settings. To change the basic settings, set the correct Date and Time, and click Apply.
•Time zone settings. To change the Time Zone for your Services Director, select the required time zone and click Apply.
•NTP settings. Where NTP is active, basic date and time settings are overwritten.
•A default set of NTP services are listed. You can enable or disable any listed service by expanding the service entry and changing its state.
•You can add another NTP service by clicking Add and specifying details for the service.
•To stop the use of the NTP service, click Stop. Click Start to restart it.
Updating Administration Credentials
You can change the administration credentials for the Services Director VA from the System > User Credentials page. These credentials are used as follows:
•To log in to the Services Director VA.
•To access a terminal session for the Services Director, such as when you wish to use the command-line user interface.
•For REST API authentication.
On the Services Director Credentials page, specify a Password and a password Confirm before clicking Update. You are required to authenticate using the new credentials.
Updating Email Settings
You can change the email settings for the Services Director VA from the System > Email Alerts page. This page enables you to enter email notification details for your Services Director, to ensure that you receive email notifications for events and failures. You must specify:
•SMTP Server - This is either the hostname or IP address of the SMTP server in your network.
•SMTP Port - Typically, you will use the default port number, 25.
•Notification Email - All email from the Services Director will go to each entry in this comma-separated list of e-mail addresses.
•From Address - The required "from" address for all emails.
You can use "$fqdn" to substitute in this appliance's fully-qualified domain name.
Services Director VA automatically restarts the Services Director service after email changes are applied.
Updating the SSL Certificate
You can replace the SSL certificate for the Services Director VA from the System > Service SSL Certificate page. Under Certificate installed, click the hyperlink, and select one of the following options:
•Single file with public and private keys. Then, click Choose File to locate the certificate file.
•Separate public and private key files. Then, click Choose File to locate each file.
•Text content of the public and private keys. Then, paste the required text in.
Apply these changes to put them into use immediately.
Updating the REST API Port
You can update the REST API port used by the Services Director VA from the System > Service Status page. Apply this change to put the new port number into use immediately.
You can also start, stop and restart the Services Director service from this page. See Starting and Stopping the Services Director Service.
Updating Security Settings
You can change the security settings for Services Director VA from the System > Security Settings page. Defaults are applied automatically when the Services Director VA is created.
This page supports the following functions:
•Changing the Master Password for your Services Director. See Changing the Master Password for the Services Director VA.
•Enabling shell access for command line users of the Services Director. Refer to the Pulse Services Director Advanced User Guide.
You can also define the suspension criteria for failed Services Director logins.
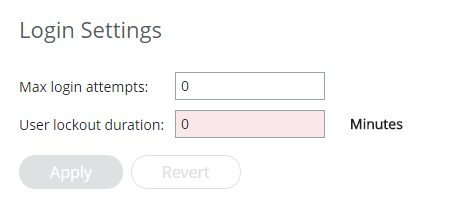
The Max login attempts defines the maximum number of failed Services Director login attempts for a user. Zero (the default setting) indicates that there is no maximum.
If the Max login attempts limit is reached, a lockout defined by the User lockout duration is applied. This has a default of 1 minute, and a maximum of 1440 minutes (equal to one day).
After the lockout period has ended, the same user can continue to attempt to log in.
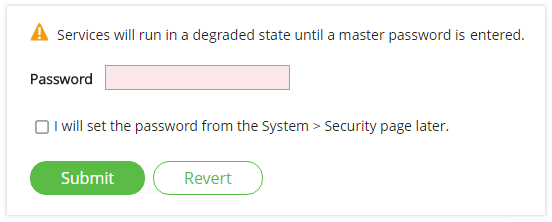
Changing the Master Password for the Services Director VA
The master password for the Active Services Director VA can be changed from the Security Settings page.
If you wish to reset the master password (that is, you do not know what the current master password is), refer to the Pulse Services Director Advanced User Guide.
Changing the Master Password
The master password for the Active Services Director VA can be changed from the Security Settings page.
If you wish to reset the master password (that is, you do not know what the current master password is), refer to the Pulse Services Director Advanced User Guide.
1.Access your Services Director VA from a browser, using its Service Endpoint IP Address.
2.Log in as the administration user. The Home page appears.
3.Click the System Menu, then click Security. The Security Settings page appears.
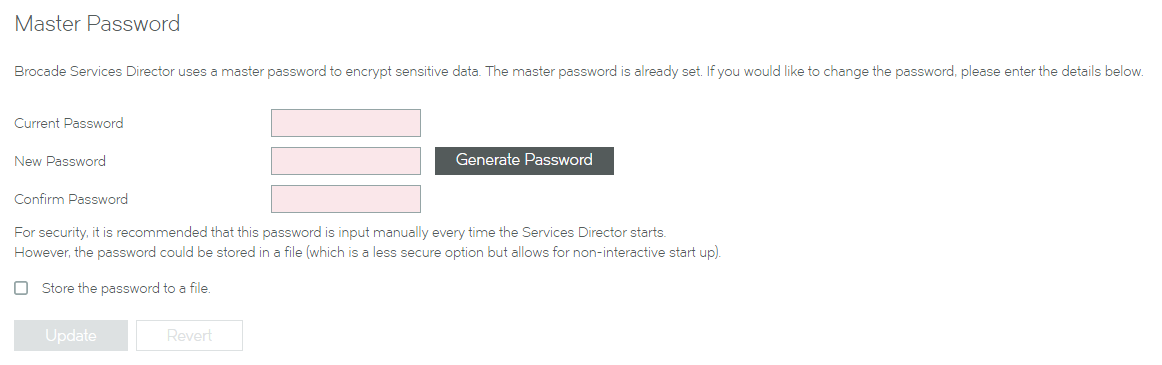
4.Enter the Current Password.
5.To change the master password, perform one of the following operations.
•Enter a new password and confirm the password.
•Click Generate Password. The Password and Confirm Password fields are populated automatically and an information dialog box is displayed.
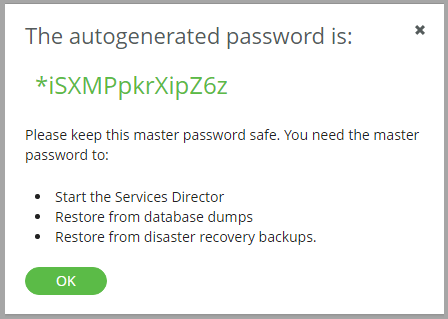
6.Click OK to close the information dialog box after recording the password, and then confirm that you have stored the password in the next dialog box.
It is essential that the master password (whether chosen yourself or generated automatically) is recorded and can be retrieved. Ivanti recommends that this password is recorded in a secure location that is separate from the Services Director VA.
7.Choose whether to store the password internally for automatic use:
•Select the Store the password in a file check box to store the master password within the Services Director VA. The password will be automatically available whenever the Virtual Machine for a Services Director VA restarts. However, you must enter the master password manually when you create a Services Director VA from a backup file.
•Clear the Store the password in a file check box to not record the master password. You must to enter the master password manually whenever the Virtual Machine for a Services Director VA restarts, and when you create a Services Director VA from a backup file.
See Entering the Master Password After a Virtual Machine Restart for details of restarting a VM.
8.Select the Store the password to a file check box if you want to store the master password internally for future use.
If you do not choose to store this password, you must enter it after the Virtual Machine for this Services Director VA restarts (see Entering the Master Password After a Virtual Machine Restart).
9.Click Update. The master password is changed.
10.Access your Standby Services Director VA from a browser.
11.Log in as the administration user.
A dialog box requesting the new master password immediately appears:
You may receive an e-mail notification of a raised master_password_fail alarm between you changing the master password on the Active Services Director VA and entering the new master password on the Standby Services Director VA.
12.Enter the new master password and click Submit.