Creating a Traffic Manager Cluster in the Azure Portal
Use the Azure Management portal to create a cluster of virtual machine instances based on the Traffic Manager template contained in the Azure marketplace.
To create a Traffic Manager cluster using the Azure Management portal
1.Login to the Azure Management portal (https://portal.azure.com).
2.On the main portal page, locate the Traffic Manager template using one of the following methods:
•Click + Create a resource and type “Pulse Secure Virtual Traffic Manager” into the search bar.
•Click the Marketplace icon in the main window, ensure Everything is highlighted in the category list, and then type “Pulse Secure Virtual Traffic Manager” into the search bar.
•Click the Marketplace icon in the main window and scroll through the list to manually locate the Traffic Manager.
For testing and development purposes, Ivanti also offers a specific edition of the Traffic Manager, entitled "Pulse Secure Virtual Traffic Manager Community & BYOL Edition".
3.The Traffic Manager is available under a range of licensing options. Click the desired variant to display the product information blade.
4.Click Create to display the “Create” blade.
The steps needed to create your Traffic Manager cluster are displayed in the main “Create” blade, with the individual settings applicable to each highlighted step displayed in a sub-blade to the right.
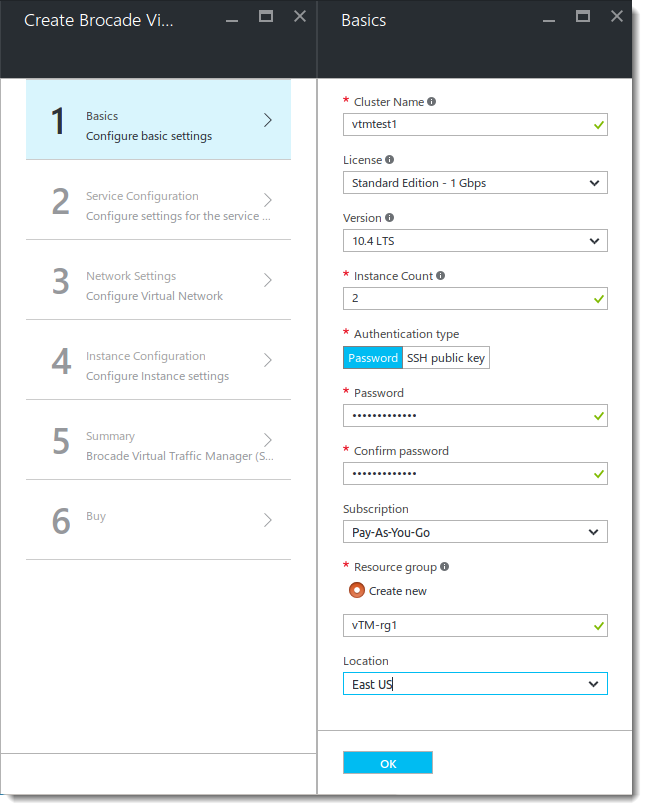
5.For the “Basics” blade, ensure the following items are configured as listed below:
•Cluster Name: Type a descriptive name for your Traffic Manager cluster.
•License: Choose your desired license type from the drop-down list.
•Version: Choose the product version you want to use.
•Instance count: The number of Traffic Manager instances you want to launch.
Instances you create here are not automatically joined together to form a cluster. To create your cluster, you must first perform initial configuration on each Traffic Manager instance you create, and then use the “Join a cluster” wizard to join them together. For information about configuring an instance, see Using the Initial Configuration Wizard. For information about creating a cluster, see About Creating a Traffic Manager Cluster.
•Authentication Type: Your password or SSH Public Key. If you click Password, enter your password in the boxes provided. If you instead choose to authenticate using an SSH Public Key, enter your key in the text box provided.
- If you choose to use a password, make sure it consists of printable ASCII characters only.
- If you choose to use an SSH Public Key, you must connect to the virtual machine console of a newly created Traffic Manager instance and set an authentication password before you can perform initial configuration.
•Subscription: Choose your Azure subscription.
•Resource Group: Type a descriptive name for a new resource group for this cluster.
•Location: Choose the geographic location into which your Traffic Manager virtual machines are launched.
6.Click OK to continue to the Service Configuration blade:
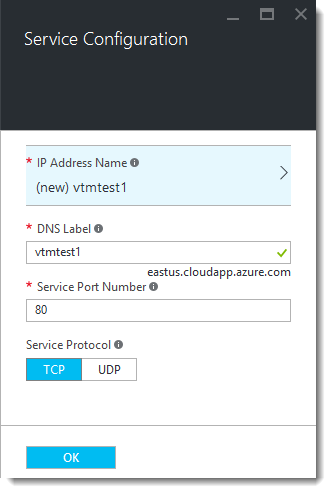
7.Ensure the following items are configured as listed below:
•IP Address Name: Choose a name to describe the public IP address Azure assigns to your cluster for service traffic (and for administrative access to your cluster members). Azure pre-populates this setting with the same name as your cluster. To change the IP address name, or to select an existing IP address, click the currently selected IP Address Name to display the “Choose Public IP Address” blade. Select an existing available IP Address, or type your new name into the box provided.
•DNS Label: Type the domain name you want to use for the cluster. Azure pre-populates this field with the name of your cluster. The fully qualified domain name (FQDN) becomes a concatenation of the DNS label, the region selected, and “cloudapp.azure.com”. For example, “vtmtest1.eastus.cloudapp.azure.com”.
•Service Port Number: Type the port number for the service your cluster is going to manage. To add further ports, modify the resource group settings after you have created the cluster.
•Service Protocol: Choose the protocol for your service.
8.Click OK to continue to the Network Settings blade:
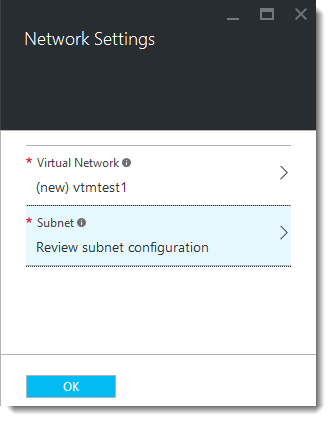
9.Choose a Virtual Network for your Traffic Manager cluster to reside on. Azure assumes you want to create a new virtual network, using the cluster name as an identifier. To instead select a previously created virtual network, or to make changes to the address space being allocated to the new virtual network, click the virtual network name to reveal the “Choose Virtual Network” and “Create Virtual Network” blades.
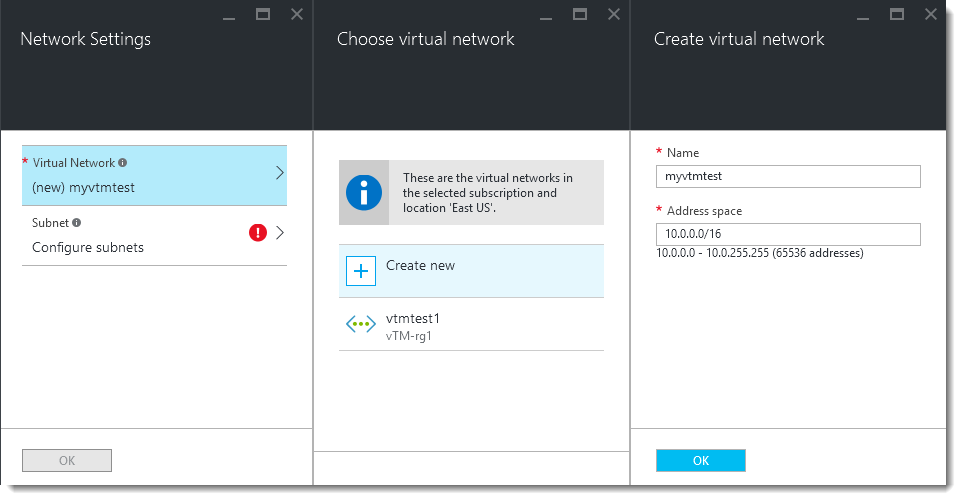
10.To save your changes and return to the “Network Settings” blade, click OK.
11.After you have selected your virtual network, you must configure the subnet your Traffic Manager cluster uses. Click Configure Subnets to choose the desired subnet:
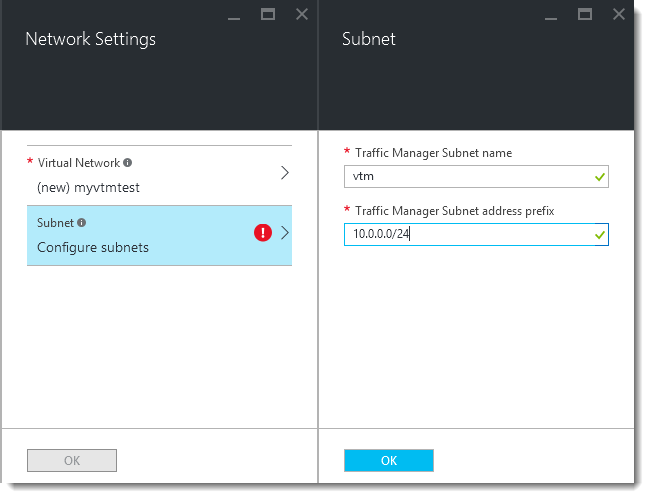
12.If you configured a new virtual network, enter a subnet name and address prefix in the “Subnet” blade. If you instead selected an exisiting virtual network, choose a subnet. Click OK to save your changes.
13.Click OK to continue to the Instance Configuration blade:
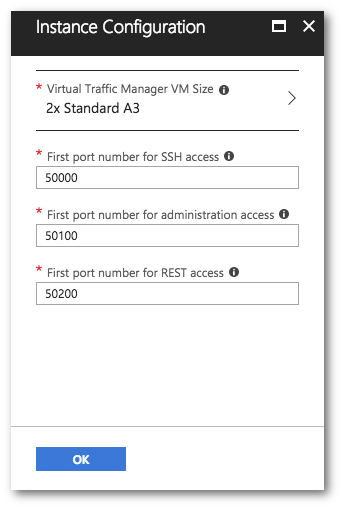
14.Configure the settings as described below:
•Virtual Traffic Manager VM Size: Choose the resource and pricing model for your Traffic Manager instances.
•First port number for SSH access: Azure uses Network Address Translation (NAT) to enable access to your individual Traffic Manager instances through specific ports on the public IP address for the service. Use this setting to determine the base port for SSH access to your Traffic Manager instances. Each instance in the cluster has SSH enabled at an incremental port number, starting at the base port you specify here. For example, choosing the default port of 50000 means that a cluster of 4 Traffic Managers uses ports 50000 to 50003 (one port per Traffic Manager).
•First port number for Administration access: As above, but for access to the Admin UI on each Traffic Manager instance in the cluster.
•First port number for REST access: As above, but for access to the REST interface on each Traffic Manager instance in the cluster.
15.Click OK to continue to the Summary blade:
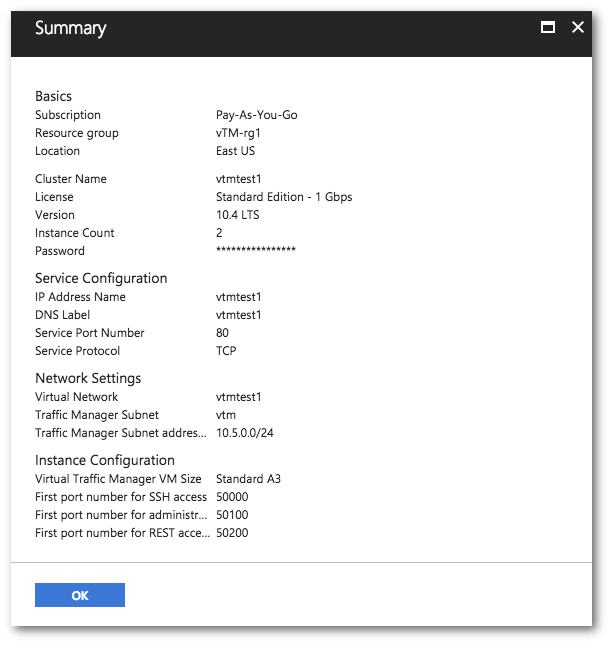
16.Verify the settings you have provided, and then click OK to display the Purchase blade.
17.Review the purchase terms and click Purchase to create your Traffic Manager instances.
After your Traffic Manager instances have been created, the Azure portal displays a blade showing the details for your newly created Resource Group. You can use the information shown here to obtain access to your Traffic Manager instances.
Configuring Your Resource Group to use More Than One Service Port
To manage an additional service in your Traffic Manager cluster, or if the existing service uses multiple ports or protocols, add load balancer and network security rules after creating the cluster.
To add load balancer and network security rules
1.Login to the Azure Management portal (https://portal.azure.com), then click the Resource Groups link in the menu bar.
2.Click the name of your Resource Group to show the resources it includes.
3.Click the name of the Network Security Group resource (typically named “<clustername>-vtmNSG”). If the Settings blade does not appear, click All Settings.
4.Click Inbound Security Rules.
5.Click +Add:
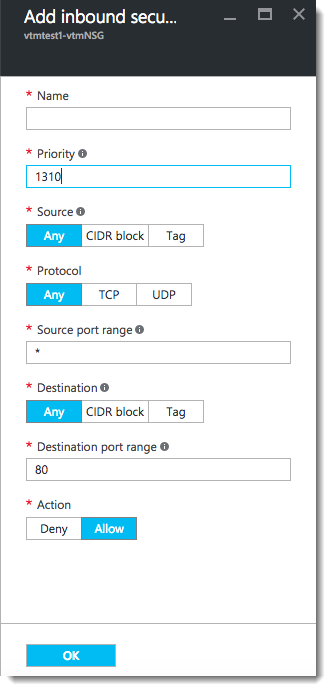
6.Configure the settings as shown:
•Name: Type a descriptive name for this rule.
•Priority: Enter the desired priority number. The higher the priority number, the lower the priority over other rules.
•Source: Select “Any”.
•Protocol: Select your traffic protocol.
•Source Port Range: Leave this setting as the default “*”.
•Destination: Select “Any”.
•Destination Port Range: Enter the port number or range for your traffic.
•Action: Select “Allow”.
7.Click OK to save your rule.
8.Navigate back to the blade for your resource group.
9.Click the Load Balancer resource name (typically named “<clustername>-vtmLB”).
10.From the load balancer settings blade, click Load balancing rules.
11.Click +Add.
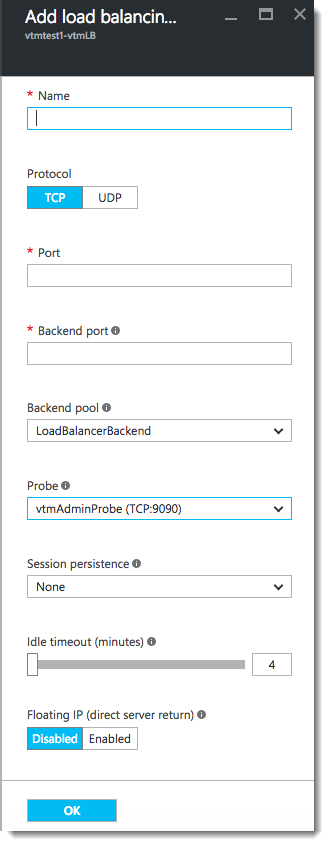
12.Configure the settings as shown:
•Name: Type a descriptive name for this rule.
•Protocol: Select your traffic protocol.
•Port: Enter the port number for your traffic.
•Backend Port: Set to the same value as Port.
•Backend Pool: Leave as the default value.
•Probe: Leave as the default value.
•Session Persistence: Select “None”.
•Idle Timeout (minutes): Set to a timeout value suitable for your service.
•Floating IP (direct server return): Select “Disabled”.
13.Click OK to save your rule.