Configuring Jail Break Compliance Detection
This section describes iOS compliance and jailbreak detection in Pulse Workspace.
Overview of Jailbroken Devices
Jailbreaking is a process that allows Apple iPhone, iPad and iPod Touch users to gain root access to the iOS operating system, and therefore bypass usage and access limitations imposed by Apple.
With a jailbroken device, an iOS user can install applications that are not available through the Apple App Store.
Jailbroken devices possess a greater risk of running malicious applications.
Support for jailbroken devices in Pulse Workspace addresses the following questions:
•How can an enterprise track network access by non-company-issued (BYOD) devices?
•Can an enterprise implement a policy that will restrict the mobile devices that access the network and protected resources, in the same way that SSL VPN solutions restrict user access?
Pulse Workspace addresses these issues with the Workspace data records, which can be used in the access management framework to enforce security policies.
After the device has been registered with the Workspace, the Pulse Secure client checks for the compliance of the device. If it identifies the device as non-compliant, it updates the status in the Workspace server. Based on the policy defined on the Jail Break Detection compliance property, it takes the action and report the status of the device as non-compliant. When the Jailbroken device attempts to connect the VPN, the PCS gateway checks for certain device attributes before allowing the access to the network.
PCS makes the Compliance status API calls to the Pulse Workspace server to make sure that the device meets the compliance requirements established by the Workspace. If the device is not compliant with the MDM, PCS restricts the VPN access to the device.
- Jailbreaking is one or many compliance considerations evaluated by Pulse Workspace, see Compliance.
- This works only for certificate-based authentication on Pulse Connect Secure v8.2R3 or later.
Configuring Certificate-Based Authentication
This section describes the process of configuring the MDM server and certificate server.
Configuring the MDM Authentication Server
The MDM authentication server configuration is used by the system to communicate with the MDM. In the device access management framework, the MDM server is used as the device authorization server.
To configure the authentication server:
1.Select Authentication > Auth. Servers to navigate to the Authentication Servers page.
2.Under New, select MDM Server and click New Server.
The New MDM Server page appears.

3.Enter a Name for the MDM server.
4.Click Pulse Workspace.
5.Click Save Changes.
Configuring the Certificate Server
The certificate server configuration enables device users to authenticate using the certificate pushed to the device by the MDM. The certificates are used for user authentication, and the users do not have to enter user credentials.
To configure the certificate server:
1.Select Authentication > Auth. Servers to navigate to the Authentication Servers page.
2.Under New, select Certificate Server and click New Server.
The New Certificate Server page appears.

3.Enter a certificate authentication Name.
4.Click Save Changes.
Configuring User Roles
User roles are classifiers for network access control policies. You create a set of roles to use in your classification scheme whether, for example:
•The device status is MDM enrollment complete or incomplete.
•The device status is MDM-policy compliant or non-compliant.
•The device is employee owned or company owned.
•The device platform is iOS, Android, or neither.
To configure user roles:
1.Select Users > User Roles to navigate to the User Roles page.
2.Click New Role to display the New Role page.

3.Provide Name, Description (optional), Options, and Access Features.
4.Click Save Changes.
You can also use system-created user roles.
Configuring Realm and Role Mapping Rules
The user realm configuration associates the authentication server data and MDM server data with user roles.
To configure the realm and role mapping rules:
1.Select Users > User Realms to navigate to the User Authentication Realms page.
2.Click New Realm to display the New Authentication Realm page.

3.Provide the following properties for the new authentication realm:
•Name, and an optional Description.
•For Authentication, select Certificate Auth.
•For Device Attributes, select MDM Server.
4.Click Save Changes.
The Role Mapping page appears.

5.Select the Role Mapping tab and click New Rule.
The Role Mapping Rule page appears.

6.For the Rule based on drop-down list, select Device attribute.
7.Click Update.
8.Provide a Name for the role.
9.Set the isCompliant attribute to is, and provide a value of 0 or 1 depending on the requirement.
10.Assign the required roles using Add and Remove.
11.Click Save Changes.
Configuring the Sign-In Policy
A sign-in policy associates devices with a realm.
To configure a sign-in policy:
1.Select Authentication > Signing In > Sign-In Policies to navigate to the Sign-In Policies page.

2.Click New URL..
The New Sign-In Policy page appears.

3.Specify a Sign-in URL, and (optionally) a Description.
4.In Authentication Realms, use Add and Remove to populate the Selected realms list.
5.Click Save Changes.
Configuring the Compliance Property
To configure compliance property on Pulse Workspace:
1.Add a new user workspace.
2.Add a policy and a tag to the newly created user workspace.
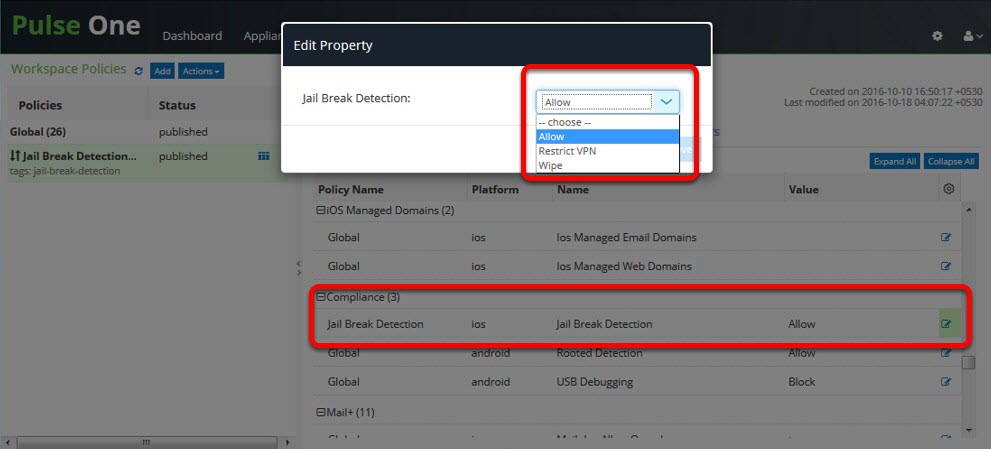
3.Configure the Jail Break Detection iOS policy property.

4.Select compliance based on your requirement - Allow, Restrict VPN, or Wipe.
5.Configure the VPN profile for the policy. For example: https://<ipaddress>/certificate.
6.Provision the iOS device that is jail broken, and ensure that the VPN profile get pushed. The action selected in the jail break iOS policy property is performed.