Use Case 2: Public Cloud Access
CASB Overviews
In this use case the CASB sits between the enterprises and cloud applications, controlling data flow through a single gateway in “real-time”. This ensures the data always goes to the cloud in a protected form. Proxy-based deployments can be enabled via 2 models:
•Forward proxy: CASB in forward proxy mode routes all traffic from endpoint to the CASB instance. CASB can either work with existing proxy services that can forward traffic to CASB proxy, or an agent software needs to be installed on managed devices to forward traffic to CASB (in our case, this is done via the ZTA client and Proxy PAC files).
•Reverse proxy: CASB in reverse proxy mode provides secure agentless connectivity for all devices, including mobile and unmanaged devices. It works by simply redirecting all traffic through the CASB from the service provider. This can be done by integrating either with existing IDaaS solutions such as Azure AD, Okta, Ping etc. SSO or with the Lookout Secure Cloud Workspace to securely redirect traffic through CASB.
This configuration is listed in the Appendix
The forward proxy model involves different configurations. Where Lookout becomes a centerpiece to link together one or more IdPs and many SPs. While nZTA can be used to securely connect end users to resources, there are use cases where the connections benefit from passing through the Lookout CASB (DLP, for example). This requires a few different configurations, done here via SAML integrations. This section only covers managed devices (devices with have the PAC file and Lookout Certificates installed). There are additional integration steps required for unmanaged devices because the device first reaches out to the resource, at which point that resource needs to be aware of Lookout to permit return traffic to be redirected. With a managed device, the connection will be first routed to the Lookout proxy before going to the resource.
•Integration of Lookout and an SP (in this guide we use Salesforce)
•This permits DLP between Lookout and Salesforce
•Integration of Lookout and an IdP (in this guide we use nZTA)
•This links the nZTA users to Lookout users which is important for UEBA and user-based policies
•The integration of nZTA with Salesforce
•This permits SSO between the Ivanti Secure Access Client through Lookout CASB onto Salesforce
Onboarding the device with nZTA then allows the Ivanti Secure Access Client to route all resource access via the required policies. Either directly to the resource or passing it through the CASB for inspection. This routing is defined via a Proxy PAC file. This directs the client browser to forward all connections to the CASB/SWG proxy gateway, except those defined as exceptions (in Step) which would then instead be directly routed by nZTA to the resource.
Forward Proxy Configuration
Lookout CASB Configurations (Forward Proxy)

Enable Proxy
To Enable Proxy:
-
Login to lookout console and generate certificates: Administration > Certificate Mgmt > Signing CA Certificates > Generate
-
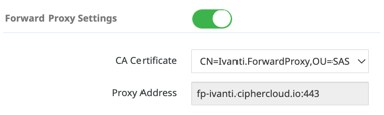
Enable Forward and Reverse Proxy: Administration > Environment Mgmt > Default
-
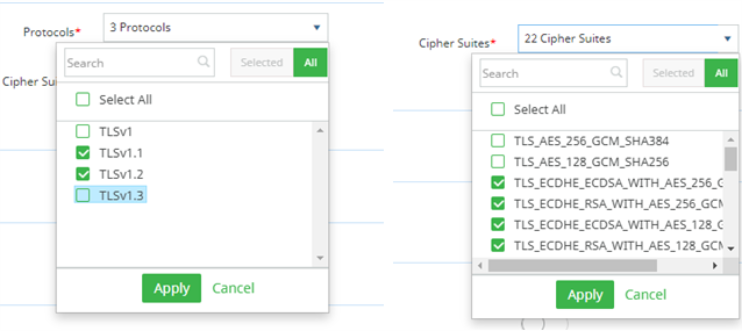
Check TLS Settings, exclude TLS 1.3, select All ciphers, and then remove the top two selections.
1.Select the certificate from the dropdown that you just created.
2.Define IP address range of ZTA connected devices (10.10.0.0/16)
•This allows ZTA traffic to go directly to the controller and gateways without interference of the Lookout proxy.
3.Define domains to exclude from CASB inspection (ZTA domain defined above as well as any network domains being accessed via ZTA to be excluded)
•For example, there may be resources the admin wants to deploy through ZTA (like internal documentation) where CASB inspection is not required. This will allow access to be secured but go directly from client to ZTA gateway without being routed through the CASB for inspection.
Proxy Authentication
To configure Proxy Authentication:
-
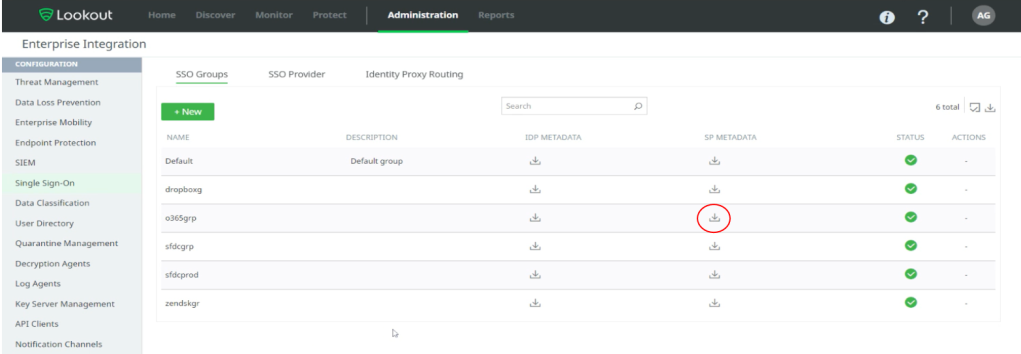
Configure SAML IdP in Lookout: Enterprise Integration > Single Sign-On
- In Default SSO group, download the SP Metadata from Lookout. This will be used in your external IdP for configuration, nZTA is used as an IdP in this use case.
-
Common fields used for attributes in IdP configuration (nZTA UI)
-
Login to nZTA console and open the Secure Access Policy wizard.
-
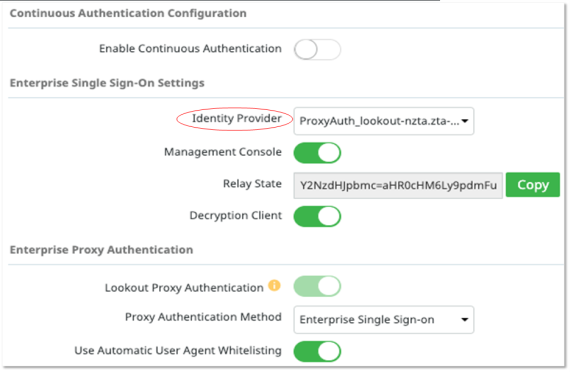
Enable Proxy Auth: Administration > System Settings > Enterprise Authentication
1.Attribute: email, Value: <username>
1.Input the FQDN of the Lookout console as the resource location.
2.Upload the SP Metadata file into nZTA and download the resulting Metadata file from the wizard.
3.You can skip over the Device Policy and User Rules sections (accept defaults) and assign access to a gateway.
•Once published it should show as a bookmark in nZTA
4.Go back to lookout and go to SSO Providers > New
5.Select Type: Identity Provider
6.Select Type: Identity Provider and the default SSO group
7.Upload the newly generated Metadata file from nZTA and validate
1.Select the IdP you created in the steps above in the settings
Download Proxy URL & Certs (install on endpoint)
-
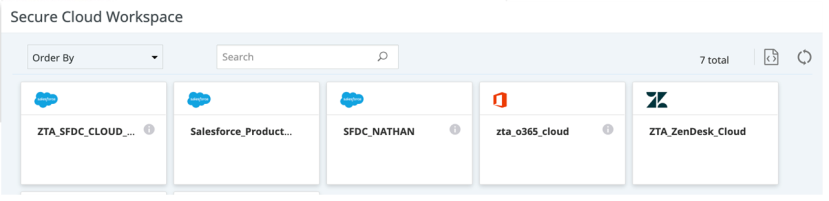
To download Proxy URL, Navigate to: Home > Secure Cloud Workspace in Lookout.
-
Download Certificates
1.Right click on the download link for the HTTP/ HTTPs Proxy PAC file and select copy link address
•Example of copied link: https://domain-ms.ciphercloud.io/public/proxy-casb-https.pac
•Example of copied link: https://domain-ms.ciphercloud.io/public/proxy.pac
1.To download Certificate, Navigate to: Administration > Certificate Management > Signing CA Certificate
2.Click Pem Certificate and copy contents, save as a .cer file on your desktop (You might need to update settings to show the file extension. Saving it as a *.cer.txt will not work.)
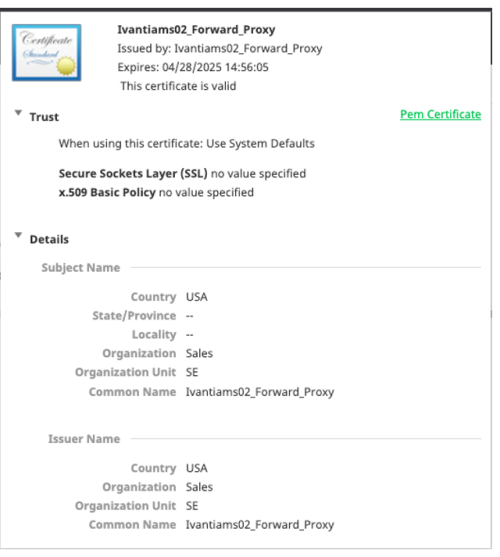
3.Install this certificate on the Endpoint
This certificate trust is required for Forward Proxy to operate properly
Proxy Auto Configuration
Proxy auto-configuration (PAC) file instructs a browser to forward traffic to a proxy server, instead of directly to the destination server. You can obtain the PAC URL for the Lookout tenant by clicking the PAC file icon from the Secure Cloud Workspace menu.
To get the PAC file URL from Lookout Tenant:
1.Click the PAC file icon located at the upper-right corner of the page.
2.Hover over the PAC file to apply to your system configuration and click its clipboard copy icon to copy PAC URL.
3.Select PAC file URL type and paste the copied PAC URL in the “Enter PAC file URL” field.
4.Click Save.
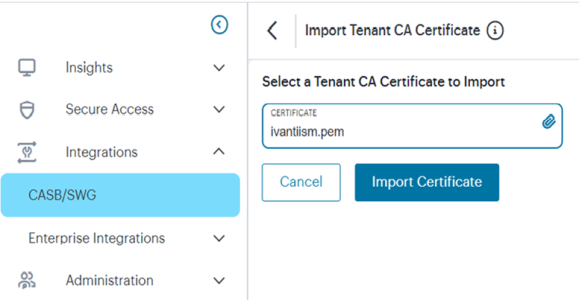
Importing the Trusted CA certificate to the nZTA
Trusted CA certificate from Lookout Tenant is required to establish a secured connection. Download the certificate in the .pem format from the Trusted CAs tab (Administration > Certificate Management).
To get the Trusted CA cert from Lookout Tenant and import to the user device:
1.In the Administration > Certificate Management page in Lookout, click the Trusted CAs tab.
2.Download the certificate and save it in the .pem format.
3.Import the root CA certificate to nZTA : navigate to Integrations > CASB/SWG and click on Import Certificate and select pem file downloaded from steps 2.
4.Click Save.
For further information, refer to the nZTA Tenant Admin Guide.
Configure SaaS Application on nZTA domain
To configure Salesforce as SaaS application on nZTA domain refer, here.