This is not the latest version of Ivanti Workspace Control documentation.View available documentation.
Connect Relay Servers
The first Relay Server in your environment must connect directly to the Datastore. Subsequent Relay Servers can connect to the Datastore or to parent Relay Servers.
The connections of a specific Relay Server are configured during or after the installation, depending on the installation method used. See Install the Relay Server component.
The Relay Server Configuration tool
Use this tools to view and manage the Relay Server's connections to Workspace Control environments.

-
Choose a Listening port between 1024 and 65535, that is not used by any other process on this machine. If a value lower than 1024 is entered, this port number will automatically be changed to 1024 when saving. If a value higher than 65535 is entered, this port number will automatically be changed to 65535 when saving. If the Relay Server is installed on a computer that is also an Agent, port 1942 cannot be used as the listening port for the Relay Server.
-
If no certificates are installed on the machine, select Relay Server Self Signed Certificate in Certificate field. For connection authentication, see Relay server certificates.
-
You can override the Default cache location. Per connected environment, a sub folder is created in %ProgramData%\Ivanti\Relay Server serves as cache location.
-
Click Add to open the Relay Server Connection Wizard.
Ivanti recommends using self-signed certificates only for testing purposes, not in a production environment.
-
Follow the prompts in the wizard to connect the Relay Server to the Workspace Control environment.
-
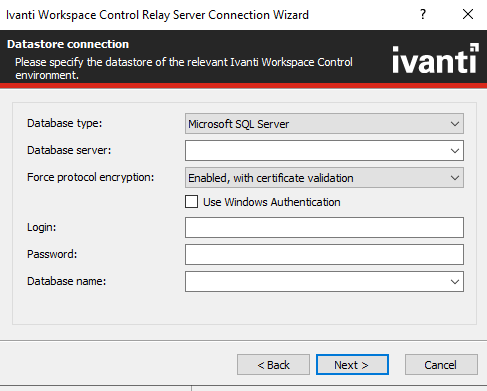
Choose Directly to an existing Datastore as the connection type and provide information about the relevant Datastore.
When connecting the Relay Server to a Datastore on a Microsoft SQL Server using Windows authentication, it is recommended to run the Relay Server Service with a Windows account instead of the Local System account. The Windows account that is used must be a domain account and needs the user right "Log on as a service".
-
Follow the prompts in the wizard to connect the Relay Server to the Workspace Control environment.
-
Choose To other Relay Server(s) as the connection type, then provide server name and listening port of one or more parent Relay Server(s).
-
Since each Relay Server can optionally host multiple environments, you also need to select the relevant environment. For easy reference, the correct environment name is shown in the Administration > Relay Servers node in the Console.
-
Provide the environment password that was configured in the Console.
-
In the configuration tool, choose Load from XML to import settings that you saved to XML when configuring a previous Relay Server. You can then edit the imported connection if necessary.
-
Use a command line:
RelayServer.exe /configfile=<file> /silent
When using this command line, the configuration tool will not open after execution. This command line is, for example, useful when the current Relay Server need to be reconfigured. It can be executed by using Ivanti Automation or any other tool.
After you finished the setting in the configuration tool, you can select Save as XML to export the list of environments and their settings to an XML file that you can use later when installing another similar Relay Server.
In an environment with cascaded Relay Servers where more than 50,000 transactions exist in the queue of one of the Relay Servers, the Relay Server will not accept new transactions from an Agent or another Relay Server until the queue has been reduced. This is to avoid problems such as that files in the Temporary folder are not cleaned up correctly, or refused transactions are not retried by an Agent or another Relay Server.