Installing VDX
To install Ivanti Virtual Desktop Extender, run the Ivanti VDX Installer. It is an installation package that contains the MSI files for the different VDX components, grouped in a single executable.
To install VDX and its components, use one of the following methods:
To install VDX and its components, follow these steps:
- Download the Ivanti VDX archive from the Ivanti Virtual Desktop Extender download page.
- Extract and run Ivanti VDX Installer <version_number>.exe.
- Click Next on the Ivanti Virtual Desktop Extender welcome window.
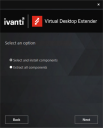
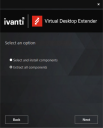
- Choose the Select and install components option to select which component(s) are installed on the machine, and then click Next.
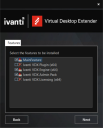
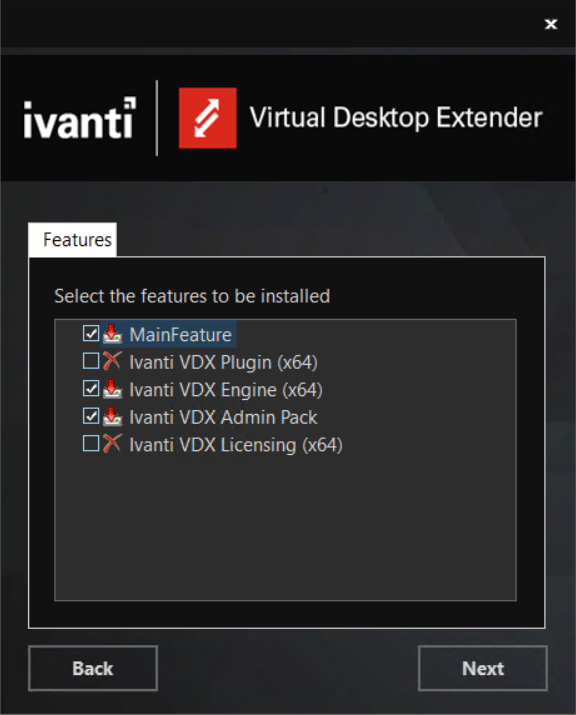
(click the image to enlarge it) - Select what features to install:
(click the image to enlarge it) - Click Install.
The Installer automatically detects which version (32-bit or 64-bit) of the component(s) to install, and then launches the installation wizard for every selected VDX component. - Once the install is complete, click Close to exit the VDX Installer.

To install individual VDX components, follow these steps:
- Download the Ivanti VDX archive from the Ivanti Virtual Desktop Extender download page.
- Extract and run Ivanti VDX Installer <version_number>.exe.
- Click Next on the Ivanti Virtual Desktop Extender welcome window.
- Choose the Extract all components option to extract all VDX component as individual MSI files, and then click Next.
(click the image to enlarge it) - Select a destination folder where to extract the MSI files, and then click Finish.
- Once the extraction is complete, click Close to exit the VDX Installer.
- Open the extraction destination folder and individually install the desired VDX components.

For details on installing VDX Licensing, see Installing and Configuring Licensing.
For details on installing other VDX components, see Installing Other VDX Components.