Using the Mobile Device Inventory
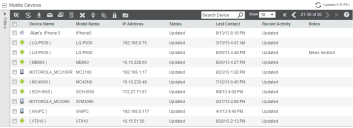
The Mobile Devices panel on the Inventory page shows a set of mobile and smart devices based on the currently selected folder. Details include the device model, if the device is compliant with its associated compliance payload, if the device is up to date, and the last time the device checked in.
For information about the printer device inventory, see Using the Printer Inventory.
For information about enrolling devices into the inventory, see Connecting Devices to the Avalanche Server.
Across the top of the panel are device tasks. You can select the checkbox to the left of the device name and then click the task (such as Update or Delete). When you use the Update command, a request is sent to the device that it contact the mobile device server and download any new settings. The Update All and Message All options will update or send a message to all of the devices associated with the current folder and any sub-folders. For more information about device tasks, see Device Tasks from the Console.
To search the device inventory for a specific device, type the device name in the search box.
The left side of the panel displays filters for the information displayed in the panel. When you use a filter, only the devices matching the filter's criteria show in the panel. Click on the Filters bar to expand the filters, then select the filters you want to use. You can use the automatic filters provided or click Edit Filters to create custom filters.
 Editing Columns
To display different information in the Mobile Device panel, create new columns or rearrange the columns.
To edit the columns displayed
1.In the Mobile Devices panel on the Inventory tab, click the Edit Columns.
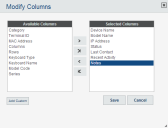
The Modify Columns dialog box appears. The Available Columns list shows column headers that do not currently display in the panel. The Selected Columns list shows column headers that currently display in the panel.
2.To add a column, select the column you want to display from the Available Columns list and click the Add.
-Or-
To remove columns from the Selected Columns list, select the column you want to remove and click the Remove.
The column name moves to the appropriate list.
3.Drag the column headers up or down to modify the order in which the columns appear in the Mobile Devices panel.
4.When you are finished, click Save.
The columns are rearranged to reflect your modifications.
To display custom columns
1.In the Mobile Devices panel on the Inventory tab, click the Edit Columns.
The Modify Columns dialog box appears.
2.Click Add Custom.
The Add Custom Property dialog box appears.
3.Click Select to select the property you want to add as a column. This can be a custom property.
4.In the Column Title text box, type the name of the column as you want it to display in the Mobile Devices panel.
5.From the Data Type drop-down list, select the data type for this property. (This can be string, integer, or boolean data.)
6.In the Tool tip text box, type the name of the tool tip you want to display. This is the text displayed if you use the mouse to hover over the column title.
7.Click Save to return to the Modify Columns dialog box.
The column name for the property is now listed in the Available Columns list.
8.Select the column name and click the Add to move the property to the Selected Columns list.
9.When you are finished, click Save.
The columns are arranged to reflect your modifications.
When you click Filters at the left of a panel, it displays filters for the information displayed in the panel. When a filter is selected, only items matching the filter appear in the panel.
Enable the Use Custom Filter option to create custom filters to filter devices using your own set of criteria.
To create a device filter
1.In the Mobile Devices panel on the Inventory tab, click Filters to expand the Filters area.
2.Select the Use Custom Filter check box then click the Edit Filters.
The Edit Filters dialog box appears.
3.Click New Filter.
4.Enter a name for the filter in the Filter Name text box.
5.Click the Launch wizard button to use the Selection Criteria Builder to create the Filter Expression.
The Selection Criteria Builder dialog box appears, allowing you to create a filter based on a variety of device characteristics. For more information on using selection criteria, see Using Selection Criteria.
6.When you have chosen the desired selection criteria, click OK.
The selection criteria appears in the Filter Expression text box.
7.Click Add Filter.
The filter moves to the Existing Filters list and is available to use.
8.Click Save Changes.
You can now select the filter from the Custom Filter drop-down list located to the left of the panel.
To apply a device filter
•In the panel, select the Use Custom Filter check box then select the filter from the Custom Filter drop-down list.
The Inventory list will refresh to display the devices according to the filter settings.
 Example - Creating a filter to view devices that haven't checked in for a week
This example custom filter will show you devices that haven't checked in to the Avalanche server for a week.
1.In the Mobile Devices panel on the Inventory tab, click Filters to expand the Filters area.
2.Select the Use Custom Filter check box then click Edit Filters.
The Edit Filters dialog box appears.
3.Click New Filter.
4.Enter a name for the filter.
5.Click the Launch wizard button.
The Selection Criteria Builder dialog box appears.
6.From the Properties drop-down menu, select LastContact.
7.Click Insert.
8.Click the >= button.
9.Type 7d.
•Example expression: LastContact >= 7d
10.Click Validate to validate the selection criteria.
11.Click OK.
The selection criteria appears in the Filter Expression text box.
12.Click Add Filter.
The filter moves to the Existing Filters list and is available to use.
13.Click Save Changes.
14.Select the filter from the Custom Filter drop-down list in the Mobile Devices panel to apply it.
The Mobile Devices panel only shows devices that fit the selection criteria of your filter.
 Using Device Filters
![]() Example - Creating a filter to view devices that haven't checked in for a week
Example - Creating a filter to view devices that haven't checked in for a week

