The first step in adding an application to your wireless network is to add it to Studio using the Applications view. This step makes the new application available to your network so it can be assigned to one or more servers.
After you add an application into the Applications view, you must assign it to a server to make it available to your users. See Adding an Application to a Server for more information.
To add an application to the Administrator:
1 From the Administrator, click Applications.
2 Click Add.
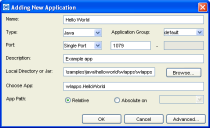
The Adding New Application dialog box appears.

Adding New Application Dialog Box
3 Type the name of the application in the Name text box.
4 Select the application type from the Type list.
Currently, Studio supports two application types: Java and Win32.
If you are using a Solaris OS, you will not be able to run Win32 applications.
5 Select the application group from the Application Group list.
6 Select a method for determining which port the application will use from the Port list.
• If you want the application accessible from any available port, select Find Available.
• If you want the application accessible only from a specific port, select Single Port. A text box becomes enabled, which you can use to type the port number you want the application to use.
• If you want the application accessible from a range of ports, select Port Range. Two text boxes become enabled, which you can use to type the start and end port numbers for the desired range. With this option selected, mobile devices can connect to the application through any port number that falls within the specified range.
If you use Find Available when selecting a port for the application, the port number may change each time you run the application. This may make it difficult to create a firewall exception for the application.
7 Type a description of the application in the Description text box.
This description appears in the Description column of the Application Distribution Manager table.
8 Type the path to the directory that contains the application in the Local Path text box.
You can also click Browse to navigate to this directory.
9 Type the full application name in the Choose App text box.
When using a Win32 application, you must include the file extension.
10 If you want multiple servers to have direct access to the application, select the Relative option.
This option instructs Studio to install the application on multiple servers, using a path that is relative to the Studio directory.
The location of the relative directory is automatically determined by Studio.
-Or-
If you want mobile device users to access this application from its original install directory, select the Absolute on option, and then select the system on which the application resides.
With this option, Studio accesses the application only from the system on which the application was initially installed, using the exact path specified in the Local Path text box. This option is recommended if you do not want an application distributed to multiple systems.
11 Click OK to add the application to the Application Distribution Manager table.
You can also configure advanced settings for your wireless applications by clicking Advanced. For more information about advanced application settings, see Configuring Advanced Application Settings.
Was this article useful?
The topic was:
Inaccurate
Incomplete
Not what I expected
Other