This section describes how to create and configure host profiles for use with Wavelink Studio applications.
Before you can connect the device to your network, you must create a host profile. This profile provides the address and port number of the host system to which you want the device to connect.
You can create as many host profiles as your network demands. Each profile can connect to a specific application on your network, allowing you to have multiple applications available to your mobile device users.
If you are using AutoDiscovery, some host profiles will appear automatically on the AutoDiscovered Hosts screen. For more information, see Connecting to an Application.
To create a host profile:
1 From the Client main screen, tap the Add New icon.
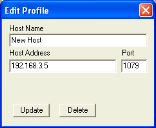
The Edit Profile dialog box appears.
2 In the Host Name text box, type the name for the profile.
This name appears beneath the host icon in the Client main screen.
3 In the Host Address text box, type the address of the host to which you want the device to connect. This value can be a DNS name or an IP address. Or, if you are using a Discovery Token, you can enter the token in the Host Address box and leave the Port text box blank.
4 In the Port text box, type the port number to which you want the device to connect.
5 Tap Update to confirm the settings.
The Studio Client creates the new host profile. The name of the profile appears beneath the corresponding icon in the Client main screen.
If you want to immediately connect to a host, tap the desired host icon in the Client main screen.
To establish SSL encryption between devices and your server, you must set up a new host profile through Wavelink Avalanche.
To create a new Host Profile for SSL:
1 Navigate to Profiles and click New Profile.
2 Select Software.
3 Enter a Name and select Enabled.
4 Click Save.
5 From the new profile screen, click New under Software Packages.
6 Select Create a new Avalanche package and enter a Name.
7 Click Next.
8 Upload the certificate file.
Studio only supports SSL certificate files with CER and CRT extensions.
9 Click Next.
10 From the Ad Hoc Package Options screen, enter a Title and set the Install Drive.
11 Click Next.
12 To provide selection criteria,, select Add selection criteria and enter a file name.
13 Click Next.
14 Wait for the software package installation to complete and then click Next.
15 Click Finished.
16 To begin using SSL encryption between the Studio Client and Server, enroll all desired devices with the new host profile.
By default, all enrolled Windows mobile devices have the UseSSL field selected from the device's Edit Profile screen.
Was this article useful?
The topic was:
Inaccurate
Incomplete
Not what I expected
Other