Avalanche powered by Wavelink
This page refers to an older version of the product.View the current version of the User Guide.
Understanding the Web Console
The top portion of the Web Console contains an alerts overview and a search box. It also displays the current user and provides links for logging out and help.
The alerts overview shows the number of critical, error, and warning alerts current in the user’s home folder. If there are any messages from the system administrator, system messages also appear with the alerts overview.
The search box allows you to search for content in the Console, such as a specific folder or profile.
Management Tabs
On the left side of the Console, use the management tabs to access inventories, profiles, reports, and other properties of your company. When you click Tools, the Tools menu provides you with access to the alerts, user management, scheduled tasks, and system information and settings. To minimize the management tabs, click the arrow at the top right corner of the tabs area.

For more information about each of the management tabs, see Management Tabs.
Folders
When you are on the Inventory or Profiles tab, the left of the Console displays the navigation tree, which allows you to organize and navigate to folders in your organization.
When you are using Avalanche with your LDAP server, the User Tree is displayed below the navigation tree. The User Tree is only available if you have the LDAP Integration Services installed on your local network and you have configured Avalanche to use it to communicate with your LDAP server.
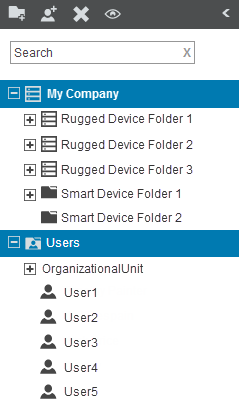
To minimize the folders, click the arrow at the top right corner of the folders area. For more information about using the navigation trees, see Using the Navigation Tree.
Panels
The main area of the Console generally consists of panels that display information about your company. The panels display information related to the tab and folder that are currently selected. For information about using and modifying the panels displayed, see Panels.
Edit Mode
In order to edit a profile, payload, device group, or folder properties, you must enter Edit Mode. While you are using Edit Mode, the item you are editing is locked. While an item is locked, no other user is able to edit the configuration. Edit Lock has an automatic timeout, at which point you are prompted in order to continue editing. If you do not respond to the prompt within the time configured, then you cannot save your changes.
You can configure the timeout and the length of time after the prompt appears before the user’s lock is terminated. The timeout for Edit Lock has a default setting of 15 minutes, and the prompt timeout has a default setting of 1 minute. For instructions on configuring these timeouts, see Configuring General System Settings.
To refresh the information displayed on the page, press F5.
This page refers to an older version of the product.View the current version of the User Guide.
The topic was:
Inaccurate
Incomplete
Not what I expected
Other
Copyright © 2017, Ivanti. All rights reserved.