The Studio Client allows you to map mobile device keys that appear on the skin to actual commands that invoke keypad functions or return specific characters.
The creation of the custom keypad involves two primary tasks:
1 Creating the color-coded mapping image.
2 Modifying the config.xml file to map the mobile device keys.
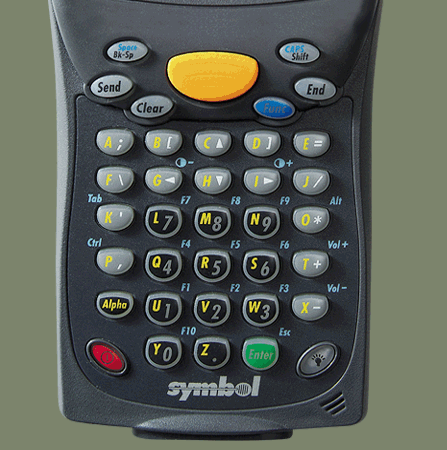
The mapping scheme for the Studio Client relies on the use of two bitmaps. The first bitmap is the skin image, and the second is a color-coded mapping image, in which colors correspond to the physical location of keys in the skin image. When running an application, the Studio Client superimposes these two images. When the user clicks a key, the Studio Client responds based on the exact color clicked by the user. For example, the following two figures show portions of the two bitmaps used for the default Client skin. The image below is the lower portion of the default skin, and shows the keys for the device.
Partial Image of the Default Skin
The image below shows the color-coded mapping image (lower portion) that the Studio Client superimposes over the skin bitmap. The location of each color in the mapping image corresponds precisely to a key location on the skin image.
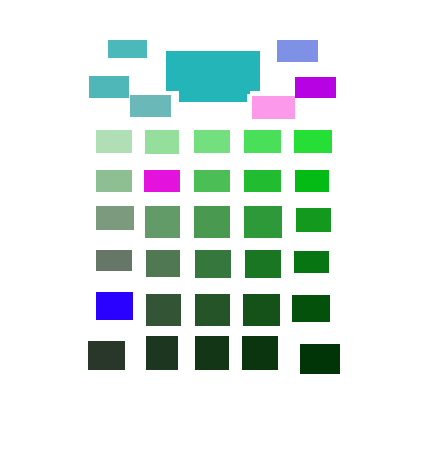
Partial Image of the Color-coded Bitmap for the Default Skin
To create the color-coded mapping image:
1 Ensure that you have configured a custom skin as described in Creating a Custom Skin.
2 Create a mapping image with color-coded elements that correspond to the physical location of keys in the custom skin.
You must use RGB colors in the mapping image, and you must determine the precise RGB hex value for all images that you want to map. It is recommended that you use a tool such as Adobe Photoshop to obtain RGB hex values.
3 In the config.xml file, located in <installpath>\WinEmulator\skins\<skindir>, set the value of the mappingImage attribute to the name of the mapping image. Do not include the path to the file.
You can copy a config.xml file from another skin directory and modify it as needed.
To map keys in the config.xml file:
1 In the config.xml file, add a button element for each key represented on the mobile device skin that you want to map to a command.
For example, the following entry in the configuration file:
<button toolTip=“Shift” onClick=“Key_Shift” mappingColor=“XXX”>
represents a key named Shift. In the normal keypad state, this key enables Shift mode (Key_Shift).
2 Optionally, add any additional commands for the key when the keypad is in Function or Alpha mode.
Use the OnFuncPressed and OnAlphaPressed attributes for this purpose. For example, if you modify the entry shown previously to use Function mode, the result might be:
<button toolTip=“Shift” onClick=“Key_Shift” OnFuncPressed=“Key_CapsLock” mappingColor=“XXX”>
In the Function keypad state, this key sets All Caps mode (Key_CapsLock).
3 Map the button element to a specific color used in the mapping image, using the mappingImage attribute.
The value of the mappingImage attribute must be a valid RGB hex value.
For example, if you modify the example shown previously, as follows:
<button toolTip=“Shift” onClick=“Key_Shift” OnFuncPressed=“Key_CapsLock” mappingColor=“0x7E91E5”>
it represents a key that maps to the color 0x7E91E5. To use this key, the mapping image must contain at least one key that uses a color with an RGB hex value of 0x7E91E5. In this example, you would typically use this color where the Shift key appears on the device skin.
See Elements of the Skin Configuration File for the list of possible values that can be used for the onClick, OnFuncPressed, and onAlphaPressed attributes.
Was this article useful?
The topic was:
Inaccurate
Incomplete
Not what I expected
Other
