Allowed Items
In this section:
- About Allowed Items
- Add an Allowed Item
- Remove an Allowed Item
- Access Times
- Application Limits
- Allowed Items and Trusted Ownership
About Allowed Items
Add Allowed items to group rules to grant users access to specific items without providing them with full administrative privileges. The Allowed items are displayed in the Allowed Items list under a selected group rule:
If a filename alone is specified, for example, myapp.exe, then all instances of this are allowed regardless of the location of the application. If the file is specified with the full path, for example, \\servername\sharename\myapp.exe, then only this instance of the application is allowed. Other instances of this application need to satisfy other Application Manager rules to be granted execution. For the files and folders in Application Manager that refer to items on a DFS share you need to specify the target server, rather than the Namespace server in the UNC path.
For more information, see Distributed File Systems.
A complete folder may be specified, for example, \\servername\servershare\myfolder, and all applications within this folder, and all subfolders if required, allowed to execute. No checks are made on the files within the folder and as such any file copied into this folder will be allowed to execute. Select Include subdirectories to include all directories beneath the specified directory. If you add a network file or folder path you must use the UNC name, as the Application Manager agent ignores any paths that are configured where the Drive letter is not a local fixed disk. The user can access the network application through a network mapped drive letter, as the path is converted to UNC format before validating it against the configuration settings. To automatically apply environment variables, select Substitute environment variables where possible in the Add a file or Add a folder dialogs. This makes the paths more generic for applying on different machines. Wildcards support provides an additional level of control for specifying generic file paths.
You can specify a complete drive, for example, W, and all the applications on this drive are allowed to execute, including subfolders. No checks are made on the files in the drive so any file copied into any folder on this drive is allowed to execute.
A file may be added along with a digital hash of the file. This ensures that only that particular file may be executed but from any location. For more information, see Signature Hashing.
A Network Connection Item can be specified. All files on the network are allowed to execute.
Choose which Windows Store apps are allowed. You can select one of the following:
- Allow All Installed Apps
- Allow the selected Individual Apps
- Allow all apps by a named Publisher
Groups can contain any number and combination of items, for example, the File, Folder, Drive, Signature, and Network for a particular application. All files are allowed to execute.
Add an Allowed Item
- Select the Allowed Items node in Rules > Group > Everyone.
- Click Add Item and from the drop-down arrow select Allowed.
-
Select the item that you want to make allowed, for example File.
The Add a File dialog displays.
-
Enter or browse for the file to be made allowed.
The Substitute environment variables where possible check box is selected by default. If it is not selected, environment variables will not be replaced with a generic environment variable.
- If applicable, enter any further information relating to the allowed item, in the Description field.
- Select Allow file to run even if it is not owned by a trusted owner if you want the file to run regardless of the owner.
- Select Ignore Audit Event filtering if you want to capture all events for this item regardless of what is set in Event filtering.
The selected item is listed in the Allowed Items work area.
If you want to disable a specific rule item, highlight the item, right-click and select Change State. This toggles between disable and enable. This can be useful when needing to troubleshoot with Support.
Remove an Allowed Item
- Select the Allowed Items node in Rules > Group > Everyone.
- Highlight the item to be removed.
-
Click Remove Item in the Rule Items ribbon.
The Remove Items dialog displays.
- Click Yes to remove the item or No to abort the task.
The selected application is listed in the Allowed Items work area.
Access Times
Access times allow you to specify what time and on what days a particular application is allowed to be run and can be applied to Allowed Items in Groups, Users, Devices, Custom Scripts, and Process Rules. Access periods can only be assigned when you check the Only allow files to run at certain access times option in the Access Times tab when adding or amending an allowed Item. Times can be amended using the Access Times option from the Rule Items ribbon. Access times can be added for file, folder and signature allowed items.
Assign Access Times
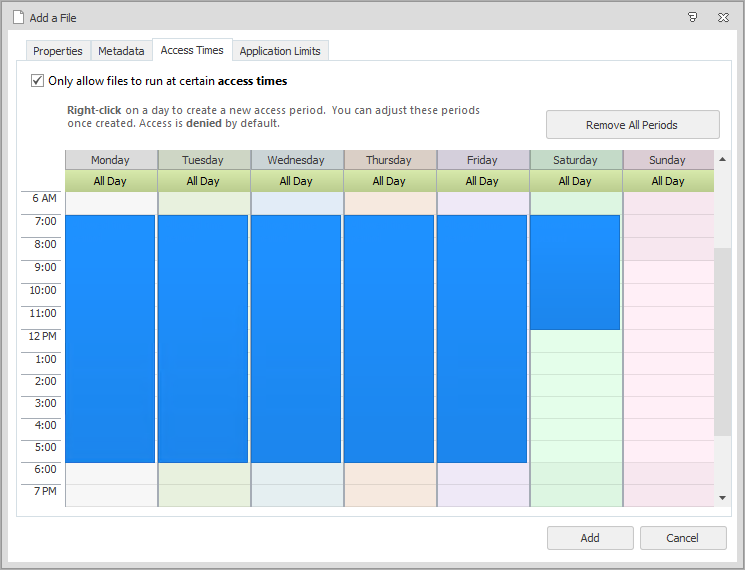
This task explains how to assign access times to an allowed item:
-
Select the Allowed Items node in Rules > Group > Everyone.
For the purpose of this example, the Everyone group is being used. This will vary depending on the group you select.
- Click Add Item and from the drop-down arrow select Allowed.
-
Select the item that you want to make allowed, for example File.
The Add a File dialog displays.
- Enter or browse for the file to be made allowed.
- From the Access Times tab, select Only allow files to run at certain access times.
- Right-click on the time and day an item can be accessed and select New Allowed Period. Repeat this step above to add any other access times.
- When the allowable periods have been selected, click Add.
Application Limits
Application Limits allow you to specify how many times an application can be run by a user during a session. You can configure limits when you check the Enable application limits option located in the Application Limits tab when you add or edit an Allowed item. You can use the Application Limits option from the Rule Items ribbon once you have added an item to a rule. Session-based Application limits can only be applied to Allowed Items in the Group, User, Device, Custom, Scripted, and Process rules. You can configure a message to displays to the user when the time limit is exceeded by using the Message Settings dialog, which you can access from the Global Settings ribbon.
Apply Application Limits

-
Select the Allowed Items node in Rules > Group > Everyone.
For the purpose of this example, the Everyone group is being used.
- Click Add Item and from the drop-down arrow select Allowed.
-
Select the item that you want to make allowed, for example, File.
The Add a File dialog displays.
- Enter or browse for the file to be made allowed.
- From the Application Limits tab, select Enable application limits.
- Select the application limit.
- Click Add.
Allowed Items and Trusted Ownership
By default, trusted ownership checking is enabled, therefore an application must always pass trusted ownership checking if it is enabled, even if the application is an allowed item. Although trusted ownership checking can be disabled completely, this is not recommended. However, if you need to provide a user with access to file, folders or groups that are not owned by a trusted user then you can disable the trusted ownership check when creating or editing the item by checking the Allow File to run even if it is not owned by a trusted owner option.