Browser Control
In this section:
About Browser Control
In the Browser Control node, you can:
- Configure URL redirection
- Add web installations
- Import snippets
- Add elevated websites
The following browsers are supported: Internet Explorer (8, 9, 10, and 11), Edge (Chromium), and Google Chrome.
When a new configuration containing Browser Control items, such as URL Redirection, is deployed to endpoints, users need to close and re-open browsers before the configuration can take effect. Closing and re-opening the browsers enables the browser extensions. If an existing configuration with Browser Control is updated with additional Browser Control items, the updated configuration takes effect as soon as it is deployed. The browser extensions are already enabled, so it's not necessary to close and re-open browsers.
To implement Browser Control features in Internet Explorer, Application Control uses a Browser Helper Object (BHO) which is loaded at browser startup. For Google Chrome and Edge (Chromium) browsers, Application Control loads the Ivanti Cascade extension.
URL Redirection
Use this feature to automatically redirect users when they attempt to access a specified URL. By defining a list of prohibited URLs, you redirect any user attempting to access a listed URL to a default warning page or a custom web page. You can also select to allow certain URLs which, when used in conjunction with redirects, gives you further flexibility and control and lets you create a whitelist of websites.
URL Redirection is configured in the Add URL to Redirect dialog accessed from the Browser Control ribbon and the URL Redirection functionality is enabled or disabled for the application in Advanced Settings, accessible via the Manage ribbon.
Before you configure this feature for Internet Explorer, you must enable third-party browser extensions using Internet Options for each of your endpoints. Alternatively, this can be applied via Group Policy.
For URL redirection within Chrome and Edge browsers, all managed endpoints must be part of a domain.
Add URL Redirection to a Rule
- In the Application Control navigation pane, select the Browser Control node for the rule to which you want to add URL redirection.
-
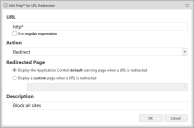
In the Browser Control ribbon, select Add Item > Add URL.
The Add URL to Redirect dialog displays.
-
Enter a URL - you can use both IP address and text URLs.
Tip: If you use a text URL and the server also acts on IP addresses, add both the text URL and the IP address for that server.
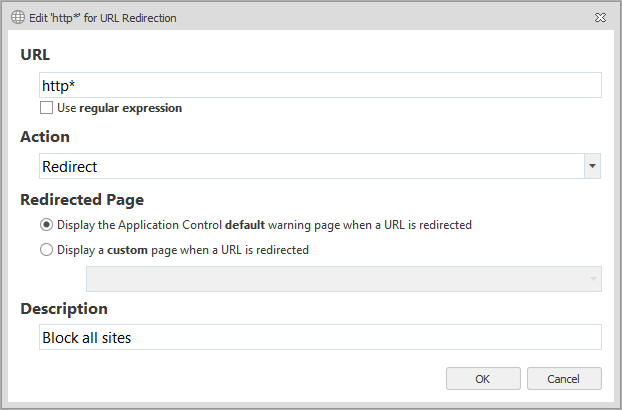
- Select the action for the URL - Redirect or Allow.
- If you have selected Redirect, choose the required response
when a user attempts to access the prohibited URL:
- Display the default warning page when a URL is redirected - the user is directed to the default "Access is denied" page.
- Display a custom page when a URL is redirected -specify an alternative location instead of displaying the default warning page. For example, this could be a location within your organizations network, a file on a disk, your intranet or another website.
- Enter an optional description for your future reference.
- Click Add.
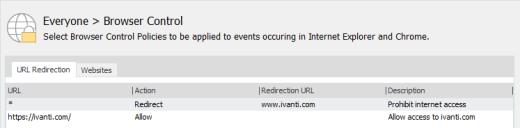
The redirect is added to the URL Redirection tab of the Browser Control work area. When the configuration is deployed and users attempt to access the specified webpage, the redirected page displays in the same browser instance. If an URL allow has been configured, the website opens as expected.
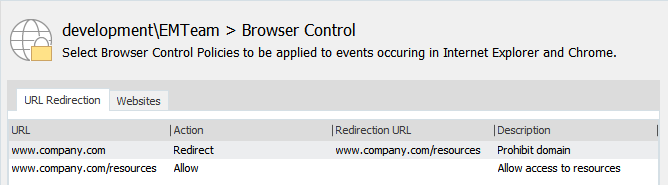
Control URL access within a domain
URL Redirection can also be used to control access within a single domain - access to a domain can be prohibited whilst access to certain of its sub-domains is permitted. For example, you could deny access to www.company.com whilst allowing access to www.company.com/resources.
Configure a whitelist with URL Redirection
You can use URL Redirection to implement a whitelist approach to controlling internet access for your organization. By creating a redirection that prohibits access to all internet sites, you can add items to allow access to the web sites you want to be available for your staff.
-
Create a URL redirect item for either http* or *. This prevents users accessing everything on the internet.
-
Create redirects to allow access to the required URLs.
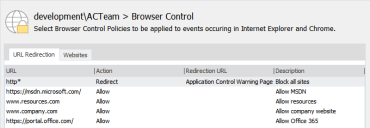

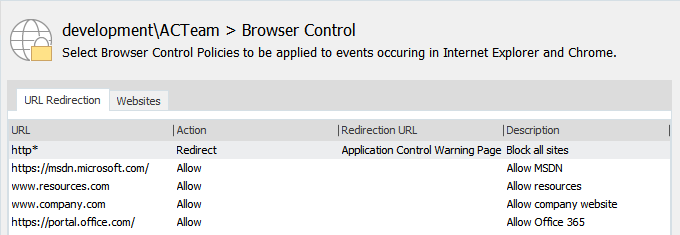
When the configuration is deployed to your users, they will not be able to access any website other than those configured in URL Redirection items with allow actions.
Allowlisting and Inline Frames
If you are using an allowlist approach and allow access to a site that uses Inline Frames (iFrames), you must set up URL redirection items to allow the URLs for each inline frame. If the URL for an inline frame is redirected, the main website URL is also redirected, even though it has been configured to be allowed.
For example, you have redirected all websites using http* and you have created a URL allow so your users can access http://www.website.com. That website uses an inline frame to display http://www.frame.com, which has not been allowed. Users will not be able to open http://www.website.com because access to http://www.frame.com is denied due to the http* redirection.
Find Inline Frame URLs with Rules Analyzer
You can use Application Control Rules Analyzer to find the URLs for inline frames. The URLs can then be allowed in URL Redirection so the parent websites are available to users.
You must be logged on with an account that allows read and write access to the registry of any managed endpoint for which you wish to generate logs for using Rules Analyzer, and have read and write access to the local registry of the computer on which the console operates.
- In the Application Control console, create a configuration with URL redirects to:
- Redirect all URLs to the website for which you want to find the inline frames
Allow access to that website
- Deploy the configuration to the endpoint on which you are creating the configuration.
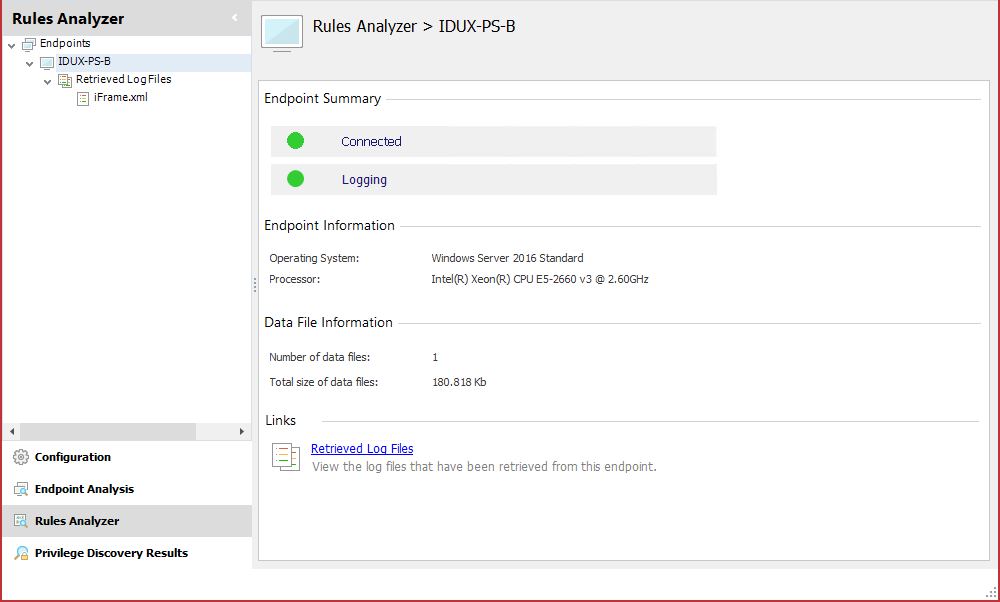
- Select the Rules Analyzer navigation button.
- Click Add Endpoint and select Browse Deployment Group or Browse Domain/Workgroup.
- Select the endpoint you are going to use to for discovering inline frame URLs.
-
Click Start Logging.
-
Access the website for which you want to find the inline frames.
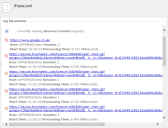
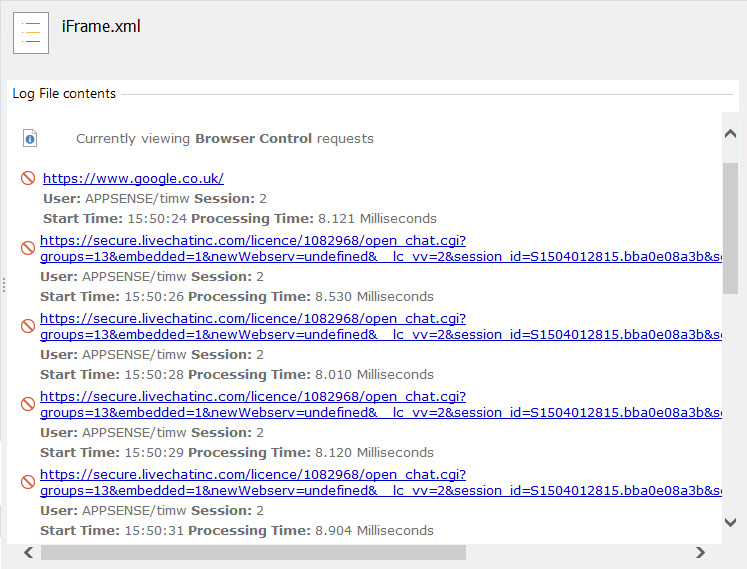
Access to the site is allowed but the URL of the inline frame is prohibited so the browser gets stuck in a loop, redirecting to itself. During this process, Rules Analyzer logs details of any redirecting inline frames.
- Close your browser and return to the Rules Analyzer.
-
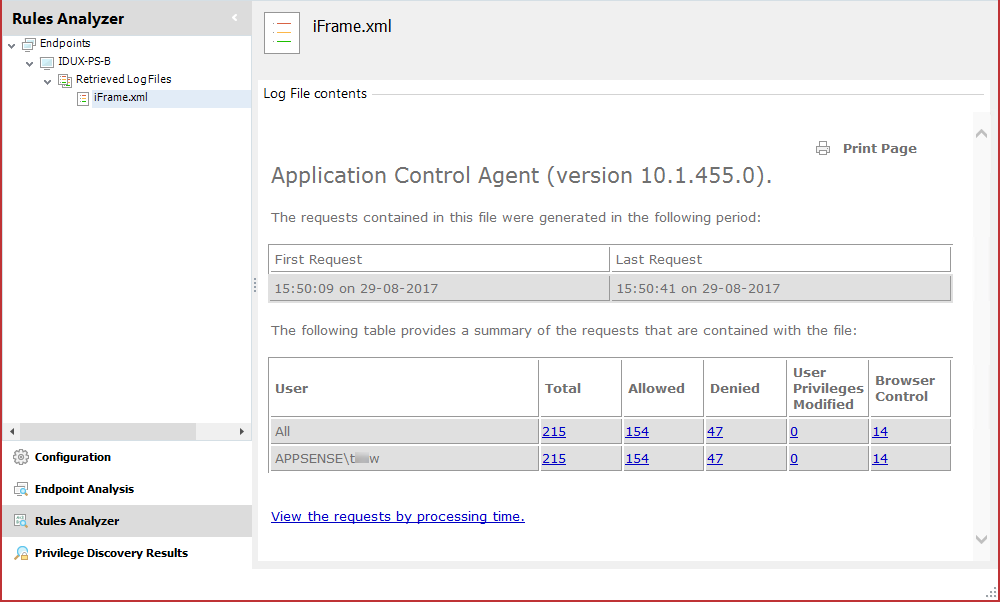
Click Stop Logging and enter a report name.
Results of your analysis are displayed.

-
Click a link in the Browser Control column to display the logged URL requests.
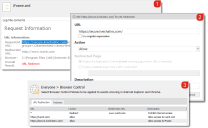
-
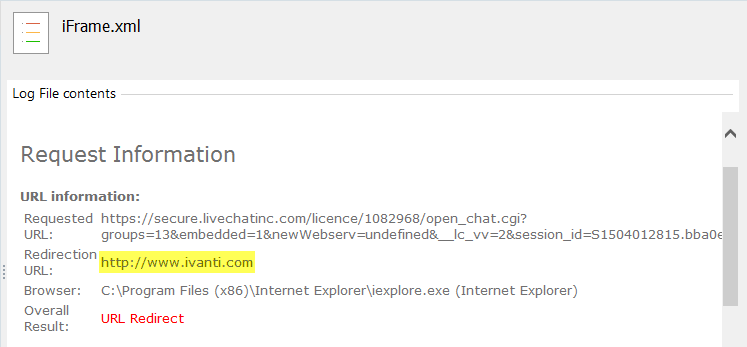
Select a URL to display further details. From the details, you can confirm that the redirection occurred from the site you allowed.

-
Copy the domain and use it to create a new URL Redirection allow.


When the configuration is deployed, users can access the site because the inline frame is allowed.
Add a Web Installation
A number of Web Installations require the end user to have administrative rights. For example, an ActiveX control or a web download such as Microsoft Update Catalog.
The Web Installation feature of Browser Control allows the elevation to administrative privileges for ActiveX installers from a particular domain. You can create a basic configuration whereby you enter the name of the domain only, or you can create an advanced configuration and specify the CAB file for an item, its Class ID, and the minimum and maximum versions. You can also specify that only signed controls from the domain can be installed.
The download of .exe or MSI files is not handled directly by Browser Control, it is can be controlled using Trusted Ownership (refer to System Controls).
However, Browser Control can be configured to prevent the .cab file from being installed (typically downloaded as part of an .exe or MSI, and used in Windows software installation).
- Navigate to the Browser Control node under your selected rule.
-
In the Browser Control ribbon, select Add Item > Add Web Installation.
The Add New Web Installation dialog displays.
- Enter a descriptive Name for the web installation.
- To ensure your users only connect only legitimate web installations, select Only allow signed controls.
- Enter the Website URL for the installation. For example, enter adobe.com to allow installations from all of adobe.com.
- Click Add.
The Websites tab in the Browser Control work area displays the name of the new web installation.
Add a Web Installation (Advanced Settings)
- Navigate to the Browser Control node under your selected rule.
-
In the Browser Control ribbon, select Add Item > Add Web Installation.
The Add New Web Installation dialog displays.
- Enter a descriptive Name for the web installation.
- If you want to allow only signed controls, select the relevant checkbox.
-
Select Use advanced settings.
The Advanced Settings section becomes active.
- Enter the Installer URL, for example http://www.example.com/control.cab.
- Add extra validation, if required: Class ID, Minimum Version, and Maximum Version
- Click Add.
The Websites tab in the Browser Control work area displays the name of the new web installation.
Snippets
Snippets give Application Control the ability to import and merge partial configurations into a currently open configuration in the console.
This is particularly useful for web installations because, along with creating the web installation part of the configuration, a number of other configurable items need to be considered. These include Process Rules, Allowed Items, Trusted Vendors, any Digital Certificates, Elevated items, and so on.
The Import Snippets dialog allows you to select from any snippets supplied to the default directory. The dialog also allows you get the latest snippets available from the Ivanti Marketplace.
Download Recent Snippets from Ivanti Community
- Select a rule.
-
In the Browser Control ribbon, select Import Snippet.
The Import Snippet dialog displays.
-
Click the Ivanti Community link in the dialog.
The most recent snippets are displayed.
-
Select a snippet and save it to C:\Program Files\AppSense\Application Manager\Console\Snippets. This is the default location.
The snippet is now available in the Import Snippet dialog.
- Select the snippet and click Add.
-
To view what is included in the snippet click the View the items that will be added to the configuration link.
A configuration report displays.
- Click Continue.
The snippet is imported and you can view the items in the various nodes in the console.
Elevated Websites
This feature is supported in 32 and 64-bit versions of Edge Chromium, and Chrome, and 32-bit versions of Internet Explorer ( 8, 9, 10 and 11).
The Elevated Website feature allows you to define a particular URL which opens in a separate secured, but elevated, instance of Internet Explorer. When elevated, the user is granted administrative privileges allowing them to install and execute components such as additional software or ActiveX controls specific to the site.
Before you configure this feature, you must enable third-party browser extensions using Internet Options for each of your endpoints, alternatively this can be applied via Group Policy.
It is recommended that this feature is only used for internal websites which require elevation to run content such as diagnostic tools or a moderated portal containing administrator approved software.
You should not elevate websites that may allow users to obtain software which may pose a security risk to your network; such as pop-ups, search bars or external links.
- Select the Browser Control node under your selected group.
- Select the Browser Control ribbon.
-
Click Add Item and select Add Elevated Website.
The Add New Elevated Website dialog displays.
- Enter a meaningful description for your reference.
-
Enter the web address in the Website URL field.
You can use regular expressions to define websites. To use this functionality, select Use regular expression and enter the website URL criteria. For example, https://.+\.com$ elevates and redirects any secure websites with the .com extension - such as https://www.cisco.com, but does not elevate and redirect http://www.cisco.com
For more information, see Wildcards and Regular Expressions
- Click Add.
- Save the AAMP file.