File Director
This page refers to an older version of the product.View the current version of the online Help.
Clustering
File Director supports clustered infrastructures and failover processing and is fully scalable to meet the varying demands of organizations. Appliances within the cluster share the same configuration settings.
In this section:
- Overview
- Prerequisites
- Enable clustering on the first appliance
- Configure additional cluster nodes
- Manage a cluster in the admin console
Overview
If an appliance is taken offline, the File Director service is maintained by having users log on in the background to an alternate appliance in the cluster, according to the current network load balancing method. Although users are momentarily disconnected, they are automatically returned to the service without losing their session state. Any transactions that have not been committed to the database are rolled back.
When setting up the load balancer, ensure that session persistence is setup for the File Director cluster. It is recommended that the cookie insert method is used.
When clustering is enabled the following configuration is replicated between nodes:
•DNS configuration
•SSL certificate (not the pending CSR state, only when a certificate has been fully applied)
•Syslog server
•QoS configuration
•License
•Global Web Client access
•HTTP mode
•NTP configuration
•Database configuration
•Kerberos configuration
The following configuration items are not replicated:
•Maintenance mode
•TLS configuration
All other settings such as Directory Services (LDAP), Cloud Connector configuration, Map Points and Policy are stored in the shared database and are also not replicated in the cluster.
File Director 2019.3 introduced functionality to the web admin console that was previously available only via the VM console. If you have not yet updated to the 2019.3 release click the VM console headings below for step-by-step instructions.
Prerequisites
Before configuring clustering:
•Ensure all appliances that will be in your cluster are of the same version.
•Create a new blank database in the default SQL instance (SQL Server 2008, 2008R2, 2012, 2014 and 2016 are supported).
•Create a new SQL account.
It is recommended that the SQL Service account has DBO privileges.
Note that only local SQL accounts are supported, domain-based accounts are not supported.
•Configure the switching environment to allow Broadcast traffic.
•Ensure all cluster nodes that are to share common settings are available on the same network to allow low frequency broadcast discovery between the cluster peers.
•Take a backup of the current appliance configuration.
Enable clustering on the first File Director appliance
Before you enable clustering it is strongly recommended you take an appliance snapshot.
1.Open the admin console for the first cluster node.
2.Click the Cluster tab
3.Enter a cluster name.
4.Enter a cluster port number. The default port is 49152 but you can use any port from 49152 to 65535.
5.To save the cluster configuration, click Save.
6.A cluster configuration change message is displayed prompting you to confirm your action. Click OK.
If File Director detects your selected node has non-default configuration settings applied, a message is displayed. You will need to determine whether you want the values of your node configuration to be overwritten with those used by the cluster - or not.
•If the node is being added to an existing cluster it is likely that you want the existing cluster settings to overwrite those of the current node. Click Yes.
•If the node is the first one to be added to a cluster click No.
Disable clustering
To disable clustering, follow the process above and at step 3 leave the cluster name field blank.
1.Start the appliance for the first cluster node.
2.Press F2 and logon.
3.Select Cluster Configuration and press Enter.
4.Enter a cluster name.
5.Enter a port number. The default port is 49152 but you can use any port from 49152 to 65535.
6.Press F10 to save the cluster configuration.
VM console - disable clustering
To disable clustering, follow the process above and at step 4 leave the cluster name field blank.
Configure an external Microsoft SQL database
1.Log on to the admin console for the first cluster node.
2.Select Cluster > Database.
3.Select Microsoft
SQL Server.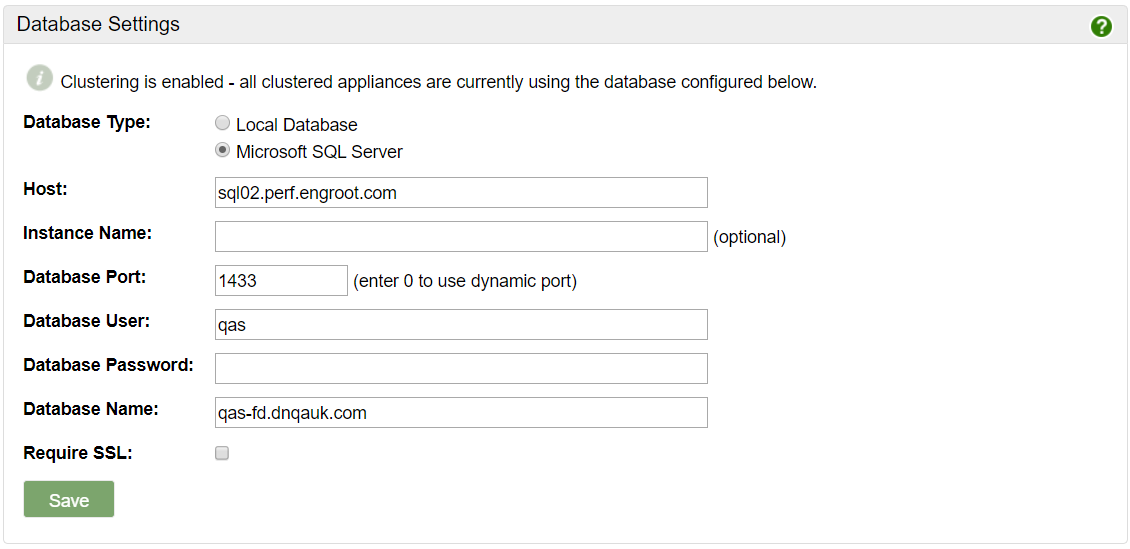
4.Complete the following fields to configure your database:
•Database Host: DNS name or IP Address of the SQL server
•Database Port: 1433
Note, if your SQL box is using dynamic ports, enter port 0.
•Database User: SQL account created during initial SQL setup.
•Database Password: Password set for the SQL account created during initial SQL setup.
•Database Name: Name of the blank database created during initial SQL setup.
5.Click Save to configure the database. A message confirms the setup has been successful.
6.To enable SQL server encryption select the Require SSL checkbox. A valid certificate must be in place.
When this option is enabled, SSL encryption is applied on the connection to the external MS SQL Server database. The File Director server will only allow SQL connections that have encryption enabled and are configured with a valid SSL certificate (from a public CA) that can be authenticated.
By default this option is not selected. This means that by default the SQL connection is unencrypted. If your SQL Server requires encryption connections will be encrypted but the SQL Server certificate will not be authenticated.
7.Restore the backup of the appliance configuration you took prior to configuring clustering.
8.Select Home > Status to ensure that appliance is fully set up.
Configure the appliance on the initial cluster node
It is recommend that once you have enabled clustering and set up the database on the first node, you configure the appliance settings or restore a backup with the required settings configured. When further nodes are added to the cluster, the appliance settings are automatically applied.
Application settings, such as Map Points, are not automatically moved to the SQL server when database settings are updated. A backup of the required settings must be restored to seed these settings in the database when switching from a configured local setup to a clustered one.
Check the Load Balancer Status
1.Select Configuration > Advanced.
2.Locate the Load Balancer Status section.
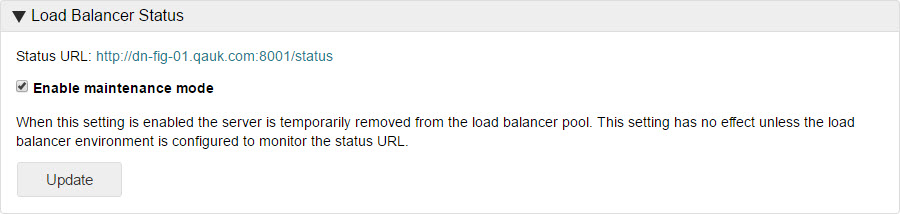
3.Click the Status URL link to check the health status of a server in a load balanced environment. A status page is displayed showing one of the following:
•Success - The server is functioning correctly within the load balancer pool.
•Failure - The server is either offline or is not functioning correctly within the load balancer pool.
Configure additional cluster nodes
Once you have successfully configured the initial cluster node, configure all the nodes you want to be part of the cluster.
1.Log on to the admin console for the node you want to add.
3.Enter the name of the cluster. Note, this must be the name you entered when setting up the initial cluster node (see Enable clustering on the first File Director appliance, above)
4.If you are not using the standard port number (49152), enter the port number you are using for your cluster.
5.To save the cluster configuration, click Save.
IfFile Director detects your selected node has non-default configuration settings applied, a message is displayed. You will need to determine whether you want the values of your node configuration to be overwritten with those used by the cluster - or not.
•If the node is being added to an existing cluster it is likely that you want the existing cluster settings to overwrite those of the current node. Click Yes.
•If the node is the first one to be added to a cluster click No.
To confirm clustering is operating correctly, log on to the web admin for the node and make a simple change, such as changing the DNS settings. When you log on to another node in the cluster, the same change should be apparent.
You will need to repeat this process for each new node that you add to the cluster.
1.Start the appliance for the node you are adding to the cluster.
2.Log in to the admin console for that node and Upload a License File.
3.On the appliance text console, press F2 and log in.
4.Select Cluster Configuration and press Enter.
5.Enter the name of the cluster. This must be the name you entered when setting up the initial cluster node.
6.If you are not using the standard port number (49152), enter the port number you are using for your cluster.
7.Press F10 to save the cluster configuration.
If you have already performed configuration via other nodes of the cluster, the settings are automatically updated to any new nodes in the cluster and thereafter should automatically remain synchronized through updates when any setting changes.
To confirm clustering is operating correctly, logon to the web admin for the node and make a simple change, such as changing the DNS settings. When you log into another node in the cluster, the same change should be apparent.
Repeat this process for every new node that you add to the cluster.
Manage a cluster in the admin console
If clustering is enabled on the appliance, you can check the status of the nodes in your cluster, apply a patch to your cluster, update, and shutdown nodes.
Patch server
By nominating one of the nodes in a cluster as the patch server, you can apply patches to all nodes in the cluster from one console. Any active node in a cluster can be used as the patch server.
The Cluster tab within File Director lists all nodes within the cluster. If no patch server is set, a warning message is displayed at the top of the Cluster Configuration dialog. Alternatively, when a node is selected as the patch server it is easily identified within the listed nodes.
To make a node the patch server, log into the admin console for that node. In the Clustering tab click Promote to Patch Server. The current node is now identified as the patch server.

Status
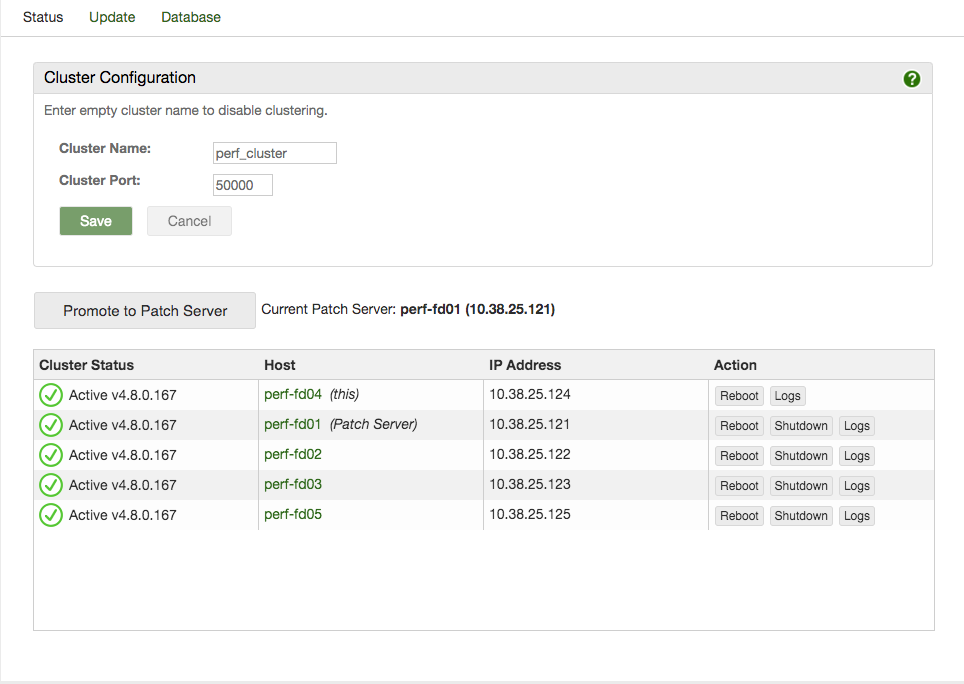
The status shows the name of the cluster, the File Director server version, and which node in the cluster is currently the patch server.
If a patch server has not been set, these details are not displayed.
Cluster status
The state of each node in the cluster is denoted by the icon displayed in the Cluster Status column.
| Icon | Meaning |
|---|---|

|
Active The node is online and using the correct File Director server version, determined for the cluster by the version applied to the patch server. |

|
Warning This can signify one of the following states: A patch server has not been set. Set one of the nodes as the patch server.
|

|
Inactive The node is offline. |
Host
Displays the name of each node in the cluster, identifies which node is the patch server, and which node you are currently accessing through the web admin console. Click on a name to see details of the current component versions of that node and its patching history. The name of the current node and the patch server are annotated appropriately.
IP address
The IP address of each node in the cluster.
Action
You have a number of action buttons available in the Action column. When selected, the action is applied to the specific node only:
•
Logs
Appliance logs are available for download for each appliance in your configuration. They enable auditing and trouble-shooting.
Press Logs to download the appliance logs for each node required.
•Reboot
Remotely reboot the node.
•Remove
If a node is inactive press Remove to remove it from the list. If a removed node is subsequently restarted, it will automatically re-display in the list.
•Shutdown
Remotely shutdown the node.