Define Merge Actions for Relationship Advanced Properties
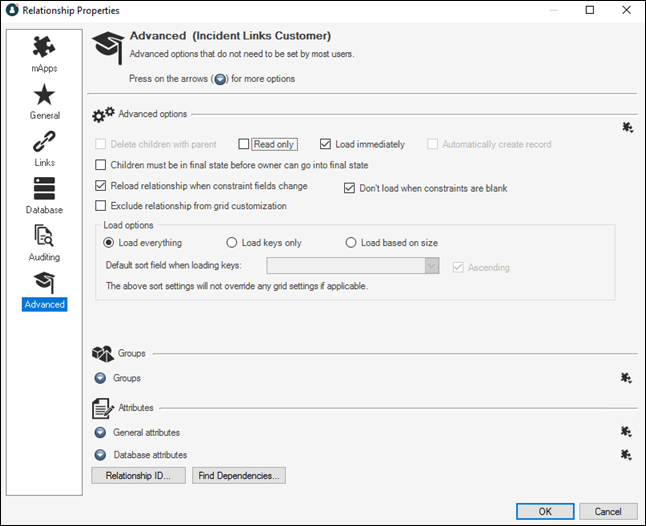
Use the Advanced page in the Relationship Properties window to define whether or not to overwrite the following advanced properties for a relationship:
- Advanced Options: Options for deleting child objects when parent objects are deleted, making records in the relationship read-only, reloading the relationship when constraints change, etc.
- Groups: Options for defining group member type when child records are added (only applicable if the child object is a group object).
- General Attributes.
- Database Attributes.
Note: The Relationship Properties window is available in the Relationship Editor (accessed from within the Object Manager in the mApp Editor).
Good to know:
- You can only configure separate merge actions for individual relationships and relationship properties if the Business Object is set to Merge in the Business Object Properties window (mApps page). If the Business Object is set to any other option, or if Include in mApp is cleared, then you cannot configure separate merge actions for individual relationship properties.
- For more information about defining advanced properties for a relationship, refer to Define Advanced Properties for a Relationship.
-
If you are configuring merge actions for Business Object relationships that were previously applied as part of a Protected mApp™ Solution, the main differences are:
- You see a shield icon
 next to
each content-protected relationship.
next to
each content-protected relationship.
- If a Business Object relationship is content-protected, it cannot be deleted.
- Relationships created during the installation of a Protected mApp Solution cannot be edited or deleted.
- If you create a new relationship, you can edit and delete it.
- See Protected mApp™ Solutions.
- You see a shield icon
To define merge actions for relationship advanced properties:
- Add a Business Object to a mApp using the Add Business Object to mApp wizard.
- Open the
Relationship Properties window:
- In the
Object
Manager within the
mApp Editor,
select the
Edit Relationships task in the
Structure area.
The Relationship Editor opens.Tip: You can also select Edit Relationship
 on the
mApp Editor
Toolbar to open the Relationship Editor.
on the
mApp Editor
Toolbar to open the Relationship Editor.
- Select a relationship, and then select Edit.
- In the
Object
Manager within the
mApp Editor,
select the
Edit Relationships task in the
Structure area.
- Set the relationship to
Merge:
- Select the mApps page, and then select Include in mApp.
- In the Options area, select Import to Target System.
- From the If already present drop-down list, select Merge as the merge action for the relationship.
- Select the
Advanced page.
- Select
mApp
 next to each property merge area, and then select a
merge action:
next to each property merge area, and then select a
merge action:
For advanced options:
- Do not overwrite advanced options: Select this option to leave the advanced options unchanged in the target system when the mApp Solution is applied.
- Overwrite advanced options: Select this option to overwrite the advanced options in the target system when the mApp Solution is applied.
For Group settings:
- Do not overwrite group settings: Select this option to leave the group settings unchanged in the target system when the mApp Solution is applied.
- Overwrite group settings:
Select this option to overwrite the group settings in
the target system when the
mApp Solution is applied.
Note: These settings are displayed only if the child object in the relationship is a group object.
For general attributes:
- Do not overwrite general attributes: Select this option to leave the general attributes unchanged in the target system when the mApp Solution is applied.
- Overwrite general attributes: Select this option to overwrite the general attributes in the target system when the mApp Solution is applied.
For database attributes:
- Do not overwrite database attributes: Select this option to leave the database attributes unchanged in the target system when the mApp Solution is applied.
- Overwrite database attributes: Select this option to overwrite the database attributes in the target system when the mApp Solution is applied.
-
Select OK.
- Prepare the mApp Solution for Distribution (), or save the mApp Solution () to continue making other changes.