Configure Customer Approvals
Users and customers can be configured to carry out approvals.
Prerequisites
-
Only customers who upgrade to CSM 10.2.0 and later and want to use new approvals need to follow these steps. Those who install CSM 10.2.0 and later as new customers already have these changes in the OOTB content.
- Remove any existing validation of Approval.Approver Name field against the User Info table.
- Remove any existing autopopulation of RecID for the Approval.Approver ID field when there is a change in the Approval table.
- Remove any existing validation of the Approval.TeamName field against Other validation types for all user teams.
- Create an approval block that triggers when a field is updated on the Incident Business Object. See Create/Edit an Approval Block.
Make the approval button visible on the approval tab of the Incident form arrangement. See Configure Customers Approvals for the CSM Portal.
Add an Attribute to Capture Email Address for Block-Created Approvals
This step can be skipped if manual customer approvals are being configured, but it does ensure that the Email Address field is populated for block-created user and customer approvals.
As customers are supported when creating approvals from the Approval Block, as part of the mechanism that generates the Approval records, it retrieves the Email Address of the User/Customer and populates the Email Address field in the Approval record. In order for this to work, we need to add a new General Attribute of ApprovalApproverEmail to the field as follows:
- In CSM Administrator, select Create a New Blueprint.
- Select the Approval Business Object.
- Select Edit Business Object.
- Select the Approver Email field.
- Right-click and select Edit Approver Email field.
- Select Advanced.
- Select the drop-down arrow
 to expand the General Attributes section.
 - Select an empty row and enter the attribute name of ApprovalApproverEmail.
- Select OK.
Add Field to Hold Approval Type Name
An approver type name field needs to be added so that the system can distinguish between user and customer approvals.
- In CSM Administrator, select Create a New Blueprint.
- Select the Approval Business Object.
- Select Edit Business Object.
- Add a new field and enter ApproverTypeName for the name.
- Leave the rest of the options as default and select OK.
You may also want to set the default value of the ApproverTypeName field to User. See Define General Behaviors for Fields
Add Radio Buttons to Approval Form
New radio buttons are needed on the approval form so that user or customer can be selected. They are each configured to store a value for ApproverTypeName (see above).
- In CSM Administrator, select Create a New Blueprint.
- Select the Approval Business Object.
- Select Edit form.
- Double-click to open the existing Approval form.
- Create enough space for the two new radio buttons, then drag them onto the form and rename them to User and Customer using the Label text box in the toolbar.
- Right-click on each radio button and select Control properties.
- Select ApproverTypeName from the Associated Field drop-down list and then set the value to User or Customer respectively.
- Select Save.
Configure Approver Type ID Field
Next you need to configure an expression to use the correct System Function dependent on the Approver Type Name. The expression looks at the value in the ApproverTypeName field and uses the System Function to assign the result to the ApproverTypeID field
- In CSM Administrator, open an existing Blueprint.
- Select the Approval Business Object.
- Select Edit Business Object.
- Select the ApproverTypeID field and then select Field Properties.
The Field Properties window opens. - Select Properties.
- Select the Calculated Value check box and then select the ellipsis alongside.
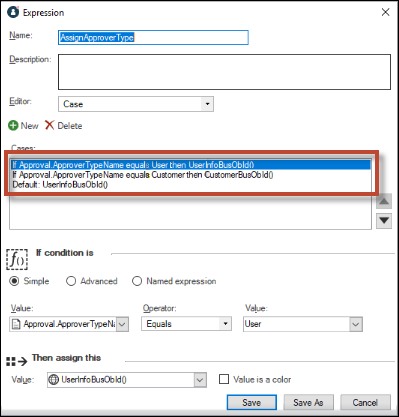
The Expression window opens. - Select Add
 to add a new expression and name it AssignApproverType.
 - Configure the expression as follows:
- Select Case from the Editor drop-down list.
- In the If condition is true section, select the Simple type of If statement, and then define its properties:
- Select Approval.ApproverTypeName from the far left Value drop-down list.
- Select Equals from the Operator drop-down list.
- Select User from the far right Value drop-down list.
- In the Then assign this value section, define the Then value:
Select UserInfoBusObId() from System Functions in the Token Selector. - Repeat step 8 by selecting to add another line to your expression. Replace User with Customer and UserBusObId() with CustomerBusObId().
Your finished expression should look like this: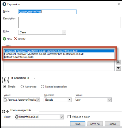
- Select Save and then OK.
Configure Validation on Approval Name
Use Validate From User/Customer on the Approver Name field.
- Open CSM Administrator and open an existing Blueprint.
- Select the Approval Business Object.
- Select Edit Business Object.
- Select the ApproverName field and then right-click to select Edit Approver Name field.
- Select Validation/Auto-Population and then enter the following values:
- Select Validate from User/Customer.
- Select By User Type.
- Select Full Name from the Attribute Name drop-down list.
- Select Approval.Approver Type ID from the User Type ID drop-down list.
- Select OK.
Configure Auto-Population on ApproverID and ApproverEmail
Use the auto-population type Attribute to auto-populate the ApproverID and ApproverEmail fields.
- In CSM Administrator, open an existing Blueprint.
- Select the Approval Business Object.
- Select Edit Business Object.
- Select the ApproverEmail field and then right-click and select Edit Approver Email field.
- Select Validation/Auto-Population and then enter the following values:
- Select Autopopulate.
- Select the Approver Name field for Populate when there is a change in table: Approval.
- Select Populate with: Attribute.
- Select Email from the Attribute drop-down list.
- Select OK.
- Select ApproverID field and then right-click and select Edit Approver ID field.
- Select Autopopulate.
- Select the Approver Name field for Populate when there is a change in table: Approval.
- Select Populate with: Attribute.
- Select RecID from the Attribute drop-down list.
- Select OK.
Configure Validation for Team Name and Autopopulation for Team ID
Use the validation type All Teams and Workgroups to validate the Approval TeamName field against all available teams and workgroups. Use the Autopopulation type of Team ID for the Team ID field.
- In CSM Administrator, open an existing Blueprint.
- Select the Approval Business Object.
- Select Edit Business Object.
- Select the Team Name field and then right-click and select Edit Team Name field.
- Select Validation/Auto-Population and then enter the following values:
- Select Other Validation Types.
- Select All teams and workgroups from the Valid team/workgroup drop-down list.
- Select OK.
- Select the Team ID field and then right-click and select Edit Team ID field.
- Select Autopopulate.
- Select the Team Name field for Populate when there is a change in table: Approval.
- Select Populate with: Team ID.
- Select OK.
For information on configuring customer approvals in the portal, see Configure Customers Approvals for the CSM Portal.