Tour the Content Manager User Interface
Use the Content Manager to manage all items and their dependencies, especially during the creation of mApp® Solutions.
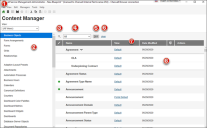
The following image shows the Content Manager User Interface (UI):
- Menu items: Switches from Content Manager to Object Manager and back again. You can also access these options using the View menu.
- Definition list: A list of all content items grouped by type within your CSM system. The lower list is grouped by item type.
- Search or Filter: Toggles between a search input field and the filter drop-down list.
- Filter drop-down list: Filters content by Business Object type or association (relationship).
- Counter: Displays the number of results (items in your system) in the main pane when you make a selection from the definition list and/or use the filters.
- Clear: Clears any filters that are in use.
- Columns: The columns displayed vary depending on your item selection. You can sort on any column apart from Actions. If you hover over a column heading, you can see the current sort direction (ascending/descending) and a tooltip if one is applicable.
- Edited: In the column with a pencil icon, green dots appear when the contents of the active Blueprint have changed.
- Name: Name of the CSM item.
- View: The view in which the CSM item appears.
- Association: Business Object with which the CSM item is associated. You can filter your results using this column. Associations can be viewed for manager items, relationships, forms, grids, and arrangements.
- Date Modified: Date the item was last modified.
- Scope: Read only information about who has access rights to this CSM item. When the Definition Type supports Scope, then the column is visible. All Manager Items support Scope.
- Protected status: A black dot is shown in this column if the item is part of a Protected mApp™ Solution.
- Actions: There are different actions available depending on whether your selected item is a Business Object or not.
Table: Actions for Business Objects Action
Description

Edit your selected Business Object. This action takes you to the Object Manager. 
Edit the relationships for your selected Business Object. This action takes you to the Relationship Editor. 
Edit a form for your select item. This action takes you to the Form Editor. 
Edit a grid for your selected Business Object. This action takes you to the Grid Editor. 
Edit a form arrangement for your selected Business Object. This action takes you to the Form Arrangement Editor. 
All these actions work exactly the same as if using them from the Object Manager.
Business Object Properties
Add Approval Support or Edit/Delete Approvals
Convert to Group Object
Edit Lifecycle
Version Info
Delete Group
Table: Actions for Other CSM Items Action
Description

Version Info
Clone
Edit
Delete
- Group Leaders: Group Business Objects are expanded by default under the group leader to show the group members.
