Generic File Import (CSV) connector
This is an on-premises connector.
The CSV connector gathers data about devices, business units, or users from .CSV files. Use a column header for the first row in the .CSV file, then populate it with the data you want to import. You should upload a sample file when you create the connector to help map the columns in the .CSV file correctly.
Options
A CSV connector has the following options:
- Connector name: A name for the connector.
- Connector server name: The name of the connector server that this connector is associated with. Each connector can only be associated with one connector server. If you added the connector to a specific connector server, this field may be populated for you. Otherwise, you can select the connector server from the list.
- Path: The directory on the server where the .CSV files are stored. Make sure each new file is saved to the same directory, and the connector imports the data from them. This path must be local to the connector server utility.
- File name filter: Filters the .CSV files in the directory if you only want to gather data from files with a specific naming convention. Use * as a wildcard character. For example: *_data.csv
- Data type: Choose which of the data types you want to import. If you want to import more than one data type, use a different connector for each data type.
- Delimiter: Select the type of delimiter that the file uses to separate values.
- Date format: Select the date format the file uses.
- Time format: Select the time format the file uses.
- Time zone: Select the time zone that is used for the data in the file.
- CSV sample file: Upload a sample file with column headers in the first row and data in at least one row to help you map the columns to the values in the database. You should select the data type before you upload a sample file. The sample file enables you to map the values in the file to the values in the Neurons database.
- Repeats: How often the connector should gather data.
- Start time: The time of day the connector should start running. To minimize the impact on your network and applications, we recommend that connectors generally run at night or on weekends.
- Active: Whether the connector is active or not. While the connector is active, it runs according to the schedule you create. If you clear the check box, the connector is inactive and will not gather data until the check box is enabled again and the connector is saved.
For details on configuring or using connectors, see Connectors.
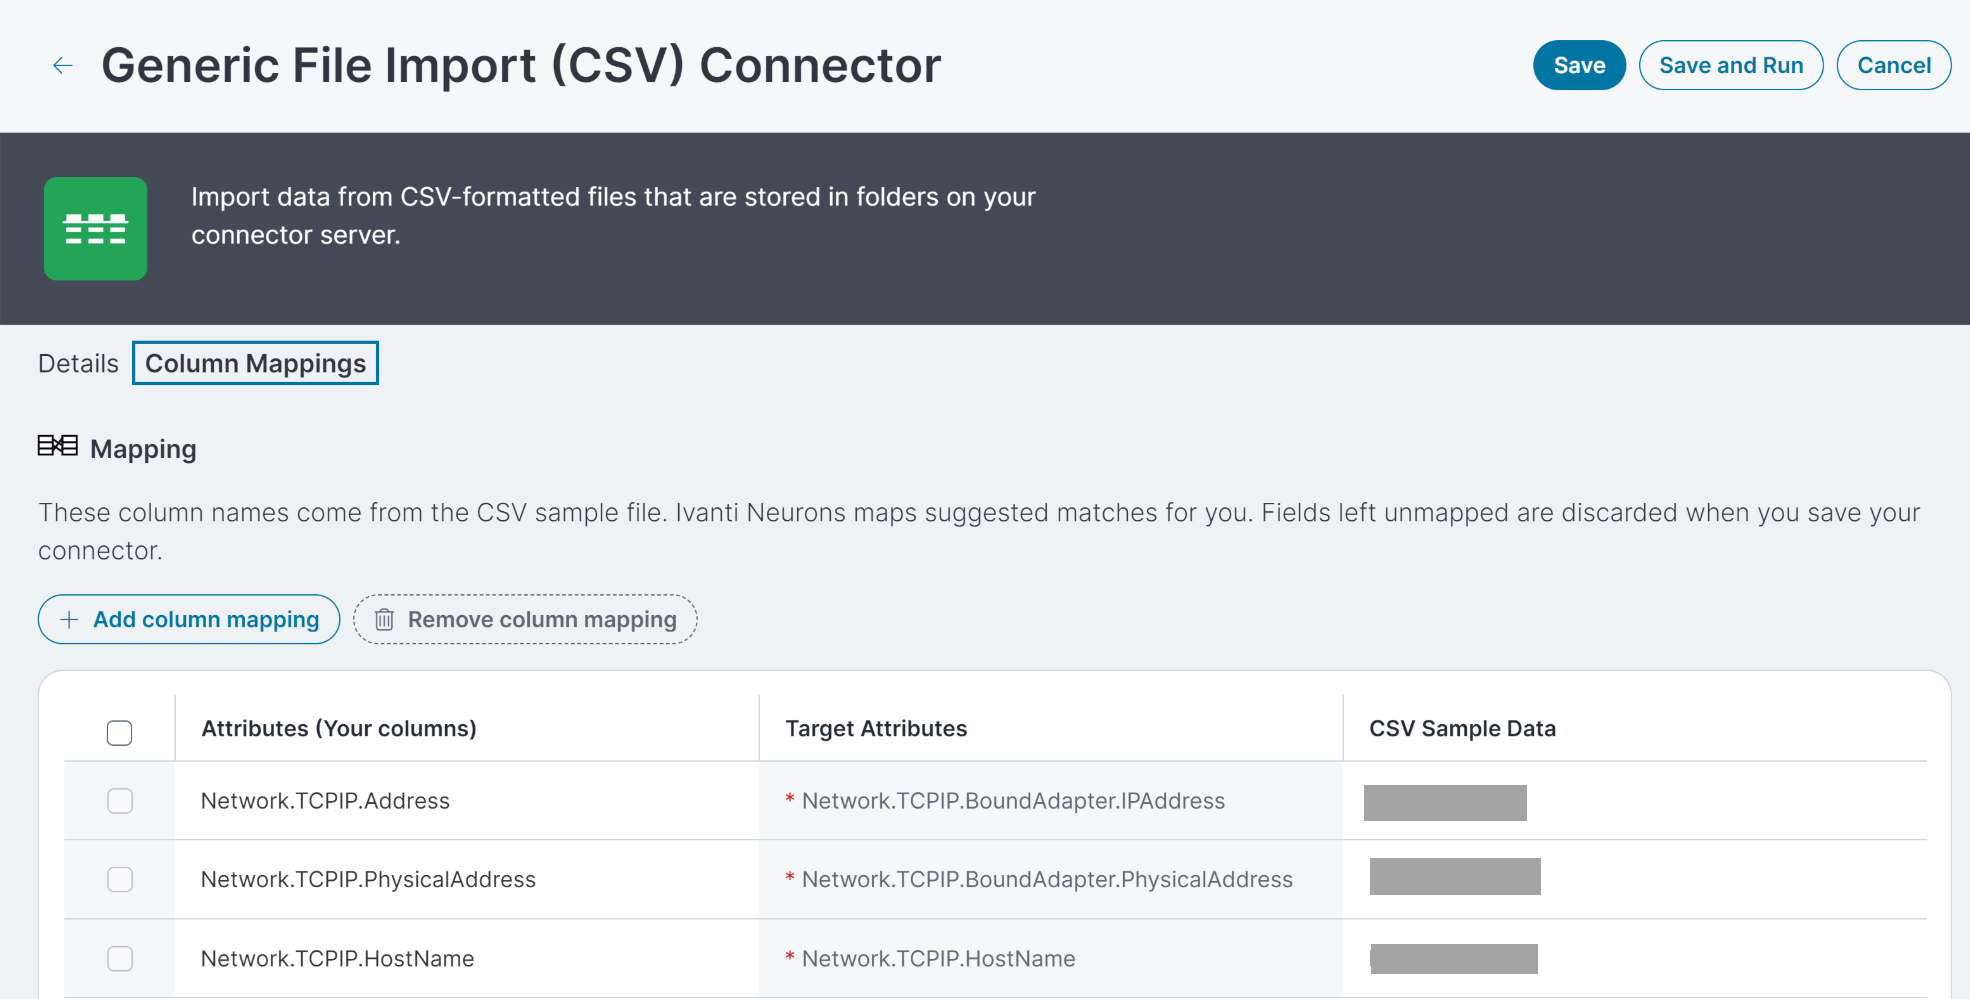
Mapping
After you've uploaded a sample file and completed all the required fields for the connector, use the Column Mapping tab to map the columns to the values in the database. Neurons maps suggested matches for you, but you should review the suggestions and make changes if necessary.
-
The Attributes column displays the column headers in your sample file.
-
The CSV Sample Data column shows an example of the values in the column from the sample file.
-
The Target Attributes column shows the values in the Neurons database. Target attributes that have an asterisk are used to match devices and ensure you don't have duplicate records, so they must be mapped in order to save and use the connector. For example, if you choose Device as the Data type, then the required attributes are the IP address (Network.TCPIP.Address in Neurons), the physical (NIC or MAC) address (Network.TCPIP.PhysicalAddress in Neurons), and the host name (or fully-qualified domain name/NetworkTCPIP.HostName in Neurons).
Neurons imports data and matches to existing objects based upon reconciliation rules. Each imported object must have enough uniquely identifying information available or Neurons will ignore that object. For devices, this information is a combination Network.TCPIP.BoundAdapter.IPAddress, Network.TCPIP.BoundAdapter.PhysicalAddress, and Network.TCPIP.HostName. Hence these three fields are required.Sometimes your dataset will not include these three attributes, and Neurons may delete the data. However, you can provide a unique identity attribute that comes from the CSV data using the target attribute of CSVID.
For example, if you export from a source that has a Device UUID column in the data, you can map the Device UUID to the CSVID attribute. This tells Neurons that whatever is mapped to the CSVID by itself is unique and can be used independently of any other information to uniquely identify the device. Ivanti recommends to use the CSVID, especially if your data in other attributes is not complete. This lets Neurons know that the device has enough information to import.
IMPORTANT: Before you import data using the CSV connector, you must verify data integrity between your CSV source and sources used by other connectors. CSV data integrity also deteriorates over time, so make sure you import up-to-date data with each CSV import. Checks and updates must be performed before every import by the CSV connector, or the deteriorated data quality will cause issues in your environment.
-
To map an attribute to a target attribute, find the value in the Target Attributes column, then click the row in the Attributes column. When you click the empty table cell, you can select a column header from the sample file.
-
To map a target attribute to an attribute, find the value in the Attributes column, then click the row in the Target Attributes column. When you click the empty table cell, you can select the database value from a menu that appears on the right.
If you don't map a field the first time you upload the sample file, the connector ignores the data in that column. If you decide later that you want to map a field, click Add column mapping and select the column header.
At this time, it's not possible to create custom target attributes.
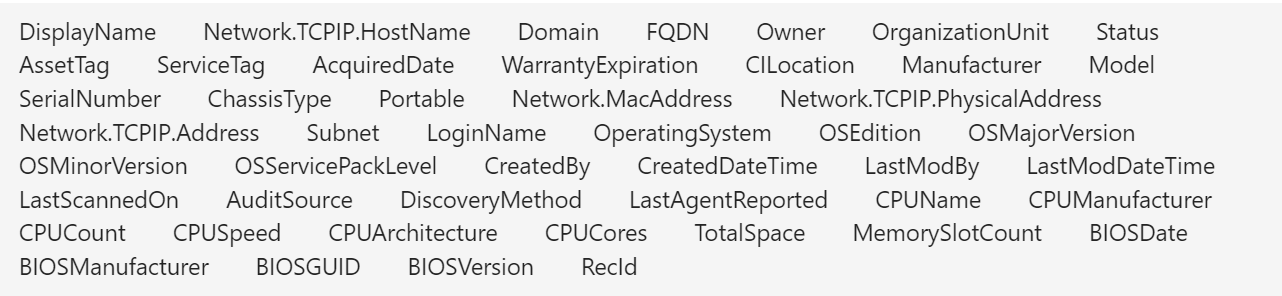
Use the following Neurons attribute names to map with the CSV column names:
Attribute Names

CSV Column Names
For an overview of default attributes that are imported by this connector and others, and how attributes are mapped to Target Attributes, see Connector data mapping.