Devices
After you've imported information into the Ivanti Neurons Platform or deployed the Ivanti Neurons Agent, the device records appear on the Devices page. Access this page by selecting Devices in the left navigation pane.
EPM connector filters out archived and disposed devices while importing devices from the Asset Control.
Use the device details search field to search the device list for matching text or click .

Alternatively, use the global search at the top of the page to search for users or devices, from anywhere in the Neurons Platform.
To delete a device from the Neurons Platform, select the box next to the device and then select Delete at the top of the page. This removes the record for that device from the Neurons Platform. If the record was imported from another source using a connector, and the device record still exists in the source, the record may be re-imported the next time the connector runs.
Creating Filters
Use the AI generated filters for enhanced device views and grouping features to find and organize devices you're managing.
You can use the generative AI-based filtering system to quickly convert natural language prompts into valid UEM query syntax, enabling faster device filtering on the Device View page.
To create generative AI-based filters
-
Next to the search field at the top of the device view, click
 (use AI to assist with search query) option.
An AI-based search bar appears and allows you to enter natural language prompts to create queries. -
In the search bar, enter a prompt and press Enter.
For example, enter "show me Windows 10 devices" in the search bar. This displays all the Windows devices registered in your organization. -
Click
 to view the AI generated filter query based on your prompts.
This displays the relevant conditions used to filter the device view.
You can also do the following:-
Click
 to manually add a new condition for device filtering.
 -
Click
 to delete the conditions manually.
Alternatively, you can click the New Dynamic Group option to create a new device group using the AI generated filters. To learn more about adding dynamic group, see creating dynamic group section.
-
Filters help you find the devices you want to manage. Applying a filter with one or more properties limits the device list to devices matching the filter.
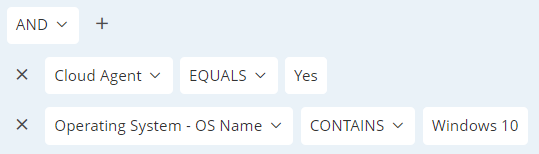
Here's a filter that only shows devices with a Cloud agent and that run a version of Windows 10:
To create a device view filter
- Next to the search field at the top of the device view, select the filter
 button.
 - Select the Boolean operator you want to use in the filter, either And, Or, Not And, or Not Or. The operator you select will apply to all filter properties.
- Select the plus sign next to the Boolean operator to add a filter property.
- In the Select a filter property drop-down, select the property you want filtered, the filter type (such as Equals or Does not contain), and then the value to be filtered.
- Repeat steps 3-4 if you want additional properties to be part of the filter.
- To apply the filter, press Enter in the last filter property or click somewhere else on the page. The filter button has a red dot on it when a filter is active.
After applying the filter, if you select the check box to the left of the Display Name column (to select all devices), the visual cue of selecting every device in the list will not always occur. However, all devices are indeed selected (as indicated at the top right of the page by "[Number] Devices Selected"). All actions such as Export and Delete will work on the selected devices.
Advanced filtering can help you view your imported device data in a meaningful and structured way. Using the filters effectively, you can create more targeted device groups or views. Also, ensure you use the prefix notation method for device filtering, with the operator before the condition.
For example, in the below-mentioned prefix notation, the operators (OR and AND) are used before the condition.
OR AND (Device Name starts with m) (Device Name ends with 2) AND (Device Name starts with w11) (Device Name ends with gw)
Here are some use cases where advanced filtering is useful:
You have to filter devices for grouping or custom views based on the following conditions:
(Device Name contains 'm' and Device Name ends with '2')
OR
(Device Name contains 'w11' and Device Name ends with 'gw')
To filter devices based on the above conditions, you can set the conditions in prefix notation as:
OR
AND (Device Name starts with m) (Device Name ends with 2)
AND (Device Name starts with w11) (Device Name ends with gw)

You have different laptop models, each requiring a specific healing workflow based on the device model type. To view each of these models, you need to create a device group based on the device's model ID. Your filter might look like this:

Your version of the Neurons Platform is integrated with Ivanti Neurons for ITSM, and the ITSM connector is set up to import data daily. You use Microsoft Teams to interact with end users via Ivanti Neurons for Healing. You want to send a Teams message to end users when their device is associated with an incident in a ‘Waiting for Customer’ state. Your filter might look like this:

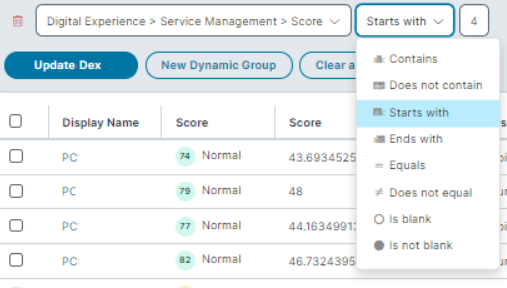
You want to create a device group based on a device's DEX score, specifically to view its Service Management record and proactively heal it if needed. (Where a device may have a reasonable overall DEX score, it may also have a low Service Management score due to many attached incidents.) You use Microsoft Teams to interact with end users via Ivanti Neurons for Healing and want to let them know when healing has occurred, as well as send a user-sentiment survey afterward. Your filter might look like this:
Use the groups feature to create groups of devices. Groups help you organize the devices you regularly manage. Quickly switch between groups with the Groups button at the top left of the page.

Groups can be either static or dynamic.
Static groups work well when you know what devices you want in the group and that list of devices doesn't change often.
Dynamic groups work well when you want to show only devices matching your filters. The dynamic group membership is recalculated each time you view the group. Dynamic groups can be created from column filters or search results.
Previously, private groups were owned only by the user who created them. You can now share private groups with other Neurons users. When you share a group, it appears under Managed Groups for the shared users. Shared users can view the Device group contents and make updates.
To create a static group
- Select the Groups button and select New group.
- Enter a Group name.
- Under group type, select Static.
- Select Add devices.
- Select the check box beside each device you want in the static group. Use search results to help you find devices. Select the Add devices button at the top to add devices to the list as necessary.
- Once you are done adding devices, select OK.
- Under Visibility, select one of the following:
- Select Private to limit access to the creator, but you can select Share with specific users to grant access to selected users while keeping the group hidden from others.
- Select Public if you want everyone to see the group.
- At the top of the page, Select Save and close. It may take 30 seconds or so for your group to be available for use.
- In the device view, select the Filter button and create a filter that includes the devices you want.
- If the results look good, select New dynamic group.
- Enter a Group name.
- Under group type, make sure Dynamic is selected.
- Under Visibility, select one of the following:
- Select Private to limit access to the creator, but you can select Share with specific users to grant access to selected users while keeping the group hidden from others. Or
- Select Public if you want everyone to see the group.
- At the top of the page, select Save and close. It may take 30 seconds or so for your group to be available for use.
You can create a static group based on imported .CSV file data. This can be useful if you have device inventory data from another source and you want to manage those devices from an Ivanti Neurons group. The .CSV file you import has these restrictions:
- No columns or headers
- Data for a single inventory attribute (such as Device > Display Name or Device > Full Name)
- 500 or fewer items
- Items are separated by commas or returns
Do not use both commas and returns in the same file.
Only devices with matching Ivanti Neurons inventory attribute data will appear in the group. If the import result is empty or missing devices you expect, refine your imported data or verify the inventory attribute you selected for matching.
To create a static group from a .CSV file
- Select the Groups button and select New group.
- Enter a Group name.
- Under group type, select Static.
- Select Import from file.
- Select the inventory attribute the imported data will match.
- Select Choose file and browse for the .CSV file containing the attribute data.
- Select Open. Devices with matching attribute data will populate the group.
- Under visibility, select Private if you want a group only you can see. Select Public if you want everyone to see the group.
- At the top of the page, select Save and close. It may take 30 seconds or so for your group to be available for use.
The Ivanti Neurons Smart Advisors offer additional details about devices. Smart Advisors provide reports for device reconciliation, stability, and inventory management (i.e., reimage or replace). For more information, see Smart Advisors.
About columns on the Devices page
Each column represents an imported device attribute. Depending on the connectors you have set up for use with the Neurons Platform, you can import thousands of different attributes and choose to display any of them in columns, add secondary columns, and create custom views of the columns on this page. The following drop-down list shows the default columns on this page and the attributes they are mapped to.
Column: Display Name; attribute: DisplayName
Column: Neurons Agent Installed; attribute: Ivanti.AgentFramework.AgentId
Column: EPM Managed; attribute: LandeskManagement.CommonBaseAgent8.Installed
Column: Connector Name; attribute: DiscoveryMetadata.Connectors.ConnectorName
Column: Connector Type; attribute: DiscoveryMetadata.Connectors.Provider
Column: Dex Score; attribute: Dexi.Score
Column: Manufacturer; attribute: System.ManufacturerName
Column: Model; attribute: System.Model
Column: IP Address; attribute: Network.TCPIP.Address
Column: Operating System; attribute: OS.Name
Column: Login Name; attribute: LoginName
Column: Last Hardware Scan Date; attribute: LastHardwareScanDate
Column: Last Discovery Scan Date; attribute: LastDiscoveryScanDate
Column: Type; attribute: Type
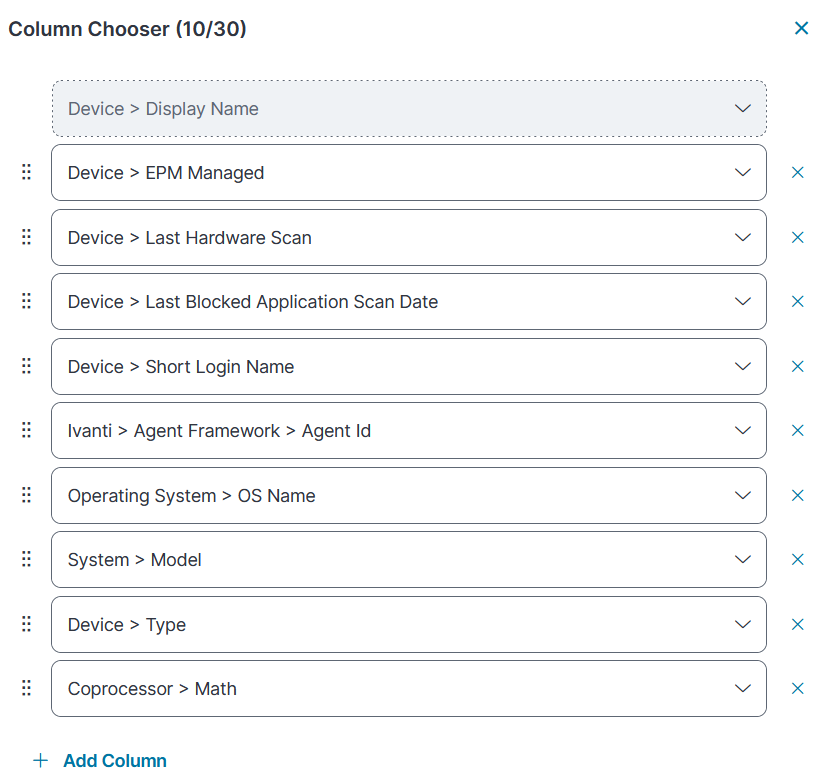
To change the default columns, use the Column Chooser button  at the right-edge of the column header. You can add and delete columns and rearrange their order. Use the drop-down lists to select which attributes will be visible.
You can also add secondary columns that represent array-type properties (e.g., multiple hard drives under mass storage, encryption method, etc.). When you add a secondary column, a drop-down option will appear in the device pane on the Device page. This feature is particularly useful for devices that have multiple drives, as each drive is displayed through the secondary columns.
To add a secondary column, click > + Add secondary column at the bottom of Column Choose pane.
Device attributes come from the connectors you are using. To narrow down the attributes that may be useful on the Devices page, you need to know what attributes have been imported and what data is contained in them:
- For a list of the device attributes imported by each connector, see Connector data mapping and download the Devices CSV file.
- At the bottom of each connector topic is a downloadable CSV file that lists the attributes only imported by that connector.
- On the Devices page, you can select a device, then open its Details tab to see all of the attributes imported for that device.
You can export device details along with the primary and secondary column data of the selected or all devices.
To export device reports, follow these steps:
-
On the Devices page, select the required devices from the list.
-
Click Export, and select the following options:
- All devices: Select this option to generate a report of all the devices and export it as a .csv file.
- Selected devices: Select this option to generate a report for only the selected devices from the list and export it as a .csv file.
- Include secondary columns: Enable this option to include the secondary columns for the selected or all devices when generating reports. Including the secondary columns can extend the report generation time based on the available data.
This action exports the device list along with the primary and secondary columns based on your requirement. Once the export is complete, a notification is displayed along with a download link.
Alternatively, you can download them under Reports > My Reports. To learn more about reports, see Reports.
How Neurons reconciles imported device records
When importing device data from one or more data sources, Neurons reconciles the incoming records using the following process:
- Neurons searches existing records using predefined attributes such as DeviceID, HardwareID, and System.SerialNumber. If an incoming record matches any one of these attributes, the records are merged.
- Neurons then searches existing records using combinations of predefined attributes such as Network.TCPIP.HostName, Network.TCPIP.Address, and Network.NICAddress. If an incoming record matches any combination of these attributes, reconciliation will occur.
- Next, Neurons looks for IP address changes. If an incoming record matches the other attributes of an existing record and only the IP address is different, then the records will be merged, but only if the JobID is different or doesn’t exist. If the JobID is the same, Neurons assumes three things: that both records are part of the same connector “run,” are likely different records, and should not be merged.
- Finally, if Neurons can’t find any existing records to reconcile with an incoming record, then that data is created as a new record.
There are two issues to be aware of:
- MAC addresses: Depending on the environment, several devices could have the same MAC address (i.e., a local MAC address assigned by the software or a network administrator) on one of the bound adapters. Neurons takes measures to avoid reconciliation problems with this specific attribute.
- Virtual Machines: Different VMs belonging to the same host can have the same value for some device attributes, such as System.SerialNumber or HardwareID. In this case, Neurons removes those attributes from the identities array to avoid reconciliation problems. For example, if the record has Model = 'Virtual Machine', then Neurons will remove System.SerialNumber from the identities array. Other attributes may also be removed, based on different conditions.
Creating custom views for columns
You can create and save custom column sets as views and configure them to be private or public views. This enables you to switch between different data perspectives of different users in an organization with ease.
To view the saved or custom views made public by other users, select the View drop-down list in the top-right corner of the Devices page. This drop-down lists pinned, public, and custom views.
To create custom views and save them, follow these steps:
-
Click
to open the Column Chooser pane. Then add more primary and secondary columns based on your requirements. -
Close the Column Choose pane. Then select the View drop-down list and click Save current view.
The Create saved view pane appears. -
On the Create saved pane, enter a name for the custom view.
-
Enable the following options:
-
Is pinned: Enable to pin the custom view to the View drop-down list.
-
Is public: Enable to set the custom view as public. This displays the custom view to other users.
-
Is default: Enable to set this custom view as a default view.
-
-
You can additionally add columns and secondary columns based on your requirement.
-
Click Save View.
This adds new custom view to the drop-down list.