Actions: Step by Step
This topic contains step by step instructions for creating Edge Intelligence actions and linking them to a query or an alert. It also explains the use of action variables, placeholders and using query data in your action.
Prerequisites
- Ivanti Neurons Agent installed on endpoints you want to query or for which you want to set alerts. See Ivanti Neurons Agent.
- Endpoints must have a Policy that has the Capability Edge Intelligence enabled. See Agent Policy Capabilities in the Policy.
- A role with permissions to configure actions, perform actions and set alerts for Edge Intelligence. See Roles.
Create a custom query action from the Edge Intelligence Configuration panel
In this example you will add an action to the Service State query to restart a service. The action uses a PowerShell script, with a placeholder for information retrieved by the query. After the service has been restarted, the user will be notified.
-
Go to Insights > Edge Intelligence, and click
 in the top-right corner of the page.
The Edge Intelligence Configuration panel appears. -
On the Actions tab select Add new action.
The New action page opens inside the panel.- Specify a Name for the action, for example Restart service.
- In the Variables section select Add new variable.
The New variable panel appears.- Specify a Name for the variable, for example ServiceName.
For illustration purposes, the specified names for the variables in this example are identical to the auto-generated variables in the next example. This is not a requirement.
- Do not specify a Value. This will be provided by the query.
- Leave the option Public variable enabled. This allows the value of the variable to be set during execution of the action.
- Click Save.
The variable is saved and the New variable panel closes.
- Specify a Name for the variable, for example ServiceName.
- In the Tasks section select Add new task.
The New task panel appears.- Specify a Name for the task, for example Restart service.
- In the bottom section click Select to see a list of available tasks. Select Execute PowerShell.
- In the Script field that appears, insert your (draft) PowerShell script.
For this example:Copy$ServiceName = "$(var.placeholder)"
Restart-Service-Name $ServiceName-Force-ErrorAction StopIf you are confident about the exact spelling of the text that should replace $(var.placeholder), you can directly type or paste the final version into the Script field. In that case, you can skip ahead to step vi.
- From the Available Placeholders section (below the Script field) copy $(action.ServiceName) using
 . This is the variable ServiceName you created in step 2b.
 - In the Script field replace $(var.placeholder) with the placeholder you copied in step iv.
The script should now look like this:Copy$ServiceName = "$(action.ServiceName)"
Restart-Service-Name $ServiceName-Force-ErrorAction Stop - Click Save.
The task is saved and the New task panel closes.
- In the Tasks section select Add new task again.
The New task panel appears.- Specify a Name for the task, for example Notify end user.
- In the bottom section click Select to see a list of available tasks. Select Notify user.
- In the Subject field that appears, type (for example) Successfully restarted service: $(action.ServiceName).
The placeholders are again listed below the task-specific fields of the New task panel, in this case the Subject and Message fields.
- In the Message field type the body of the message you want to send to the user. For example:
Dear user,
The following service was successfully restarted:
$(action.ServiceName)
Best regards,
The IT Team - Click Save.
The task is saved and the New task panel closes.
The result should look like the image below.

- Click Save.
The action is saved and the New action page closes.
- On the Queries tab of the Edge Intelligence Configuration panel find the Service State query and click on its name.
The details page for the query opens inside the panel, displaying an overview of linked actions.- In the Actions section select Add action.
The Add action panel opens. - From the drop-down select Restart service, the name of the action you created in step 2a-e.
The Action data section (listing the variables you created in step 2b) and the Available Placeholders section (listing data retrieved by the query) appear.- In the Action section, for Name:
- at Type select Use the following value:
- at Value specify $(query.name), the placeholder for ServiceName.
You can copy a placeholder by using the
icon displayed next to the placeholder definition. - In the Action section, for Name:
- Click Add to save your changes.
The Add action panel closes.
- In the Actions section select Add action.
- Click Close.
The Edge Intelligence Configuration panel closes.

The Restart service action is now available for use:
- Run the Service State query.
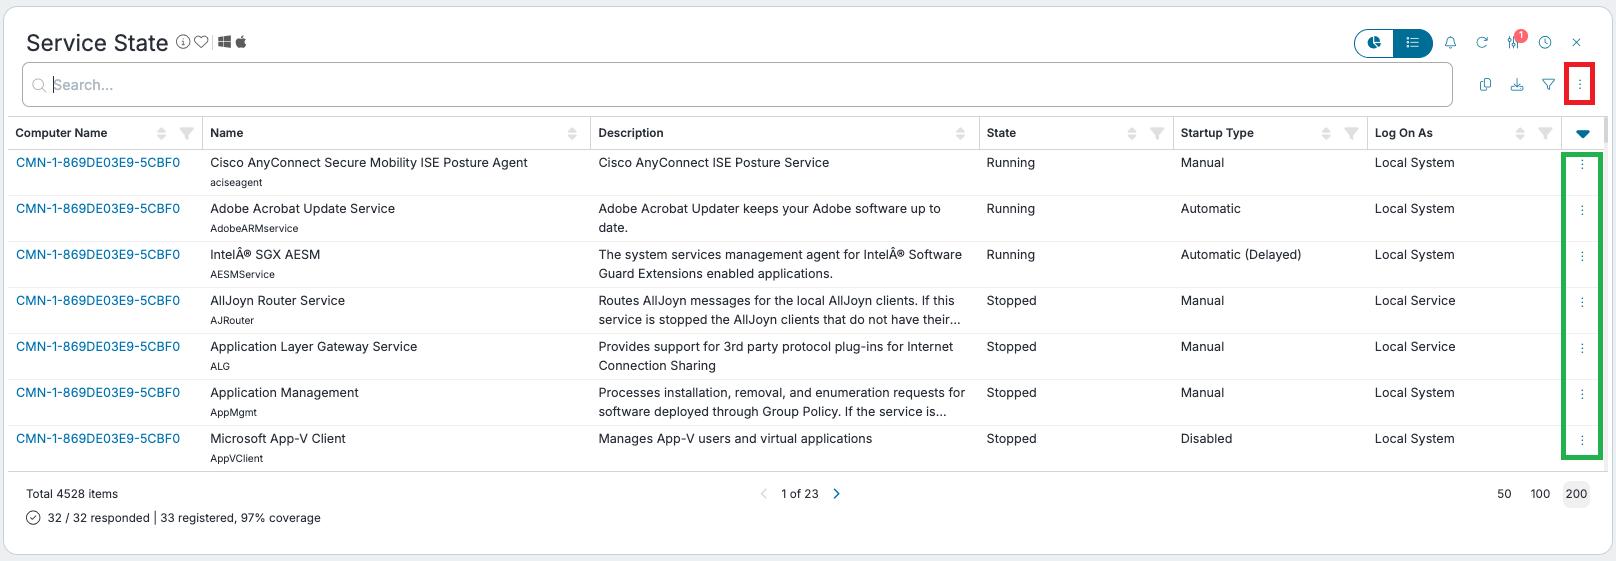
- From the list view of the query results find the line with the desired Computer Name and Service Name.
Optionally, you can use filters and/or parameters to do this. - Open the options menu (
 ) for the selected line and select Restart Service.
- The action restarts the service and the Service State query results are updated.
- The notification you created in step 2d is displayed to the end user.
If you select the query-level actions menu (highlighted in red in the following image) instead of the record-level actions menu (highlighted in green), Edge Intelligence applies the action to all records in the query results. Depending on your query parameters, this could result in every service on every device in your environment being restarted. Proceed with caution when using query-level actions and always validate newly created custom actions in a test or lab environment before deploying them to production.
Create a Quick Action using the 'Manage actions for query' panel
In this example you will add a similar action as in the example Create a custom query action from the Edge Intelligence Configuration panel, but as a Quick Action. This automates some of the configuration steps for you.
- Go to Insights > Edge Intelligence, and open the Service State query (in the Inventory category).
The Service State query widget appears. - Use the toggle
 to switch to the list view.
 - Open the options menu ( ) and select Manage.
The Manage actions for Service State query panel appears, displaying a list of linked actions. - Select Create a Quick Action.
The Create a Quick Action panel appears.- Specify an Action name, for example Restart Service Quick Action.
- Select the Execute Powershell task.
The selected task is added under Tasks, and additional configuration fields for the task appear.- In the Script field, insert your (draft) PowerShell script.
For this example:Copy$ServiceName = "$(var.placeholder)'"
Restart-Service-Name $ServiceName-Force-ErrorAction Stop - In the Script field, select $(var.placeholder) and click on the placeholder Program, under Available Placeholders.
The placeholder is inserted and the script should now look like this:Copy$ServiceName ="$(query.name)"
Restart-Service-Name $ServiceName-Force-ErrorAction StopYou can insert placeholders as you type the script.
- In the Script field, insert your (draft) PowerShell script.
- Select Add another task.
The list of available tasks appears. - Select the Notify user task.
The selected task is added under Tasks, and additional configuration fields for the task appear.- Specify a Subject and a Message for the notification. You can use placeholders in these fields.
- Click Save.
The Create a quick action panel closes and the Manage actions for Service State query panel becomes visible again. Your new action is listed under Linked actions.
- Click Close.
The Manage actions for Service State query panel closes.
The Restart service Quick Action action is now available for use.