Installing Using an Existing SQL Server Instance (either locally or remotely)
You can configure your Ivanti Endpoint Security installation to use a SQL Server instance that exists either locally or remotely.
Prerequisites:
- Complete Downloading Ivanti Endpoint Security.
- As applicable to your network environment, you have gathered the information and completed the tasks itemized in the Appendix D: Installation Checklist.
- If you are installing using SSL, complete the first portion of Appendix B: Configuring Your Server to use SSL.
- If you are installing using a remote instance of SQL Server, complete Configuring SQL Server to Accept Remote Connections.
Additionally, if you are installing using a remote instance of SQL Server, and no instances of SQL Server exist locally, complete Installing Using a Remote SQL Server Instance (with no local instance) rather than this procedure.
- If installing using a remote instance of SQL Server, complete Creating Remote Accounts.
If using preexisting accounts, you may skip completion of this step.
- Using either a local or domain account with system administrator privileges, log in to the server on which you will install Ivanti Endpoint Security.
- Stop or disable any AntiVirus products (such as McAfee, Trend-micro, Symantec, and so on) running on your server.
An AntiVirus product can prevent processes from running correctly during the installation. Therefore, to ensure a successful installation, all AntiVirus services must be stopped or disabled prior to running the Ivanti Endpoint Security installer.
- Double-click the Ivanti Endpoint Security installer at the location defined during the download.
The Ivanti Endpoint Security InstallShield Wizard opens and begins extracting files. This process may take several minutes. - If prompted, install prerequisites and reboot your server.
The installer reopens by itself after the reboot. - Click Next.
The License Agreement page opens.Click Print for a hard copy of the license agreement.
- Review the License Agreement and select the I accept the terms of the license agreement option.
- Click Next.
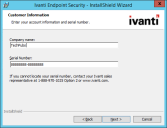
The Customer Information page opens. - Type the applicable information in the following fields:
- Click Next.
A new page or dialog opens. - DNS Client
- Function Discovery Resource Location
- SSDP Discover
- UPnP Device Host
- Static Content
- Default Document
- HTTP Errors
- ASP.NET
- .NET Extensibility
- ASP
- ISAPI Extensions
- ISAPI Filters
- Basic Authentication
- Windows Authentication
- Static Content Compression
- Dynamic Content Compression
- If you receive only system requirement warnings, you may proceed with installation by clicking Next. Ivanti recommends resolving warnings before proceeding with installation.
- If you receive any system requirement failures, you must cancel the installation, resolve these failures, and then restart installation.
- Define the Web client account and service account that Ivanti Endpoint Security will use.
Define these accounts based on how you are configuring your Ivanti Endpoint Security server. - In the Web Client Account Username field, edit the user name.
- In the Web Client Account Password field, type a password.
- In the Web Client Account Confirm password field, retype the password.
- In the Service Account Username field, edit the user name.
- In the Service Account Password field, type a password.
- In the Service Account Confirm password field, retype the password.
- In the Web Client Account Username field, type the user name of the Web client account on your SQL Server.
- In the Web Client Account Password field, type the password of the Web client account on your SQL Server.
- In the Web Client Confirm password field, retype the password.
- In the Service Account Username field, type the user name of the service account on your SQL Server.
- In the Service Account Password field, type the password of the service account on your SQL Server.
- In the Service Account Confirm password field, retype the password.
- Type the user name associated with the desired account in the Web Client Account Username field.
- Type the password associated with the user name in the Web Client Account Password field.
- Retype the password in the Web Client Account Confirm password field.
- Type the user name associated with the desired account in the Service Account Username field.
- Type the password associated with the service account user name in the Service Account Password field.
- Retype the password in the Service Account Confirm password field.
- Click Next.
If required, acknowledge the creation of new accounts by clicking OK.
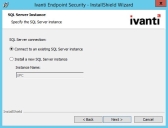
The SQL Server Instance page opens. - Ensure the Connect to an existing SQL Server instance option is selected.
- Click Next.
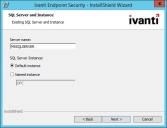
The SQL Server and Instance page opens. Use this page to define the SQL Server instance you will use with Ivanti Endpoint Security. - Select a Server Location.
Select one of the following options. -
Select the On another machine (remote) option.
- Type the server name (not the IP address) in the Server name field.
- Select a SQL Server Instance.
Select one of the following options: - Select the Named instance option.
- If the SQL Server instance is local, select it from the list. If the SQL Server instance is remote, type its name in the field.
- Click Next.
The SQL Server Authentication page opens. - Define the credentials that will be used to access the SQL Server instance (based upon its authentication mode).
Select from the following options: - Select the SQL Server Authentication option.
- Type a user name that will validate with the SQL Server instance in the Login field.
- Type the password associated with the user in the Password field.
- Click Next.
A new page opens. - If you only receive SQL Server configuration requirement informationals or warnings, click Next to continue (the Ivanti Endpoint Security installation will automatically reconfigure SQL Server). Proceed to the next step.
- If you receive any SQL Server configuration requirement failures, you must cancel the installation, resolve the failures, and then proceed with the installation.
- [Optional] Change the Ivanti Endpoint Security installation location.
- Click Browse.
- Define the desired file path using either the Look in lists or the Folder name field.
- Click OK.
The Installation Folder field reflects your changes.
- [Optional] Change the Ivanti Endpoint Security content storage location.
The content storage location is the location where patches and other content items are downloaded. Ivanti recommends allocating at least 32 GB of storage space to content (plus an additional 10 GB if managing non-Windows endpoints).- Click Browse.
- Define the desired file path using either the Look in lists or the Folder name field.
- Click OK.
The Content Storage Location field reflects your changes.
- Click Next.
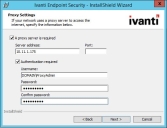
The Proxy Settings page opens.Refer to the Ivanti Endpoint Security: Requirements Guide for a complete list of proxy types that Ivanti Endpoint Security supports.
- If your network uses a proxy server to access the Internet, select the A proxy server is required check box and type the applicable information in the following fields.
- If your network uses a proxy server to access the Internet, and that proxy requires authentication, select the Authentication required check box and type the applicable information in the following fields.
- Click Next.
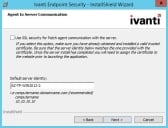
- If you are using SSL for server and agent communication, select the Use SSL security for Patch agent communication with the server check box.
You must possess an SSL certificate to implement SSL communication. Implementation of SSL communication during installation is optional. This feature can be implemented following installation.
- In the Default server identity field, type the name of your server in one of the following formats:
- DNS name (computername.domainname.com)
- Computer name (computername)
- IP address (10.10.10.10)
- Click Next.
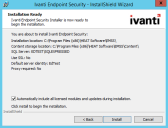
The Installation Ready page opens. - [Optional] If you only want to install core components, clear the Automatically include all licensed modules and updates during installation check box.
- Review the installation information and click Install to begin the installation of Ivanti Endpoint Security. This process may take several minutes.
Important: During installation, do not attempt to access the Ivanti Endpoint Security Web site. Accessing the Web site during installation can cause installation errors.
- After installation completes, click Finish.
- Acknowledge the notification that appears by clicking OK.
The credentials you use to log in to the Ivanti Endpoint Security Web site for the first time are the credentials that you used when you logged into the server initially.
Ivanti Endpoint Security is installed and can now be accessed.
|
Field |
Description |
|---|---|
|
Company Name |
Your company name. |
|
Serial Number |
Your Ivanti Endpoint Security serial number. Your serial number is two groups of eight alphanumeric characters. Letters are not case sensitive. If you cannot locate your serial number, obtain it by contacting Ivanti Sales Support. |
Tip: Retain your serial number following installation, as it is necessary if a reinstall of the Ivanti Endpoint Security server is needed.
|
Page/Dialog |
Step |
|---|---|
|
If the Question dialog opens: |
Click Yes to start network discovery services. The following services are necessary to use discovery features within Ivanti Endpoint Security: |
|
If the Required IIS Features page opens: |
Your server does not have the required IIS features installed. Click Install Features to install the features and proceed. On Windows Server 2008, the default installation of IIS lacks components necessary for Ivanti Endpoint Security. The Ivanti Endpoint Security installer installs the following IIS components if not present: |
|
If the System Requirements page opens: |
Your server does not meet the minimum installation requirements. When installing on a virtual platform you will likely receive a warning about the CPU requirements since the installer is unable to identify the processor in a virtual environment. Click View all Failures/Warnings for detailed information about prerequisite status deficiencies. |
|
If the Service Accounts page opens: |
Proceed to the next step. |
|
Option |
Steps |
|---|---|
|
If your install will use a local SQL Server instance: |
Define the credentials for two new user accounts (which are created by the installer). |
|
If your install will use a remote SQL Server instance: |
Define the credentials for the two user accounts created while completing Creating Remote Accounts. Important: The Web client account and the service account credentials must be identical on both the SQL Server and the Ivanti Endpoint Security server. If they are not, you cannot access the Ivanti Endpoint Security Web site. |
|
If your install will use a local or remote SQL Server instance that uses preexisting accounts as the Web Client and Service Accounts: |
Define the credentials for the preexisting accounts. Important: You can use either local or domain accounts. If using domain accounts, include the domain name as part of the user name (DOMAIN\username). Additionally, preexisting accounts may only be used if they meet the requirements listed in Defining the Web Client Account and Service Account. |
|
Option |
Steps |
|---|---|
|
To use a locally installed existing SQL Server instance: |
Select the On this machine (local) option. |
|
To use a remotely installed existing SQL Server instance: |
If you must define an IP address, either map the IP address to the server name in the hosts file or create an alias using SQL Server Configuration Manager. |
|
Option |
Steps |
|---|---|
|
To use a default instance of SQL Server: |
Select the Default instance option. |
|
To use a named instance of SQL Server: |
|
|
Option |
Steps |
|---|---|
|
To use Windows authentication: |
Select the Windows Authentication option. |
|
To use SQL Server authentication: |
|
The credentials used to access the SQL Server instance must be assigned the sysadmin system role within Microsoft SQL Server Management Studio. If the user account defined is not assigned this role, the The credentials provided do not have sufficient privileges to continue dialog opens after clicking Next. You need to define a user account and assigned the sysadmin system role before you can continue.
If you cannot be assigned this role due to network security policies and procedures that split administrative duties between a Ivanti Endpoint Security administrator and a SQL Server administrator, refer to Installing Ivanti Endpoint Security (Separate Ivanti Endpoint Security and SQL Server Admins).
|
Page |
Steps |
|---|---|
|
If the Destination Location page opens: |
Click Next and proceed to the next step. |
|
If the SQL Server Configuration Requirements page opens: |
The pre-installed instance of SQL Server is not configured to work with Ivanti Endpoint Security. Click View Configuration Detail for detailed information about SQL Server configuration status requirements. |
If one or both of the storage directories defined on the Destination Location page does not contain the recommended available disk space, the Proxy Settings page does not immediately open. Rather, a dialog that lets you redefine the storage directories opens. Then after redefining the storage directories, the Proxy Settings page opens.
|
Field |
Type |
|---|---|
|
Server Address |
The IP address of the applicable proxy server. |
|
Port |
The port number used for communication. |
You can also configure Ivanti Endpoint Security to use a proxy following installation. Refer to The Service Tab section in the Ivanti Endpoint Security Help for additional information on proxy communication.
|
Field |
Type |
|---|---|
|
Username |
A user name that authenticates with the proxy. |
|
Password |
The password associated with the user name. |
|
Confirm Password |
The password retyped. |
During agent registration, the Ivanti Endpoint Security agents use this name to identify the server.
If you are using SSL, the server name that you type in the field must match the server named on your certificate.
You may use the Ivanti Installation Manager after the initial installation of Ivanti Endpoint Security to install additional components. For additional information, refer to Using Ivanti Installation Manager in the Ivanti Endpoint Security Help.
After Completing This Task:
Proceed to one of the following procedures based on selections made during installation.
- If your server will use SSL, finish Appendix B: Configuring Your Server to use SSL.
- If your server will not use SSL, proceed to Logging In to Ivanti Endpoint Security.
