Creating a New Patch
If you require a new pre-requisite patch to be created, you can create it using the Pre-Requisite Summary page.
Use the Pre-Requisite Summary page to launch the Patch Properties page to create a pre-requisite signature patch.
- Expand the patch properties in the left pane to Pre-Requisites.
Example: New Patch > Signatures > New Signature > Pre-Requisites.
The Pre-Requisite Summary page opens.
- Click New.
- Type a unique name for the patch in the Title field. The default title is New Patch.
- Type a unique identifier for the patch in the Identifier field.
You may determine the identifier or you may choose to use one supplied by the vendor. - Type the release date for the patch in the Released field.
By default, the current date is specified. You can use the vendor's date if necessary. -
Type the vendor's URL in the Hyperlink field.
- Select a vendor from the Vendor drop-down list.
Vendors must be added before they can show up as an item in the Vendor drop-down list. For more information, see Adding a New Vendor. - Select an impact from the drop-down list in the Impact field.
To understand the various impact options available, refer to Understanding Patch Severity Levels. - Select an applicable patch status from the drop-down list in the Status field:
- Active
- Beta
- Pending
To understand the various status options and their meaning, refer to The Patch Properties Page.
- [Optional] Select CVE Identifiers.
- Click the CVE Identifiers button.
The CVE Identifiers dialog opens. - Select File > Add.
The Add CVE Code dialog opens and lists the available CVE Identifiers. - Double-click on the CVE Identifier that is applicable to your needs.
The Add CVE Code dialog closes and the item is added to the CVE Identifiers dialog. - Click Save.
The CVE Identifiers dialog closes and the item is added to CVE Identifiers field. - [Optional] Repeat steps a, b, c and d to add additional CVE Identifiers.
- Type a description in the Description field.
This description will be visible in the Patches page of the Ivanti Endpoint Security. - [Optional] Select the Make this Patch hidden from the end user check box.
- Select File > Save.
- Exit the Patch Properties page.
- Select File > Exit.
A dialog displays. - Click OK.
The Patch Properties page exits and is replaced by the Pre-Requisite Summary page.
The dialog indicates that to apply the newly created pre-requisite signature patch you must use the Add button on the Pre-Requisite Summary page. Refer to Adding a Pre-Requisite.
- Select File > Exit.
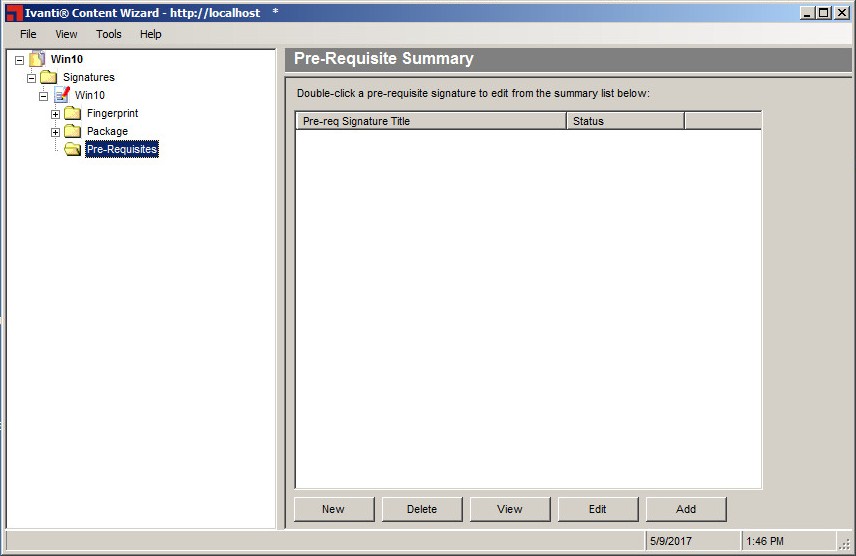
Tip: Right-click inside the Pre-Requisite Summary page window will bring up a selectable menu that mimics the available buttons.
The Patch Properties page opens.
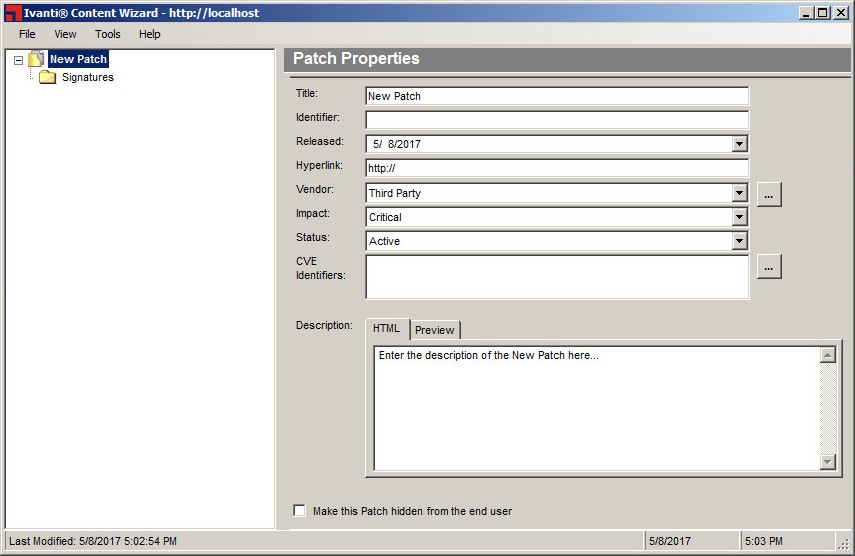
For more information on the various properties and fields in the Patch Properties page, refer to The Patch Properties Page.
If you save the patch without adding a package, you are asked if you want to save without adding a package. Click Yes to proceed.
After Completing This Task:
Apply the newly created pre-requisite signature patch to the applicable signature, refer to Adding a Pre-Requisite.