Using a Template to Add a Package Script
The Ivanti Content Wizard contains templates to assist users in creating package scripts. The templates use .msi- or .exe-based software installation programs.
Prerequisites:
- Create a package for the patch. For more information, see Adding Packages.
- Add content to the package. For more information, see Adding Content to a Package.
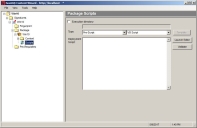
- Expand the patch properties in the left pane to Scripts.
Example: New Patch > Signatures > New Signature > Package > New Package > Scripts.
The Package Scripts page opens.
- Click Template.
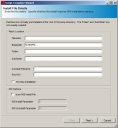
The Script Template Wizard opens.
- Specify the patch details.
- Type a name for the script in the Filename field.
- Type the location of the installable file in the Basepath field. By default, files are placed in the root directory.
- Type the name of the of the folder in which the script will reside in the Folder field, if necessary.
- Type the name of the of the subfolder in which the script will reside in the Subfolder field, if necessary.
- Type the name of the uninstall file in the Uninstall Filename field.
- To include keystrokes in the package, type the keystroke parameters in the Key Info field. For more information, see Key Info Parameters.
- To indicate the patch requires a prerequisite signature, select the Pre Req Installation check box.
- If the installable file is in .msi format, select the Is an MSI Install File check box and complete the following sub-steps.
- Set the MSI Install Parameter.
- Set the MSI Uninstall Parameter.
- Click Next.
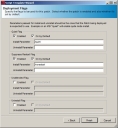
The Deployment Flags page opens.
- Select the flags you want to use with your patch.
For more information on flag descriptions, refer to Patch Deployment Flags. - Click Finish.
The Script Template Wizard closes.
A script for the package is created with the options specified in the Script Template Wizard.
Key Info Parameters
The Key Info field in the Script Template Wizard allows you to specify keystrokes required for use with executables that do not support an unattended installation.
There are five different parameters for the Key Info string. For each key stroke you wish to include you must enter all five parameter values inside of the string divided by the pipe character ( | ). The pipe character is not required at the end of the Key Info string if you are only including one keystroke. You also do not need a pipe on the last set of Key Info parameters in cases where you are including multiple key strokes.
The Key Info string format is as follows: Application Name,Application Time-Out,Key Name,Key Time-Out,Mandatory,Wait For
The following list describes each Key Info parameter.
|
Parameter |
Description |
|---|---|
|
Application Name |
Indicates the name of the application to send keystrokes to. The application name is case-sensitive. |
|
Application Time-Out |
Indicates the application's time-out period (in seconds). If the script is unable to activate the application within the specified time-out period then the script will throw an error. |
|
Key Name |
Indicates the key that will be sent to the application. The Enter key can be represented by either Enter or the tilde character (~). |
|
Key Time-Out |
Indicates the key's time-out period (in seconds). If the script was able to activate the application within the specified time-out period then it will attempt to send the keystroke to the application. The script attempts to send the keystrokes to the specified application until the key time-out time period has been met. |
|
Mandatory |
Indicates if the keystroke is a mandatory key or not. If the key is mandatory and either the key or application time-out is met then the script will throw an error. Otherwise, if the key is not mandatory and either of the time-outs are met then the script will not throw an error. |
|
Wait For |
Indicates the amount of time to wait after the keystroke has been sent. Typically this is used only when you have to wait for a process, such as the next form, to load. |
Patch Deployment Flags
You can add flags to a package script in the Deployment Flags page of the Script Template Wizard. Specify which flags are available and their default settings when performing a deployment.
The following table defines the flag behavior:
|
Description (flag behavior) |
Display Flag |
Select Flag |
|---|---|---|
|
Perform an uninstall; can be used with -mu or -q. |
-yd |
-y |
|
Force other applications to close at shutdown. |
-fd |
-f |
|
Do not back up files for uninstall. |
-nd |
-n |
|
Do not restart the computer when the installation is done. |
-zd |
-z |
|
Use quiet mode, no user interaction is required. |
-qd |
-q |
|
Use unattended setup mode. |
-dmu |
-mu |
|
Install in multi-user mode (UNIX, Linux only). |
-dsu |
-su |
|
Restart service after installation (UNIX, Linux only). |
-drestart |
-restart |
|
Do not restart service after installation (UNIX, Linux only). |
-dnorestart |
-norestart |
|
Reconfigure after installation (UNIX, Linux only). |
-dreconfig |
-reconfig |
|
Do not reconfigure after installation (UNIX, Linux only). |
-dnoreconfig |
-noreconfig |
|
This package is chainable and will run Qchain.exe (Windows) or (UNIX/Linux). |
-dc |
-c |
|
Suppress the final chained reboot. |
-dc |
-sc |
|
Repair permissions. |
-dr |
-r |
|
Deploy only. |
-PLD1 |
-PLD0 |
|
No Pop-up |
-PLN1 |
-PLNP |
|
Debug |
-PLDG |
-PLDEBUG |
|
Suppress Repair |
-dsr |
-sr |
|
Force the script to reboot when the installation is done. |
-1d |
-1 |
|
Reboot is required. |
Not applicable |
-2 |
|
Reboot may occur. |
Not applicable |
-3 |
|
Reboot is required and may occur. |
Not applicable |
-4 |