The Endpoint Membership View
This view lists the endpoints that hold membership in the selected group. If the group selected is a custom group, you can also use this view to add endpoints. Use this view to manage endpoints assigned to the selected group. This view contains features similar to those available from the Endpoints page.
For additional information about this view, refer to The All Tab (Groups Page).
A new tab is added after Patch and Remediation is installed. For additional information, refer to The Patch and Remediation Tab (Groups Page).
The All Tab (Groups Page)
Use the All tab to perform tasks related to group endpoints.
The All Tab Toolbar (Groups Page)
The All tab toolbar contains buttons for you to perform tasks and functions for managed endpoints.
The following table describes the toolbar functions used in the All tab, available on the Groups page Endpoint Membership view.
|
Button |
Description |
|---|---|
|
Membership |
Adds or removes managed endpoints to or from the selected group. For additional information, refer to Adding Endpoints to a Group. |
|
Manage Agents... (menu) |
Opens the Manage Agents menu. |
|
Install Agents... (Manage Agents... menu item) |
Installs agents on selected endpoints. For additional information, refer to Installing Agents by Agent Management Job. |
|
Uninstall Agents... (Manage Agents... menu item) |
Deletes agents from selected endpoints. For additional information, refer to Uninstalling Agents by Agent Management Job. |
|
Download Agent Installer... (Manage Agents... menu item) |
Downloads an agent installer to the endpoint used to access Ivanti Endpoint Security. For additional information, refer to Downloading the Agent Installer. |
|
Delete |
Deletes a disabled endpoint. For additional information, refer to Deleting Endpoints (Groups Page). |
|
Enable |
Enables a disabled endpoint. For additional information, refer to Enabling or Disabling Ivanti Endpoint Security Agents within a Group. |
|
Disable |
Disables an enabled endpoint. For additional information, refer to Enabling or Disabling Ivanti Endpoint Security Agents within a Group. |
|
Agent Versions... |
Defines the endpoint agent version. For additional information, refer to Defining the Endpoint Agent Version (Groups Page). |
|
Manage Modules... |
Opens the Add/Remove Modules dialog. Use this dialog to toggle module- specific agent functions. For additional information, refer to Managing Endpoint Modules (Groups Page). |
|
Wake Now... |
Wakes endpoints selected from the list. For additional information, refer to Waking Endpoints (Groups Page). |
|
Export |
Exports the page data to a comma-separated value (.csv) file. For additional information, refer to Exporting Data. Important: The Enhanced Security Configuration feature for Internet Explorer suppresses export functionality and must be disabled to export data successfully. Pop-up blockers in Internet Explorer or other supported browsers may also suppress export functionality and should be disabled. |
|
Options (menu) |
Opens the Options menu. For additional information, refer to The Options Menu. |
The All Tab List (Groups Page)
The All tab lists the operating system, identification, agent, and module information for group endpoints.
The following table describes the columns within the All tab list.
|
Column |
Description |
|---|---|
|
Name |
The name of the endpoint. Click the link to view The Endpoint Details Page for it. |
|
Display Name |
Alternate name or phrase (up to 50 characters) for the endpoint to help you identify and distinguish it. Endpoint decision-making information it can provide includes what system it belongs to, where it is located, and what it is used for. You can edit this name on the Endpoint Details page. |
|
IP Address |
The IP address of the endpoint. |
|
Agent Status |
The status of the Ivanti Endpoint Security Agent on the endpoint. Values include: Online: The agent is communicating with the Ivanti Endpoint Security Server regularly. See Configuring the Agents Tab for more information on configuring default agent behavior. Offline: The agent has not communicated with Ivanti Endpoint Security Server within the check in interval. In an Offline status, the agent still enforces all policies. A Warning ( Disabled: The agent is disabled by a Ivanti Endpoint Security administrator. It doesn't enforce module policies nor complete tasks. |
|
Last Connected Date (Server) |
Exported comma separated value (.csv) file only. Last date and time (in server local time) when the endpoint communicated with the Endpoint Distribution Service (EDS) server. |
|
EDS Status |
Exported comma separated value (.csv) file only. Status of the Endpoint Distribution Service (EDS) server. The following list defines column values: Started: EDS server has started and is in an operational state accepting workloads. Starting: EDS server is in the process of starting its service. Stopped: EDS server has stopped and is not accepting workloads. Stopping: EDS server is in the process of stopping so as to not accept workloads. Offline: EDS server is offline as it has not contacted the database in the configured amount of time. |
|
Operating System |
The operating system that the endpoint uses. |
|
Agent Version |
The version of the Ivanti Endpoint Security Agent installed. A |
|
Module Installed |
Indicates whether a module is installed on the endpoint. A new Module Installed column is added for each module installed on your Ivanti Endpoint Security Server. The following list defines column entry values: Yes: The module is installed. No: The module is not installed. Pending Install: The module is in the process of installing. Pending Uninstall: The module is in the process of uninstalling. Pending Reboot: The module has been installed, but the endpoint needs to reboot to complete installation. Error: There was an error while installing or uninstalling the module. Click the for additional information about the error. Expired: The module license has expired. |
The AntiVirus Tab (Groups Page)
Use the AntiVirus tab to perform tasks related to a selected group's endpoint.
The AntiVirus Toolbar (Groups Page)
The AntiVirus tab toolbar contains the tasks and functions that are available for you to perform for managed endpoints with AntiVirus features enabled.
The following table describes the toolbar functions used in the AntiVirus tab on the Groups page Endpoint Membership view.
|
Button |
Function |
|---|---|
|
Manage Agents... (menu) |
Opens the Manage Agents menu. |
|
Install Agents... (Manage Agents... menu item) |
Installs agents on selected endpoints. For additional information, refer to Installing Agents by Agent Management Job. |
|
Uninstall Agents... (Manage Agents... menu item) |
Uninstalls agents from selected endpoints. For additional information, refer to Uninstalling Agents by Agent Management Job. |
|
Download Agent Installer... (Manage Agents... menu item) |
Downloads an agent installer to the endpoint used to access Ivanti Endpoint Security. For additional information, refer to Downloading the Agent Installer. |
|
Agent Versions... |
Defines the agent version(s) that can be installed on an endpoint. For additional information, refer to Upgrading Endpoints. |
|
Delete |
Deletes a disabled endpoint. For additional information, refer to Deleting an Endpoint. |
|
Enable (Menu) |
Expands the Enable menu. |
|
Enable Module (Enable menu item) |
Enables the AntiVirus agent module on selected endpoints. |
|
Enable Agent (Enable menu item) |
Enables a disabled endpoint. For additional information, refer to Enabling the Ivanti Endpoint Security Agent. This button is available only when an endpoint is disabled. |
|
Disable (Menu) |
Expands the Disable menu. |
|
Disable Module (Disable menu item) |
Disables the AntiVirus agent module on selected endpoints. For additional information, refer to Disabling Modules on an Endpoint. |
|
Disable Agent (Disable menu item) |
Disables an enabled endpoint. For additional information, refer to Disabling the Ivanti Endpoint Security Agent. |
|
Manage Modules |
Opens the Add/Remove Modules dialog. Use this dialog to toggle module-specific agent functions. For additional information refer to Installing Endpoint Modules. |
|
Scan Now... |
Launches the Virus and Malware Scan Wizard . Use this wizard to launch an immediate anti-virus scan on the selected endpoint(s). For additional information refer to Running Scan Now on an Endpoint. |
|
Export |
Exports the page data to a comma-separated value (.csv) file. For additional information, refer to Exporting Data. |
|
Important: The Enhanced Security Configuration feature for Internet Explorer suppresses export functionality and must be disabled to export data successfully. Pop-up blockers in Internet Explorer or other supported browsers may also suppress export functionality and should be disabled. |
|
|
Options |
Opens the Options menu. For more information see The Options Menu. |
The AntiVirus Tab List (Groups Page)
The AntiVirus tab list itemizes endpoint identification data, server connectivity, operating system, and agent information.
The following table describes the columns within the AntiVirus tab on the Groups page Endpoint Membership view.
|
Column |
Description |
|---|---|
|
Name |
The name of the endpoint. Click the link to view its The Endpoint Details Page. |
|
Display Name |
Alternate name or phrase (up to 50 characters) for the endpoint to help you identify and distinguish it. Endpoint decision-making information it can provide includes what system it belongs to, where it is located, and what it is used for. You can edit this name on the Endpoint Details page. |
|
IP Address |
The IP address of the endpoint. |
|
Agent Status |
The status of the Ivanti Endpoint Security Agent on the endpoint. Values include: Online: The agent is communicating with the Ivanti Endpoint Security Server regularly. See Configuring the Agents Tab for more information on configuring default agent behavior. Offline: The agent has not communicated with Ivanti Endpoint Security Server within the check in interval. In an Offline status, the agent still enforces all policies. A Warning ( Disabled: The agent is disabled by a Ivanti Endpoint Security administrator. It doesn't enforce module policies nor complete tasks. |
|
Last Connected Date (Server) |
Exported comma separated value (.csv) file only. Last date and time (in server local time) when the endpoint communicated with the Endpoint Distribution Service (EDS) server. |
|
EDS Status |
Exported comma separated value (.csv) file only. Status of the Endpoint Distribution Service (EDS) server. The following list defines column values: Started: EDS server has started and is in an operational state accepting workloads. Starting: EDS server is in the process of starting its service. Stopped: EDS server has stopped and is not accepting workloads. Stopping: EDS server is in the process of stopping so as to not accept workloads. Offline: EDS server is offline as it has not contacted the database in the configured amount of time. |
|
AV State |
State of the AntiVirus agent module (Enabled, Disabled). |
|
AV Definition Version |
Version of the definition file currently installed on the endpoint. If the definition version is not the latest available, a warning triangle is displayed. |
|
Last AV Definition Update (Server) |
Date and time that the anti-virus definition was last updated on the endpoint. |
|
AV Scan Status |
Status of the latest anti-virus scan to run on the endpoint (In-progress, Success). |
|
Last AV Scan Time (Server) |
Date and time that the last anti-virus scan started, shown as server time. |
|
Operating System |
Operating system the endpoint is running. |
|
AV Running Version |
Version number of the AntiVirus module component installed on the endpoint. |
|
Agent Version |
Indicates the version of the agent that the endpoint is currently running. |
|
A |
The Application Control Tab (Groups Page)
Use the Application Control tab to perform tasks related to a selected group's endpoint. This tab is similar to the Endpoints page Application Control tab, but lets you perform tasks from a group level.
The Application Control Toolbar (Groups Page)
The Application Control tab toolbar contains the tasks and functions that are available for you to perform for managed endpoints with Application Control features enabled.
The following table describes the toolbar functions used in the Application Control tab on the Groups page Endpoint Membership view.
|
Button |
Description |
|---|---|
|
Membership |
Adds or removes managed endpoints to or from the selected group. For additional information, refer to Adding Endpoints to a Group. |
|
Manage Agents... (menu) |
Opens the Manage Agents menu. |
|
Install Agents... (Manage Agents... menu item) |
Installs agents on selected endpoints. For additional information, refer to Installing Agents by Agent Management Job. |
|
Uninstall Agents... (Manage Agents... menu item) |
Deletes agents from selected endpoints. For additional information, refer to Uninstalling Agents by Agent Management Job. |
|
Download Agent Installer... (Manage Agents... menu item) |
Downloads an agent installer to the endpoint used to access Ivanti Endpoint Security. For additional information, refer to Downloading the Agent Installer. |
|
Delete |
Deletes a disabled endpoint. For additional information, refer to Deleting Endpoints (Groups Page). |
|
Agent Versions... |
Defines the endpoint agent version. For additional information, refer to Defining the Endpoint Agent Version (Groups Page). |
|
Enable (Menu) |
Expands the Enable menu. |
|
Enable Agent (Enable menu item) |
Enables a disabled endpoint. For additional information, refer to Enabling or Disabling Ivanti Endpoint Security Agents within a Group. |
|
Enable Module (Enable menu item) |
Enables the Application Control agent module on only selected endpoints. For additional information, refer to Enabling or Disabling Endpoint Modules within a Group. |
|
Disable (Menu) |
Expands the Disable menu. |
|
Disable Agent (Disable menu item) |
Disables an enabled endpoint. For additional information, refer to Enabling or Disabling Ivanti Endpoint Security Agents within a Group. |
|
Disable Module (Disable menu item) |
Disables the Application Control agent module on only selected endpoints. For additional information, refer to Enabling or Disabling Endpoint Modules within a Group. |
|
Manage Modules... |
Opens the Add/Remove Modules dialog. Use this dialog to toggle module- specific agent functions. For additional information, refer to Managing Endpoint Modules (Groups Page). |
|
Wake Now... |
Wakes endpoints selected from the list. For additional information, refer to Waking Endpoints (Groups Page. |
|
Export |
Exports the page data to a comma-separated value (.csv) file. For additional information, refer to Exporting Data. Important: The Enhanced Security Configuration feature for Internet Explorer suppresses export functionality and must be disabled to export data successfully. Pop-up blockers in Internet Explorer or other supported browsers may also suppress export functionality and should be disabled. |
|
Options (menu) |
Opens the Options menu. For additional information, refer to The Options Menu. |
The Application Control Tab List (Groups Page)
The Application Control tab list itemizes identification data, operating system, agent information, and Application Control policy information for each endpoint in the selected group.
The following table describes the columns within the Application Control tab on the Groups page Endpoint Membership view.
|
Column |
Description |
|---|---|
|
Endpoint Name |
Indicates the name of the endpoint. Clicking the Endpoint Name link displays the applicable Endpoint Details page. See The Endpoint Details Page for additional information. |
|
Display Name |
Alternate name or phrase (up to 50 characters) for the endpoint to help you identify and distinguish it. Endpoint decision-making information it can provide includes what system it belongs to, where it is located, and what it is used for. You can edit this name on the Endpoint Details page. |
|
IP Address |
The IP address of the endpoint. |
|
Agent Status |
The status of the Ivanti Endpoint Security Agent on the endpoint. Values include: Online: The agent is communicating with the Ivanti Endpoint Security Server regularly. See Configuring the Agents Tab for more information on configuring default agent behavior. Offline: The agent has not communicated with Ivanti Endpoint Security Server within the check in interval. In an Offline status, the agent still enforces all policies. A Warning ( Disabled: The agent is disabled by a Ivanti Endpoint Security administrator. It doesn't enforce module policies nor complete tasks. |
|
Last Connected Date (Server) |
Exported comma separated value (.csv) file only. Last date and time (in server local time) when the endpoint communicated with the Endpoint Distribution Service (EDS) server. |
|
EDS Status |
Exported comma separated value (.csv) file only. Status of the Endpoint Distribution Service (EDS) server. The following list defines column values: Started: EDS server has started and is in an operational state accepting workloads. Starting: EDS server is in the process of starting its service. Stopped: EDS server has stopped and is not accepting workloads. Stopping: EDS server is in the process of stopping so as to not accept workloads. Offline: EDS server is offline as it has not contacted the database in the configured amount of time. |
|
LAC State |
Indicates the state of the Application Control module component on the endpoint (Enabled or Disabled). |
|
LAC Policy Enforcement |
Indicates the Application Control policy enforcement. |
|
Operating System |
The operating system that the endpoint uses. |
|
LAC Running Version |
Indicates the version of the Application Control module component installed on the endpoint. |
|
Agent Version |
The version of the Ivanti Endpoint Security Agent installed. |
|
A |
The Patch and Remediation Tab (Groups Page)
Use the Patch and Remediation tab to perform tasks related to a selected group's endpoint. This tab is similar to the Endpoints page Patch and Remediation tab, but lets you perform tasks from a group level.
The Patch and Remediation Tab Toolbar (Groups Page)
The Patch and Remediation tab toolbar contains the tasks and functions that are available for you to perform for managed endpoints with Patch and Remediation features enabled.
The following table describes the toolbar functions used in the Patch and Remediation tab on the Groups page Endpoint Membership view.
|
Button |
Description |
|---|---|
|
Deploy... |
Launches the Deployment Wizard, which allows you to create a deployment for the selected endpoints (Patch and Remediation only). For additional information, refer to Deploying Content to Endpoints (Endpoint Membership View). |
|
Manage Agents... (menu) |
Opens the Manage Agents menu. |
|
Install Agents... (Manage Agents... menu item) |
Installs agents on selected endpoints. For additional information, refer to Installing Agents by Agent Management Job. |
|
Uninstall Agents... (Manage Agents... menu item) |
Deletes agents from selected endpoints. For additional information, refer to Uninstalling Agents by Agent Management Job. |
|
Download Agent Installer... (Manage Agents... menu item) |
Downloads an agent installer to the endpoint used to access Ivanti Endpoint Security. For additional information, refer to Downloading the Agent Installer. |
|
Delete |
Deletes a disabled endpoint. For additional information, refer to Deleting Endpoints (Groups Page). |
|
Enable (Menu) |
Expands the Enable menu. |
|
Enable Agent (Enable menu item) |
Enables a disabled endpoint. For additional information, refer to Enabling the Ivanti Endpoint Security Agent. |
|
Enable Module (Enable menu item) |
Enables the Patch and Remediation module for selected endpoints. For additional information, refer to Enabling or Disabling Endpoint Modules within a Group. |
|
Disable (Menu) |
Expands the Disable menu. |
|
Disable Agent (Disable menu item) |
Disables an enabled endpoint. For additional information, refer to Disabling the Ivanti Endpoint Security Agent. |
|
Disable Module (Disable menu item) |
Disables the Patch and Remediation module for selected endpoints. For additional information, refer to Enabling or Disabling Endpoint Modules within a Group. |
|
Agent Versions... |
Defines the endpoint agent version. For additional information, refer to Defining the Endpoint Agent Version (Groups Page). |
|
Manage Modules... |
Opens the Add/Remove Modules dialog. Use this dialog to toggle module- specific agent functions. For additional information, refer to Managing Endpoint Modules (Groups Page). |
|
Scan Now... |
Launches the DAU task on selected endpoints. For additional information, refer to Using Scan Now to Scan Groups. |
|
Reboot Now... |
Prompts the selected endpoint to reboot. For additional information, refer to Rebooting Group Endpoints. |
|
Wake Now... |
Wakes endpoints selected from the list. For additional information, refer to Waking Endpoints (Groups Page). |
|
Export |
Exports the page data to a comma-separated value (.csv) file. For additional information, refer to Exporting Data. Important: The Enhanced Security Configuration feature for Internet Explorer suppresses export functionality and must be disabled to export data successfully. Pop-up blockers in Internet Explorer or other supported browsers may also suppress export functionality and should be disabled. |
|
Options (menu) |
Opens the Options menu. For additional information, refer to The Options Menu. |
The Patch and Remediation Tab List (Groups Page)
The Patch and Remediation Tab tab list itemizes endpoint identification data, server connectivity, operating system, and agent information.
The following table describes the columns within the Patch and Remediation Tab tab on the Groups page Endpoint Membership view.
|
Column |
Description |
|---|---|
|
Name |
The name of the endpoint. Clicking the Name link displays the applicable Endpoint Details page. See The Endpoint Details Page for additional information. |
|
Display Name |
Alternate name or phrase (up to 50 characters) for the endpoint to help you identify and distinguish it. Endpoint decision-making information it can provide includes what system it belongs to, where it is located, and what it is used for. You can edit this name on the Endpoint Details page. |
|
IP Address |
The IP address of the endpoint. |
|
Status (icon) |
The icon representing the Patch and Remediation module status. You can mouse over the icon to display description of the Patch and Remediation status. For additional information, refer to Agent Module Status Icons. |
|
Agent Status |
Indicates the status of the endpoint. The following list defines column values: Online: The agent is able to communicate with the Ivanti Endpoint Security server in the predefined time period. Refer to Configuring the Agents Tab for additional information on configuring agent default behavior. Offline: The agent is unable to communicate with the Ivanti Endpoint Security server in the predefined time period. In an Offline status, the agent still enforces all policies. A Warning ( Disabled: The agent will no longer enforce any module policies or complete tasks. All endpoints must show a Disabled status in order to delete the endpoint. Refer to Disabling the Ivanti Endpoint Security Agent. |
|
Last Connected Date (Server) |
Exported comma separated value (.csv) file only. Last date and time (in server local time) when the endpoint communicated with the Endpoint Distribution Service (EDS) server. |
|
EDS Status |
Exported comma separated value (.csv) file only. Status of the Endpoint Distribution Service (EDS) server. The following list defines column values: Started: EDS server has started and is in an operational state accepting workloads. Starting: EDS server is in the process of starting its service. Stopped: EDS server has stopped and is not accepting workloads. Stopping: EDS server is in the process of stopping so as to not accept workloads. Offline: EDS server is offline as it has not contacted the database in the configured amount of time. |
|
PR Status |
The status for Patch and Remediation module on the endpoint (Working, Idle, Sleeping, Offline, Disabled). |
|
DAU Status |
The status of the Discover Applicable Updates (DAU) scan when last run. The status is also a link to the applicable Deployment Results page. Status values include: Success or Failure followed by the failure code, and Not Available, which indicates that the endpoint has not checked in. |
|
The Not Available DAU Status is not a hyperlink (Patch and Remediation only). |
|
|
Last DAU Scan (Server) |
The date and time of the last successful DAU scan (server side). A value of Not Available indicates the endpoint has not completed a DAU scan (Patch and Remediation only). |
|
Operating System |
The operating system the endpoint is running. |
|
PR Running Version |
The Patch and Remediation module version number running on the endpoint. |
|
Agent Type |
The type of agent that is running on the endpoint and communicating with Ivanti Endpoint Security (Ivanti Endpoint Security or Patch). |
|
Agent Version |
Indicates the version of the agent that the endpoint is currently running. A |
The Power Management Tab (Groups Page)
Use the Power Management tab to perform tasks related to a selected group's endpoint. This tab is similar to the Endpoints page Power Management tab, but lets you perform tasks from a group level.
The Power Management Tab Toolbar
This toolbar contains buttons you can use to enable or disable the Power Management component on listed endpoints.
The toolbar includes the following buttons.
|
Button |
Description |
|---|---|
|
Manage Agents... (menu) |
Opens the Manage Agents menu. |
|
Install Agents... (Manage Agents... menu item) |
Installs agents on selected endpoints. For additional information, refer to Installing Agents by Agent Management Job. |
|
Uninstall Agents... (Manage Agents... menu item) |
Uninstalls agents from selected endpoints. For additional information, refer to Uninstalling Agents by Agent Management Job. |
|
Download Agent Installer... (Manage Agents... menu item) |
Downloads an agent installer to the endpoint used to access Ivanti Endpoint Security. For additional information, refer to Downloading the Agent Installer. |
|
Delete |
Deletes a disabled endpoint. For additional information, refer to Deleting an Endpoint. |
|
Enable (Menu) |
Expands the Enable menu. |
|
Enable Agent (Enable menu item) |
Enables a disabled endpoint. For additional information, refer to Enabling the Ivanti Endpoint Security Agent. |
|
Enable Module (Enable menu item) |
Enables the Power Management agent module on only selected endpoints. For additional information, refer to Enabling or Disabling Endpoint Modules within a Group. |
|
Disable (Menu) |
Expands the Disable menu. |
|
Disable Agent (Disable menu item) |
Disables an enabled endpoint. For additional information, refer to Disabling the Ivanti Endpoint Security Agent. |
|
Disable Module (Disable menu item) |
Disables the Power Management agent module on only selected endpoints. For additional information, refer to Enabling or Disabling Endpoint Modules within a Group. |
|
Agent Versions... |
Defines the agent version(s) that can be installed on an endpoint. For additional information, refer to Upgrading Endpoints. |
|
Manage Modules... |
Opens the Add/Remove Modules dialog. Use this dialog to add and remove modules to or from the endpoint. For additional information, refer to Installing Endpoint Modules. |
|
Wake Now... |
Wakes endpoints selected from the list. For additional information, refer to Waking Endpoints (Groups Page). |
|
Export |
Exports the page data to a comma-separated value (.csv) file. For additional information, refer to Exporting Data. Important: The Enhanced Security Configuration feature for Internet Explorer suppresses export functionality and must be disabled to export data successfully. Pop-up blockers in Internet Explorer or other supported browsers may also suppress export functionality and should be disabled. |
|
Options (menu) |
Opens the Options menu. For additional information, refer to The Options Menu. |
The Power Management Tab List (Groups Page)
The Power Management tab list itemizes endpoint identification data, operating system, agent information, and Power Management policy information.
The following table describes the columns within the Power Management tab on the Groups page Endpoint Membership view.
|
Column |
Description |
|---|---|
|
Endpoint Name |
Indicates the name of the endpoint. Clicking the Name link displays the applicable Endpoint Details page. |
|
IP Address |
Indicates the IP address of the endpoint. |
|
Agent Status |
Indicates the status of the endpoint (Online, Offline, or Disabled). |
|
Last LPM Reporting Time (Server) |
Indicates the last time the Ivanti Power Management state was reported to the server. |
|
PM State |
Indicates the status of Ivanti Power Management (Enabled or Disabled). |
|
Operating System |
Indicates the operating system the endpoint is running. |
|
PM Running Version |
Indicates the version of Ivanti Power Management installed on the endpoint. |
|
Agent Version |
Indicates the version of the agent that the endpoint is currently running. A icon next to an agent version indicates that an upgrade of the agent was requested. Click the icon to display additional agent version details. |
The Device Control Tab (Groups Page)
Use the Device Control tab to perform tasks related to a selected group's endpoint. This tab is similar to the Endpoints page Device Control tab, but lets you perform tasks from a group level.
The Device Control Toolbar (Groups Page)
The Device Control tab toolbar contains the tasks and functions that are available for you to perform for managed endpoints with Device Control features enabled.
The following table describes the toolbar functions used in the Device Control tab on the Groups page Endpoint Membership view.
|
Button |
Description |
|---|---|
|
Membership |
Adds or removes managed endpoints to or from the selected group. For additional information, refer to Adding Endpoints to a Group. |
|
Manage Agents... (menu) |
Opens the Manage Agents menu. |
|
Install Agents... (Manage Agents menu item) |
Installs agents on selected endpoints. For additional information, refer to Installing Agents by Agent Management Job. |
|
Uninstall Agents... (Manage Agents menu item) |
Deletes agents from selected endpoints. For additional information, refer to Uninstalling Agents by Agent Management Job. |
|
Download Agent Installer... (Manage Agents menu item) |
Downloads an agent installer to the endpoint used to access Ivanti Endpoint Security. For additional information, refer to Downloading the Agent Installer. |
|
Delete |
Deletes a disabled endpoint. For additional information, refer to Deleting Endpoints (Groups Page). |
|
Agent Versions... |
Defines the endpoint agent version. For additional information, refer to Defining the Endpoint Agent Version (Groups Page). |
|
Enable (Menu) |
Expands the Enable menu. |
|
Enable Agent (Enable menu item) |
Enables a disabled endpoint. For additional information, refer to Enabling or Disabling Ivanti Endpoint Security Agents within a Group. |
|
Enable Module (Enable menu item) |
Enables the Device Control agent module on only selected endpoints. For additional information, refer to Enabling or Disabling Endpoint Modules within a Group. |
|
Disable (Menu) |
Expands the Disable menu. |
|
Disable Agent (Disable menu item) |
Disables an enabled endpoint. For additional information, refer to Enabling or Disabling Ivanti Endpoint Security Agents within a Group. |
|
Disable Module (Disable menu item) |
Disables the Device Control agent module on only selected endpoints. For additional information, refer to Enabling or Disabling Endpoint Modules within a Group. |
|
Manage Modules... |
Opens the Add/Remove Modules dialog. Use this dialog to toggle module-specific agent functions. For additional information, refer to Managing Endpoint Modules (Groups Page). |
|
Export |
Exports the page data to a comma-separated value (.csv) file. For additional information, refer to Exporting Data. Important: The Enhanced Security Configuration feature for Internet Explorer suppresses export functionality and must be disabled to export data successfully. Pop-up blockers in Internet Explorer or other supported browsers may also suppress export functionality and should be disabled. |
|
Options (menu) |
Opens the Options menu. For additional information, refer to The Options Menu. |
The Device Control Tab List (Groups Page)
The Device Control tab list itemizes endpoint identification data, operating system, agent information, and Device Control policy information.
The following table describes the columns within the Device Control tab on the Groups page Endpoint Membership view.
|
Column |
Description |
|---|---|
|
Endpoint Name |
The name of the endpoint. Clicking the Name link displays the applicable Endpoint Details page. See The Endpoint Details Page for additional information. |
|
Display Name |
Alternate name or phrase (up to 50 characters) for the endpoint to help you identify and distinguish it. Endpoint decision-making information it can provide includes what system it belongs to, where it is located, and what it is used for. You can edit this name on the Endpoint Details page. |
|
IP Address |
The IP address of the endpoint. |
|
Agent Status |
The status of the Ivanti Endpoint Security Agent on the endpoint. Values include: Online: The agent is communicating with the Ivanti Endpoint Security Server regularly. See Configuring the Agents Tab for more information on configuring default agent behavior. Offline: The agent has not communicated with Ivanti Endpoint Security Server within the check in interval. In an Offline status, the agent still enforces all policies. A Warning ( Disabled: The agent is disabled. |
|
Last Connected Date (Server) |
Exported comma separated value (.csv) file only. Last date and time (in server local time) when the endpoint communicated with the Endpoint Distribution Service (EDS) server. |
|
EDS Status |
Exported comma separated value (.csv) file only. Status of the Endpoint Distribution Service (EDS) server. The following list defines column values: Started: EDS server has started and is in an operational state accepting workloads. Starting: EDS server is in the process of starting its service. Stopped: EDS server has stopped and is not accepting workloads. Stopping: EDS server is in the process of stopping so as to not accept workloads. Offline: EDS server is offline as it has not contacted the database in the configured amount of time. |
|
DC State |
Indicates the state of Device Control module component on the endpoint (Enabled or Disabled). |
|
Operating System |
The operating system that the endpoint uses. |
|
DC Running Version |
Indicates the version of the Device Control module component installed on the endpoint. |
|
Agent Version |
The version of the Ivanti Endpoint Security Agent installed. A |
|
Last Logged Event (Server) |
Indicates the last date and time an event was recorded in the Device Control log. |
|
Policy Up To Date |
Indicates whether the Device Control policy is up to date (True or False). |
Adding Endpoints to a Group
You can manage endpoints and mobile endpoints collectively by adding them to custom groups. Add endpoints to a group from the Groups page.
- From the Navigation Menu, select Manage > Groups.
- From the Groups tree, right-click a group in the Custom Groups hierarchy and select Add endpoints to group.
Remember: Endpoints can only be added to custom groups.
- Add endpoints to the group.
- [Optional] To filter the endpoints that are listed down to a pre-existing group, select a Group from the drop-down list and click
 .
. - [Optional] To filter the endpoints that are listed, type filter criteria in the table fields and click
 to select an operator (see Using Filter Rows).
 - Select endpoints and click Add.
- Click Add All to include the entire list.
- You can add endpoints to the group by importing them from a list. Click Importing Endpoints into Groups to use this feature.
- Use the Remove and Remove All buttons to remove endpoints from the list.
- Review the list of endpoints to confirm it is correct.
Tip:
- [Optional] To filter the endpoints that are listed down to a pre-existing group, select a Group from the drop-down list and click
The Membership dialog opens.

- Click OK.
The selected endpoints are added to the group. Select Endpoint Membership from the View list to confirm they are added.
Importing Endpoints into Groups
If you are adding a large number of endpoints to a group, importing a list of endpoints can be faster than selecting them individually within the Membership dialog.
Import Rules
- You can only import endpoints using their host names. IP Addresses cannot be imported.
- You must separate each endpoint with a comma.
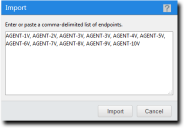
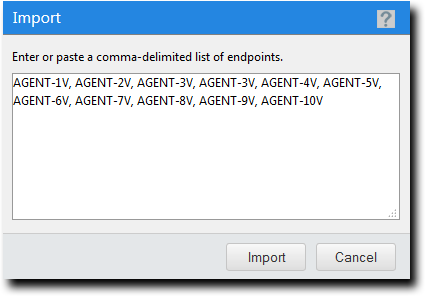
Tip: You can use Ivanti Endpoint Security to easily obtain a list of endpoints to import. To create a list:
- Open the Endpoints page (Manage > Endpoints).
- Using the page filters to display the endpoints you want to add to your group.
- Click Export.
- Open the exported .csv file and copy and paste the endpoint names into the Import dialog. Add a comma between each name.
Deploying Content to Endpoints (Endpoint Membership View)
Within Ivanti Endpoint Security, content can be deployed from a number of pages, including the Groups page Endpoint Membership view. When deploying from this page, the Deployment Wizard is pre-configured to deploy content to selected endpoints within a selected group.
For additional information, refer to About Deployments.
- From the Navigation Menu, select Manage > Groups.
- From the View list, select Endpoint Membership.
- From the directory tree, select the group containing endpoints you want to deploy content to.
- Select the Patch and Remediation tab.
- [Optional] Select endpoints to receive deployments.
- Click Deploy.
The Deployment Wizard opens, pre-configured to deploy to selected endpoints.
After Completing This Task:
Review Using the Deployment Wizard and complete subsequent tasks.
Installing Agents by Agent Management Job
Within Ivanti Endpoint Security, there are multiple methods of installing an agent on endpoints using an Agent Management Job. To create an Agent Management Job that installs agents from the Endpoint Membership view, select Manage Agents > Install Agents from the toolbar.
For additional information, refer to Installing Agents by Agent Management Job.
Uninstalling Agents by Agent Management Job
Within Ivanti Endpoint Security, there are multiple methods of uninstalling an agent from endpoints using an Agent Management Job. To create an Agent Management Job that uninstalls agents from the Endpoint Membership view, select Manage Agents > Uninstall Agents from the toolbar.
To pre-populate the Schedule Agent Management Job - Uninstall Wizard target list, first select the desired group from the Browser, and then select the check box associated with the desired endpoints.
For additional information, refer to Uninstalling Agents by Agent Management Job.
Downloading the Agent Installer
You can install an agent on a local endpoint from the Endpoint Membership view.
To download an agent installer from the Endpoint Membership view, select Manage Agents > Download Agent Installer from the toolbar. For additional information, refer to Downloading the Agent Installer.
Defining the Endpoint Agent Version (Groups Page)
From the Groups page, you can upgrade your endpoints to a newer version of the agent.
Define agent version(s) for group endpoints from the Groups page Endpoint Membership view.
- From the Navigation Menu, select Manage > Groups.
- From the View list, select Endpoint Membership.
- Select a group from the directory tree.
You may select a group that is either in the Custom Groups or Systems Groups hierarchy.
- Select the endpoints on which you want to define agent version(s).
-
Click Agent Versions.
The Manage Agent Versions dialog opens.
- Define the agent version(s).
Use one of the following methods: - From the Select One list, select an agent version.
- Click Apply to All Agents.
- Click OK.
The Manage Agent Versions dialog closes. If an agent version other than the defined version is installed on the endpoints, the defined version is installed over the previous version.
|
Method |
Steps |
|---|---|
|
To define a standard agent version for all listed endpoints: |
|
|
To define an agent version for each endpoint: |
Select an agent version from the Agent Version list for each endpoint. |
The agent versions available for selections are defined from the Options page. For additional information, refer to Configuring the Agents Tab.
Deleting Endpoints (Groups Page)
From the Groups page, you can delete an endpoint from the Ivanti Endpoint Security database.
Prerequisites:
The endpoints you want to delete must be disabled. For additional information, refer to Enabling or Disabling Ivanti Endpoint Security Agents within a Group.
Delete endpoints from the Endpoint Membership view.
Deleting an endpoint removes its record from the Ivanti Endpoint Security database, but it does not remove the agent on the endpoint.
- From the Navigation Menu, select Manage > Groups.
- From the View list, select Endpoint Membership.
- Select a group from the directory tree.
You may select a group that is either in the Custom Groups or Systems Groups hierarchy that is disabled.
- Select the endpoint listings you want to delete.
You can delete endpoints from any module tab.
- Click Delete.
A confirmation dialog opens. - Click OK to confirm the deletion.
The selected endpoints are deleted.
Enabling or Disabling Ivanti Endpoint Security Agents within a Group
Disabling an agent deactivates its functionality. Disabled agents do not contact the Ivanti Endpoint Security server, use Ivanti Endpoint Security features, or occupy Ivanti Endpoint Security licenses.
Disable an agent if it will be unused for a prolonged period. You can re-enable an agent at any time.
Enable or disable an agent within a group from the Endpoint Membership view.
- From the Navigation Menu, select Manage > Groups.
- From the View list, select Endpoint Membership.
- Select one of the following tabs:
- The All Tab
- The Patch and Remediation Tab
- From the Browser, select a group within either the Custom Groups or Systems Groups hierarchy.
- If necessary, define filter criteria and click Update View.
- Select the endpoints on which you want to enable or disable the agent: Use one of the following methods.
|
Method |
Steps |
|---|---|
|
To enable a disabled endpoint: |
Click Enable. |
|
To disable an enabled endpoint: |
|
The applicable agents are enabled or disabled. The Endpoint Membership view and Endpoints page reflect your changes.
Disabling an agent within a group is not limited to the group; the agent is completely disabled within the Ivanti Endpoint Security.
Enabling or Disabling Endpoint Modules within a Group
From the groups page, you can disable an agent's individual modules. Disable an endpoint's module component if it will be unused for a prolonged period. You can re-enable the endpoint module at any time.
Prerequisites:
Endpoints must have the applicable agent module installed, and the endpoint must be licensed for the agent module. For additional information, refer to Installing Endpoint Modules.
Enable or disable a module within a group from the Endpoint Membership view.
- From the Navigation Menu, select Manage > Groups.
- From the View list, select Endpoint Membership.
- Select a group from the directory tree.
You may select a group that is either in the Custom Groups or Systems Groups hierarchy.
- Select the tab for the module you want to enable or disable.
The tabs available depend on which modules you have purchased and installed.
- [Optional] Define filter criteria and click Update View.
- Select the check box(es) for endpoint(s) with module components you want to enable or disable.
- Enable or disable the selected endpoint module(s): Use one of the following methods.
- Select Enable > Enable Module.
- Acknowledge the disablement by clicking OK.
|
Method |
Steps |
|---|---|
|
To enable a disabled module component: |
Select Enable > Enable Module. |
|
To disable an enabled endpoint: |
|
The applicable endpoint module components are enabled or disabled. The Endpoint Membership view and Endpoints page reflect your changes.
Disabling an endpoint module within a group is not limited to the group; the endpoint module is completely disabled within the Ivanti Endpoint Security system.
Managing Endpoint Modules (Groups Page)
You can manage endpoint module licenses from the Groups page. Using this feature allows you control which modules apply to a particular endpoint.
Manage modules for individual endpoints from the Groups page Endpoint Membership view.
- Select Manage > Groups.
- From the View list, select Endpoint Membership.
- Select one of the following tabs:
- The All Tab
- The Patch and Remediation Tab
- Select a group from the directory tree.
You may select a group that is in either the Custom Groups or Systems Groups hierarchy.
- Select the check box(es) associated with the endpoints for which you want to manage modules.
- Click Manage Modules.
The Add/Remove Modules dialog opens. - Manage modules for each endpoint.
- To activate a module for a particular endpoint, select the module check box for the applicable endpoint.
- To deactivate a module for a particular endpoint, clear the module check box for the applicable endpoint.
Select or clear the Select All check boxes associated with a module to globally toggle a module for all endpoints.
- Click OK.
The Add/Remove Modules dialog closes. The agent features for each edit are updated during the next Discover Applicable Updates task.
Using Scan Now to Scan Groups
You can initiate a Discover Applicable Updates (DAU) task for all endpoints in a selected group or only selected endpoint within the group. When you initiate this task, the agent scans its host endpoint for vulnerabilities and inventory. Scan results are then uploaded to Ivanti Endpoint Security, which you can view.
You can launch a DAU task for all endpoints in a selected group or individual endpoints in a selected group. Perform this task from the Groups page Endpoint Membership view.
- From the Navigation Menu, select Manage > Groups.
- From the View list, select Endpoint Membership.
- Select the Patch and Remediation tab.
- From the directory tree, select the group containing endpoints you want to schedule DAU tasks for.
- Schedule a task for the entire group or individual endpoints. Use one of the following methods.
- From the toolbar, click Scan Now.
- Select Yes, scan all members of the selected group check box.
- Select the Include child groups in the scan check box. This option schedules tasks for all groups in the selected group's child hierarchy.
- From the list, select the check boxes associated with the desired endpoint(s).
- Click Scan Now.
- Select the Yes, scan the selected endpoint check box.
|
Method |
Steps |
|---|---|
|
To schedule a task for an entire group: |
|
|
To schedule a task for individual endpoints: |
|
When the Patch and Remediation and Application Control modules are both installed, the Scan Now button is replaced with a Scan Now menu. When this menu is present, select Scan Now > Discover Applicable Updates from the toolbar to perform a DAU task.
- Click Schedule.
- Acknowledge the scheduling by clicking Close.
The scan is scheduled. As with all deployments, although the Discovery Applicable Updates task is scheduled for immediate execution, it will not actually occur until the next time the agent checks in.
Rebooting Group Endpoints
From the Endpoint Membership view, you can reboot entire groups or endpoints within a group.
- From the Navigation Menu, select Manage > Groups.
- From the View list, select Endpoint Membership.
- Select the Patch and Remediation tab.
- From the directory tree, select the group containing endpoints you want to reboot.
- Reboot the entire group or individual endpoints. Use one of the following methods.
- Click Reboot Now.
- Select Yes, reboot all members of the selected group check box.
- Select the Reboot child groups check box.
- Select the check boxes associated with the desired endpoint(s).
- Click Reboot Now.
-
Select the Yes, reboot the selected endpoint check box.
- Click Reboot.
- Acknowledge the reboot by clicking Close.
The reboot is scheduled. As with all deployments, although the reboot is schedule for immediate execution, it will not actually occur until the next time the agent checks in.
|
Method |
Steps |
|---|---|
|
To reboot an entire group |
|
|
To reboot individual endpoints: |
|
Exporting Endpoint Membership View Data
To export information displayed in the Endpoint Membership view list to a comma separated value (.csv) file, click the toolbar Export button. Exporting data lets you work with that data in other programs for reporting and analytical purposes.
For additional information, refer to Exporting Data.