The Options Page
You can control a number of default settings from the Options page: user interface options, agent options, and so on. Use these options to customize default settings and values.
The Options page contains the following tabs, which contain options related to their labels:
The Options Page Buttons
The Options page contains several buttons that are common to each of its tabs. These buttons share similar functions to buttons commonly seen on page toolbars.
The following table describes the Option page button functions.
|
Button |
Function |
|---|---|
|
Export |
Exports the page data to a comma-separated value (.csv) file. For additional information, refer to Exporting Data. Important: The Enhanced Security Configuration feature for Internet Explorer suppresses export functionality and must be disabled to export data successfully. Pop-up blockers in Internet Explorer or other supported browsers may also suppress export functionality and should be disabled. |
|
Reset |
Cancels any edits made to the options since the tab was loaded. |
|
Save |
Saves the tab option settings (if any edits were made). You must click this button to implement your edits. |
Viewing the Options Page
Navigate to the Options page to edit default system settings. You can reach this page from the Navigation Menu.
- From the Navigation Menu, select Tools >Options.
- Select atab.
- [Optional] Complete a task listed in Working with Options.
The General Tab
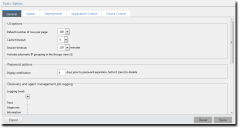
Default settings for user interface options, password options, and report and display options are controlled from the General tab. The options available on this page are generalized and are not closely related.
UI Options
With these options, you can control user interface features according to your preferences.
Select from lists and check boxes to configure UI options.
|
Option |
Description |
|---|---|
|
Default number of rows per page |
Defines the default number of rows that display in list pages (25, 50, 100, 200, 500). |
|
Cache timeout |
Defines the maximum number of minutes data is held in the memory before it needs to be reloaded from the database (5, 10, 15, 20, 30). |
|
Session timeout |
Defines the number of minutes before a repeat login is required due to inactivity (20, 40, 60, 80, 100, 120). |
|
Activate automatic IP grouping in the Groups view |
Creates groups organized by IP address in the Groups page Browser named IP Collection. |
|
Enhanced Reports URL |
Defines the URL that is opened when Reports > Enhanced Reports is selected from the Navigation Menu. This feature is intended to open a third-party reporting solution, but you can use it to open any URL you want. |
Password Options
This option defines the number of days before an upcoming password expiration that a warning appears that notifies you of the upcoming expiration.
Complete the field to configure the options.
The following table describes the available Password option.
|
Option |
Description |
|---|---|
|
Display notification x days prior to password expiration |
Defines the number of days prior to a required password change (as controlled by Windows) that a notification displays. A value of 0 disables the notification. |
User that do not have password expirations are unaffected by this option.
Discovery and Agent Management Job Logging
During Discovery Scan or Agent Management Jobs, a log of events is saved on your server. The Discovery and Agent Management Job Logging options lets you configure the information that is logged during job activity.
Discovery and Agent Management Job Logging Options:
|
Option |
Description |
|---|---|
|
Logging Level |
Defines the information recorded in the job during Discovery Scan Jobs and Agent Management Jobs. Options include:
|
|
Include common troubleshooting information for |
Defines whether the log include common troubleshooting information for a given part of a job. Options include:
|
By default, Discovery Scan and Agent Management Job logs are saved to %Installation Directory%\HEAT Software\EMSS\Web\Services\ScanEngine\Engine\engine.logon the server.
Report and Display Options
These options control date, time, and paper formatting for reports. Modify date and time settings according to your locale. Modify paper settings according the paper types your enterprises uses for printing.
These options apply only to reports in a PDF format.
|
Option |
Description |
|---|---|
|
Date format |
Defines the date format displayed in text-based and graphical reports. Select from the following options:
|
|
Time separator |
Defines the character used to separate hours, minutes, and seconds in reports. Select from the following options:
This option also defines the time format used in reports. Select from the following options:
|
|
Time format |
Displays the selected Date Format punctuated by the selected Time Separator. This field refreshes as you select different Report and display options. |
|
Paper size for reports |
Defines how reports are formatted for printing. Select from the following options:
|
The Agents Tab
This tab contains default options related to the agent. Default option sections include:
Agent Installation
These options define default installation values for Agent Management Jobs. Adjusting these settings can help save on effort using an Agent Management Job.
Use Agent Installation options to define the default settings for the Agent Settings page in the Schedule Agent Management Job Wizard. Complete the field and select from the lists to define the options.
When configuring an Agent Management Job, the following options can be changed.
|
Agent Installation Option |
Description |
|---|---|
|
Timeout (drop-down list) |
Defines the default number of minutes before an agent installation job terminates due to non-responsive status (0-30). |
|
Number of retries (drop-down list) |
Defines the default number of attempts an agent installation will retry if initial and subsequent installations fails (1-10). |
|
Number of simultaneous installs (drop-down list) |
Defines the default maximum number of agents that can be installed or un-installed simultaneously during an Agent Management Job (1-25). A setting of 1indicates that serial install/uninstalls should occur. |
|
Server identity (field) |
Defines the default text entered in the Server Identity field during agent installation jobs. Server Identity is the name agents list as their Ivanti Endpoint Security server. |
|
Scan method for pre- selected targets (radio buttons) |
Defines how endpoints pre-selected from a page list are added to a job's targets list (discovery scan or agent management) after launching a job configuration dialog. The options are: IP Address: Adds the selected endpoint to a job's target list using its IP address. ComputerName: Adds the selected endpoint to a job's target list using its endpoint name. |
Communication
This section contains default options for agent communications with the server.
|
Option |
Description |
|---|---|
|
Agents should be shown offline when inactive for |
Defines the time period (in minutes, hours, or days) before an agent is considered offline because it has not checked. A value of 0 disables this option. Disabled and uninstalled agents are not considered offline. |
Absentee Agent Deletion
Sporadically, an endpoints will cease communication with the server. Configure the Absentee Agent Deletion option to determine the amount of time before the agent is removed from your server database.
|
Option |
Description |
|---|---|
|
Delete absentee agent after x days. |
Removes an uncommunicative agent after the defined time period (days). A value of 0 disables this function. |
Absentee agents records are only deleted from the database, leaving no history of them in the Web console. However, the agent software is not deleted from its host endpoint.
Agent Versions
There are multiple versions of the agent. By defining Agent Version options, you can limit which versions are available for installation.
|
Option |
Description |
|---|---|
|
Windows 8.1 and newer agent version |
Defines which agent versions are available for installation on endpoints running Windows operating systems when working with the following system dialogs:
|
When selecting agent version options, remember the following information:
- Newest Available means only the latest agent version is available for installation.
- Agent Version only list items mean only that agent version is available for installation.
- Agent Version + list items mean that agent version and all versions that supersede it are available for installation.
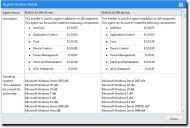
The Agent Version Detail dialog describes the various agent versions. It also lists system requirements, applicable notes, and recent changes.
To access this dialog, click the What is different about each version? link on the Agents tab.
|
Field |
Description |
|---|---|
|
Agent Version |
The agent name and version number. |
|
Description |
A description of the agent. This field also lists the components that are installed with the agent. |
|
Operating Systems |
The operating systems that are supported by the agent. |
|
System Requirements |
The system requirements to install the agent on an endpoint. |
|
Installation Notes |
The information notes pertaining to installation of the agent. |
|
Changes |
The changes made to the agent since its previous release. |

