Service Manager
Working with Email Inboxes
•About Working with Email Inboxes
•About Creating Incidents from Emails
•About Creating Other Business Object Types from Emails
•About Updating a Service Request via Email
•Accessing the Default Email Inbox
•Example: Creating or Linking Business Objects via Email
•Home
•Home
•Home
•Home
•Examples of Processing Emails Received in XML Format
•Home
About Working with Email Inboxes
Use this feature to create a business object, such as an incident, from an email. After an incident or other business object record is created (or updated), the application attaches the email to the record (in the Activity History tab) and moves the email from the inbox folder to the archived folder.
If a user exists or is created, the application adds the associated email to the employee record for the user.
About Creating Incidents from Emails
The default Service Manager application comes with one inbox, which is based on the Incident business object. When you send an email to this inbox, the email listener processes the incoming message and creates an incident.
About Creating Other Business Object Types from Emails
You can create additional inboxes for other business objects. To process emails from other business objects, you must create an inbox for each business object. You must define a template for each business object so that users can submit emails in the correct format.
We recommend that you create new inboxes for other business objects after you modify the default inbox.
About Updating a Service Request via Email
You cannot create service request records from incoming emails; however, you can update service request records from incoming emails.
•The corresponding field names and field values in the record are updated from the email and the email is attached to the record under the Activity History tab.
•If the email body does not contain valid field names and field values, then an attempt is made to search for the service request from the service request ID is in the subject line; then the email is attached to the record in the Activity History tab.
If Service Manager cannot locate the service request record, the application creates a new incident and attaches the email to the record.
Accessing the Default Email Inbox
Service Manager always has a default inbox configured to create incidents. Therefore, you do not need to configure an inbox for creating incidents, but can instead just update the default inbox if you need to make changes.
The default email inbox is used to create incidents in Service Manager from email. Follow the steps here to access it.
1.Log into the Service Manager Application.
2.Open the Email Config workspace. If there is only one email server, the application automatically opens it. If there is more than one, click the default record link under the Mail Host column.
3.From the Inbox tab at the bottom of the page, click the default record link under the Address column. The application opens the Inbox Configuration workspace.
Creating an Inbox
1.Log into the Service Manager Application.
2.Open the Email Config workspace.
3.From the Inbox tab at the bottom of the page, click New. The application displays the New Inbox workspace.
Inbox Configuration Workspace
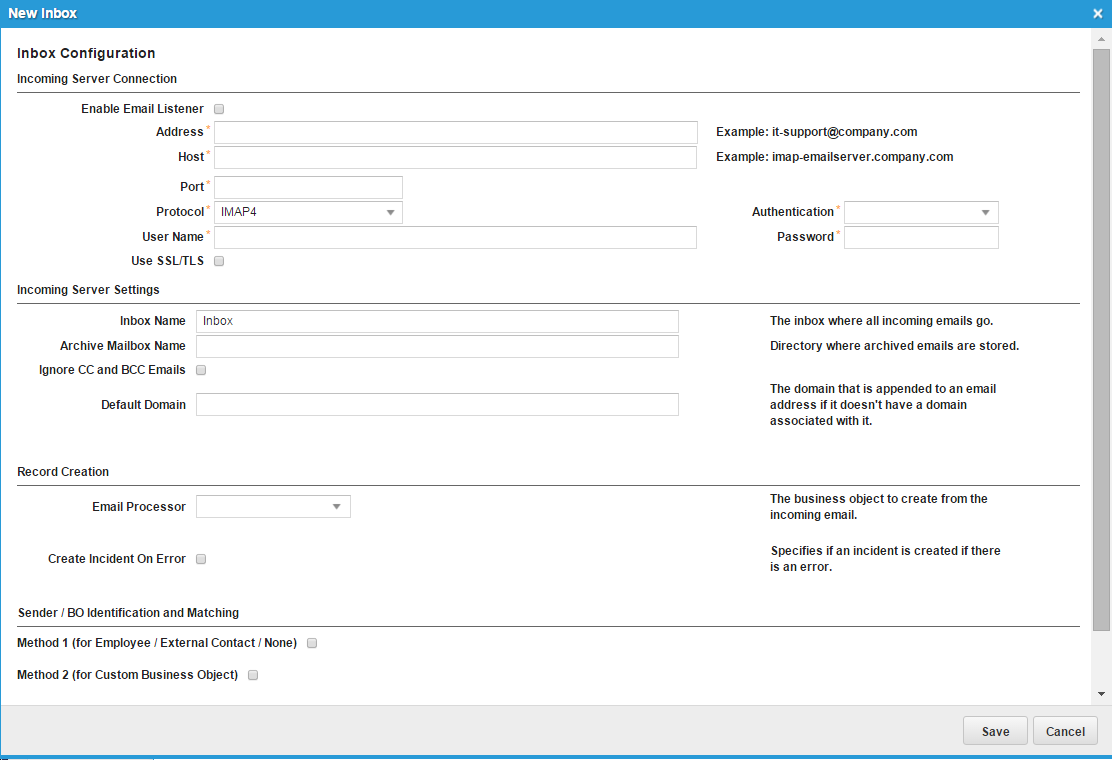
4.Enter information into the fields.
| Parameter | Description |
| Incoming Server Connection | |
| Enable Email Listener | Turns on the email listener to catch emails and create a business object. |
| Address | The email address that users send emails to. An example is [email protected]. |
| Host | The host name or group that handles emails from the email address. An example is pop.emailsvr.com. |
| Port | (Only shown if you select POP3 or IMAP4 for the Protocol field.) The corresponding port number for the selected protocol. The default email port for POP3 is port 110 and the default port for IMAP4 is port 143. |
| Protocol | The protocol used to retrieve emails. The options are POP3, IMAP4, and Exchange Web Services. |
| Authentication |
(Only shown if you select POP3 or IMAP4 for the Protocol field.) The authentication method for incoming messages. See About Authentication Types. |
| User Name | The user name required to access the inbox on the email server. Usually the same as the address. |
| Password | The password required to access the inbox in the email server. |
| Use SSL/TLS | (Only shown if you select POP3 or IMAP4 for the Protocol field.) Enables SSL and TLS security for incoming messages. |
| Incoming Server Settings | |
| Inbox Name | (Only shown if you select Exchange Web Services or IMAP4 for the Protocol field.) A directory for incoming emails. When the application processes an email, it creates or updates the business object record. If the email is incorrectly configured, the application moves it from the inbox folder to the archive folder. |
| Archive Mailbox Name |
(Only shown if you select Exchange Web Services or IMAP4 for the Protocol field.) A directory for storing archived or processed emails.
NOTE: Even though this field is called Archive Mailbox Name, this is not actually a mailbox, but is instead a folder. |
| Ignore CC and BCC Emails | Ignores emails addressed to this inbox when the email address is only in the CC or BCC fields. The application does not process these emails. |
| Default Domain |
A default domain. The application may not correctly process incoming emails without a domain. Use the default domain to construct a valid address, enabling emails to process as normal, including creating incident records. |
| Include Source Mailbox Name | (Only shown if you select Incident for the Email Processor field.) Includes the name of the source mailbox in the From field of the email. When checked, the CreatedBy field in an incident stores the processing mailbox name (such as Email [email protected]; If unchecked, the CreatedBy field has the value email listener. This enables you to determine which mailbox generated the incident. |
| Test Connection |
(Only shown if you select Exchange Web Services for the Mail Protocol field or if you select Advanced for the Email Component Type field on the Email Configuration workspace. See Configuring the Outgoing and Incoming Email Servers for more information.) Tests the Microsoft Exchange web services connection and displays the highest priority result of the most recent test.
After you click Test Connection, the application displays a confirmation message stating that the application will check the connection and then send an email to the specified user account. The specified user account is the email address that is specified in the User Name field in the Outgoing Server section of the Email Config workspace. See Configuring the Outgoing and Incoming Email Servers. Click Yes to proceed. See About the Test Connection Results. |
| Record Creation | |
| Email Processor |
The business object created from the incoming email. Incident: When the email is received, an incident record is created. This option is the default setting. Problem: When the email is received, a problem record is created. Other: You can select another business object. See Home . Export Email as XML: When the email is received, it is exported as an XML file. See Home . |
| Name | (Only shown if you select Other for the Email Processor field.) The type of business object that the application creates when it receives the email. |
| Unique Key | (Only shown if you select Other for the Email Processor field.) The value that identifies this business object. Match the value you enter in this field with the Display field value for the business object on the Object Details tab (found in the Configuration Console in the Business Objects workspace for the particular business object). For example, the default unique key for change is ChangeNumber and the default unique key for knowledge is KnowledgeNumber. |
| Record Marker |
(Only shown if you select Problem or Other for the Email Processor field.) A valid marker value that separates multiple record information within an email. For example, if you enter # as a record marker, information in the email body preceding the # sign creates one record and information after the # sign creates another record. When inserted in a message body, this record marker (for example, a # sign) allows multiple records to be created from the body of a single message. See the note below. |
| Field Value Separator |
(Only shown if you select Problem or Other for the Email Processor field.) A character that separates the field name from the field value. For example, if you enter $ as a field separator value, Summary$summary_field_information populates the Summary field with the field information.
Do not add white spaces before the field value separator. |
| Create Email When No Target BO | (Only shown if you select Other for the Email Processor field.) Check this option to send an email if the application cannot find the target business object. |
| Create Incident On Error |
Creates an incident when an error occurs in generating the record from an email (regardless of the business object specified). The application displays the fields in the Incident and Task Creation section if you select this option.
NOTE: The application only creates an incident upon error for cases other than create incident. That is, it creates an incident when there is an error updating an incident, or when there is an error creating or updating any other business object. |
| Data Import Connection | (Only shown if you select Export Email as XML for the Email Processor field.) Specifies the data import connection to use. Select one from the drop-down list. The list is populated based on the list of data import connections that are created using the Data Integration Wizard. See Setting Up a Data Import Connection for information about data import connections. |
| Compress Message | (Only shown if you select Export Email as XML for the Email Processor field.) If checked, supports Unicode characters in the email message body. |
| Incident and Task Creation (This section only appears if you check Create Incident On Error or if you select Incident from the Email Processor field) | |
| Incident or Task Owner Team | The team to which incidents generated from email errors are assigned. |
| Create New Task for Every Email | Creates a task record for the incident record. This task record appears in the Tasks tab of the incident record. |
| New Task Subject | The default subject line for every task email. |
| Sender / BO Identification and Matching | |
| Method 1 (for Employee / External Contact / None) | Creates a record and links it to an existing user (either employee or external contact), or creates a record and a new user and links the record to the new user.
NOTE: You can check either this option or the Use Method 2 (for Custom BO) option, but not both. Use Method 1 if you are linking to either an employee or external contact. Use Method 2 if you are linking to any other business object. |
| Create record by creating or linking the Employee or External Contact |
(Only shown if you check Use Method 1.) Does one of the following: If the user (either employee or external contact) is already in the application, creates a record and links it to the user. If the user (either employee or external contact) is not in the application, creates a record and a new user and links the record to the new user.
NOTE: If you create a task for an external contact, there must be a value for the LoginID field in the External Contact workspace. When you configure the email listener to create a new external contact, the application uses the default value of the LoginID field as the primary email address. We recommend that you create a business rule that ensures that this field is populated. |
| Create record only when the Employee or External Contact exists |
(Only shown if you check Use Method 1.) Does one of the following: If the user (either employee or external contact) is already in the application, creates a record and links it to the user. If the user (either employee or external contact) is not in the application, does not create a record or a new user. |
| Create record without creating Employee or External Contact |
(Only shown if you check Use Method 1.) Does one of the following: If the user (either employee or external contact) is already in the application, creates a record and links it to the user. If the user (either employee or external contact) is not in the application, creates a record and links it to the default user called Internal Services. |
| Contact Type | (Only shown if you check Use Method 1 and then select Create record by creating or linking the Employee or External Contact.) The contact type. Can be either Employee or External Contact. |
| Method 2 (for Custom Business Object) | (Only shown if you select Incident, Problem, or Other for the Email Processor field.) Creates a record and links it to either an existing business object, or if the business object does not exist, creates a new business object and links the record to it.
NOTE: You can check either this option or the Use Method 1 (for Employee / External Contact / None) option, but not both. Use Method 1 if you are linking to either an employee or external contact. Use Method 2 if you are linking to any other business object. |
| Create record by creating or linking the Custom Business Object |
(Only shown if you check Use Method 2.) Does one of the following: If the business object already exists, creates a record and links it to the business object. If the business object does not exist, creates a record and creates a new business object, and links the record to the new business object. |
| Create record when the Custom Business Object exists |
(Only shown if you check Use Method 2.) Does one of the following: If the business object already exists, creates a record and links it to the business object. If the business object does not exist, does not create a record or a new business object. |
| Relationship to Custom Business Object | (Only shown if you check Use Method 2.) The name of the relationship between the target business object (the value in the Email Processor field) and the new business object. |
| Match the email address "from" value to the related object field value | (Only shown if you check Use Method 2.) You can either enter a value in this field or in the related object field value field, but not in both. See Example: Creating or Linking Business Objects via Email for more information. |
| related object field value | (Only shown if you check Use Method 2.) You can either enter a value in this field or in the Match the email address "from" value to the related object field value field, but not in both. See Example: Creating or Linking Business Objects via Email for more information. |
5.Click Save.
6.Do one of the following:
•If you selected Problem, Other, or Export Email as XML from the Email Processor field, configure the fields on the Field Mapping tab. See Using the Field Mapping Tab.
•If you selected Incident from the Email Processor field, configure the fields on the Status Mapping tab. See Using the Status Mapping Tab.
About Authentication Types
The following table lists the authentication types for each protocol based on the email component type that you selected for the Email Configuration workspace [either Basic (Default) or Advanced]. See Configuring the Outgoing and Incoming Email Servers for information about the email component types.
| Protocol | Basic (Default) | Advanced |
|---|---|---|
| Exchange Web Services |
Plain |
Plain |
| POP3 |
APOP AuthLogin CramMD5 NTML Plain |
APOP AuthLogin CramMD5 NTML Plain |
| IMAP4 |
AuthLogin CramMD5 NTML Plain |
AuthLogin CramMD5 NTML Plain None Regular DigestMD5 Msn GssAPI Auto |
The following table describes the Simple Authentication and Security Layer (SASL) authentication types:
| Authentication Type | Description |
|---|---|
| None |
No authentication.
Sometimes used with SMTP when the server allows relay for anonymous senders. |
| Regular |
Standard authentication.
Passwords are transmitted as clear text. Not supported by SMTP servers. |
| APOP |
Secure APOP authentication.
Supported by many POP3 servers but cannot be used with other servers like SMTP because APOP is POP3-specific. Disabled when FIPS mode is enabled. |
| AuthLogin |
SASL LOGIN authentication.
Not secure but widely supported. Passwords are transmitted as Base64 strings.
Note for IMAP users: This is the AUTHENTICATE LOGIN command, not the LOGIN command (which corresponds to the Regular authentication type). |
| Plain |
SASL PLAIN authentication.
Not secure but widely supported. Passwords are transmitted as Base64 strings. |
| CramMD5 |
Secure SASL CRAM-MD5 authentication.
Might not be supported by particular server implementations. Disabled when FIPS mode is enabled. |
| DigestMD5 |
Secure SASL DIGEST-MD5 authentication.
Might not be supported by particular server implementations. Disabled when FIPS mode is enabled. |
| NTLM |
Secure SASL NTLM authentication. Also known as Secure Password Authentication (SPA).
In a Microsoft Windows domain environment such as Active Directory, you can also use NTLM to authenticate the current Microsoft Windows user. In this case, you should pass a null reference (or "Nothing" in Visual Basic) for the accountName and password values.
Might not be supported by particular server implementations. |
| Msn |
Secure SASL MSN authentication. Equivalent to NTLM.
Not widely supported. |
| GssAPI |
Secure SASL GSSAPI authentication (through Kerberos or NTLM).
Like SASL NTLM, supports Integrated Windows Authentication mode. The internal implementation (Kerberos or NTLM) is selected depending on if the value of the targetName field of the Login method is an empty string (or for SMTP, the TargetName field). An empty string denotes NTLM, and all other values (including a null reference) denote Kerberos.
The underlying implementation downgrades to NTLM from Kerberos if the targetName field is not empty but not valid (denotes non-existent SPN). |
| Auto |
Automatic.
Tells the email service to automatically select the best supported authentication method and downgrade to insecure methods if the server does not support secure methods. |
About the Test Connection Results
The following are the results that the application displays after you click Test Connection to test the connection between Service Manager and the Exchange Web Services mail protocol or the Advanced email component type.
| Result | Meaning |
|---|---|
| The request failed. The remote server returned an error: (403) Forbidden. | Use HTTPS instead of HTTP. |
| Invalid URL: The host name could not be parsed. | There is an invalid URL in the Host field. Verify the URL. |
| The request failed. The remote name could not be resolved: 'typo.something.com' | There is an invalid URL in the Host field. Verify the URL to check for typos. |
| The request failed. The remote server returned an error: (401) Unauthorized. | The credentials (user name or password) are invalid. Verify the credentials. |
| Inbox folder not found! | The name of the inbox folder is invalid. If you are using Microsoft Office 365, there may be an access permission issue. |
| Archive folder not found! | The name of the archive folder is invalid. |
Using the Field Mapping Tab
The Field Mapping tab only appears if you check Use Method 2 (for Custom BO).
If you create a new business object, you can map certain fields to appear in an email.
1.After performing the tasks in Creating an Inbox, select the Field Mapping tab.
2.Click New Tenant Email Mailbox Mapping. The application displays the Tenant Email Mailbox Mapping workspace.
3.Enter the field to map.
| Field | Description |
|---|---|
| Map Field | The name of the field to map, such as PrimaryEmail. |
| Map Value | The field value, such as @From: |
Field Mapping Values
|
Map Field |
Map Value |
|
FRS_Knowledge Type |
Document |
|
Title |
@Subject |
|
Details |
@Body |
|
Collection |
IT Knowledge |
|
Category |
Mobile |
|
Keywords |
@From |
|
Status |
Draft |
Tokens for Field Values
|
Tokens for Field Values |
|
|
@From |
The email address from which the mapping occurs. |
|
@To[N] |
The email address for the nth value to which the mapping occurs. Indexing starts from 1, so the first email recipient is addressed as @to[1]. If the index is missing, then just the @to is used or the first recipient is less than 1 (or, @to[0]). |
|
@CC[N] |
The carbon copy email address for the nth value to which the mapping occurs. |
|
@FirstName |
The first name associated with the email from which the mapping occurs. |
|
@LastName |
The last name associated with the email from which the mapping occurs. |
|
@Subject |
The subject of the email. |
|
@Body |
The body of the email. |
4.Click Save.
Using the Status Mapping Tab
The Status Mapping tab only appears if you select Incident from the Email Processor field.
1.After performing the tasks in Creating an Inbox, select the Status Mapping tab.
2.Click New Tenant Email Status Mapping. The application displays the Tenant Email Status Mapping workspace.
3.Enter information.
| Field | Description |
|---|---|
| Current Status | The current status that triggers the quick action. |
| Quick Action | The name of the quick action to execute. |
| Enabled | Enables this status mapping record. If not checked, the default status handling logic is in effect. |
4.Click Save.
Modifying an Inbox
You can modify the settings for all inboxes, including the default inbox.
1.Log into the Service Manager Application.
2.Open the Inbox workspace. The application displays the list of inboxes.
3.Click the inbox to modify. The application displays the Inbox Configuration workspace.
4.Edit the fields as needed. For more information on each field, see Creating an Inbox.
5.Click Save.
Deleting an Inbox
Use caution when deleting the default inbox, as this might cause you to permanently lose all of the emails in the application.
1.Log into the Service Manager Application.
2.Open the Email Config workspace,
3.Click the record link under the Mail Host column.
4.From the Inbox tab, select the address to delete.
5.Click Delete.
Deleting an Inbox

6.Click Yes at the confirmation prompt.
Was this article useful?
Copyright © 2019, Ivanti. All rights reserved.