Service Manager
Working with Incoming Web Service Connections
If you are creating an incoming web service connection to use with DSM, do NOT use this workspace!
Instead, configure the DSM integration from the DSM workspace. See Configuring the New DSM Integration for complete information about configuring an incoming web service for DSM.
•Viewing, Editing, Cloning, and Deleting Incoming Web Service Connections
•Adding an Incoming Service Reference
•Testing the Incoming Web Service Connection
Viewing, Editing, Cloning, and Deleting Incoming Web Service Connections
1.From the Configuration Console, click Extend > Integration Tools > Web Service Connections (BETA) to open the Web Service Connection Manager (BETA) workspace.
Web Service Connections (BETA) Workspace
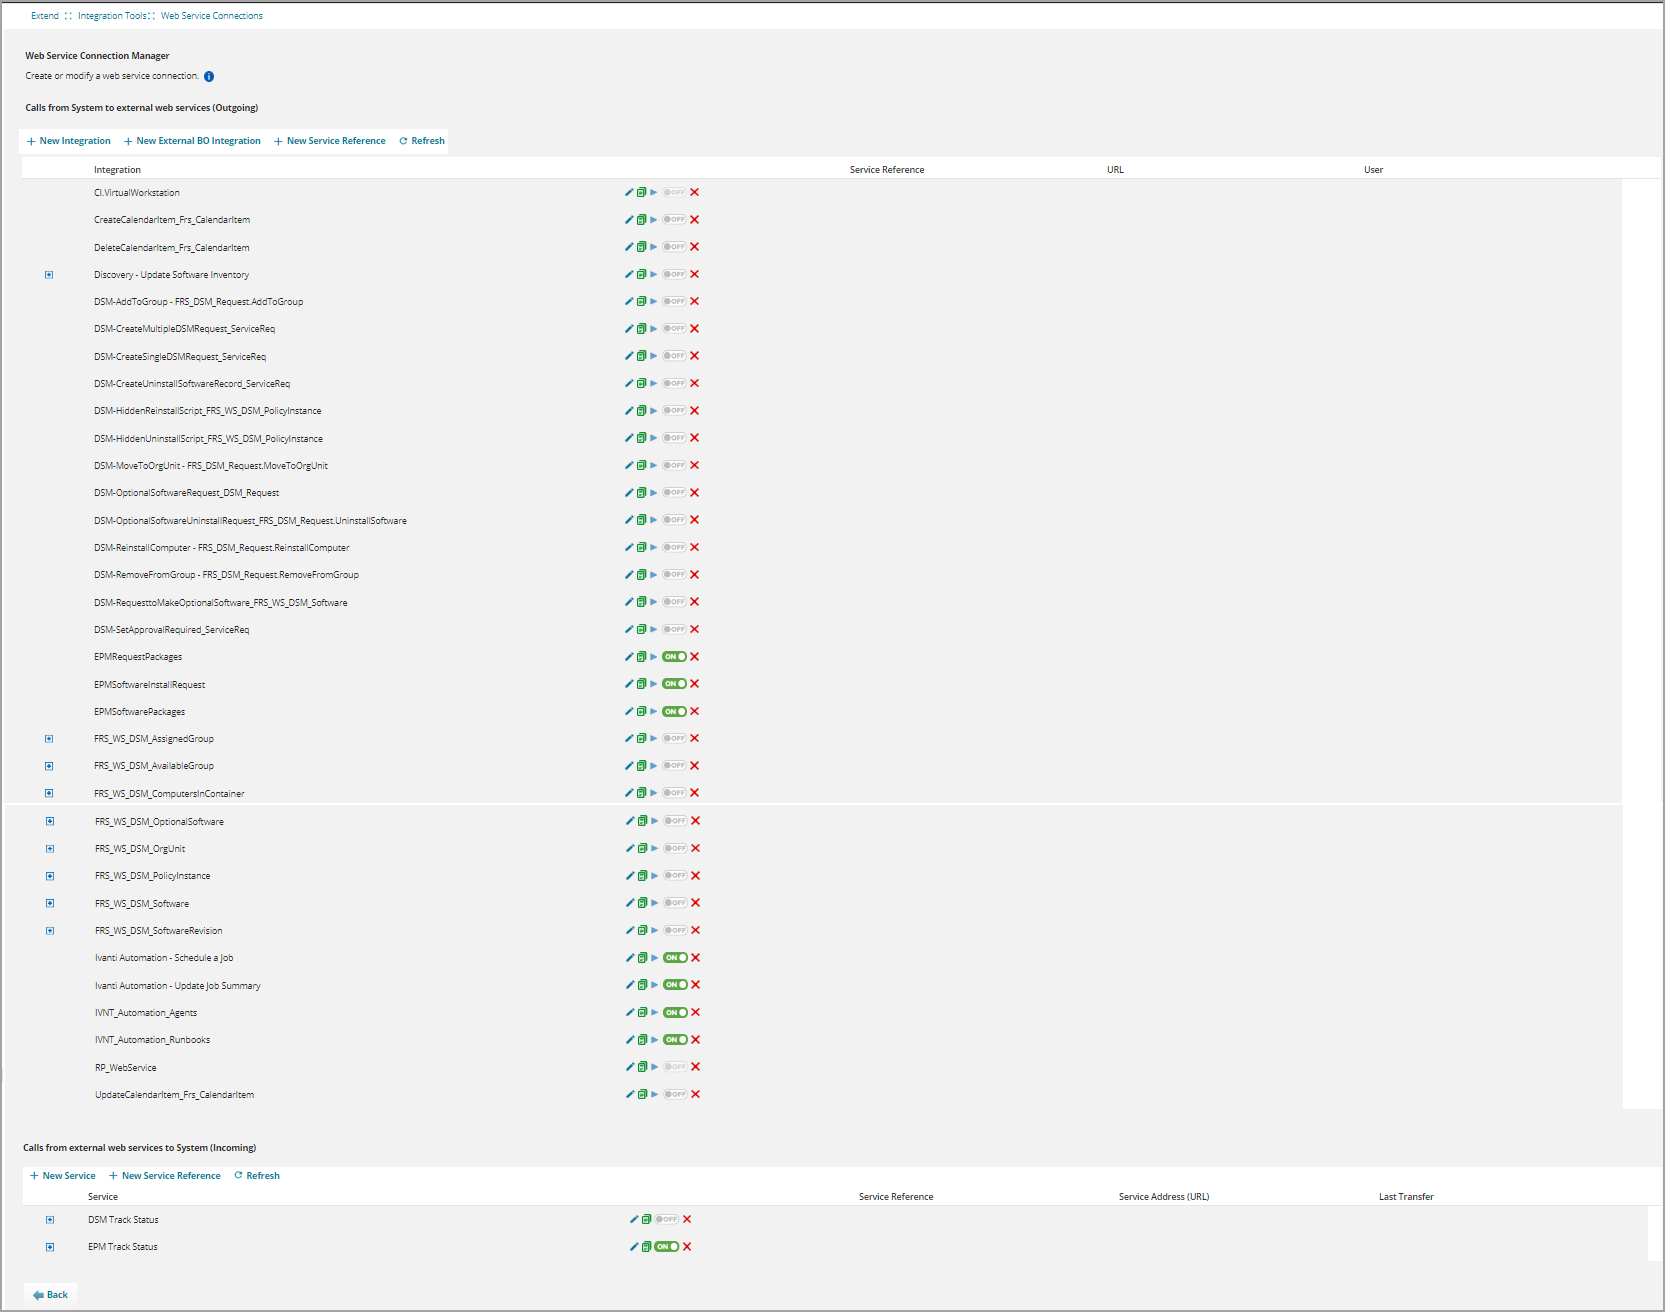
The Web Service Connection Manager (BETA) workspace has two sections: outgoing (see Working with Outgoing Web Service Connections) and incoming. The incoming web services section contains the following fields:
| Field | Description |
|---|---|
| Calls from external web services to Ivanti (incoming) | |
| Service | The name of the external service that calls Service Manager, such as SalesForce. |
| Service Reference | The name of the service action that the external service performs on Service Manager. An example is Update Employee. |
| Service Address (URL) |
The service address URL. The URL must be in the following format: http(s):// HEAT_SM_server:Port/InboundWebservice/Tenant_URL/Web_service_page.asmx. An example is http://heatdev.solys.local/InboundWebservice/HEATDEV/ServiceTest.asmx. |
| Last Transfer | The date and time of the last request received by Service Manager from the external service. |
2.To edit an existing service or service reference, click the edit icon next to its name.
3.To clone a service, including all of its service references, do the following:
| a. | Click the clone icon next to its name. icon next to its name. |
| b. | In the confirmation message, click OK. The application displays the new service in the list. |
4.To activate or deactivate a service or service reference, click the activate toggle icon next to its name. This makes the web service connection active or inactive. When it is inactive, the application cannot process the web service.
5.To delete a service or service reference, do the following:
| a. | Click the delete icon next to its name. icon next to its name. |
| b. | In the confirmation message, click Yes. |
If there are any mappings associated with this data import connection, the application displays a second confirmation message.
| c. | Click OK. The application removes the service or service reference and its name no longer appears on the list. |
6.To edit a service reference, do the following:
| a. | Click the expand icon next to the name of a service to expand the list of service references associated with it. icon next to the name of a service to expand the list of service references associated with it. |
| b. | Click the edit icon next to the service reference to edit. The application displays the Edit Service Reference dialog box. |
| c. | Modify the following information as needed: |
| Field | Description |
|---|---|
| External BO Name or Integration Name | Automatically populated and cannot be changed. Contains the name of the business object that the service reference is associated with, or the name of the integration. |
| Service Reference | The name of the service reference. Either enter a name or select a service reference from the drop-down list (populated from the entries in the WSDL and Script Repository workspace). |
| Service Address (URL) or WSDL Description |
The service address URL.
If you selected an entry from the WSDL and Script Repository workspace for the Service Reference field, the application changes the name of this field from Service Address (URL) to WSDL Description and automatically populates this field. |
| Use global constants for login and password | Specifies if the login and password information are global constants. If you check this option, you must create the login and password global constants before you can use them. See Using Global Constants to Hide Login ID and Password Information. |
| Login |
The login ID used to log in to the service reference. Either enter a value (if you did not check Use global constants for login and password) or select a value from the drop-down list (if you checked Use global constants for login and password). |
| Password |
The password used to log in to the service reference. Either enter a value (if you did not check Use global constants for login and password) or select a value from the drop-down list (if you checked Use global constants for login and password). |
| d. | Click Save. |
Adding an Incoming Service
1.From the Configuration Console, click Extend > Integration Tools > Web Service Connections (BETA) to open the Web Service Connection Manager (BETA) workspace.
2.Under the Calls from external web services to System (Incoming) section at the bottom of the page, click New Service. The application displays the Integration page.
3.Enter information into the fields.
| Field | Description |
|---|---|
| Integration Name | A unique name for the incoming web service connection. |
| Description | A brief description. |
| Response XML (optional) | Contains a message to display. Used if an associated service reference does not have response XML defined. |
4.Click Next. The application displays the Integration Script page.
5.Enter information into the fields.
| Field | Description |
|---|---|
| Service Reference |
Select a service reference from the drop-down list, or click Add new... to add a new service reference. See Adding an Incoming Service Reference. |
| Request Data |
The request data sent from the external application.
To get the request data, go to the external application and send an HTTP request to the service address from the service reference that you just created. After the application receives the request, the application displays it in this field. |
| Script Snippet |
A application-generated script snippet. The script displayed here is based on request data.
This information is displayed to help you create the script; however, this information is not the actual script. The actual script to be used is displayed in the Scripts field. |
| Scripts |
The script that is executed.
Copy and paste it from the script snippet or click Append to populate this field. See Sample Script for a sample script. |
6.Click Save.
Adding an Incoming Service Reference
You can have one or more service references for each integration. You can create new service references either from the main Web Service Connections (BETA) page or from the Integration Script page, which is the second page you see when creating an incoming service.
1.From the Configuration Console, click Extend > Integration Tools > Web Service Connections (BETA) to open the Web Service Connection Manager (BETA) workspace.
2.Highlight an existing service under the Calls from external web services to System (Incoming) section at the bottom of the page.
3.Click New Service Reference. The application displays the Create Service Reference dialog box.
4.Enter information into the fields.
| Field | Description |
|---|---|
| Integration Name | Automatically populated. Contains the name of the business object that the service reference is associated with, or the name of the integration. |
| Service Reference | The name of the service reference. Either enter a name or select a service reference from the drop-down list (populated from the entries in the WSDL and Script Repository workspace). |
| Service Address (URL) |
The service address URL. The URL must be in the following format: http(s):// HEAT_SM_server:Port/InboundWebservice/Tenant_URL/Web_service_page.asmx. An example is http://heatdev.solys.local/InboundWebservice/HEATDEV/ServiceTest.asmx.
NOTE: If you are configuring the DSM integration, we highly recommend that you use the DSM Integration workspace instead of this workspace. See Configuring the New DSM Integration for information. |
5.Click Save.
Testing the Incoming Web Service Connection
Follow these steps to test an incoming web service connection that you have already created (see Adding an Incoming Service Reference).
Before you begin, do the following:
1.Create an incoming web service connection, including a service reference. See Adding an Incoming Service and Adding an Incoming Service Reference.
Add the client IP address into the list of trusted hosts. See Setting the Trusted IP Addresses for information.
Follow these steps to test the incoming web service connection.
1.Install the Postman tool. See https://www.getpostman.com/ for more information.
2.From the GET drop-down list, select POST.
3.In the Enter request URL field, enter the service address URL and add the API key at the end. For example, enter http://heatdev.solys.local/InboundWebservice/HEATDEV/ServiceTest.asmx?APIKey=E076BD94D61F4141B16FFA88D0E0A45C. See Configuring the API Key for information about API keys and how to generate them.
4.Click Body, and then select enter raw.
5.Enter the following:
<?xml version="1.0"?>
<InboundWebServiceTest>This is a test</InboundWebServiceTest>
Using the Postman Tool
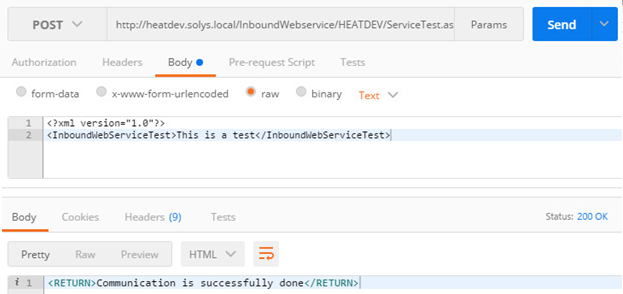
6.Click Send.
The application should display the response text that you entered in the Response XML field.
Working with Outgoing Web Service Connections
•Viewing, Editing, Cloning, and Deleting Incoming Web Service Connections
•Adding an Outgoing Web Service Connection Integration
•Adding an Outgoing External Business Object Integration
•Adding an Incoming Service Reference
•Troubleshooting Time Out Issues
Viewing, Editing, Cloning, and Deleting Outgoing Web Service Connections
1.From the Configuration Console, click Extend > Integration Tools > Web Service Connections (BETA) to open the Web Service Connection Manager (BETA) workspace.
Web Service Connections (BETA) Workspace
The Web Service Connection Manager (BETA) workspace has two sections: outgoing and incoming (see Working with Incoming Web Service Connections). The outgoing web services section contains the following fields:
| Field | Description |
|---|---|
| Calls from Ivanti to external web services (outgoing) | |
| Integration |
The name of the web service connection. Click on the expand icon to the left of the name to expand the integration and see any associated service references. |
| Service Reference | A web service name that the integration (connection) can access. Each integration can have one or more service references associated with it. |
| URL | The web service address. |
| User | The user ID used to access the web service. |
2.To edit an existing integration or external business object integration, click the edit icon next to its name.
3.To clone an existing integration or external business object integration, including all of its service references, do the following:
| a. | Click the clone icon next to its name. |
| b. | In the confirmation message, click OK. The application displays the new integration or external business object integration in the list. |
4.To run an integration or external business object integration, click the run icon next to its name. This submits the web service job for processing.
5.To activate or deactivate an integration or external business object integration, click the activate toggle icon next to its name. This makes the web service connection active or inactive. When it is inactive, the application cannot process the web service.
6.To delete an integration, external business object integration, or service reference, do the following:
| a. | Click the delete icon next to its name. |
| b. | In the confirmation message, click Yes. If there are any mappings associated with this data import connection, the application displays a second confirmation message. |
| c. | Click OK. The application removes the integration, external business object integration, or service reference and its name no longer appears on the list. |
7.To edit a service reference associated with an integration or external business object integration, do the following:
| a. | Click the expand icon next to an integration or external business object integration to expand the list of service references associated with it. |
| b. | Click the edit icon next to the name of the service reference to edit. The application displays the Edit Service Reference dialog box. |
| c. | Modify the following information as needed: |
| Field | Description |
|---|---|
| External BO Name or Integration Name | Automatically populated. Contains the name of the business object that the service reference is associated with, or the name of the integration. |
| Service Reference | The name of the service reference. Either enter a name or select a service reference from the drop-down list (populated from the entries in the WSDL and Script Repository workspace). |
| Service Address (URL) or WSDL Description |
The service address URL.
If you selected an entry from the WSDL and Script Repository workspace for the Service Reference field, the application changes the name of this field from Service Address (URL) to WSDL Description and automatically populates this field. |
| Use global constants for login and password | Specifies if the login and password information are global constants. If you check this option, you must create the login and password global constants before you can use them. See Using Global Constants to Hide Login ID and Password Information. |
| Login |
The login ID used to log in to the service reference. Either enter a value (if you did not check Use global constants for login and password) or select a value from the drop-down list (if you checked Use global constants for login and password). |
| Password |
The password used to log in to the service reference. Either enter a value (if you did not check Use global constants for login and password) or select a value from the drop-down list (if you checked Use global constants for login and password). |
| d. | Click Save. |
Adding an Outgoing Web Service Connection Integration
1.From the Configuration Console, click Extend > Integration Tools > Web Service Connections (BETA) to open the Web Service Connection Manager (BETA) workspace.
2.Click New Integration. The application displays the Integration Detail page.
Web Service Connections (BETA) Setup Sequence

3.Enter information into the fields.
| Field | Description |
|---|---|
| Integration Name | A unique name for the integration. |
| Description | A brief description. |
4.Click Next. The application displays the Integration Script page.
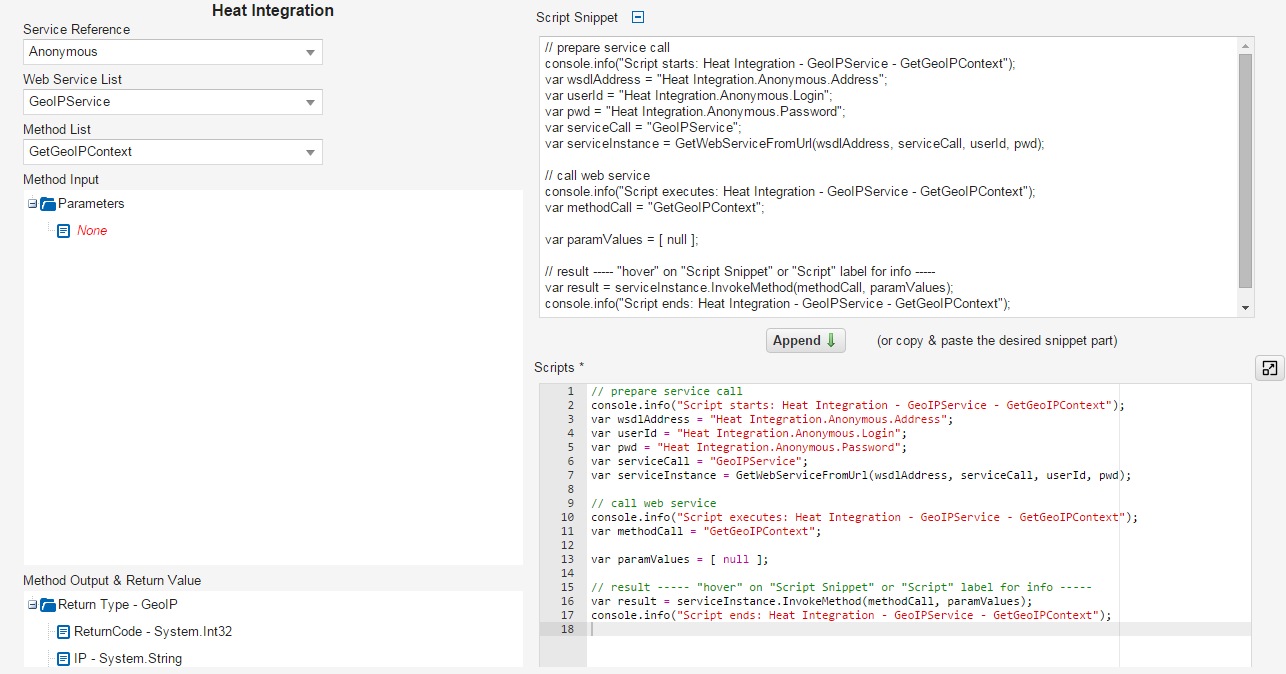
5.Enter information into the fields.
| Field | Description |
|---|---|
| Service Reference |
Select a service reference from the drop-down list, or click Add new... to add a new service reference. See Adding an Incoming Service Reference. |
| Web Service List |
Displays the available web services from the service reference URL. Choose a web service from the drop-down list. |
| Method List |
Displays the available methods from the selected web service list. Choose a method from the drop-down list. This is displayed to help you create the script. |
| Method Input |
The input parameters for the method. The information displayed here is based on the method that you select.
This information is displayed to help you create the script; however, this information is not the actual script. The actual script to be used is displayed in the Scripts field. |
| Method Output & Return Value |
The output and return values for the method. The information displayed here is based on the method that you select.
This information is displayed to help you create the script; however, this information is not the actual script. The actual script to be used is displayed in the Scripts field. |
| Script Snippet |
An application-generated script snippet. The information displayed here is based on the method that you select. See Sample Script for a sample script.
This information is displayed to help you create the script; however, this information is not the actual script. The actual script to be used is displayed in the Scripts field. |
| Scripts |
This is the script that is executed.
Copy and paste it from the script snippet or click Append to populate this field. See Sample Script for a sample script. |
Adding a Web Service Connection Integration
6.Click Next. The application displays the Schedule page.
For information about using the Schedule page, see Setting the Data Import or Web Service Connection Schedule.
7.Click Next. The application displays the Review and Publish page.
For information about using the Review and Publish page, see Reviewing and Publishing Import or Web Service Connection Data.
Sample Script
The following is a sample script that can be used when creating a web service connection integration.
// --------------------------------------------------------------------
// Demo integration script
// --------------------------------------------------------------------
// prepare service call
console.info("Script starts: Demo integration.Internal service.Address -FRSHEATIntegration - GetRolesForUser");
var wsdlAddress = "Demo integration.Internal service.Address";
var userId = "Demo integration.Internal service.Login";
var pwd = "Demo integration.Internal service.Password";
var serviceCall = "FRSHEATIntegration";
var serviceInstance = GetWebServiceFromUrl(wsdlAddress,serviceCall, "", "");
var tenantId;
var sessionKey;
var authResponse = serviceInstance.InvokeMethod("AuthenticateUser", [userId, pwd, tenantId]);
if (authResponse.authenticationStatus != "Success")
console.info("Script error: Access Denied Demointegration.Internal service.Address - FRSHEATIntegration -GetRolesForUser");
else
{
// call web service
sessionKey = authResponse.authenticationSessionKey;
console.info("Script executes: Demo integration.Internalservice.Address - FRSHEATIntegration - GetRolesForUser");
var methodCall = "GetRolesForUser";
var paramValues = [sessionKey, tenantId ];
// result "hover" on "Script Snippet" or "Script" label for info
var result = serviceInstance.InvokeMethod(methodCall, paramValues);
console.info("Script result: " + result.roleList[0].Name + "Demointegration.Internal service.Address - FRSHEATIntegration -GetRolesForUser");
}
See Web Service Methods for more information.
Adding an Outgoing External Business Object Integration
Before you add an external business object integration, you must create an external business object (see Creating a Stand-Alone Business Object) and add the new business object to a role (see Working with Roles).
1.From the Configuration Console, click Extend > Integration Tools > Web Service Connections (BETA) to open the Web Service Connection Manager (BETA) workspace.
2.Click New External BO Integration. The application displays the Integration Detail page.
3.In the External BO Name field, select the external business object that you created and optionally add a description in the Description field.
4.Click Next. The application displays the Integration Script page.
5.Enter information into the fields.
| Field | Description |
|---|---|
| Service Reference |
The web service to use with the external business object. Select a service reference from the drop-down list, or click Add new... to add a new service reference. See Adding an Incoming Service Reference. |
| Web Service List |
The available web services from the service reference URL. Choose a web service from the drop-down list. This provides the mechanism for communicating with the external application. |
| Method List |
The available methods from the selected web service list. Choose a method from the drop-down list. This is displayed to help you create the script. |
| Method Input |
The input parameters for the method. The information displayed here is based on the method that you select.
This information is displayed to help you create the script; however, this information is not the actual script. The actual script to be used is displayed in the Scripts field. |
| Method Output & Return Value |
The output and return values for the method. The information displayed here is based on the method that you select.
This information is displayed to help you create the script; however, this information is not the actual script. The actual script to be used is displayed in the Scripts field. |
| Script Snippet |
An application-generated script snippet. The information displayed here is based on the method that you select. See Sample Script for a sample script.
This information is displayed to help you create the script; however, this information is not the actual script. The actual script to be used is displayed in the Scripts field. |
| Scripts |
The script that is executed to feed the external data into Service Manager. The script uses Java script and does not support browser-based elements.
Copy and paste it from the script snippet or click Append to populate this field. See Sample Script for a sample script. |
6.Click Next. The application displays the Schedule Setting page.
For information about using the Schedule page, see Setting the Data Import or Web Service Connection Schedule.
7.Click Next. The application displays the Review and Publish page.
For information about using the Review and Publish page, see Reviewing and Publishing Import or Web Service Connection Data.
Adding an Outgoing Service Reference
You can have one or more service references for each integration. You can create new service references either from the main Web Service Connections (BETA) page or from the Integration Script page.
1.From the Configuration Console, click Extend > Integration Tools > Web Service Connections (BETA) to open the Web Service Connection Manager (BETA) workspace.
2.Highlight an integration.
3.Click New Service Reference. The application displays the Create Service Reference dialog box.
4.Enter information into the fields.
| Field | Description |
|---|---|
| External BO Name or Integration Name | Automatically populated. Contains the name of the business object that the service reference is associated with, or the name of the integration. |
| Service Reference | The name of the service reference. Either enter a name or select a service reference from the drop-down list (populated from the entries in the WSDL and Script Repository workspace). |
| Service Address (URL) or WSDL Description |
The service address URL. The URL must be in the following format: http(s):// HEAT_SM_server:Port/InboundWebservice/Tenant_URL/Web_service_page.asmx. An example is http://heatdev.solys.local/InboundWebservice/HEATDEV/ServiceTest.asmx.
If you are configuring the DSM integration, we highly recommend that you use the DSM Integration workspace instead of this workspace. See Configuring the New DSM Integration for information. |
| Use global constants for login and password |
Specifies if the login and password information are global constants. If you check this option, you must create the login and password global constants before you can use them. See Using Global Constants to Hide Login ID and Password Information. |
| Login |
The login ID used to log in to the service reference. Either enter a value (if you did not check Use global constants for login and password) or select a value from the drop-down list (if you checked Use global constants for login and password). |
| Password |
The password used to log in to the service reference. Either enter a value (if you did not check Use global constants for login and password) or select a value from the drop-down list (if you checked Use global constants for login and password). |
5.Click Save.
Troubleshooting Time Out Issues
The following troubleshooting tip is for on-premise customers only and does not apply to Cloud customers.
Starting in Service Manager Release 2016.2, if your application times out while working with web services, you can change the settings in the app.config file located at ...\Program Files\HEAT Software\HEAT\IntegrationServer\IntegrationServiceHost. Open the file with a text editor and update the following settings, which are both measured in seconds:
<appSettings>
<add key="ScriptActionHostSendTimeoutSeconds" value="180" />
<add key="ScriptActionHostReceiveTimeoutSeconds" value="300" />
</appSettings>
Was this article useful?
Copyright © 2019, Ivanti. All rights reserved.