Service Manager
Configuring the DSM Legacy Integration
Before you can install the software through a service request or incident in Service Manager, you must synchronize the software between Desktop and Server Management (DSM) and Service Manager. (See Synchronizing Software Packages and Sets.) The software must also be activated on Service Manager. (See Activating Software Packages and OS Sets.)
Service Desk Analysts periodically synchronize software packages to keep the list up to date. After manually activating packages, sets, and operating systems, Service Desk Analysts can install or provision a software package on a managed computer.
Establishing the DSM Legacy Environment
| Step # | Step Description | Reference |
|---|---|---|
| 1 | Specify the DSM server URL and restart the DSM Messenger service. | See Configuring the New DSM Integration. |
| 2 | Ping the DSM server from Service Manager to verify connectivity. | |
| 3 | Synchronize software so that software packages and sets on the DSM application are accessible through Service Manager. | |
| 4 |
Activate the software to make it available for installation or provisioning through Service Manager. During activation you can update software parameters, specify whether approval is required, and publish the software by making it available in the Self-Service Portal. |
Activating Software Packages and OS Sets and Specifying Approval for Software Packages |
| 5 | Update the default software package parameters. | Viewing and Editing Default Installation Parameters |
| 6 | Link the software packages to Service Manager software records to enable DSM-managed software to appear in the Service Manager software list. | Linking Software Packages to Software Records |
| 7 | Create the hardware and software profiles for provisioning. | Defining Hardware and Software Profiles |
| 8 | Map the Service Manager configuration items to DSM-managed computers. | Mapping Configuration Items to DSM-Managed Computers |
Configuring the Software
You must apply the following changes in DSM:
1.Update to DSM Release 7.0.2 or a newer version.
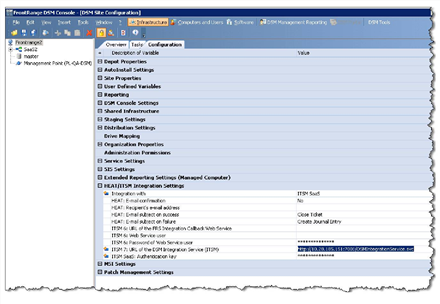
2.Open the DSM console.
3.Specify the URL for the DSM integration service.
DSM Console
4.Log into the Service Manager Configuration Database. See the Configuration Database Guide for Ivanti Service Manager for more information about using the Service Manager Configuration Database.
5.Open the Tenants workspace and then open the tenant.
6.Copy the value in the Client Authentication Key field into the DSM Console field in the DSM console.
7.Set the Integration with field to Cloud Platform. (This was formerly called ITSM SaaS.)
8.Save the changes that you made in the DSM console.
9.Stop and restart the DSM Messenger Service.
10.Ping the DSM server from Service Manager to verify connectivity, as described in Pinging the DSM Server.
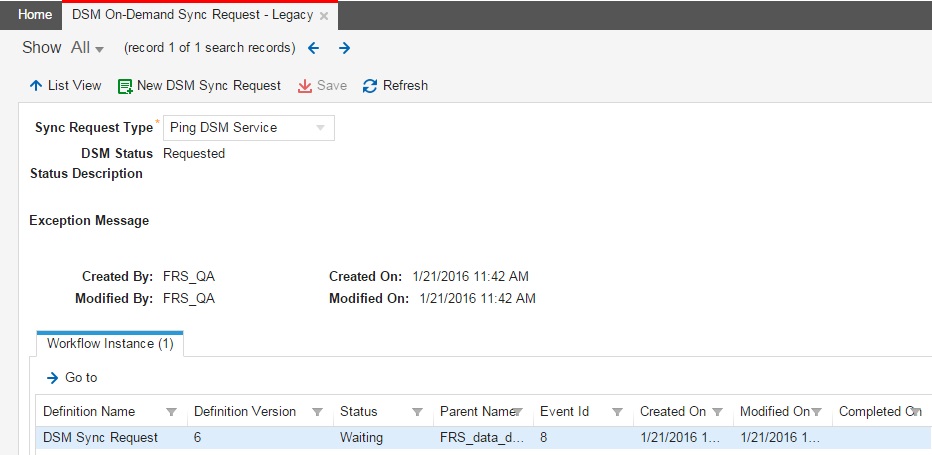
Pinging the DSM Server
Ping the DSM server to check the connection between Service Manager and DSM.
1.Log into the Service Desk console.
2.Open the DSM On-Demand Sync Request - Legacy workspace.
3.Click New DSM Sync Request.
4.From the Sync Request Type menu, choose Ping DSM Service.
5.Click Save.
6.Click Refresh.
•If the ping is successful, the status changes to completed.
•If the ping fails, the status changes to failed.
DSM Ping Server
If the ping fails, do the following:
•Check the connectivity between the DSM Messenger Service and the DSM integration web services.
•Check the connectivity between the DSM server and the DSM integration web services.
•Check the workflow instantiation record upon creating the ping request.
Viewing Configuration Items in the DSM Managed Software - Legacy Workspace
Service Desk Analysts can open the DSM Managed Software - Legacy workspace to view (but not change) managed software, its status, and other information.
1.Log in to Service Manager.
2.Open the DSM Managed Software - Legacy workspace to view:
•Software synchronization and activation status.
•Software parameters.
•Whether a package is uninstallable.
•Whether an approval is required for a package.
•Whether a package or set is published to the Self Service portal.
Was this article useful?
Copyright © 2019, Ivanti. All rights reserved.