Importing and Exporting Data
•About Importing and Exporting Data
•About the Data Integration Wizard
•About Importing Multiple Files
•About Configuring Data Integration
•Importing Discovery Data from Ivanti Neurons
•About Importing Data from SCCM into ISM
•Importing Data from Ivanti HEAT Discovery Release 9.3.x or Later
•Importing Hierarchical XML Data
•Using the Run Program for the Remote Host
•Exporting Data From Service Manager to Ivanti HEAT Discovery Release 9.x
•Viewing the Integration Status and History
About Importing and Exporting Data
The Service Manager architecture easily connects to and integrates with data sources and simplifies the import of external data from other applications.
Use the Data Integration Wizard to import data from external sources into Service Manager. Importing records is an important activity when setting up your Service Desk. In Service Manager, importing records helps to quickly create new employees, incidents, tasks, or other business object records.
You can import files up to 250 MB using manual file upload or files up to 500 MB using an FTP, Secure FTP, or shared file connection. (File share is only available for on-premise deployments.)
To import a file from the network (with VPN access) or from an FTP site, ensure that you have the necessary permissions to access the file.
About the Data Integration Wizard
To access the Data Integration Wizard, from the Configuration Console, click Extend > Integration Tool.
The Data Integration Wizard allows users to:
•Map the source file to the target business object while setting up the import instead of setting up the mapping prior to importing as in the existing Business Object Uploader.
•Specify a template file to set up the mapping if the actual data file is too large.
•View details of all the existing schedules in Service Manager when setting up the import.
How Data Integration Works
Integration enables you to set up and maintain data across two systems.
From the Integration workspace, you can access your configured import files. You can schedule imports to run at specific times, or manually import data as needed.
•You have a file containing the data to import. The file can be in .CSV, .XLS, or .XLSX (Microsoft Excel) format.
•You must have share access to both the file (and its enclosing directories) and the Service Manager server receiving the data.
•The data goes into the database as new records.
About Importing Multiple Files
To import multiple files, you can use the asterisk wildcard in the Data File Name field. For example, if you enter Test*.csv, all CSV files beginning with Test are imported.
You cannot use wildcards to import multiple files when importing data via FTP. You can only use wildcards to import multiple files when importing data from a shared network folder.
If you have the following files, for example:
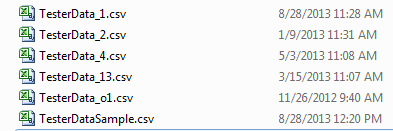
•Files are processed based on the their creation date and time, so TesterData_o1.csv is processed first, although alphabetically it is fifth, and TesterData_1.csv is processed fifth, although it is first alphabetically.
•A \Processed folder is created in the path if it does not exist. For this example, it is \\CA-L02540\test\Processed\. As each file is imported, it is moved to the \Processed folder. When the import is complete, all six files above will be moved from the \test folder into the \test\Processed folder.
•As each file is processed, the Integration History - Source Name column is updated by appending each processed file name, so it will be
•TesterData_1.csv
Then
•TesterData_2.csv,
•TesterData_3.csv
And so on ...