Working with Ivanti Voice
•About the Ivanti Voice Deployment
•Customizing Your Voice-to-Ivanti-Neurons for ITSM Integration
•Viewing the Voice Activity Log
•Creating Incidents Using Ivanti Voice
•Configuring Ivanti Voice Integration
•Configuring Agent Voice Settings
About Ivanti Voice
Ivanti Voice is the telephony application that integrates automated call routing and management, and CTI to Ivanti applications such as Neurons for ITSM. The server components of Ivanti Voice are referred to as IP Communications Management (IPCM). IPCM uses the next-generation, standards-based IP communication transport, called Session Initiation Protocol (SIP). Neurons for ITSM and Ivanti Voice are typically installed and maintained on separate servers.
You can use Ivanti Voice to make the Service Desk accessible over the phone to customers and for agent-to-agent phone communication within your organization. Using the integrated Voice toolbar, Service Desk Analysts or agents do not need to leave the Cloud environment to answer calls from customers, transfer calls to other agents, conference in other agents, etc.
If Ivanti Voice is configured to automatically create incidents when customers call, the system can also create incidents in Neurons for ITSM from the customer phone calls.
From Ivanti Voice, the fields that are automatically entered from the phone call can also be configured. The default fields and mapped values might differ in your environment.
Using the IPCM Agent dashboard, Service Desk Managers or users designated as agent supervisors can route calls based on the availability and skills of individual agents, view agent status, assign calls in queue, request call recording, and so on.
Before proceeding with the following tasks, ensure that you have installed and configured Ivanti Voice.
About the Ivanti Voice Deployment
•Necessary Components for Ivanti Voice
Necessary Components for Ivanti Voice
What you need:
•Your local Ivanti Voice server name or IP address.
•A valid user and password into Ivanti Voice.
•(Optional) The port configured for Ivanti Voice web service, if changed. The default is 2323.
Agent Login Sequence
The following demonstrates what happens when an agent logs in.
Ivanti Voice Agent Login Sequence
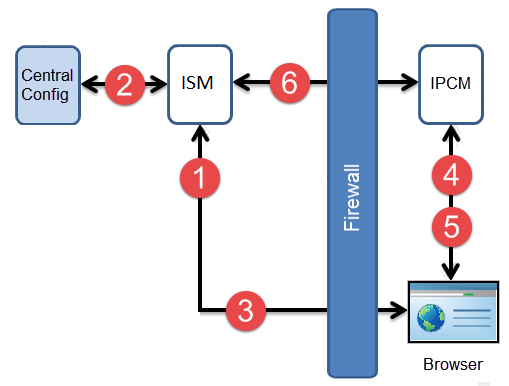
1.The agent logs into a secure (HTTPS) connection.
2.The system verifies the Ivanti Voice server IP address or domain name.
3.The system obtains the session key from the Ivanti Voice server IP address or domain name.
4.The system verifies the session key (TCP 5743).
5.The system makes the phone connection (SIP UDP 5060).
6.The system validates the session key (HTTPS).
Incoming Call Sequence
The following shows the sequence of events for incoming calls.
Ivanti Voice Incoming Call Sequence

1.The system receives a call (SIP UDP 5060).
2.The IVR searches and updates the record (HTTPS).
3.The call is forwarded to the agent (SIP UDP 5060, RTP UDP, TCP 5743).
4.The record appears to the agent (HTTPS).
The Ivanti Voice Toolbar
If Ivanti Voice is not open, the system disables the Dial field and button on the toolbar.
To use the Voice toolbar, your employee profile must have the Enable Voice option selected (see Enabling Voice for a User) and the option Is Voice Agent option selected (see Configuring Voice Agent Properties).
The application invokes the Voice toolbar using Flash or secure web-sockets. You need to modify the value of EnableVoiceFlash global constant to decide the required invoking option. To set the invoking option, follow the below steps:
1.Open the Configuration console.
2.Click Configure > Build > Global Constants to open the Global Constants workspace.
3.To invoke the Voice toolbar using Flash, modify the value of EnableVoiceFlash global constant as 1. To invoke the Voice toolbar using secure web-sockets, modify the value of EnableVoiceFlash global constant as 0.
By default, the application invokes the Voice toolbar with secure web-sockets. For web-socket Server Certificate details, see Server Certificate Configuration.
4.Click Save.
If you are using Ivanti Voice, you see the following Voice toolbar when you log in:
Ivanti Voice Toolbar

The following describes the Voice toolbar parts:
|
Toolbar Button |
Function |
Description |
|---|---|---|
|
|
Ready |
Update your status to ready, which means that you are ready to accept calls.
NOTE: If this button is disabled, there might be connectivity issues with the Ivanti Voice server. |
|
|
Not Ready |
Updates your status to not ready. Select a reason from the drop-down list.
NOTE: If this button is disabled, there might be connectivity issues with the Ivanti Voice server. |
|
|
Answer Call |
Answers a call.
NOTE: If this button is disabled, there might be connectivity issues with the Ivanti Voice server. |
|
|
Alternate Call |
Switches between calls. |
|
|
Hold Call |
Puts the current call on hold. |
|
|
Retrieve Call |
Retrieves a call that is on hold. |
|
|
Phone Number and Dial Call |
Starts a call. Enter the phone number and click Dial. If you disable this field, the system does not open Ivanti Voice. |
|
|
Single step transfer |
Transfers the active call to another agent in a single step. Enter the phone number and then click Single Step Transfer. |
|
|
Single step conference |
Creates a conference call with the customer and another agent in a single step. Enter the phone number and then click Single Step Conference. |
|
|
Transfer call |
Allows you to first talk to another agent and then transfer the call to another agent. Enter the phone number and click Dial. The system puts the original call on hold while the agents talk. To pass the call to the other agent, click Transfer Call. |
|
|
Conference |
Creates a conference call with the customer and another agent. Enter the phone number and click Dial. The system puts the original call on hold while the agents talk. To add the other agent to the conference call, click Conference. |
|
|
Hangup call |
Ends the call. |
|
|
IPCM Settings |
Assigns you to a different extension. The extension you enter must be registered with Ivanti Voice. Your browser reloads and the system associates the new extension with your login. The new extension is active until you switch back to the original one. |


