Configuring the Metrics Server
Perform these steps to configure one or more Metrics Server databases, which you can use to analyze data. Your deployment can have multiple Metrics Server databases to improve performance.
On this page, you will do the following:
•Specify the locations for the log file and the configuration server.
•Map applications to the Metrics Server.
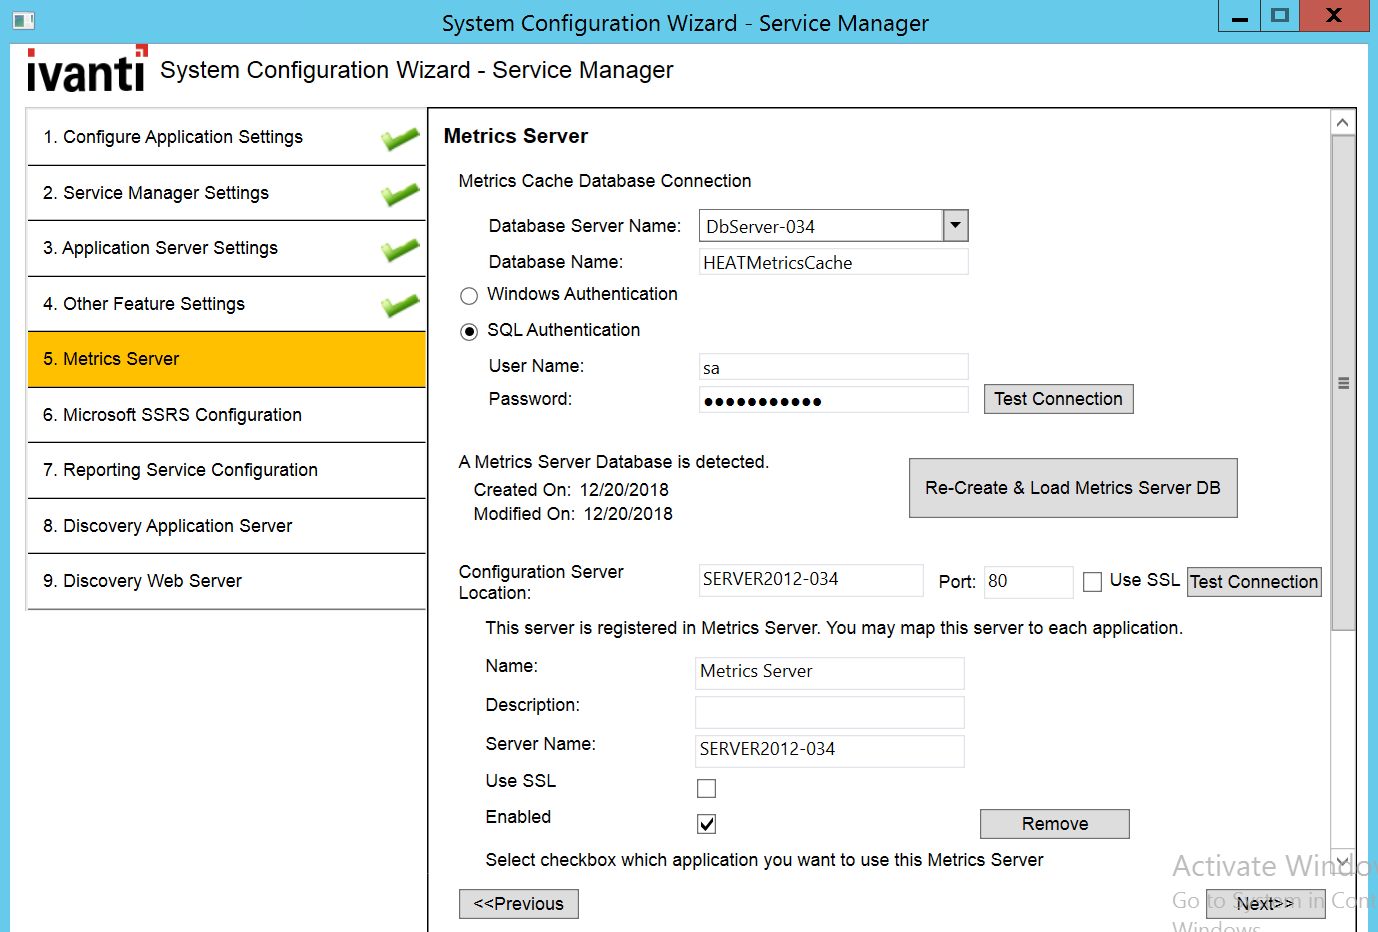
1.Enter values into the fields:
| Parameter | Description |
|---|---|
| Metrics Cache Database Connection | |
| Database Server Name |
Where the metrics cache database server is located. The default value is the server where the application server is located.
Do one of the following: •Accept the default value. •Enter the name of the server of the metrics cache database. •Browse for a server name by clicking the down arrow and selecting <Browse for more...>. The system displays all available database servers in the network for your connection. Choose a server and click OK.
NOTE: Do not choose localhost unless you are setting up a Demonstration or Proof-of-Concept Deployment. |
| Database Name |
The name of the metrics cache database.
Do one of the following: •Accept the default value. •Enter the name of the metrics cache database. |
| Authentication Method |
Select one of the following: •Windows Authentication: Uses Microsoft Windows authentication. •SQL Authentication: Uses Microsoft SQL authentication. If you select this option, enter the user name and password below.
NOTE: The metrics cache database server is not compatible with SSL if your system has Windows authentication set up. |
| User Name | (Only if you selected SQL Authentication) The user name associated with the Microsoft SQL authentication. |
| Password | (Only if you selected SQL Authentication) The password associated with the user name for the Microsoft SQL authentication. |
2.Click Test Connection to test the connection to the metrics cache database server. The system displays a success or failure message below the Test Connection button. You must have a working connection to create a database. You cannot continue with the configuration if this connection does not work.
3.Do one of the following:
•If this is the initial setup, go to Creating a New Metrics Server Database.
•If your system already has a metrics server database, go to Recreating the Metrics Server Database.
Creating a New Metrics Server Database
An initial installation does not have a metrics server database. Follow these steps to create one.
1.Click Create & Load Metrics Server DB. The system displays the New Database dialog box.
New Database Dialog Box
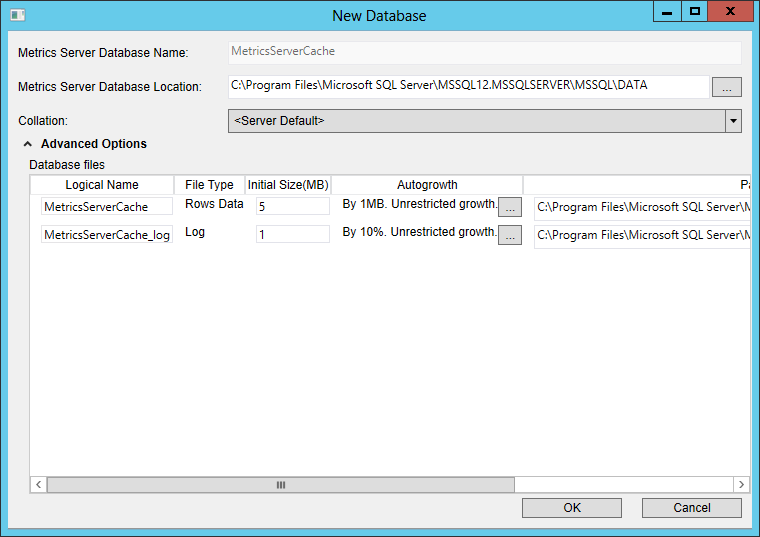
2.In the Location field, select a location for the metrics server database.
3.Click Advanced Options to view and reconfigure these metrics server database settings:
•Logical name: The logical name of the metrics database. This name is stored as a file name, and is a separate entity from the read-only database name that is displayed in Microsoft SQL Server Management Studio.
•File type: The file type, either database records or database logs. These values are read-only.
•Initial size in MB: The initial file size, in MB, when creating the metrics database.
•Autogrowth size: Specifies how the database will expand when it reaches its maximum file size. We recommend having at least 1 GB or 10% to start with. Click ... to update the values.
•The location of the database: The location of the file. Click ... to update the location.
•File name: The name of the file.
4.Click OK in the New Database dialog box.
The Configuration Server Location field indicates the location of the system that hosts the configuration server. The default value is the name of the host that you are logged into now.
5.If this is the system that hosts the configuration server, accept the default value.
If the host that you are logged into now is not the configuration server, enter the machine name or fully-qualified domain name of your configuration server.
If you use SSL, you enter the fully-qualified domain name of the configuration server.
6.Enter the port number in the Port field. The default value is 80. If you click Use SSL, it changes to 443.
7.Select whether to use SSL for connections to the configuration server.
If you use SSL, you must provide a fully-qualified domain name in the Configuration Server Location field.
8.Click Test Connection to test the connection to the configuration server. A pop-up message notifies you of success or failure.
We do not recommend enabling SSL on the configuration server until you have fully tested Neurons for ITSM to ensure that it works with SSL.
For information on configuring Neurons for ITSM with SSL, see Optional SSL Configuration.
9.Enter the following information to register a server in a multi-server deployment to the metrics server database:
•Accept the default server name or enter a different name.
•Optional. Enter a description of the server.
•The default server name value is the name of the host that you are logged into now. You must use this name or localhost.
•Check the box to use SSL encryption.
•Check the box to enable this metrics server.
10.Click Save.
11.To map an application to the new metrics server to an application, check Map. You can reference the same metrics server to multiple Neurons for ITSM applications.
To change this server at a later time, run the System Configuration Wizard, advance to the Metrics Server page, and click Remove.
12.Click Next. The system displays the Discovery Application Server page.
Recreating the Metrics Server Database
If you are upgrading or repairing Neurons for ITSM, you already have a metrics server database, and the Metrics Server page looks like Metrics Server Page.
1.To recreate the metrics server database, click Re-Create & Load Metrics Server DB. The system displays the New Database dialog box.
2.Perform steps 2 through 12 in Creating a New Metrics Server Database.
If you have customized the existing metrics server database, specify a different location in the Metrics Server Database Location field in the New Database dialog box. Otherwise, the system overwrites your customization when you load the recreated database.