Appendix B: Migrating Data from One Tenant Instance to Another Using Simple Mode or Advanced Mode
We do not recommend using these methods for migrating data. See The Four Ways to Migrate Data for a list of the ways to migrate data.
We recommend enabling and using the Ivanti Service Manager development project for migrating data, as described in Migrating Data using Heat Development Project.
•About Using Simple Mode and Advanced Mode
•How to Use Simple Mode to Migrate Data
•Using Advanced Mode to Migrate Data
•Migration Scenarios Using Simple Mode and Advanced Mode
About Using Simple Mode and Advanced Mode
The relationship data between two business objects is copied from the source to the target under the following operations and conditions:
Operations:
•Simple mode copy
•Copy configuration and master data
•Copy master data only
Condition:
•Only both business objects on both sides of the relationship are included for copying at the same time.
For example, if you copy user-related data, but do not copy the users, then data such as user to team and user to group assignment is not copied. As another example, if you want the service to category assignment to be copied, you must copy both the service (CI#Service) and the category (Category#) in the same push operation.
Choose between the following:
•Simple Mode: See How to Use Simple Mode to Migrate Data.
•Advanced Mode: See Using Advanced Mode to Migrate Data.
How to Use Simple Mode to Migrate Data
•Using Simple Mode to Migrate Data
Using Simple Mode to Migrate Data
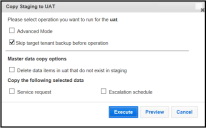
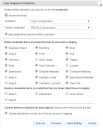
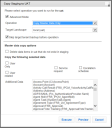
When you start the migration, you see the Copy dialog box in Operations Console with Simple Mode and Advanced Mode.
Operations Console with Simple Mode and Advanced Mode
1.Do not check Advanced Mode, which means you are choosing to use Simple Mode, which migrates a predefined set of data.
2.Check Skip target tenant backup before operation to not perform a database backup. Leave the box empty if you want to back up the database before proceeding with the migration.
3.Check Delete data items in target_tenant_instance that do not exist in source_tenant_instance to delete the data items in the target tenant instance that do not exist in the source tenant instance.
4.Under Copy the following selected data, check Service request if you want to migrate service request information, and check Escalation schedule if you want to migrate escalation schedule information.
5.Do one of the following:
•Click Preview to preview the changes that will be migrated. The system generates an XML file for you to review. You must save the XML file and open it with an XML editor to see the changes. If you need to make additional changes, go back into the system and make them. If you are satisfied with the changes, go back to the Operations Console and click Execute.
•Click Execute to start the data migration.
Simple Mode Migrated Data
Metadata
See Types of Data for information about metadata.
•Deletes the metadata items in the target tenant instance that do not exist in the source tenant instance for the following items (equivalent to checking the box next to the metadata item name in the Delete metadata items in target_tenant_instance that do not exist in source_tenant_instance section):
•Role
•Layout
•Form
•Grid
•Trigger
•Rule
•Rule override
•Validation data
•Validation list definition
•Does not delete the metadata items in the target tenant instance that do not exist in the source tenant instance for the following items (equivalent to not checking the box next to the metadata item name in the Delete metadata items in target_tenant_instance that do not exist in source_tenant_instance section):
• Business object
•Branding
•Workflow
•Counter
•Grid-part metadata
•Chart-part metadata
•Special-part metadata
•Search
•Report
•Dashboard
•Quick action
•View part
Does not replace the metadata items in the target tenant instance that are newer than those in the source tenant instance for the following items (equivalent to not checking the box next to the metadata item name in the Replace metadata items in target_tenant_instance that are newer than those in source_tenant_instance section):
•Search
•Report
•Dashboard
•Quick action
See Simple Mode Options -- Top Half.
Custom Validation Data
See Types of Data for information about validation data.
Deletes all custom validation data objects in the target tenant instance that do not exist in the source tenant instance. This is equivalent to checking Delete data items in target_tenant_instance that do not exist in source_tenant_instance in the Custom defined validation list data objects section.
See Simple Mode Options -- Top Half.
Master Data
See Types of Data in the Terminology section for information about master data.
•Migrates user-related groups of master data. This is equivalent to checking Delete data items in target_tenant_instance that do not exist in source_tenant_instance in the Master data copy options section.
•Migrates user-related data (including employee, external contact, profile base, and profile employee information), which is the equivalent of checking User related in the Copy the following selected data section.
See Simple Mode Options -- Top Half and Simple Mode Options -- Bottom Half.
Simple Mode Options -- Top Half
Simple Mode Options -- Bottom Half
Settings
See Types of Data for information about settings, also referred to as configuration data.
•Deletes settings in the target tenant instance that do not exist in the source tenant instance. This is equivalent to checking Delete setting records in target_tenant_instance that do not exist in source_tenant_instance in the Settings copy options section.
•Updates settings that were changed. This is equivalent to checking Update setting records that were changed in the Settings copy options section.
•Applies the two options above to the following settings:
•Allowed attachments
•Dynamic styles
•Password policy
•Approval status keywords
•Email status update mapping settings
•Ignore message with subject settings
•Object mapping for email
•Task assignment status keywords
•Truncate body settings
•Trusted sender domains
See Simple Mode -- Settings Options.
Simple Mode -- Settings Options
Using Advanced Mode to Migrate Data
•Migrating Metadata and Validation Data (Copy Configuration)
•Updating Metadata, Validation Data, and Master Data (Copy Configuration & Master Data)
•Updating Master Data (Copy Master Data Only)
•Overwriting all Metadata and Validation Data (Copy to Replace)
•Updating Only Transactional Data (Copy Data Only)
•Updating Configuration Data (Copy Settings)
•Updating Configuration Data (Copy Translation)
•Increasing the Version Number (No Op [Increase Version Only])
Migrating Metadata and Validation Data (Copy Configuration)
Perform the following steps to update the configuration of a tenant instance by migrating metadata and validation data. (See Types of Data for information about metadata and validation data.) When you perform this migration, metadata and validation data that exist on the target tenant instance are overwritten by the data on the source tenant instance.
Perform steps 1 to 4 in Starting the Tenant Instance Migration before you perform the steps in this section.
1.Check Advanced Mode.
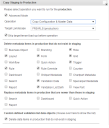
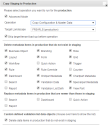
2.In the Copy dialog box, for the Operation field, choose Copy Configuration to configure the Operations Console to copy metadata and validation data. The dialog box expands and appears similar to the dialog box in Copy Dialog Box (Migrate Metadata and Validation Data).
You cannot change the value for the Target Landscape field, as it is read-only and depends on the target you chose before you started the migration
Copy Dialog Box (Migrate Metadata and Validation Data)
3. Check Skip target tenant backup before operation to select whether to back up the target tenant instance prior to the data migration.
•To back up the target tenant instance, leave this checkbox empty. If you have not yet backed up the target tenant outside of the Operations Console, we highly recommend that you back it up here.
•To not back up the target tenant instance, select this checkbox. If you have already backed up the target tenant outside of the Operations Console, it is generally not necessary to back it up here.
4.Use the Delete metadata items in target_tenant_instance that do not exist in source_tenant_instance section to select how to process items that were deleted in the source tenant instance prior to the migration.
For example, assume that staging is the source tenant instance and UAT is the target tenant instance. If you deleted some business objects on the staging tenant instance as part of a reconfiguration procedure, you can select whether to delete or retain those business objects on the UAT tenant instance when you perform the data migration.
•To delete business objects on the UAT tenant instance, if those business objects were also deleted on the staging tenant instance, check Business Objects.
•To retain business objects on the UAT tenant instance even though they were deleted on the staging tenant instance (that is, to merge the staging and UAT business object lists), do not check Business Objects.
•Use the checkboxes for other items (layouts, workflows, rules, and so on) in the same way.
If you do not select any options in this section, all data is merged, and no data on the UAT instance of the tenant is deleted.
Even if the target tenant instance is locked, you can still create, edit, and delete dashboards, quick actions, reports, and searches. If you select any of these items, be aware that they could be deleted or updated when you execute a migration even if the target tenant instance is locked
5.Use the Replace metadata items in target_tenant_instance that are newer than those in source_tenant_instance section to select how to process items that exist on both the source tenant instance and the target tenant instance when the version on the target tenant instance is newer than the version on the source tenant instance. This situation is not typically encountered or recommended, but the ability to respond to it is provided because it does occur occasionally.
For example, assume that staging is the source tenant instance and UAT is the target tenant instance. During testing on the UAT tenant instance, it was determined that a saved search needed to be modified, and the modification was performed on the UAT instance of the tenant. At the same time, another item (for example, change management processes and approvals) was updated on the staging instance of the tenant as part of a scheduled reconfiguration.
•To merge the data on the staging instance of the tenant with the data on the UAT instance of the tenant, check Search. This results in the most recent change updates (from staging) and the most recent saved search updates (from UAT) coexisting on the UAT instance of the tenant after the migration. This is the recommended procedure because it ensures that the most recent version of all data is present on the UAT instance of the tenant after the migration.
•To overwrite all of the data on the UAT instance of the tenant with data from the staging instance of the tenant (including overwriting the saved searches that were updated on the UAT instance of the tenant), do not check Search. This results in the most recent change updates (from staging) migrating to the UAT instance of the tenant, but the saved search changes that were made on the UAT instance of the tenant prior to the migration are overwritten and reverted to the version on the staging instance of the tenant.
•Use the checkboxes for other items (dashboards, quick actions, and reports) in the same way.
If you do not select any checkboxes in this section, all data on the UAT instance of the tenant is overwritten by data from the staging instance of the tenant. To ensure that all data on the staging instance of the tenant is merged with the data on the UAT instance of the tenant (instead of being overwritten), select every checkbox in this section.
Even if the target tenant instance is locked, you can still create, edit, and delete dashboards, quick actions, reports, and searches. If you select any of these items, be aware that they could be deleted or updated when you execute a migration even if the target tenant instance is locked.
6.Use the Custom defined validation list data objects section to select how to process validation lists that have been customized. Customized validation lists are not included in the Validation Data and Validation List Definition checkboxes shown in Copy Dialog Box (Migrate Metadata and Validation Data) and described in step 3. To migrate customized validation lists, you must specify them in this step instead. (See Types of Data in the Terminology section for information about validation data.)
For example, assume that staging is the source tenant instance and UAT is the target tenant instance. If a customized validation list already exists on the UAT tenant instance, and the validation list is then further customized on the staging tenant instance, you can select whether to overwrite the UAT version with the staging version or merge the two validation lists.
•To see the customized validation lists, place the mouse pointer over the checkbox.
•To delete customized validation list items on the UAT instance of the tenant that were also deleted on the staging instance of the tenant (that is, to overwrite the UAT validation list with the staging validation list), check Delete data items in UAT that do not exist in Staging.
•To retain customized validation list items on the UAT instance of the tenant even though they were deleted on the staging instance of the tenant (that is, to merge the staging and UAT validation lists), leave the Delete data items in UAT that do not exist in Staging checkbox empty.
7.Select one of these options to start or postpone the data migration:
•Execute: Starts the migration immediately.
•Preview: Creates an XML-based patch file called MetadataDiff.xmlMetadataDiff.MetadataPatch. You can review this file to see details of the data that will be migrated. A preview takes the same amount of time to execute as an actual migration.
•Save Setting: Saves your current selections without executing a migration. The next time you open this dialog box it is populated with your saved settings.
•Save UAT Settings: Saves your current selections for use when you migrate from the UAT instance of the tenant to the production instance of the tenant.
•Cancel: Exits the dialog box without saving any settings.
When the data migration finishes, the system creates a log entry for it and updates the status of the affected tenants and tenant instances in the Operations Console migration dashboard. The system also displays an informational message with the results of the migration. Check the Events & Audit History workspace to review the warnings and errors before continuing. (See About the Events & Audit History Workspace.)
Updating Metadata, Validation Data, and Master Data (Copy Configuration & Master Data)
Do not use this feature if you have more than 100,000 records as the migration will fail. If you have more data, we recommend that you either exclude some of the records from the data migration or use Microsoft SQL Server scripts or some other tool to migrate the data.
From the Operations Console you can migrate master data together with metadata and validation data in the same migration. (See Types of Data in the Terminology section for information about master data, metadata, and validation data.)
Master data consists of data sets that are used across an organization and are typically unique to that organization. User and role definitions, role assignments, and categories are examples of master data.
Perform the following steps to update the configuration for a tenant instance by migrating master data together with metadata and validation data. When you perform this migration, master data, metadata, and validation data that exist on the target tenant instance (UAT in this example) are overwritten by the data on the source tenant instance (staging in this example).
Perform steps 1 to 4 in Starting the Tenant Instance Migration before you perform the steps in this section.
1.Check Advanced Mode.
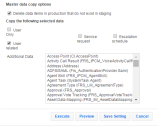
2.In the Operation field in the Copy dialog box, choose Copy Configuration & Master Data to configure the Operations Console to copy master data together with metadata and validation data. The dialog box expands and appears similar to the dialog box shown in Copy Dialog Box (Migrate Metadata, Validation Data, and Master Data) -- Top Half and Copy Dialog Box (Migrate Metadata, Validation Data, and Master Data) -- Bottom Half .
Note that the top portion of the dialog box is identical to the dialog box shown in Copy Dialog Box (Migrate Metadata and Validation Data). The bottom portion of the dialog box shown in Copy Dialog Box (Migrate Metadata, Validation Data, and Master Data) -- Bottom Half (beginning with Master data copy options) is new.
Copy Dialog Box (Migrate Metadata, Validation Data, and Master Data) -- Top Half
Copy Dialog Box (Migrate Metadata, Validation Data, and Master Data) -- Bottom Half
3.Fill in the top portion of the dialog box (the settings for metadata and validation data) as described in Migrating Metadata and Validation Data (Copy Configuration).
4.Use the Master data copy options section to select how to process master data that was deleted in the source tenant instance prior to the migration.
For example, assume that staging is the source tenant instance and UAT is the target tenant instance. If you deleted master data on the staging tenant instance as part of a reconfiguration procedure, you can select whether to delete or retain that master data on the UAT tenant instance when you perform the migration.
•To delete master data on the UAT tenant instance that was also deleted on the staging tenant instance (that is, to overwrite the UAT master data with the staging master data), check Delete data items in UAT that do not exist in Staging. Keep in mind that if deleted master data record definitions are used elsewhere in Ivanti Service Manager, the deletion could break existing relationships or otherwise adversely affect the content of data records.
•To retain master data on the UAT tenant instance even though it was deleted on the staging tenant instance (that is, to merge the staging and UAT master data), do not check Delete data items in UAT that do not exist in Staging.
Because of the implications of possibly breaking relationships and data records by deleting master data records in this step, it is sometimes advisable to fill in the Copy the following selected data section as described in steps 4 and 5 before making your choice in this step.
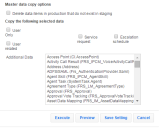
5.Use the Copy the following selected data section to select which master data to migrate. If you do not select any items in this section, no master data is migrated.
Master data selection choices are as follows:
•User Only: Migrates user-related data (including employee, external contact, profile base, and profile employee information).
•User related: Place the mouse pointer over this item to display an expanded list of all business objects contained in this item. Includes contact group, department, email address, organizational unit, and standard user team data). When you select this item, the Operations Console performs a full copy of all master data records in the tenant instance from each of the listed business objects.
If a tenant instance has more than 20,000 users in the system, we do not recommend selecting User Related due to performance impact.
The profile base object is included in this selection, meaning that Profile.Employee and Profile.ExternalContact are migrated. If the configuration includes a newly created child of the group-object Profile# (this is the profile base object), you must include the master data of the associated object as part of the additional data to be copied (described in step 5).
The organizational unit definition is also included in this item. If any changes were made to organizational units on other tenants through the Ivanti Service Manager Configuration Console or by other means, they are overwritten when this item is migrated.
The Address.Email object is also included in this item. If the email addresses for the staging instance of the tenant are "scrubbed" to use the @saasitdemo.com domain instead of the company domain, the scrubbed email addresses for all Profile.object records are migrated to the target domain. If this configuration is eventually migrated to the production instance of the tenant, the @saasitdemo.com domain setting is still in place, and various login, LDAP import, notification, and email delivery issues will occur. A workaround for this scenario is to not scrub email addresses on the staging instance of the tenant, and instead block all outbound email or redirect outbound email to a single email address. The options to block email and to re-direct all mail to a single account can be set in the email configuration business object
Because user and team email addresses on the staging and UAT instances of the tenant might be scrubbed, the migration does not update existing users or teams. Instead, it migrates only new users and user teams.
User role assignments and user team assignments are updated as part of this selection.
•Service request: Place the mouse pointer over this item to display an expanded list of all business objects contained in this item. When you select this item, the Operations Console performs a full copy (not a partial or selective copy) of all master data records in the tenant instance from each of the listed business objects.
To migrate a subset of the master data records shown in the list (for example, to migrate only the service request category (which has the object name "category")), do not check Service Request. Instead, include category in the Additional Data section as described in step 5. When you migrate data from the Additional Data section, it is a full migration (not a partial or selective migration).
Request offerings and their accompanying workflows are migrated when you select this item. Only those workflows that are part of a request offering design are migrated. Workflows that are associated with the service request business object are not migrated.
•Escalation schedule: Place the mouse pointer over this item to display an expanded list of all business objects contained in this item, such as escalation schedule, escalation setting, service level package, and service level target. When you select this item, the Operations Console performs a full copy of all master data records in the tenant instance from each of the listed business objects.
As a general rule, all of the escalation parameters displayed in the Ivanti Service Manager Configuration Console Escalation tab are migrated.
Note that when you migrate escalation schedules, existing schedules on the target tenant instance are overwritten.
6.Use the Additional Data section to list additional master data or transactional data to migrate. Select one or more items to migrate. The Additional Data section contains business objects that:
•Are not a part of metadata.
•Are not a part of custom defined validation data.
•Are not a part of the User Only, User related, Service request, or Escalation schedule categories described in step 5.
•Are not a part of typical transaction data such as incident, task, and change.
•Might be transactional data. The Operations Console cannot autonomously differentiate between master data and transactional data business objects.
Guidelines for selecting items are as follows:
•You can select zero or more items from the Additional Data list.
•Do not select a business object that contains more than 10,000 records due to performance concerns.
•If an object that is usually configured as metadata was for some reason configured as master data (or results in the creation of a related master data object), select the item here so that it is migrated.
For example, validation list data is migrated only if the validation list (that is, the pick list) is based on a business object that is part of the business object list for the validation business object. If the validation list (that is, the pick list) is based on a master business object instead of a validation business object, it will not be migrated by checking Validation Data. Instead, you must select the ValidationListData item in the Additional Data list (as described here in step 5) in order for the validation list to be migrated.
Click or <ctrl>-click items in the Additional Data list to migrate custom data configured as business objects. Keep in mind that migrating business objects with thousands of records can impact performance; these business objects should usually be migrated outside of the Operations Console. Smaller objects (such as Category) are better candidates to select here for migrating within the Operations Console.
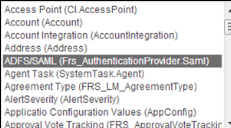
Note that the Operations Console cannot perform selective copies during a migration. That is, it can only copy a table to a table. For example, if you select the Additional Data item Table ADFS/SAML (frs_AuthenticationProvider.SAML) (Example Item Selected in the Additional Data List), all of the records from the source database are copied to the target database where frs_AuthenticationProvider.AuthType = SAML. There is no option to copy only "active" or some selective option from the table frs_AuthenticationProvider.SAML.
Example Item Selected in the Additional Data List
7.Select one of these options to start or postpone the data migration:
•Execute: Starts the migration immediately.
•Preview: Creates an XML-based patch file for review.
•Save Setting: Saves your current selections without executing a migration. You can continue the migration process later using your saved settings.
•Save Target Settings: Saves your current selections for use with the next migration in the migration sequence. For example, if the current migration is from staging to UAT, choose this option to save the settings for the UAT to production migration that you will perform next.
•Cancel: Exits the dialog box without saving any settings.
When the data migration finishes, the system creates a log entry for it and updates the status of the affected tenants and tenant instances in the Operations Console migration dashboard as shown in Migration Dashboard in Starting the Data Migration. The system also displays an informational message with the results of the migration. Check the Events & Audit History workspace to review the warnings and errors before continuing.
Updating Master Data (Copy Master Data Only)
From the Operations Console you can migrate master data only. Only do this after you have migrated the configuration data at least once.
Do not use this feature if you have more than 100,000 records as the migration will fail. If you have more data, we recommend that you either exclude some of the records from the data migration or use Microsoft SQL Server scripts or some other tool to migrate the data.
Master data consists of data sets that are used across an organization and are typically unique to that organization. User and role definitions, role assignments, and categories are examples of master data. (See Types of Data for information about master data.)
Perform the following steps to update the configuration of a tenant instance by migrating master data only. When you perform this migration, master data that exists on the target tenant instance (UAT in this example) is overwritten by the data on the source tenant instance (staging in this example).
Perform steps 1 to 4 in Starting the Tenant Instance Migration before you perform the steps in this section.
1.Check Advanced Mode.
2.In the Operation field in the Copy dialog box, choose Copy Master Data Only to configure the Operations Console to copy master data only. The dialog box expands and appears similar to the dialog box shown Copy Dialog Box (Migrate Master Data Only).
Copy Dialog Box (Migrate Master Data Only)
3.Fill in the dialog box (master data copy options) as described in steps 4, 5, 6, and 7 of Updating Metadata, Validation Data, and Master Data (Copy Configuration & Master Data).
When the data migration finishes, the system creates a log entry for it and updates the status of the affected tenants and tenant instances in the Operations Console migration dashboard as shown in Migration Dashboard in Starting the Data Migration. The system also displays an informational message with the results of the migration. Check the Events & Audit History workspace to review the warnings and errors before continuing.
Overwriting all Metadata and Validation Data (Copy to Replace)
From the Operations Console you can perform a migration that overwrites all metadata and validation data on the target tenant instance with data from the source tenant instance. (See Types of Data for information about metadata and validation data.) This migration is equivalent to creating the first configuration on the target tenant instance as described in Creating the First Staging or UAT Instance of the Tenant from the Production Instance of the Tenant.
Perform the following steps to update a the configuration for a tenant instance by overwriting all metadata and validation data.
Perform steps 1 to 4 in Starting the Tenant Instance Migration before you perform the steps in this section.
1.Check Advanced Mode.
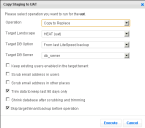
2.In the Operation field in the Copy dialog box, select Copy to Replace. This configures the Operations Console to overwrite all metadata and validation data on the target tenant instance. The dialog box appears similar to the dialog box shown in Copy Dialog Box (To Overwrite Metadata and Validation Data).
3.Perform the procedure described in Updating Metadata, Validation Data, and Master Data (Copy Configuration & Master Data).
Copy Dialog Box (To Overwrite Metadata and Validation Data)
4.Click Execute to initiate the migration.
When the data migration finishes, the system creates a log entry for it and updates the status of the affected tenants and tenant instances in the Operations Console migration dashboard as shown in Migration Dashboard in Starting the Data Migration. The system also displays an informational message with the results of the migration. Check the Events & Audit History workspace to review the warnings and errors before continuing.
Updating Only Transactional Data (Copy Data Only)
The relationship data between two business objects is not copied from the source to the target when you select the Updating Only Transactional Data (Copy Data Only) option.
From the Operations Console you can migrate transactional data (data records, including incidents, changes, service requests, and so on) without migrating any other type of data.
Perform the following steps to update the configuration for a tenant instance by migrating transactional data. When you perform this migration, transactional data that exists on the target tenant instance is overwritten by the data on the source tenant instance.
Perform steps 1 to 4 in Starting the Tenant Instance Migration before you perform the steps in this section.
1.Check Advanced Mode.
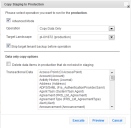
2.In the Operation field in the Copy dialog box, select Copy Data Only to configure the Operations Console to copy transactional data. The dialog box expands and appears similar to the dialog box shown in Copy Dialog Box (Migrate Only Transactional Data).
Copy Dialog Box (Migrate Only Transactional Data)
3. Check Skip target tenant backup before operation to select whether to back up the target tenant instance prior to the data migration.
•To back up the target tenant instance, leave this checkbox empty. If you have not yet backed up the target tenant instance outside of the Operations Console, we highly recommend that you back it up here.
•To not back up the target tenant instance, select this checkbox. If you have already backed up the target tenant instance outside of the Operations Console, it is generally not necessary to back it up here.
4.Use the Data only copy options section to select how to process transactional data that was deleted in the source tenant instance prior to the migration.
For example, assume that staging is the source tenant instance and production is the target tenant instance. If you deleted transactional data on the staging tenant instance as part of a reconfiguration procedure, you can select whether to delete or retain that data on the production tenant instance when you perform the data migration.
•To delete transactional data on the production tenant instance if that data was also deleted on the staging tenant instance, check Delete data items in production that do not exist in staging.
•To retain transactional data on the production tenant instance even though it was deleted on the staging tenant instance (that is, to merge the staging and production transactional data), leave this checkbox empty.
5.In the Transactional Data list, select the items to migrate.
6.Click Execute to initiate the migration or click Preview to create an XML-based patch file for review.
When the data migration finishes, the system creates a log entry for it and updates the status of the affected tenants and tenant instances in the Operations Console migration dashboard as shown in Migration Dashboard in Starting the Data Migration. The system also displays an informational message with the results of the migration. Check the Events & Audit History workspace to review the warnings and errors before continuing.
Updating Configuration Data (Copy Settings)
From the Operations Console you can migrate configuration data, also known as settings.
Perform steps 1 to 4 in Starting the Tenant Instance Migration before you perform the steps in this section.
1.Check Advanced Mode.
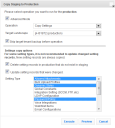
2.In the Operation field in the Copy dialog box, choose Copy Settings to configure the Operations Console to copy configuration data. See Copy Dialog Box (Migrate Settings).
Copy Dialog Box (Migrate Settings)
3. Check Skip target tenant backup before operation to select whether to back up the target tenant instance prior to the data migration.
•To back up the target tenant instance, leave this checkbox empty. If you have not yet backed up the target tenant instance outside of the Operations Console, we highly recommend that you back it up here.
•To not back up the target tenant instance, select this checkbox. If you have already backed up the target tenant instance outside of the Operations Console, it is generally not necessary to back it up here.
4.Do one of the following:
•To delete configuration data (settings) on the target tenant instance if that data was also deleted on the source tenant instance, check Delete setting records in target_tenant_instance that do not exist in source_tenant_instance.
•To retain configuration data (settings) on the target tenant instance even though it was deleted on the source tenant instance (that is, to merge the source and target configuration data), leave this check box empty.
5.To update configuration data (settings) that has changed in both the source and the target tenant instances, check Update setting records that changed.
6.In the Setting Type list, select the configuration data types (settings) to migrate.
7.Click Execute to initiate the migration or click Preview to create an XML-based patch file for review.
When the data migration finishes, the system creates a log entry for it and updates the status of the affected tenants and tenant instances in the Operations Console migration dashboard as shown in Migration Dashboard in Starting the Data Migration. The system also displays an informational message with the results of the migration. Check the Events & Audit History workspace to review the warnings and errors before continuing.
Updating Configuration Data (Copy Translation)
From the Operations Console you can migrate translation. The system connects to the source database and copies over any translations that are different or more recent in the target database. If there is no record in the source database but there is a record in the target, the system does not delete the record in the target database.
Perform steps 1 to 4 in Starting the Tenant Instance Migration before you perform the steps in this section.
1.Check Advanced Mode.
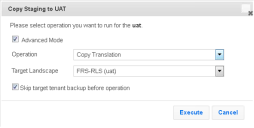
2.In the Operation field in the Copy dialog box, choose Copy Translation to configure the Operations Console to copy translated data. See Copy Dialog Box (Migrate Settings).
Copy Dialog Box (Copy Translation)
3. Check Skip target tenant backup before operation to select whether to back up the target tenant instance prior to the data migration.
•To back up the target tenant instance, leave this checkbox empty. If you have not yet backed up the target tenant instance outside of the Operations Console, we highly recommend that you back it up here.
•To not back up the target tenant instance, select this checkbox. If you have already backed up the target tenant instance outside of the Operations Console, it is generally not necessary to back it up here.
4.Click Execute to initiate the migration.
When the data migration finishes, the system creates a log entry for it and updates the status of the affected tenants and tenant instances in the Operations Console migration dashboard as shown in Migration Dashboard in Starting the Data Migration. The system also displays an informational message with the results of the migration. Check the Events & Audit History workspace to review the warnings and errors before continuing.
Increasing the Version Number (No Op [Increase Version Only])
You can only migrate data from one instance to another if there is a Push link and the system only displays a Push link if the tenant instances have different version numbers. (The system automatically increases the version number of a tenant instance after a successful migration.) Also, you can only migrate data from staging to production when the production instance of the tenant is at version 0. See Version Numbers of Tenant Instances for an example with Push links and different version numbers for each tenant instance.
Version Numbers of Tenant Instances
From the Operations Console you can increase the version number without changing any data by selecting No Op (Increase version only).
Perform steps 1 to 4 in Starting the Tenant Instance Migration before you perform the steps in this section.
1.Check Advanced Mode.
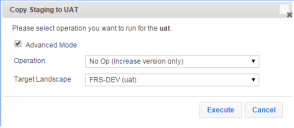
2.In the Operation field in the Copy dialog box, choose No Op (Increase version only) to increase the version number. See Copy Dialog Box (No Op [Increase Version Only]).
Copy Dialog Box (No Op [Increase Version Only])
3.Click Execute to initiate the migration.
When the data migration finishes, the system creates a log entry for it and updates the status of the affected tenants and tenant instances in the Operations Console migration dashboard as shown in Migration Dashboard in Starting the Data Migration. The system also displays an informational message with the results of the migration. Check the Events & Audit History workspace to review the warnings and errors before continuing.
