Starting the Data Migration
•Starting the Tenant Instance Migration
•Creating the First Staging or UAT Instance of the Tenant from the Production Instance of the Tenant
Starting the Tenant Instance Migration
Perform the following steps to start migrating data from the one tenant instance to another. These steps apply for each of the four migration methods. (See The Four Ways to Migrate Data for information about the different migration methods.)
1.Log in to the Operations Console and click the Tenants tab.
2.Navigate to the tenant instance to perform the migration for and click Manage Migration.
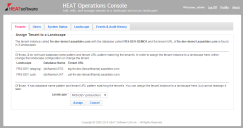
If the tenant instance is not assigned to a landscape, the system prompts you to assign the tenant instance to a landscape to prepare it for migration. See Assigning a Tenant to a Landscape. (If you do not see this screen, your tenant instance is ready for migration. Go to step 5.)
Assigning a Tenant to a Landscape
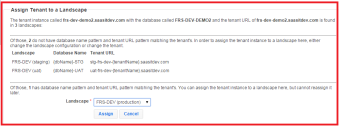
For example, if you click Manage Migration in the screen shown in Database Pattern Screen 1, the system displays the screen in Database Pattern Screen 2.
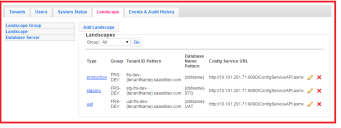
These screens are based on the landscape information, shown in Database Pattern Screen 3.
There is only one landscape with the pattern frs-dev-{tenantName}.saasitdev.com and that is the production landscape. Therefore, on the bottom of Database Pattern Screen 2, you can assign that tenant instance to that landscape. In the middle part of Database Pattern Screen 2 are the other available landscapes but these do not have the same pattern.
3.Select a landscape from the Landscape drop-down list.
If you do not want to assign it to any of the landscapes in the Landscape drop-down list, you can click Cancel and go to the Edit Landscape screen to edit the landscape database pattern. See Editing a Landscape.
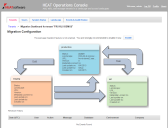
4.Click Assign. The system displays the Migration Configuration screen, showing all of the tenants and tenant instances and available migration paths in the landscape. See Migration Dashboard.
Things to note in Migration Dashboard:
•The display box for each tenant instance (production, staging, and UAT in this example) contains status information that is updated whenever a tenant instance is updated.
•Arrows show all possible migration paths. If an arrow contains a Push or Apply Package link, the path is available to use based on the current status of all tenant instances in the landscape. Depending on the status of the tenant instance, some migrations paths might not be available.
•A migration history log is displayed at the bottom of the migration dashboard. If no migrations have taken place yet, "No Events Found" displays there as shown in Migration Dashboard.
•To enable the Ivanti Service Manager development project to migrate data, click Enable. See Migrating Data using Heat Development Project.
5.To start the migration, click either Push or Apply Package in the arrow representing the migration path to use. The system displays the Copy source_tenant_instance to target_tenant_instance (for example, Copy Production to Staging) dialog box.
6.The remaining steps in the migration procedure differ depending on which migration method you use and whether this is the first migration for this migration path. If this is the first migration, the system creates the first configuration on the target tenant instance. If a migration has already been performed and this is a subsequent migration, the result is an update of the configuration on the target tenant instance.
•If this is the first migration, go to Creating the First Staging or UAT Instance of the Tenant from the Production Instance of the Tenant. Follow this process for each of the four migration methods. (See The Four Ways to Migrate Data for information about the different migration methods.)
•If this is not the first migration and you are enabling the Ivanti Service Manager development project and either using the push link or applying a package, go to Migrating Data using Heat Development Project.
•If this is not the first migration and you are disabling the Ivanti Service Manager development project and using either Simple Mode or Advanced Mode, go to Starting the Data Migration. We do not recommend disabling the Ivanti Service Manager development project and using either Simple Mode or Advanced Mode.
Creating the First Staging or UAT Instance of the Tenant from the Production Instance of the Tenant
This process applies for each of the four migration methods. (See The Four Ways to Migrate Data for information about the different migration methods.)
At the beginning of the migration process, you migrate the data from the production instance of the tenant to the staging instance of the tenant. When you migrate the data from the staging instance of the tenant to the UAT instance of the tenant, you must also migrate data from the production instance of the tenant to the UAT instance of the tenant. That way, the UAT instance of the tenant has the latest data from both the staging and production instances of the tenant.
Follow these steps to create the first staging or UAT instance of the tenant from the production instance of the tenant. You also follow these same steps if you want to refresh a staging or UAT instance of the tenant from the production instance of the tenant.
|
Perform steps 1 to 4 in Starting the Tenant Instance Migration before you perform the steps in this section. |
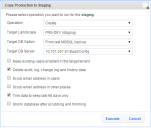
When you migrate data from the production instance of the tenant to either the staging or UAT instance of the tenant for the first time, the system creates the first configuration on the staging or UAT instance of the tenant and you see a Copy Production to Staging (or Copy Production to UAT) dialog box similar to Copy Dialog Box (Creating a Tenant Instance Configuration from the Production Tenant Instance).
Copy Dialog Box (Creating a Tenant Instance Configuration from the Production Tenant Instance)
1.Enter the following information in the Copy dialog box:
|
You cannot enter data for the following: In the Operation field, Create is the only option available. (This is because the system creates the first populated iteration of the target tenant instance.) For the Target Landscape, the system automatically populates this field based on where the Push arrow is pointing. For example, in Migration Dashboard, if you click Push in the arrow between the production instance of the tenant and the staging instance of the tenant, the system automatically enters the staging tenant instance into this field. |
•Select a backup option in the Target DB Option field. Because this is the first time that you are creating the staging or UAT instance of the tenant, there is no backup, so you must select to use a live backup. See Backup Types for information about the options.
•In the Target DB Server field, if the target landscape contains more than one database server, select the server that hosts the Configuration Database.
•Check Keep existing users enabled in the target tenant to keep all the users, and not just the administrators, active.
•Check Delete audit, log, change log and history data to delete the data in these tables:
Logs
Frs_ops_logon_history
Frs_ops_gbu_pipeline_history
Frs_ops_metadata_history
Frs_ops_upload_cache
Journal
LDAPImportLog
Frs_ops_package_item
Frs_ops_package
All audit tables, with the name Audit_table
•Check Scrub email address in users to ensure that you do not accidentally email users repeatedly during configuration testing on the target tenant instance. If you check this option, the system changes all email fields containing customer email to use the @it.com domain instead of the company domain. This change applies to the user's primary email, contact email, manager email, and team email.
•Check Scrub email address in other places to scrub email accounts saved in transactional data (such as in incidents, service requests, workflow tasks, and so on).
•Check Trim data to keep last 90 days only to only copy transactional data that was created or modified within the last 90 days. If you are updating the database from a copy of your existing customer database, most records are likely to be current within 90 days.
|
Do not check this option if you are creating the database from the sample ("out of the box") database, because the records are likely to be older than 90 days in the sample database. |
•Check Shrink database after scrubbing and trimming to truncate unnecessary data when the tenant instance is created from a backup. This is performed as a background task. If the database is very large, this task can take a long time or could abort. The Operations Console does not report any status on this task. If your database is very large, we recommend that you consider shrinking it outside of the Operations Console instead of in this procedure.
2.Click Execute. In the confirmation dialog box, click OK.
3.If there are any error or warning messages, the system displays them. Click OK.
The system migrates the data from the production instance of the tenant to the staging or UAT instance of the tenant, and configures the staging or UAT instance of the tenant for the first time.
