Neurons Bots Integration for ITSM
The Ivanti Neurons Bots integration allows Neurons Bots defined on an Ivanti Neurons tenant to be executed from within Neurons for ITSM. This integration is provided in the form of a new Quick Action that enables users to configure the inputs required by the Neurons Bot, so that they are automatically populated from the current business object context at run time.
Prerequisites
The following prerequisites are required before you can configure an Ivanti Neurons Bot for use within Neurons for ITSM:
•Request that feature flags be enabled: The Neurons Bot and Action Service are disabled by default. Contact the Ivanti Cloud Operations team and request that these two feature flags are enabled. Refer to More Information.
•Enable the Action Service global constant: To use Neurons Bots, the EnableActionService must be set to True. If EnableActionService is not available in the global constants list (this may be the case for upgraded instances), Administrators can manually add the global constant. Refer to Working with Global Constants.
•Define an App Registration in Ivanti Neurons: The app registration parameters are required for your Neurons Bot client registration within ITSM. You can skip this prerequisite step if you already have a suitable app registration defined in Ivanti Neurons. You need the Neurons Auth URL, Client ID and Client Secret details of the app registation when configuring your client registration in ITSM. For infomation on creating an app registration in Ivanti Neurons, refer to App Registrations.
•Define a Neurons Bot in Ivanti Neurons: You must either define a new Neurons Bot, or have a suitable existing Neurons Bot defined in your Ivanti Neurons tenant. For information on creating a Neurons Bot, refer to Neurons Bots creation.
Configure a Client Registration for your Neurons Bot
Configuring a client registration only needs to be done if it has not already been setup previously for other integrations. Only a single client registration should ever be created.
To configure the client registration:
-
From ITSM, open the Client Registration workspace.
-
Enter the following details:
-
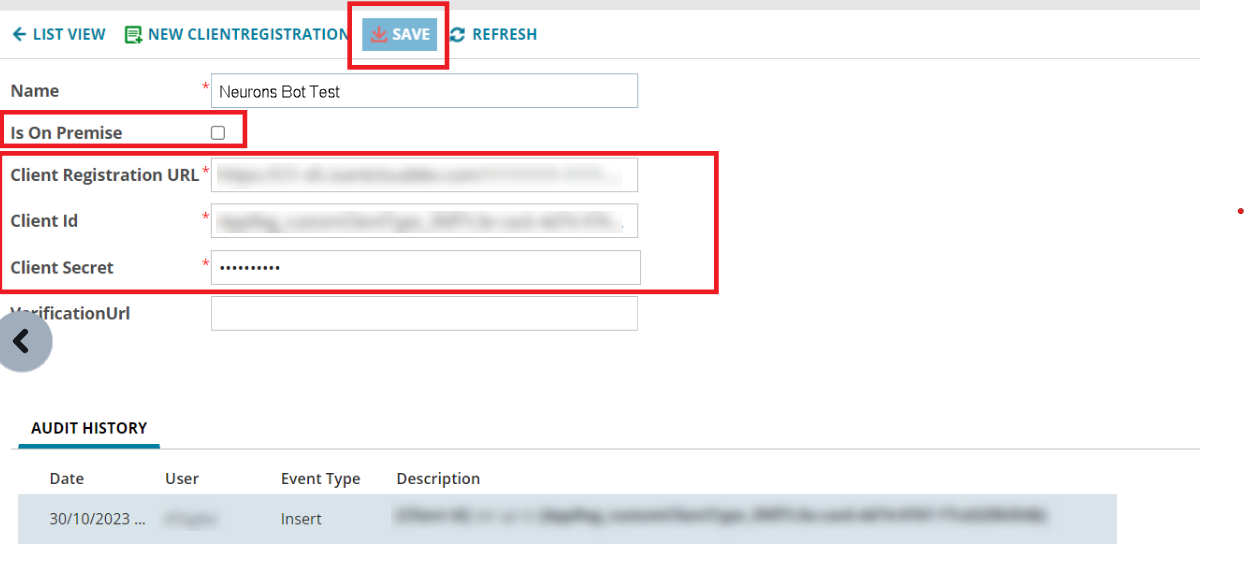
Click Save.
•Name: Enter a contextual name.
•Is On premise: Clear the check box, this is not supported for on-premises installations.
•Client Registration URL: Enter the Neurons Auth URL from the Ivanti Neurons app registration.
•Client ID and Client Secret: Enter the Client ID and Client Secret from the Ivanti Neurons app registration.
Add the Neurons Bot Results Child Panel to the CI Business Object Layouts
If you are upgrading from a Neurons for ITSM version earlier than 2024.2, you need to add the Neurons Bot Results child panel to the CI business object layouts.
The Neurons Bot Results child panel enables you to monitor the progress of a Neurons Bot when invoked.
For more information on layouts, refer to Creating a Layout.
1.Navigate to the Computer form view for the CI business object.
| a. | Open the Configuration console, and then select Build > Business Objects. |
| b. | Open the CI business object, and then select Layouts. |
| c. | Select the layout you want to add the panel to. For new setups this is typically added to the AMC.CI layout. |
| d. | From View in this layout, select the view that you want to add the child panel to. For example, select Computer. |
2.Add the Neurons Bot Results child panel.
| a. | Scroll to the bottom of the Child Panels table, and click Add Child Panel. |
| b. | Click <Not set> in the Display Name column, and enter Neurons Bot Results . |
| c. | Click <Not Set> in the Object column (2nd column) to open the Relationship Editor, configure the following settings: |
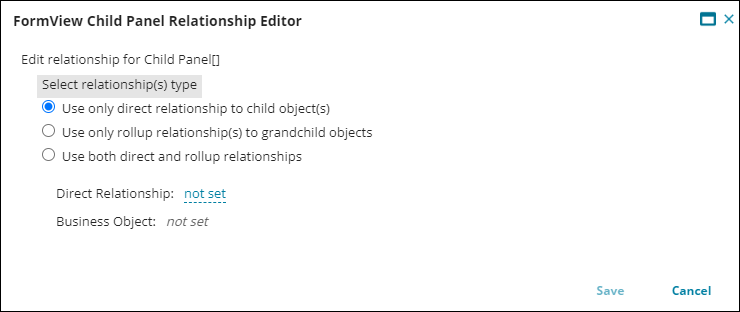
•Select Use only direct relationship to child object(s).
•Set Direct Relationship to NeuronsBotInvocationCIResult (via ResultAssocCI).
•Click Save, and then click Yes.
| d. | Click <Not Set> in the List column, and select NeuronsBotInvocationCIResults. |
| e. | Click <Not Set> in the Form(s) column, and select NeuronsBotInvocationCIResult. |
| f. | Select the Show Count in Title checkbox. |
| g. | Click Save. |
3.Add the Neurons Bot Invocations child panel.
| a. | Scroll to the bottom of the Child Panels table, and click Add Child Panel. |
| b. | Click <Not set> in the Display Name column, and enter Neurons Bot Invocations. |
| c. | Click <Not Set> in the Object column (2nd column) to open the Relationship Editor, and configure the following settings: |
•Select Use only rollup relationship(s) to grandchild objects.
•Set Business Object to NeuronsBotInvocation.
| d. | Click Add New Rollup Sequence, and configure the following settings. |
•Enter Invocations for the Display Name.
•Select the Show rollup records by default checkbox.
•Click the plus ![]() icon next to rollup chain, and then click <Not Set> under no object selected.
icon next to rollup chain, and then click <Not Set> under no object selected.
•Select NeuronsBotInvocationCIResult from the drop-down list.
•Click the plus ![]() icon again, and then click <Not Set> under no object selected.
icon again, and then click <Not Set> under no object selected.
• Select NeuronsBotInvocation from the drop-down list.
•Click Save, and then click Save again.
•Click Yes, and then click OK
| e. | Click <Not Set> in the List column, and select NeuronsBotInvocations. |
| f. | Click <Not Set> in the Form(s) column, and select NeuronsBotInvocation. |
| g. | Select the Show Count in Title checkbox. |
| h. | Click Save. |
Configure a Neurons Bot Quick Action
You need to configure a Neurons Bot Quick Action in the Graphical Action Designer, which defines how a Neurons Bot is invoked within ITSM.
To open the Graphical Action Designer, refer to Using the Graphical Action Designer (GAD).
For information on configuring a Neurons Bot Quick Action, refer to Neurons Bot Quick Action.
Invoke a Neurons Bot
Refer to Invoking a Neurons Bot