Importing from the Ivanti Neurons Platform
Ivanti Neurons for ITAM Cloud enables you to import asset data from the Ivanti Neurons Platform using a connector (OData Connection) designed for your data source. To do this, you must be an Asset Administrator with an Ivanti Neurons Platform account that's set up and ready to use.
There are three types of records you can import from the Neurons Platform:
1.Software inventory – Licensable software records that will display in two places:
•The Hardware Assets workspace > Licensable Software tab for individual devices with that software installed.
•The Software Assets workspace > Installations tab for a manufacturer, listing all devices with that software installed.
2.Invoices – Records for vendor invoices that are associated with asset purchase orders. These will display in the Invoices workspace.
3.Devices – Hardware asset records that will display in the Hardware Assets workspace.
Before you begin
Ensure that you're current on all ITAM content package updates, which are available from the Ivanti Marketplace.
You must also have all aspects of your Neurons Platform account set up and ready to use with ITAM. This includes:
•Contacting Ivanti customer support to request that the tenants for both the Neurons Platform and ITAM are set up to communicate with each other during the data transfer.
•Configuring the Ivanti Neurons connector for your data source. For details, see Ivanti Neurons Connector in the Configuring Ivanti Neurons for ITSM help. While configuring the connector, you may need guidance when mapping the target fields. If so, see Connector field mappings (PDF).
Next, in the ITAM user console, you need to select the types of records you want to import. This is a one-time configuration.
This procedure is applicable only for service bus-based syncs, not for API syncs. Whenever the connector is run for API syncs, it will import all record types whether or not they're enabled in this workspace.
The New Ivanti Neurons Asset Import Configuration option isn't currently functional and is for future use only.
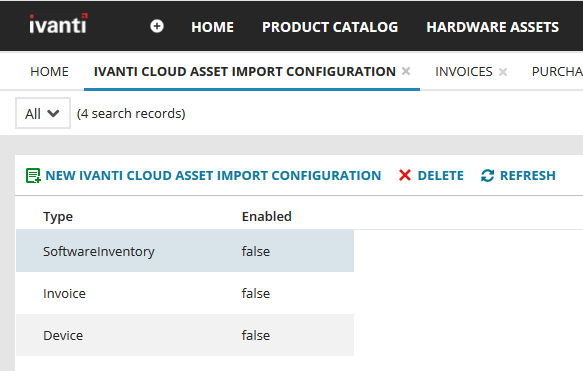
1.Open the Ivanti Neurons Asset Import Configuration workspace.
2.In the list view, double-click the record type you want to import. By default, all record types are turned off (shown as false).
3.Click the Enabled check box.
4.Click Save, then click List View. Repeat for each record type you want to import.
Selected record types should now display as true, which means that the Ivanti Neurons connector will actively import data for that type until you disable it again.
Finally, set the CI (asset) type settings for the imported data. This is a one-time configuration.
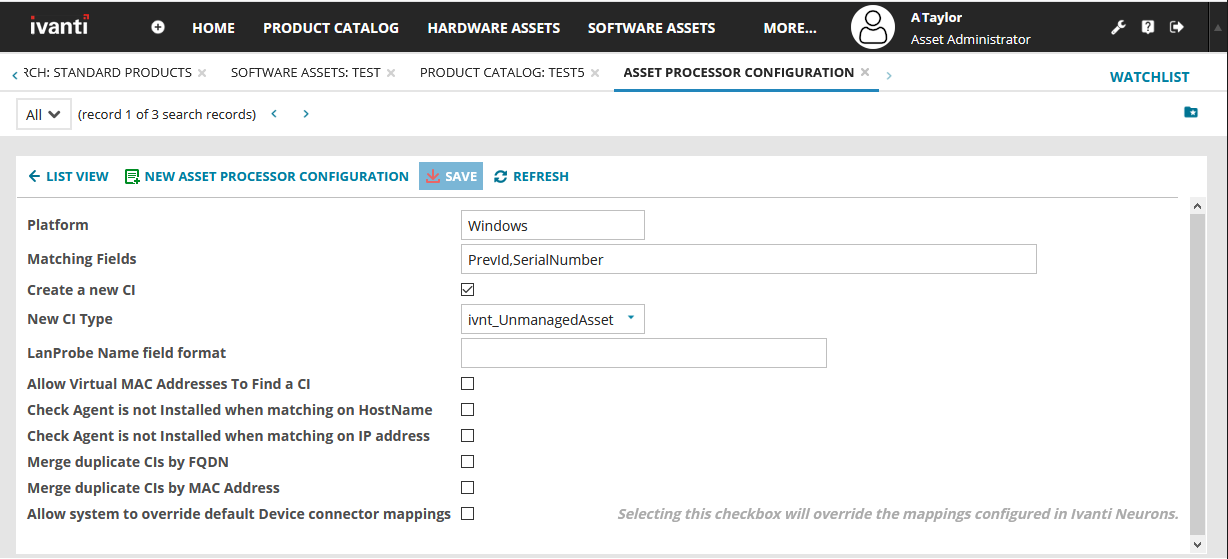
1.Open the Asset Processor Configuration workspace.
2.Double-click Windows.
3. Ensure that the Matching Fields are as shown below, and enable Create a new CI. By default, the New CI Type is set to unmanaged (ivnt_UnmanagedAsset), though you can change the type as needed. The selected type will be the category that all the imports are pulled into, as displayed in the Hardware Assets workspace.
Optional but recommended
You can create device parent type/subtype filters and field mappings that define how the Ivanti Neurons connector will import your source asset data. These customizations provide a high level of control over how data is displayed in the Hardware Assets workspace and are useful when importing many records at once. For details, see Customizing imports from the Ivanti Neurons Platform.
If you don't create field mappings for devices imported from Ivanti Neurons:
Device records will display in the Hardware Assets workspace as the CI (asset) type specified in the Asset Processor Configuration workspace (by default, unmanaged). Once the records are imported, you'll need to manually change their status to a managed asset type and subtype by following the procedure below.
The import process
You’ll need to be logged into both the Neurons Platform (as Administrator) and ITAM (as Asset Administrator) to monitor the end-to-end process as it occurs.
The general steps for the import are:
•From the Ivanti Neurons console, run the data connector to start the process. The connector will begin pulling records into the Neurons Platform from the data source, then over to your ITAM database. If needed, you can set a schedule in the Ivanti Neurons console for recurring imports. You can only run one connector at a time.
It should take no longer than several minutes for the import process to begin populating the database. If this doesn't occur, contact Ivanti customer support for assistance.
•In the ITAM user console:
•Open the Integration Queue workspace and monitor the progress, which may take a while. Refresh the page as often as needed. You’ll see the status of the import job go from Queued to Running to Completed. The job will disappear from this workspace when completed.
•Review the Message Queue Journal workspace for incoming messages processed from Ivanti Neurons.
•Imported records will display in the correct workspace for the record type, as mentioned above. You may need to refresh those workspaces (Hardware Assets, Software Assets, and Invoices) before the data displays.
If you didn't customize how the Ivanti Neurons connector imports source asset data, device records will display in the Hardware Assets workspace as unmanaged by default. You'll need to manually change the status of these records to a managed asset type and subtype.
1.Open the Hardware Assets workspace.
2.In the list view, expand Asset Type: ivnt_UnmanagedAsset.
3.Manually select the records in the list.
4.In the upper-right area of the page, click the More drop-down menu and select Administration Actions > Change Asset Type.
5.In the Enter dialog, select the correct type and subtype from the drop-downs.
6.Click OK. The workspace list view will update accordingly.
