Application Management Tab
The Application Management tab is not available until after you have completed the setup wizard.
The Application Management tab allows you to specify the folder to use when deploying third-party applications. In addition, you can specify if publishing to Intune is allowed and, if so, how to make a connection with your Intune environment.
Applications contain detection scripts that are created and signed by Ivanti. To validate these scripts, each client machine must have the Ivanti Code Signing Certificate added to the Trusted Root CA and Trusted Publishers stores. For more information, see Client machine requirements on System Requirements.
Available Options
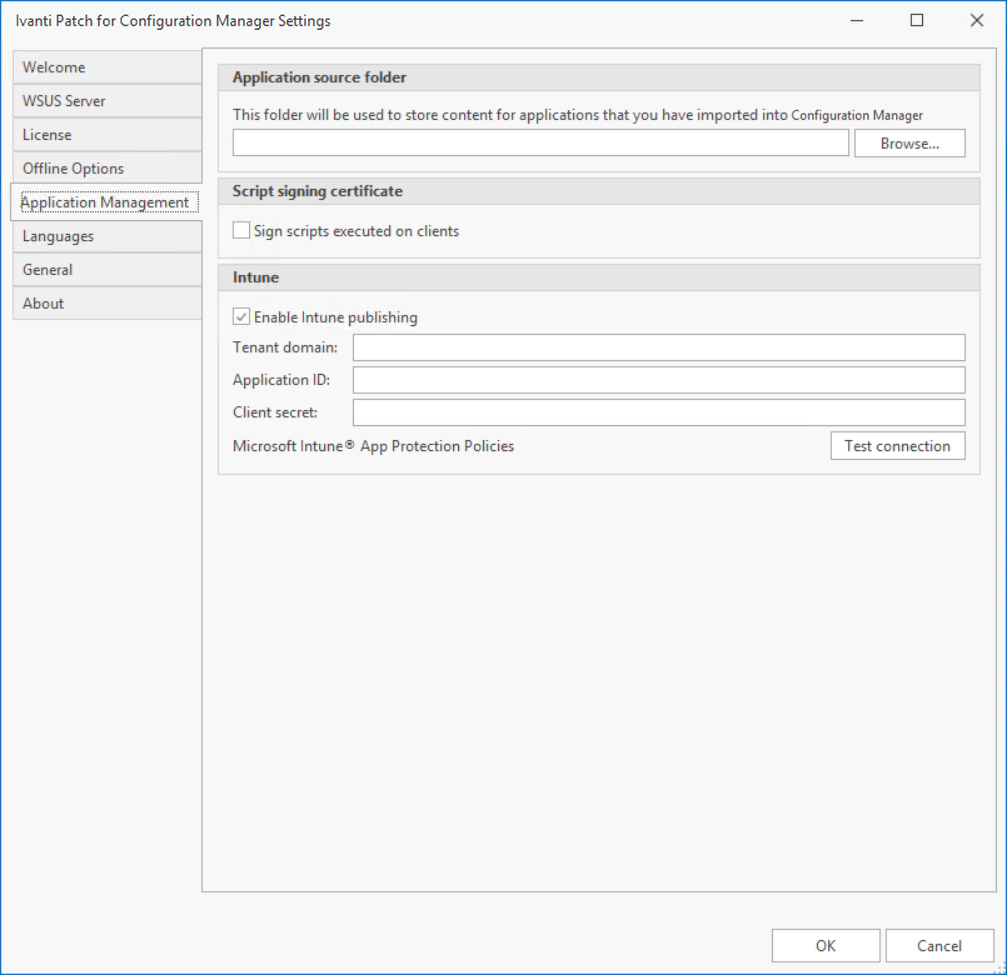
Application Source Folder
- This folder will be used to store content for applications that you have imported into Configuration Manager: Specify the full path name to the local folder or network share that will be used to store the installers for the third-party applications you deploy.
- Browse: If you don't remember the exact location of the folder, click this button to search for the folder. This button also enables you to make a new folder.
The full path name entered in this field must be a UNC path.
Intune
For information on how to perform a deployment to Microsoft Intune, see Synchronizing Third-Party Applications.
- Enable Intune publishing: Specifies if third-party applications can be imported to Microsoft Intune. If this check box is enabled, you must use the following three options to configure your connection to the Microsoft Intune tenant.
- Tenant domain: This setting can be found by logging on to your Azure portal, going to the Active Directory blade and then clicking on Domain names.
- Application ID: This setting can be found on the Overview tab of your Azure portal. This is available immediately after the registration process.
- Client secret: This setting can be found on the Certificates & secrets tab of your Azure portal. Create a new client secret if needed and then paste the secret here.
- Test connection: Click this to verify that you can successfully make a connection to your Azure portal.
If you have not yet registered your Azure portal, see Additional Azure Portal Information before configuring these options.
Another option: Within the Intune tenant, go to Tenant administration > Tenant status > Tenant name.
Additional Azure Portal Information
If you have not yet completed the application registration in the Azure AD section of your Azure portal, follow these steps. This will give you the necessary permissions to connect, create and read applications within your Intune tenant.
- Create a new registration within your Azure portal by selecting App registrations > New registration and then following the registration wizard.
- Name: Provide a unique and descriptive name
- Remaining options: In most cases, simply take the defaults.
- Click Register.
You can now configure the permissions that are needed to communicate with Microsoft Intune. - Within the Azure portal, select API permissions > Add a permission
- Select Microsoft Graph.
- Under Delegated permissions, enable the following permissions:
- Directory.Read.All
- Directory.ReadWrite.All
- Under Application permissions, enable the following permissions:
- DeviceManagementApps.ReadWrite.All
- Application.Read.All
- Application.ReadWrite.All
- Directory.Read.All
- Directory.ReadWrite.All
- GroupMember.Read.All
- GroupMember.ReadWrite.All
- Click Add permissions
An administrator must grant consent for the permissions. If you are an administrator, you can do it yourself by clicking Grant admin consent for <name>.