Synchronizing Third-Party Applications with Configuration Manager and Intune
Patch for Configuration Manager can deploy a number of free third-party applications to your endpoints, including:
- 7-Zip
- Adobe Acrobat Reader
- Firefox
- Zoom Client
- And more . . .
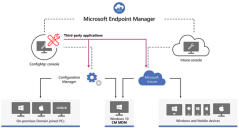
You do this by selecting the desired applications from the Application catalog and then creating a scheduled task that will import them into Configuration Manager and/or Microsoft Intune. Your normal Configuration Manager or Intune processes are then used to deploy the applications. Each subsequent time that the scheduled task is run, it will check to see if additional applications have been selected to be imported and it will check for updates to existing applications that have been previously deployed.
You cannot add to or edit the Application catalog that is provided by Ivanti. If you want to add or edit applications, do the following:
- In Configuration Manager, use the Application Management > Application workspace
- In Intune, go to https://endpoint.microsoft.com and use the Apps section
Settings
An application source folder must be defined on the Application Management tab before you can access the Synchronize Applications dialog.
URL
Access to the following URL is required in order to download the Application catalog:
https://application.ivanti.com
For the complete list of URLs that are required by Patch for Configuration Manager, see the Ivanti Community (opens in a new window).
Configuration Manager
If you are using a version of Configuration Manager that is older than version 1906, the following site system roles are required:
- Application catalog website
- Application catalog web service
For additional details, see the Microsoft documentation site (opens in a new window)
Microsoft Intune
You must configure your Intune connection settings before attempting to publish third-party applications to Intune. For complete details, see Application Management Tab.
- Within the Configuration Manager Software Library workspace, expand the Software Updates > Ivanti Patch folder and click on Automation Scheduler.
A calendar is displayed that contains the scheduled tasks for all consoles that are using the same database. You can: - Edit a scheduled task by double-clicking it or by selecting it and then clicking Edit
- View the history of a task by selecting it and then clicking History
- Delete a task by selecting it and then clicking Delete
- On the Home tab, click Synchronize Applications.
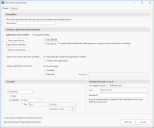
The Synchronize Applications dialog is displayed.
- Specify a name that uniquely identifies the purpose of this task.
This is the name that will be displayed in the Automation Scheduler calendar. - Click Select applications.
- On the Select Applications dialog, select the desired applications.
- Click Save.
- (Conditional) If any of the applications that you selected cannot be automatically downloaded but must instead be acquired from the vendor, click Sideload applications.
If an application cannot be automatically downloaded, No will be displayed within the Automatic Download column in the Select Applications dialog. This may be the case if you are running in offline mode. - Use the information In the Download column to locate and download each application installation file.
- Save each file to a folder on the console machine.
The best choice is to create a new folder that is used exclusively for sideloaded updates. - Input the associated installation files into the dialog.
You can do this one of two ways: - Click Browse and select the associated update files that you manually downloaded earlier.
- Drag the update files from File Explorer to the dialog.
- The correct GUID folder is created for each application installation file.
- The correctly-named installation file is placed within each GUID folder.
- The installation files are verified by comparing the file digest to the expected digest for each application.
- Each application's entire folder structure is copied to the application source folder.
- Specify which platform to which the applications will be imported.
- Use MECM: Specifies that the applications will be imported into Microsoft Endpoint Configuration Manager. Once there, the installer for the third-party application will be downloaded to one or more distribution points and pushed out to your endpoints using your regular Configuration Manager infrastructure.
- Use Intune: Specifies that the applications will be imported into Microsoft Intune.
- Specify what to do when new versions of the selected applications become available from the vendor.
You have two options: - Automatically update the application content: The application will be automatically updated in place by a background task. The new version of the application will be available to users when the task is complete.
- Create a new application: A new application will be created when new content becomes available. You will need to manually deploy the new application. If you want to delete older versions of an application, you can do so from the Application Management > Applications workspace within Configuration Manager.
- (Conditional) If you are importing to Intune, specify if you want to assign the applications to existing users or groups during the Intune deployment process.
- Do not assign: The imported applications will not be assigned to a user or group.
- Available: The applications will have to be manually installed by the user in the Company Portal app. This is equivalent to the Available for Enrolled Devices property in Intune.
- Required: The applications will be installed automatically without user input. This is equivalent to the Required property in Intune.
- Specify when the task should be run and by whom.
- Schedule: Specify the day and time when the task should run.
- Logged on user: If enabled, specifies that you will use the credentials of the currently logged on user to add the task to Microsoft Scheduler. The User box is automatically populated so you only need to type the account password.
- Different user: If enabled, specifies that you want to use a different user account when adding the task to Microsoft Scheduler. For example, you might specify a service account whose password does not expire.
- Have Log on as a batch job rights
- Be a member of the WSUS Administrators group on the WSUS server
- Be a member of the local administrators group on the WSUS Server if the WSUS Server is remote
- Proxy authentication is required – use these credentials: If enabled, indicates that proxy server credentials are required when using the user account. If you then choose Same as above, the user account credentials will be used as the proxy credentials. If you choose Credentials below, you can provide a separate set of proxy credentials.
- User name: Type the user name for an account on the proxy server. It may be necessary to specify a domain as part of your user name (for example: mydomain\my.name).
- Password: Type the password for the proxy server account.
- Click Add task.
This will schedule the task and it can be viewed within the Automation Scheduler calendar. - Verify that the third-party applications have been successfully added to the designated platforms.
Tip: You can also manage the scheduled tasks using the Microsoft Task Scheduler.
In order to publish an application that cannot be automatically downloaded, it must first be sideloaded. Sideloading means the installation file is manually downloaded, its contents are verified and then the file is saved to the proper directory within the application source folder. The exact process is as follows:
The files you add to this dialog will be processed and readied for publication. Specifically:
When the process is complete, each update's status will change to Successfully copied.
At this point the applications are ready to be published from the application source folder using the normal publication process.
You must configure your Intune connection settings before attempting to publish third-party applications to Intune. For complete details, see Application Management Tab.
By assigning the applications to a group, the applications can automatically be made available to your endpoints without performing additional actions on the Intune portal.
The account must:
When specifying a different user, you must indicate if credentials are required to authenticate to a proxy server.
The first time that the task is run, it will import the third-party applications to the specified platform(s). You can monitor the import process by refreshing the History View for the task.
Each subsequent time that the task is run, it will check for new applications to import and it will also check if newer versions of previously deployed applications are available and require updating.
Microsoft Endpoint Configuration Manager
Verify that the third-party applications have been added to the Application Management > Applications workspace.
At this point you can perform your normal Configuration Manager functionality on the applications. For example, using the existing Configuration Manager infrastructure, you might wish to view the application properties and perform edits before manually deploying the applications to your endpoints.
Microsoft Intune
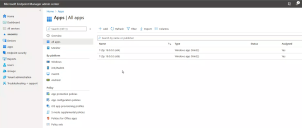
Verify that the third-party applications have been added to the Apps | All apps workspace within your Microsoft Endpoint Manager console.
At this point you can perform your normal Intune functionality on the applications. For example, you might wish to view the application properties and perform edits using the existing Intune infrastructure.

