Streamlined Deployment of Third-Party Updates
Patch for Configuration Manager can quickly deploy published third-party updates to your endpoints. The process is quicker and easier than performing the same actions within Configuration Manager. This is particularly important when you need to quickly distribute time sensitive updates such as zero-day vulnerability updates and critical business-related updates to your clients. Here's a quick comparison of the deployment process in both products.
- Microsoft Endpoint Configuration Manager: The deployment workflow requires many steps and mixes third-party updates with other updates that have been published. You need to search for the third-party updates that you want to deploy, and the entire process can be quite time consuming.
- Ivanti Patch for Configuration Manager: The streamlined deployment, once it is configured, becomes a one-click publish and deployment process that is fully integrated with Configuration Manager. You can deploy your third-party updates without leaving the Patch for Configuration Manager workspace. You can specify when the deployed updates will be available to your clients. This includes the option to deploy the updates as soon as possible, something that is not easy to do in Configuration Manager.
Overview of the Streamlined Deployment Process
The desired updates are selected from within the Published Third-Party Updates workspace and then deployed using a deployment profile. The updates will be downloaded to one or more distribution points and pushed out to your endpoints using your regular Configuration Manager infrastructure.
There are two steps to the process:
- Create or edit a deployment profile
- Deploy the updates using a profile
A deployment profile defines what actions will be performed during a deployment. You can create as many different profiles as you need to satisfy your specific deployment scenarios.
- Within the Configuration Manager Software Library workspace, expand the Software Updates > Ivanti Patch folder and then click on Published Third-Party Updates.
- Click Deployment Profiles.
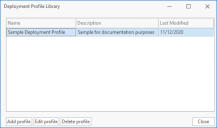
The Deployment Profile Library dialog is displayed. - Create a new profile or edit an existing profile.
- To create a new profile, click Add profile.
- To edit an existing profile, select the profile and then click Edit profile.
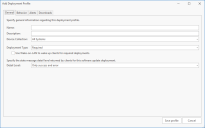
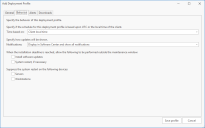
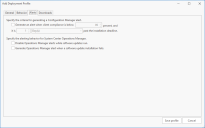
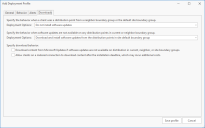
- Use the available tabs on the Deployment Profile dialog to configure the profile.
This dialog is automatically populated with any of your existing Configuration Manager deployment templates. The opposite is also true. Any profile you create here will be made available as a template in the Configuration Manager deployment work flow.
- Name: The name that you want to assign to this profile.
- Description: A comment that describes the purpose of this profile.
- Device Collection: Specify the collection where you want to deploy the profile.
- Deployment Type: Specify if the deployment is required for all clients.
- Required: If an update is applicable to a client, deployment of the update will be strictly enforced. The user can choose a start time that is earlier than the deadline, but if no start time is provided the deployment will begin no later than the deadline.
- Available: If an update is applicable to a client, it will be made available but deployment of the update will not be enforced.
- Use Wake-on-LAN to wake up clients for required deployments: If enabled, clients that are powered off or in a reduced power state will be woken up in order to receive the deployment.
- Specify the state message detail level returned by clients for this software update deployment: Choose the verbosity level for reporting purposes: All, Only success and error, or Only error.
- Specify if the schedule for this deployment profile is based upon UTC or the local time of the client: Choose between the following two options:
- UTC: The deployment is available for multiple machines at the same time.
- Client local time: The deployment is performed at different times, depending on the local time of each client.
- Specify how updates will be shown: Choose the level of notifications you want to receive when the deployment is performed.
- When the installation deadline is reached, allow the following to be performed outside the maintenance window: Choose which actions can be forced outside the maintenance window.
- Suppress the system restart on the following devices: Choose which client types will not be restarted, even if the updates being deployed require a restart. This will allow an administrator to choose when the devices will be restarted.
- Specify the behavior when a client uses a distribution point from a neighbor boundary group or the default site boundary group: Choose whether to allow the download and installation of the updates from a distribution point.
- Specify the behavior when software updates are not available on any distribution points in current or neighbor boundary group: Choose whether to allow the download and installation of the updates from a default distribution point.
- Specify download behavior: Choose which download actions will be allowed.
In addition to the manual process described here, you can also automate the deployment process by creating a Publish by Filter task, a Publish by CVE task or a Publish Recommendations task.
- Within the Configuration Manager Software Library workspace, expand the Software Updates > Ivanti Patch folder and then click on Published Third-Party Updates.
- Select the update(s) you want to deploy.
- Click Deploy.
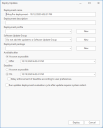
The Deploy Updates dialog is displayed. - As soon as possible: The deployment process will begin immediately after the Deploy button is clicked.
- After: Allows you to specify a specific date and time after which the deployment process can begin.
- As soon as possible: The deployment process will begin immediately once the Deploy button is clicked, and there will be no grace period for users to install the update themselves.
- On: Allows you to specify a specific date and time that the deployment process must begin.
- Delay enforcement of deadline according to user preference: If enabled, this will honor any working hours that have been set by a user and the deployment process will not begin until the time period that is outside of those set hours.
- Click Deploy.
A deployment is generated and it can be viewed in the Scheduled Deployments calendar and in the Monitoring > Overview > Deployments workspace in Configuration Manager. The deployment will be processed the same as if it were initiated through the normal Configuration Manager deployment workflow.
Deployment name: By default, the name will consist of the update name and the current date and time. Feel free to change the deployment name to something more specific to your implementation.
Deployment description: The description will be displayed when viewing the deployment in the Deployment calendar.
Deployment profile: The deployment profile that will be used when deploying the selected updates. See Creating or Editing a Deployment Profile.
Software Update Group: This is optional if you are deploying only one update. If you are deploying more than one update, you must specify a software update group. If you add the updates to an existing group, all of the updates within that group will be redeployed.
Deployment package: Specifies where the deployments will be staged for distribution. Configuration Manager uses a deployment package to move the content into a distribution point, which is then pushed down to endpoints.
Available after: Specifies when the deployed updates will be available to your clients.
Deadline: Specifies the latest date and time the deployment will be completed.
Run updates deployment evaluation cycle after update requires system restart: If enabled, after deploying an update that requires a restart, the client will perform another evaluation for missing updates after the restart is complete.
