Automatically Publishing Updates for CVEs
If you prefer, you can manually import CVEs and publish the associated updates only once and not on a regular basis.
Overview
The Common Vulnerabilities and Exposures (CVE) List is a public reference of known cybersecurity vulnerabilities. This list, maintained by the MITRE Corporation (mitre.org), continually changes as new vulnerabilities are detected. If your organization uses the CVE list, it can be difficult to determine exactly which updates you need to publish to protect your machines from the threats identified in the list.
Fortunately, Patch for Configuration Manager simplifies this process. You can create a recurring scheduled task that will automatically:
- Scan a folder containing one or more CVE files
- Determine which updates are related to each CVE
- Publish the updates that address the CVEs
You can have multiple scheduled CVE tasks for each console. One reason you may want multiple scheduled tasks is to define different cadences for different sets of CVEs. Or, you may want to publish different updates to different Software Update Groups. There is no theoretical limit to the number of recurring scheduled tasks you may have at a given time, but you may determine that there is a practical limit for your site.
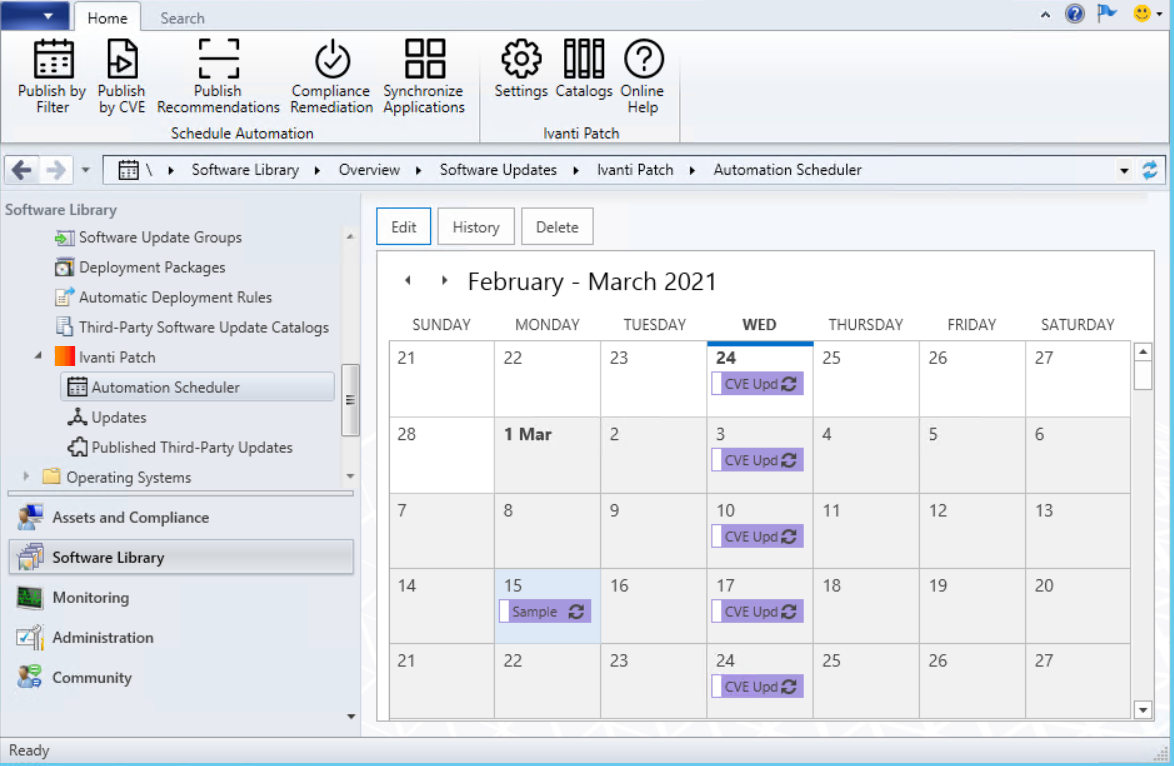
- Within the Configuration Manager Software Library workspace, expand the Software Updates > Ivanti Patch folder and then click on Automation Scheduler.
- A calendar is displayed that contains the scheduled tasks for all consoles. You can:
- Edit a scheduled task by double-clicking it, using the right-click menu, or by selecting it and then clicking Edit
- View the history of a task by using the right-click menu or by selecting it and then clicking History
- Delete a task by using the right-click menu or by selecting it and then clicking Delete
Tip: You can also manage the scheduled tasks using the Microsoft Task Scheduler.
- On the Home tab, click Publish by CVE.
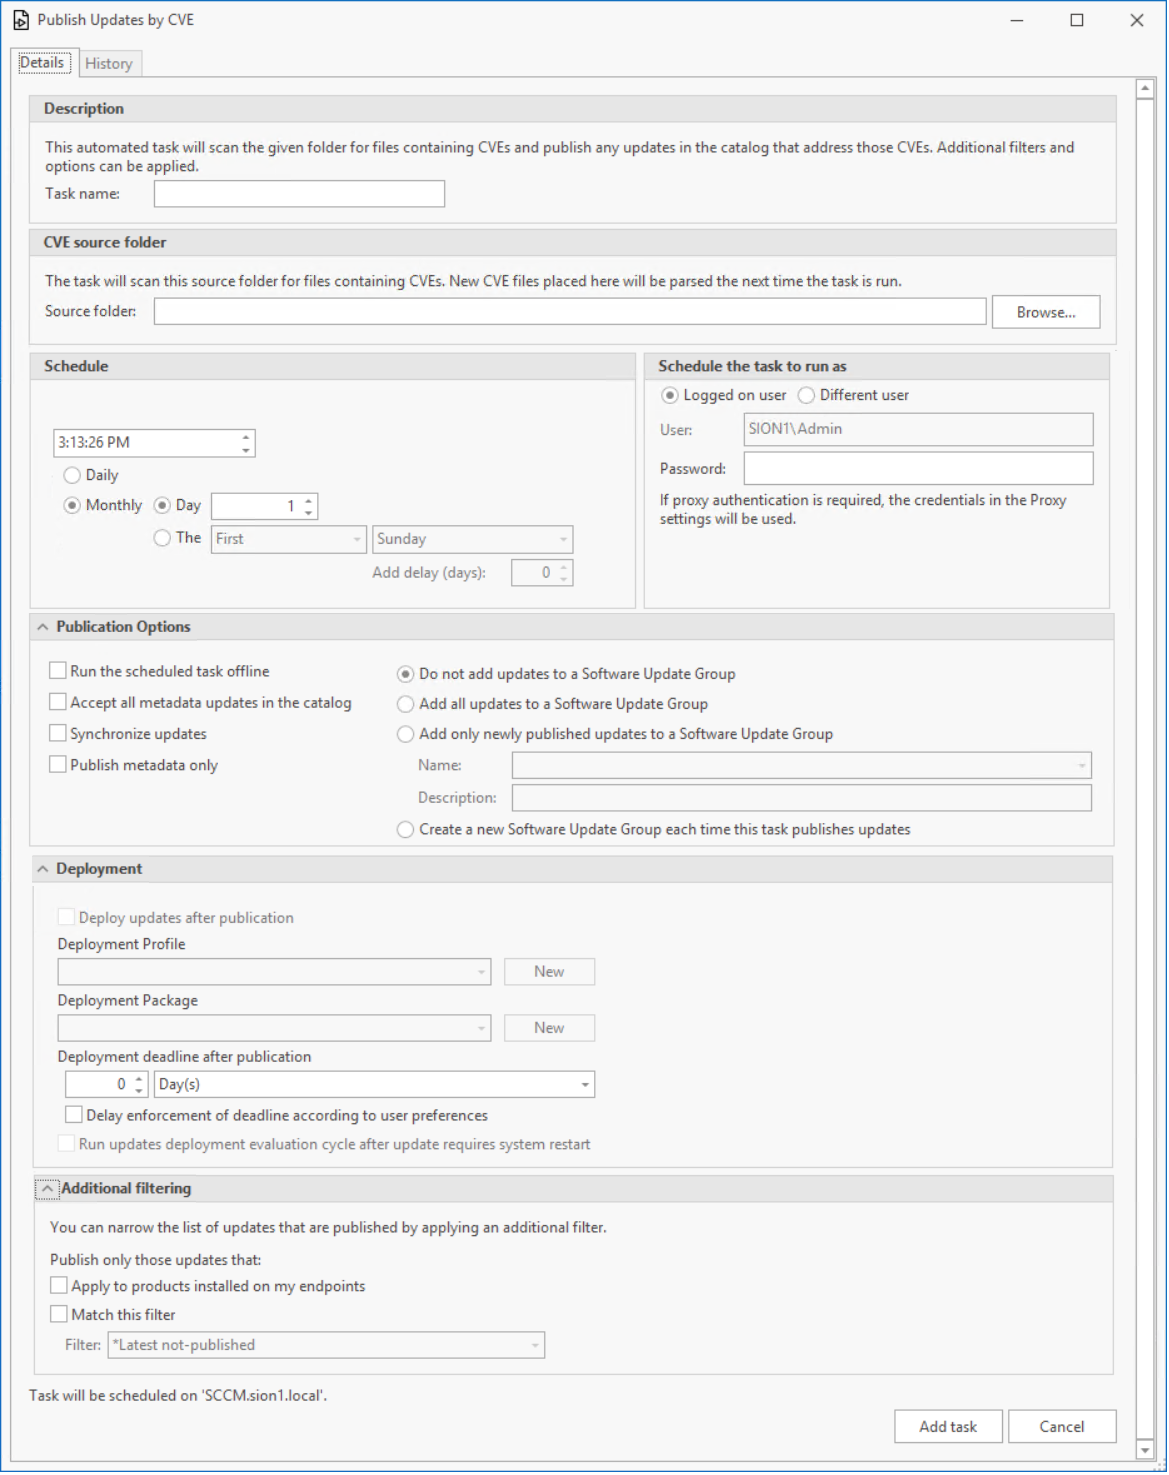
The Publish Updates by CVE dialog is displayed.
- Specify a name that uniquely identifies the purpose of this task.
This name will also be displayed in the Automation Scheduler calendar. - Specify the path to your CVE source folder.
This is the folder that contains your CVE file(s). All files in the folder will be scanned to determine if they contain CVEs. The files can be in any acceptable format, such as .txt, xml or .csv. Duplicate CVEs will be ignored.The full path name entered in this field must be a UNC path.
Example: Your security team may use a vulnerability scanning tool on a monthly basis to create an updated list of CVEs. Each month, you simply move the newly generated CVE file to this folder and let the automated process take it from there.
- Specify when the task should run and what action(s) should occur.
- Schedule: Specify the day and time when the task should run. One option is to schedule a task in conjunction with a regular monthly event, such as Microsoft's Patch Tuesday. For example, you might schedule a publication to occur the day after Patch Tuesday by specifying The Second Tuesday and then using the Add delay (days) option to delay the task by one day.
A task that is scheduled using the Add delay (days) option will run for 12 months before it must be rescheduled. When the task is down to its final three months, an alert will be generated and you will be prompted to enter your credentials to reschedule the task. If you enter your credentials, all tasks using the Add delay (days) option will be rescheduled for another 12 months.
- Logged on user: If enabled, specifies that you will use the credentials of the currently logged on user to add the publishing task to Microsoft Scheduler. The User box is automatically populated so you only need to type the account password.
- Different user: If enabled, specifies that you want to use a different user account when adding the publishing task to Microsoft Scheduler. For example, you might specify a service account whose password does not expire.
The account must:
- Have Log on as a batch job rights
- Be a member of the WSUS Administrators group on the WSUS server
- Be a member of the local administrators group on the WSUS Server if the WSUS Server is remote
When specifying a different user, you must indicate if credentials are required to authenticate to a proxy server.
- Proxy authentication is required – use these credentials: If enabled, indicates that proxy server credentials are required when using the user account. If you then choose Same as above, the user account credentials will be used as the proxy credentials. If you choose Credentials below, you can provide a separate set of proxy credentials.
- User name: Type the user name for an account on the proxy server. It may be necessary to specify a domain as part of your user name (for example: mydomain\my.name).
- Password: Type the password for the proxy server account.
- Run the scheduled task offline: If enabled, the scheduled publication task will be run in offline mode. This means the console will not attempt to download the selected update files. In order for the publication to be successful, the update(s) must already reside in the Local Source folder.
This check box is automatically enabled if Run disconnected is enabled on the Offline Options tab.
- Accept all metadata updates in the catalog: If you want to automatically update WSUS with any metadata revisions that are available for updates that have been previously published, enable this check box.
- Synchronize updates: If you want Configuration Manager to automatically synchronize itself with the WSUS database as part of this task, enable this check box. This will cause an incremental synchronization to be performed. If you do not enable this check box, the published updates will not be available for deployment until your regularly scheduled synchronization process occurs. Synchronization can also be started by selecting the Home tab and then clicking Synchronize Software Updates.
- Publish metadata only: If enabled, this will publish detection logic for the update but not the actual software update binaries. You might do this if you want to detect if an update is needed by your clients but ensure that the update cannot be installed. This is useful only in very specific scenarios and server configurations.
If you edit an update that is published as metadata-only, the original update will be deleted and the edited update republished as metadata-only. This means the revision number for these updates will always be 1. An update that is published as metadata-only cannot be re-signed because there is no content to sign. An attempt to re-sign it will result in a warning message in the log file.
- Software Update Group Options: Configuration Manager provides the use of software update groups to help you organize and deploy your software updates. Updates that are published using Patch for Configuration Manager can be automatically added to a new or existing software update group.
You can choose one of the following options:
- Do not add updates to a Software Update Group: None of the updates in the scheduled task will be added to a software update group.
- Add all updates to a Software Update Group: All updates specified in the scheduled task will be added to a software update group.
- Add only newly published updates to a Software Update Group: Only newly published updates specified in the scheduled task will be added to a software update group.
The following options apply only if you choose to add updates to a software update group:
- Name: If you want the published updates to be added to an existing software update group, select the group name from the drop-down list. You can also type the first few letters of the name until the correct group is displayed. If you want to specify a new group, select New from the drop-down list and provide a unique group name and a description.
- Description: This field describes the purpose of the specified software update group. The description is defined when the group is created and cannot be modified here.
The updates will be added to the software update group after the publication process is complete and a synchronization has been performed.
- Create a new Software Update Group each time this task publishes updates: A unique Software Update Group will be created for each publication. The group will be named based on the task name and the date and time that the publication occurs.
- Deployment Options: This area provides the option to have Patch for Configuration Manager quickly deploy the published updates to your endpoints. Updates will be made available to your endpoints immediately upon deployment. For additional information on deployments, see Streamlined Deployment of Third-Party Updates.
- Deploy updates after publication: If you want to specify deployment options, enable this check box. In order for this check box to be available for selection, in the Publications Options section you must enable the Synchronize updates option and you must choose to add updates to a software update group.
- Deployment profile: The deployment profile that will be used when deploying the selected updates.
- Deployment package: Specifies where the deployments will be staged for distribution. Configuration Manager uses a deployment package to move the content into a distribution point, which is then pushed down to endpoints.
- Deployment deadline after publication: Allows you to specify a specific date and time that the deployment process must begin.
- Delay enforcement of deadline according to user preference: If enabled, this will honor any working hours that have been set by a user and the deployment process will not begin until the time period that is outside of those set hours.
- Run updates deployment evaluation cycle after update requires system restart: If enabled, after deploying an update that requires a restart, the client will perform another evaluation for missing updates after the restart is complete.
- Publish only those updates that: Enables you to specify which CVE-related updates you want to publish on a recurring basis. You can choose either or both of the following two options:
- Apply to products installed on my endpoints: If enabled, only updates that apply to products that are currently installed on your client machines will be published.
- Match this filter: You can choose either the predefined filter named *Latest not-published or any of your custom filters.
Example 1: To publish all updates that have not been previously published and that are not superseded, select the * Latest not-published filter. This is an easy way to automatically publish new updates on a recurring basis.
Example 2: Assume you have previously created a custom filter that identifies all unpublished critical updates for the products you use in your organization. Simply select that filter here to publish just those updates on a recurring basis.
If an update contains different packages for different languages, only the language versions specified on the Languages tab will be published.
- Schedule: Specify the day and time when the task should run. One option is to schedule a task in conjunction with a regular monthly event, such as Microsoft's Patch Tuesday. For example, you might schedule a publication to occur the day after Patch Tuesday by specifying The Second Tuesday and then using the Add delay (days) option to delay the task by one day.
- Click Add task.
- Review the Automation Scheduler calendar to verify that the task is scheduled for the correct date and time.
- (Optional) Use the Configuration Manager Trace Log Tool to open the AutoPublish.log file and monitor the publication process.
The AutoPublish.log file is written by any one-time or recurring scheduled jobs that publish to WSUS. The log is located in the \Users\<user name>\Ivanti\Patch directory.