Security Assertion Markup Language (SAML) Setup Guide
Summary: High-level overview of how Security Assertion Markup Language (SAML) works and how to set it up in Ivanti Neurons RBVM/ASPM/VULN KB.
Introduction
Security Assertion Markup Language (SAML) is a standard for logging users into applications based on their sessions in another context. This single sign-on (SSO) login standard has significant advantages over logging in using a username/password:
-
No need to type in credentials.
-
No need to remember and renew passwords.
-
No weak passwords.
Most organizations already know the identity of users because they are logged in to their Active Directory domain or intranet. It makes sense to use this information to log users into other applications, such as web-based applications, and one of the more elegant ways of doing this is by using SAML.
This guide provides a high-level overview of SAML, shows how it works, and includes steps to set up SSO with RiskSense.
How SAML Works
SAML SSO works by transferring the user’s identity from one place (the identity provider) to another (the service provider). This is done through an exchange of digitally signed XML documents. SAML is XML-based, which makes it a very flexible standard. Two federation partners can choose to share whatever identity attributes they want in a SAML assertion (message) payload if those attributes can be represented in XML. Neurons RBVM/ASPM/VULN KB requires two attributes: an email address, and another attribute chosen by the identity provider. The attribute names are configurable in Neurons RBVM/ASPM/VULN KB and will likely differ between identity providers.
Consider the following scenario: A user is logged into a system that acts as an identity provider. The user wants to log in to the Neurons RBVM/ASPM/VULN KB application (the service provider). The following happens:
-
The user accesses the remote application using an intranet link, a bookmark, or similar, and the application loads.
-
The application identifies the user’s origin via a user-supplied email address and redirects the user back to the identity provider, asking for authentication. This is the authentication request.
-
The user either has an existing active browser session with the identity provider or establishes one by logging into the identity provider.
-
The identity provider builds the authentication response in the form of an XML document containing the user’s username or email address, signs it using an X.509 certificate, and posts this information to the service provider.
-
The service provider, which already knows the identity provider and has a certificate fingerprint, retrieves the authentication response and validates it using the certificate fingerprint.
-
The identity of the user is established, and the user is provided with application access.
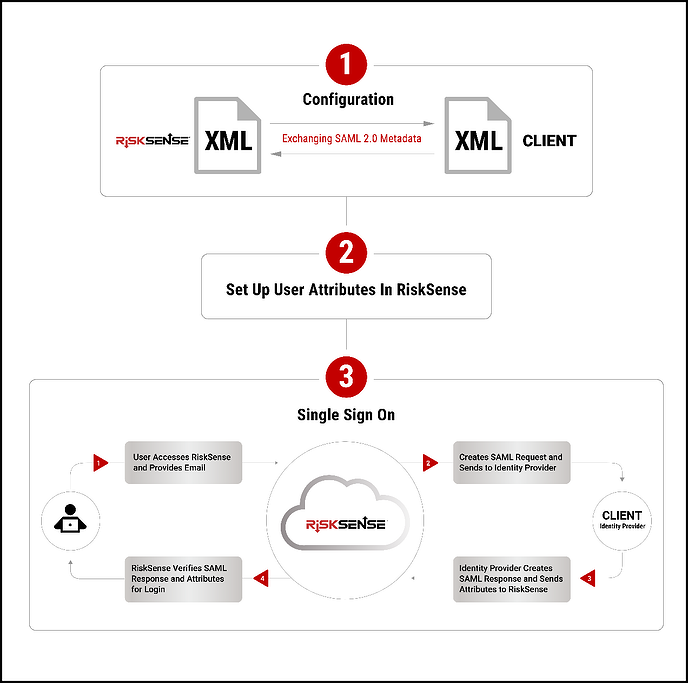
SAML SSO Configuration and Login Workflow
The following diagram illustrates the configuration and workflow used to carry out a service-provider-initiated SAML SSO login that, when attempting to log in to a remote application such as the Neurons RBVM/ASPM/VULN KB platform, triggers the SAML SSO workflow event sequence.
Neurons RBVM/ASPM/VULN KB SAML Setup Process
-
Identify customer point of contact for SSO implementation. This contact will work with a Neurons RBVM/ASPM/VULN KB Customer Success Operations Manager (CSOM) to set up SAML.
-
The customer SSO contact and Neurons RBVM/ASPM/VULN KB CSOM have an initial meeting to discuss implementation. The following topics and guidelines are discussed:
-
Neurons RBVM/ASPM/VULN KB uses two authentication attributes that need to be established on the client’s SSO solution. Please note that each attribute name is case sensitive.
-
The first authentication attribute is always an email address. This cannot be changed. Please note that this must be the email address that the identity provider responds with.
-
The second attribute can be whatever the client wants. Examples include first name, last name, company ID number, etc.
-
For both attributes, it helps us to know how the authentication attribute will be written out when “asked” for by the SSO. For example, if the two attributes used are email and first name and the SSO identifies them spelled out as “E-mail” and “fname”, Neurons RBVM/ASPM/VULN KB needs to ensure that we enter these two credential designations spelled out the exact same way.
-
-
We need to establish who will test the logins. Will the SSO contact is authorized to log into Neurons RBVM/ASPM/VULN KB to test the connection, or will another user need to be set up with a Neurons RBVM/ASPM/VULN KB login to test the connection?
-
-
After the credentials are set, the client must send their updated metadata file to RiskSense in a secure email.
-
We will send our metadata file to the client in a secure email to upload in the client’s SSO solution.
-
Once completed, have the designated login tester attempt to sign in. If all goes well, they should be logged into the platform. If not, Neurons RBVM/ASPM/VULN KB has logs we can check to ascertain the compatibility issue. Common issues include:
-
A mismatch of credentials.
-
A mismatch in spelling of credentials.
-
Authentication credentials not sent to Neurons RBVM/ASPM/VULN KB.
-
Client’s metadata file may contain errors.
-
-
Additional meetings can be set up, if needed, between Ivanti and the SSO contact to troubleshoot and review any errors to ensure a successful connection.
-
Once the login is successful, other Neurons RBVM/ASPM/VULN KB users will be upgraded to SAML. This can be performed by users with the correct permissions or by the Ivanti support team.
-
If the initial tester needs to be deactivated, Neurons RBVM/ASPM/VULN KB support will deactivate the user.
Creating a SAML User
To create a SAML user, see Creating a SAML User.
Logging in as a SAML User
To log into Ivanti Neurons RBVM/ASPM/VULN KB as a SAML user, see Logging into Ivanti Neurons for RBVM Using SAML.