Automating Patch Management in an Agentless Environment
The goal of any IT group is to centralize and automate processes to reduce the amount of work needed to maintain your environment. The goal of Ivanti is to provide tools and solutions to help you achieve this level of automation. This section will discuss ways to help automate the patch management process.
Automating Machine Discovery
The first goal in automating the patch process is to create your machine groups as dynamically as possible. The easiest way to achieve this is to use Active Directory. If you group the machines in your environment the same way you will be managing the patching of machines, you can use the OU area of the machine group. Each time the machine group is used it will “talk” to Active Directory and pull the current list of machines from the OUs. The same can be said of using the domain area, but that may encompass more than you want in an automated process. Another way to easily create dynamic groups is by IP range. Any new machines in those ranges will be captured whenever you perform a new scan.
Scan Template
When we start talking about automation we need to consider what we will be pushing. Most companies have very loosely defined approval processes for patches. Depending on your needs you will need to decide what works best for your situation. If you are concerned with all security patches, regardless of product, you can use the predefined Security Patch Scan template that is built into the product. Any new releases of XML data files will automatically include the security patches in this scan template the next time it is used.
This may be adequate for your end-user environment, but for automating server patching you may want to consider using a patch group. The patch group or approved patch list allows you to define a list of specific patches to scan for. This can be tied to the scan template and then scheduled to scan with automatic deployment to automate the patch process from start to finish. When new patches are released, you can evaluate and determine what patches are approved for deployment in your environment and update your patch group or your approved patch list with the new patches. A scheduled scan will take these changes into account by scanning and deploying the missing patches from the patch list.
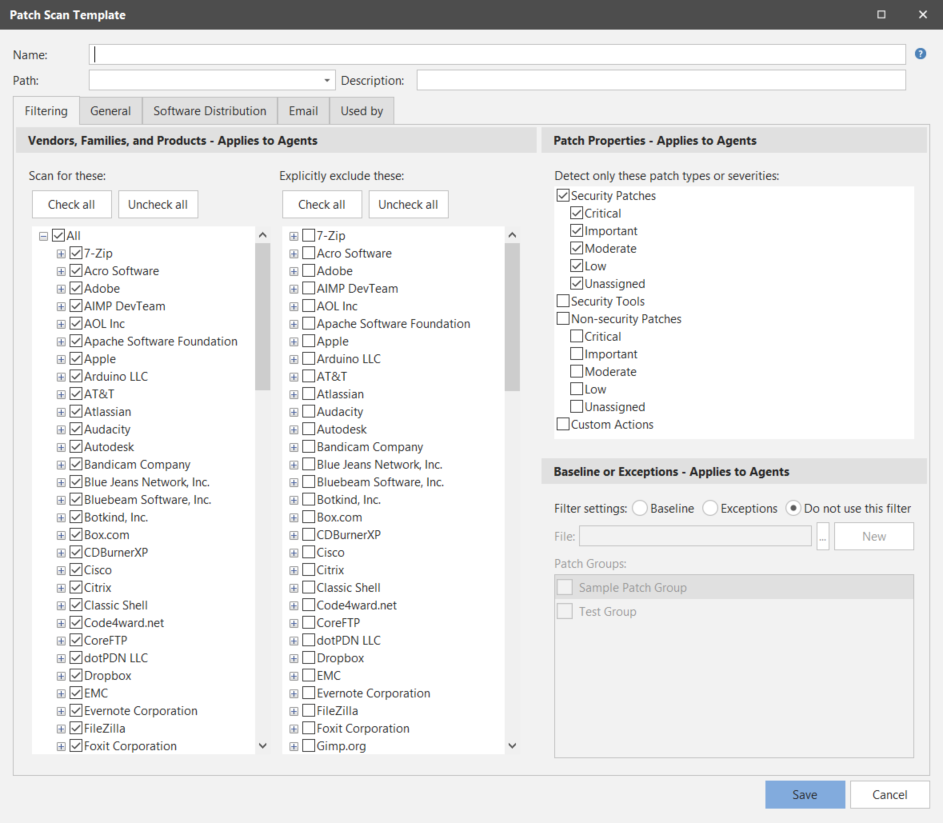
In the following screen shot you can see the scan template Filtering tab. You can use the Baseline or Exceptions filter to specify either an approved patch list or one or more patch groups that collectively represent a baseline set of patches. The section that follows explains how to create a patch group or patch list.
Patch Groups
When Security Controls uses a patch group to scan for selected patches, it always scans for and reports on the status of all product levels. It will also disable patch replacement, meaning it will show as missing earlier patches that have been replaced by later patches.
To create a new patch group, on the main menu select New > Windows Patch > Patch Group. This presents the Patch View dialog. Any existing patch groups are displayed in the bottom pane. Use the Patch View filters to narrow the list of patches displayed in the top pane. You then right-click on the desired patch or patches, select Add to Patch Group and choose a patch group name. The patch group is automatically saved.

You might create a Smart Filter that identifies all of the current vendor critical security patches. From this point on, for each patch release you simply use your Smart Filter and from the filtered view select all and add to the existing patch group, creating an easily repeatable process that takes only minutes to maintain.
In your patch scan template, in the Baseline or Exceptions area, click the browse button and select the patch group(s) you wish to use. Now the scan template is configured to scan for a specific list of patches.
If you choose to use an approved patch list, all you need to do is create a text file and enter patches by KB number, one patch per line. In the Baseline or Exceptions area of your scan template, click the File box’s browse button and navigate to your text file. This file is easily distributed to multiple consoles for ease of use and simplification of patch approval across multiple consoles.
Example approved patch list:
Q123456
Q234567
Q345678
Deployment Template
In your deployment template you will want to configure reboot options to meet the needs of the group you are intending to automate. If you are working with an end-user environment, you may want to set reboot options to be more flexible to work around people potentially working late. For example, on the Post-deploy Reboot tab, in the Schedule reboot area specify On the next occurrence of specified time. You might also enable the Extend time-out check box.

For server environments, the recommended reboot option is not as obvious.
- You may want to configure reboots to be performed immediately after installation. Why? Because you will normally run the scan and deployment in a maintenance window and will want the reboot to follow immediately. You can also shorten the timeouts on reboot to speed up the process as anyone who would be on these machines should be aware of the maintenance windows in advance.
- On the other hand, you may elect to Never reboot after deployment even though a reboot is typically required. This makes sense in situations where server availability is extremely critical to your business. You might want to manually reboot your servers so that you are always onhand in case something should go wrong during the reboot process.
Scheduling Automated Operations
This final step is where it all comes together. Once you have your groups and templates configured you will want to schedule your jobs to execute on a regular basis. To schedule a job to run automatically you start at either the home page or the machine group. When starting from within a machine group, click Run operation. You will see a dialog similar to the following:
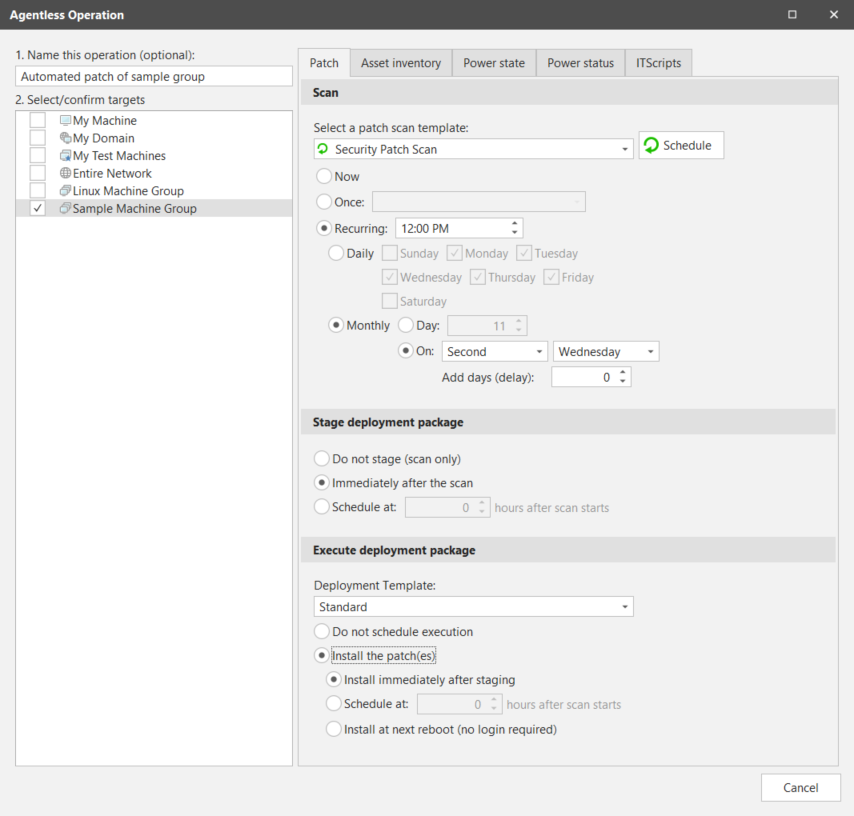
From this dialog you can execute jobs now, schedule to run once at a specific time and date, or schedule recurring jobs to run. You can also elect to immediately deploy patches after the scan. This is the most important option we will discuss in this section. The machine groups and scan and deployment templates we have created previously have fine-tuned what we want to scan and deploy for our environment. With the knowledge of what will be pushed we can now schedule the job to execute from start to finish without the need to handle the job from one stage to the next. In the screen shot above you will see we’ve defined a recurring scan with immediate deployment that is set to execute on the second Wednesday of every month. This is the day after Patch Tuesday, which will almost always have new patches to push.
When scheduling jobs keep in mind where the scheduled task resides. A scheduled scan with immediate deployment resides on the console until the scan completes. Once the scan completes it will push patches out to machines and execute immediately. The reboot will be scheduled based on the settings in the deployment template and on the target machine’s local time.
Staged Deployments
Instead of performing the staging and deployment steps immediately after the scan, you might decide that it makes more sense to schedule the steps at more appropriate times for your organization. For example, your corporate security policy might specify a patch deployment windows that begins at 10:00 p.m. on Saturday. In this case, it might be best to schedule the stage deployment process to begin earlier that day, say at 8:00 a.m. This will give Security Controls all day Saturday to create the deployment packages and copy them to your target machines. You can then schedule the actual execution of the deployment package to occur at the start of your deployment window. When 10:00 p.m. rolls around, everything will be in place and the deployments will occur without delay on your target machines.
You would define your Agentless Operation dialog as follows:

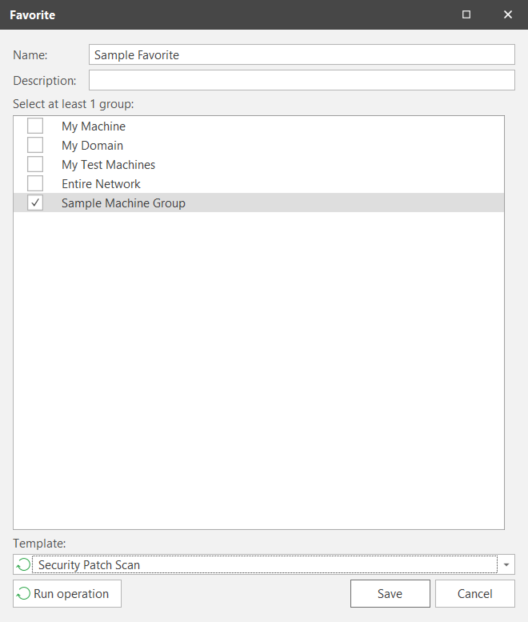
Favorites
A favorite is a combination of machine group and scan template for the console to reference when it executes a job. You can reuse favorites to schedule multiple jobs to run at different times. From the favorite you can click Run Operation and schedule out additional one time or recurring jobs as needed without having to recreate additional favorites.
Automated Email Reporting
From your machine group, scan template, and deployment template you can configure reports to be automatically generated and emailed to designated recipients. When automating the patching of an environment, this is an easy and efficient tool for keeping all necessary personnel up to date on the state of the environment. There are a variety of different reports to choose from that will present different data for different audiences and needs. You may need to try a few to find the best fit for your reporting needs.
To use the automated email feature you need to setup your email credentials. To do this you select Tools > Options > Email and then provide your email server address and authentication information.
Related Topics
- Console Software and Hardware Recommendations
- Port Requirements and Firewall Configuration
- Distributed Environment Management
- Agentless Patch Management
- Best Approach for Applying Patches in an Agentless Environment
- Agent-Based Patch Management
- Agent Rollout Options
- Installing and Supporting Agents on Internet-Based Machines
- Agent-Based Product Level and Patch Deployment Process
- Guide to Surviving Patch Tuesday
- Microsoft SQL Server Database Maintenance
- Performing Patching in a Disconnected Environment