Modifying the required business objects and windows
Using the example of sending notifications after a Note has been created, we need to modify the Note window. In the following example, we will modify the Note window in the Incident module. You can do the same in other modules.
To modify the Note business object and window:
- In Object Designer, expand the Incident Management folder, then double-click Note.
- Ensure that you have the following attributes, all of which have the Data Type of Boolean. If you do not have them, create them.
Notify Assignee
Notify Originator
Notify Customer
Notify Supplier - Click
 .
. - In Window Manager, open required the Note window from the Incident Management module.
- Expand the Attributes tree (
 ), and add the four attributes listed above.
 - Click .
Your Note window might look something like this: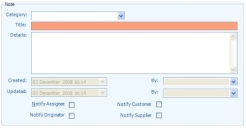

The check boxes send the following notifications:
Notify Assignee – notifies the User/Group or Role specified on the Reminder object. This is defined when you configure your process and specify the runtime values for the required attribute. For more information, see Modifying your process and specifying the runtime values.
Notify Originator – notifies the user that raised the process (and potentially any CCed users).
Notify Customer – notifies the customer set on the process.
Notify Supplier – notifies the supplier set on the process.
Repeat the process for the Reminder window. The Reminder business object should already have the required attributes, all you need to do is add them to the Reminder window. In addition to these check boxes, you may want to add Group, User and Role to your Reminder window. These will be used for specific runtime values to ensure that the current assignment information is taken from the current process.
For information on configuring these runtime values, see Modifying your process and specifying the runtime values.
To modify the Reminder window:
- Use Window Manager to add the required attributes to the Reminder window.
- Expand the Attributes tree, and add the Group, User and Role lists to the window.
You do not need to expand these related business objects or add any of the attributes listed below the node. You need to add the business object itself, and this appears as a list on the window.
These attributes have the relationship icon associated with them:  .
.
- Click .