Deploying on Amazon Web Services
•Deploying Ivanti Connect Secure using AWS Marketplace
•Custom Ivanti Connect Secure Deployment on AWS Portal
•Deploying AWS Cloud ICS using Terraform Template
•Provisioning Ivanti Connect Secure with Predefined Configuration
•Configuring Licenses on the Ivanti Connect Secure Appliance
•Accessing the Ivanti Connect Secure Virtual Appliance
•Seamless Migration of ICS configuration on AWS
Supported Platforms Systems
This section helps you in choosing the instance types that should be deployed with Ivanti Connect Secure.
•ISA4500-V
•ISA6500-V
•ISA8500-V
For more details, see ISA VA Supported Platforms.
Prerequisites
SNAT End Point Tunnel IP
The packets transmitted from ICS Internal Interface are dropped by AWS Virtual Gateway in L3 traffic. This is because the source IP and MAC address are not matching and the transit routing is not supported.
Ivanti Connect Secure must be able to SNAT these packets to the Internal interface IP which belongs to a subnet within the VPC.
To NAT endpoint tunnel IP to Internal interface IP, do the following:
1.Log in to Ivanti Connect Secure admin console.
2.Navigate to System > Network > VPN Tunneling.
3.Enable Source NATTING. By default, Source NATTING is disabled.

Enabling SNAT on ICS would reduce the number of connections, since one IP will be handling the traffic for all the end user Ivanti client connections. So, it is recommended that you purchase a NAT gateway and assign it to ICS.
Deploying Ivanti Connect Secure using AWS Marketplace
Ivanti Connect Secure is made available in AWS Market Place. The CloudFormation templates are available at Amazon marketplace.
Prerequisites and System Requirements on AWS Marketplace
To deploy the Ivanti Connect Secure Virtual Appliance on AWS Marketplace, you need the following:
•An AWS account
•Access to the AWS Marketplace (https://aws.amazon.com/marketplace)
•Ivanti Connect Secure licenses *
Deploying Ivanti Connect Secure on AWS Marketplace
1.Launch AWS Marketplace using the URL: https://aws.amazon.com/marketplace and search with keyword Ivanti.

AWS Marketplace contains the following two Ivanti Connect Secure SKUs:
•Ivanti Connect Secure -25.x- BYOL 2 NIC
•Ivanti Connect Secure -25.x - BYOL 3 NIC
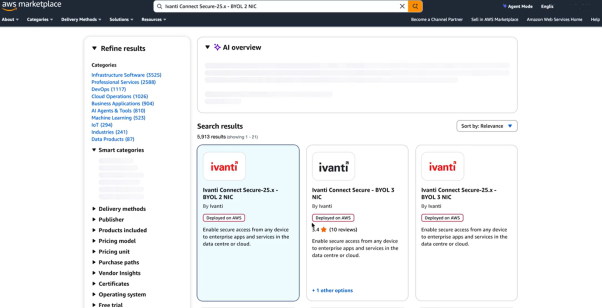
2.Click View Purchase option and it will go to subscription page
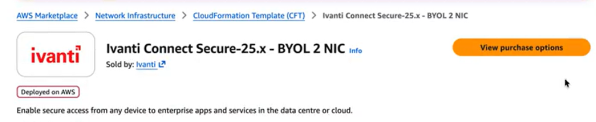
3.Select either 3-NIC model or 2-NIC model based on your requirement. In the Product Subscription page displayed, click Continue to Subscribe. In this section, 3-NIC model is chosen as example.
4.In Fulfillment Option, select either Existing VPC or New VPC that you want to deploy and click Continue to Launch. In the Launch page displayed, select Launch CloudFormation and click Launch.
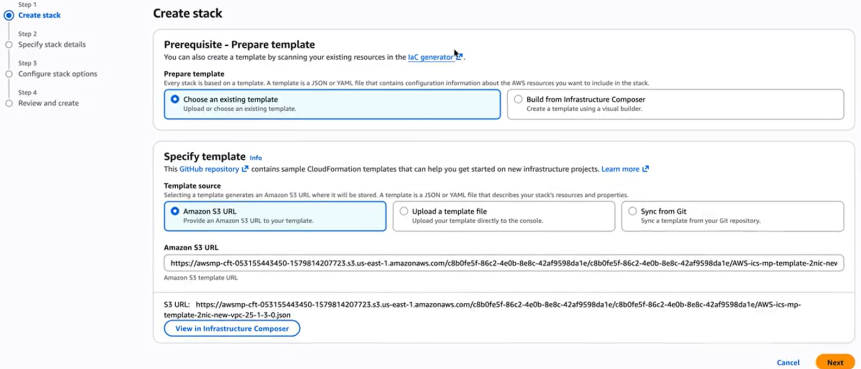
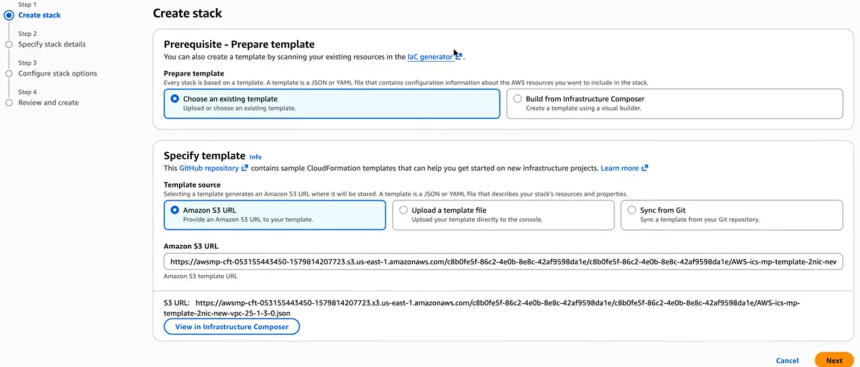
Specify Template
1.In the Create stack wizard, in the Specify Template page choose the template that describes your stack’s resources and their properties and, click Next.
Specify Stack Details
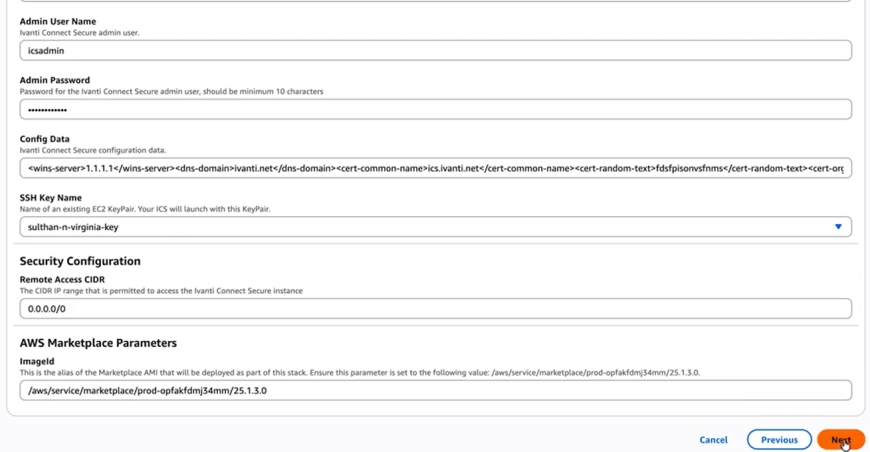
1.In the Specify Stack Details page, specify a name for the stack.
2.In the Parameters section, use the default parameter values. These are defined in the CloudFormation template. Users can also customize the parameters to suit their requirements, (for example: subnet ip address range)
3.In the Ivanti Connect Secure Configuration section:
•Select Ivanti Connect Secure VM size. By default it is set to m5.xlarge.
•By default, ICS admin user name is configured. You can give any other user name if you want to.
•Enter the Admin user password.
•Config Data: This is pre-populated as part of AWS Cloudformation template. In order to customize the config parameters, see Ivanti Connect Secure Provisioning Parameters.
•Select SSH Key Name of EC2 key pair. This key is used to access ICS via SSH. The SSH keys are generated using ssh-keygen on Linux and OS X, or PuTTyGen on Windows. For details about generating the SSH key pairs, refer http://docs.aws.amazon.com/AWSEC2/latest/UserGuide/ec2-key-pairs.html.
Without providing the SSH key, an error is displayed during deployment.
Accessing the ICS using SSH will work on releases prior to 22.4R2 and all FIPS releases.
•In the Security Configuration section, enter Remote Access CIDR IP range that permits end user access to Ivanti Connect Secure instance.
Review
1.In the Review page, verify the details and click Create.
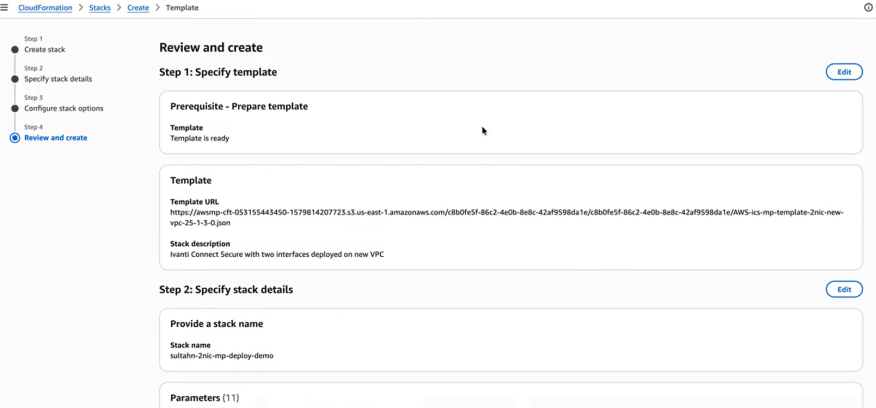
2.Wait for a few minutes while it creates all the resources. This completes deploying ICS on AWS Marketplace.
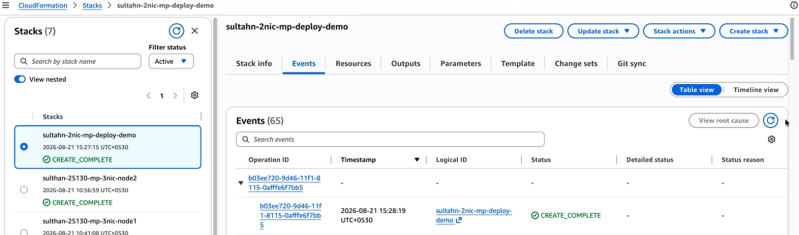
To access Ivanti Connect Secure Virtual Appliance, see Accessing the Ivanti Connect Secure Virtual Appliance
Resizing a Disk Volume in the AWS portal
From 22.6R2 release, On fresh installation, 80 GB disk space is available by default. You can modify or increase the disk size only once on fresh installation or upgrade of the ICS images, but not on rollback or factory reset images.
If the user is upgrading to 22.6R2 or later, then the disk size change from 40 GB to 80 GB have to be done prior to upgrade on AWS cloud platform.
Disk Size Allocation is supported from 22.6R2 and later releases.
1.To increase the data volume size, in the navigation pane, choose Instances.
2.Under the Storage tab, select the Volume ID of your data volume.
3.Click Modify volume.
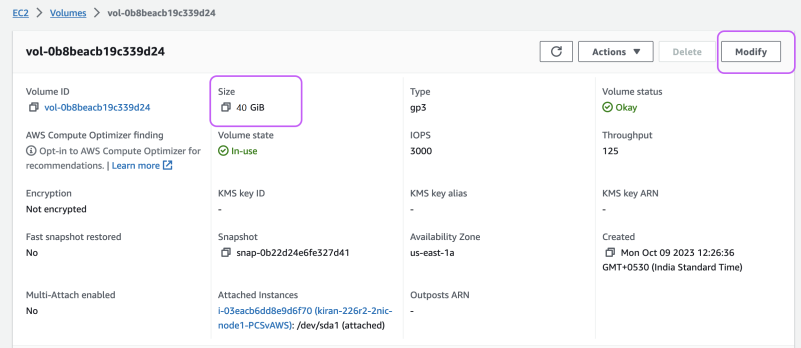
4.The Modify volume screen displays the volume ID and the volume’s current configuration, including type, size, input/output operations per second (IOPS), and throughput. Change the Size to 80 GB.
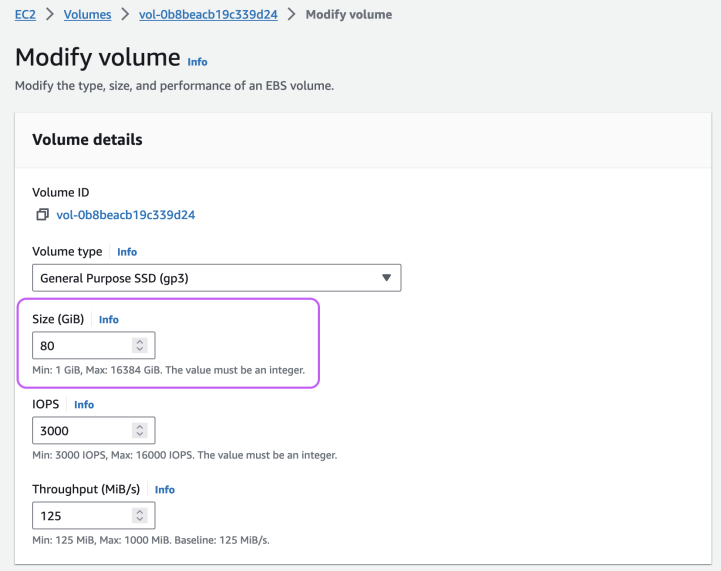
5.Choose Modify, and when prompted for confirmation choose Modify again. You are charged for the new volume configuration after volume modification starts.
Custom Ivanti Connect Secure Deployment on AWS Portal
Prerequisites and System Requirements on AWS
To deploy the Ivanti Connect Secure Virtual Appliance on AWS, you need the following:
•An AWS account
•Access to the AWS portal (https://console.aws.amazon.com/)*
•Ivanti Connect Secure Virtual Appliance AMI ID
•AWS CloudFormation template
•Ivanti Connect Secure licenses **
•Site-to-Site VPN between AWS and the corporate network (optional)
Note: This is needed only if the Ivanti Connect Secure users need to access corporate resources.
•Ivanti License Server (optional)**
•Located at corporate network, accessible through site-to-site VPN
•Ivanti Connect Secure configuration in XML format (optional)
Ivanti Connect Secure Virtual Appliance can be deployed only through AWS CloudFormation style.
Deploying Ivanti Connect Secure on Amazon Web Services
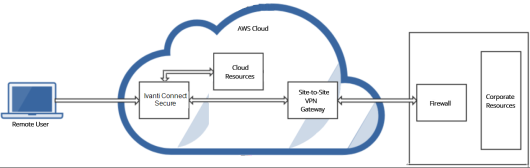
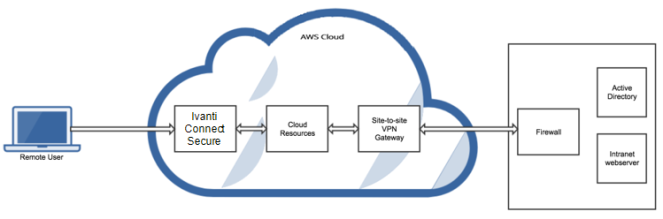
As depicted in the below diagram, a remote user can use Ivanti Connect Secure to securely access cloud resources as well as corporate resources. To access corporate resources, the Ivanti Connect Secure administrator needs to ensure that site-to-site VPN is already established between AWS and the corporate network.
Supported Platform Systems
From 25.1.3.0 release, ICS supports Secure Boot and Nitro TPM, and new instance types which are powered by 4th gen Intel Xenon Scalable processors and have support of DDR5 memory.
•ISA4500-V (xlarge)
•ISA6500-V (2xlarge)
•ISA8500-V (4xlarge)
|
Model |
vCPU |
Memory |
Diskspace |
|---|---|---|---|
| c7i.xlarge | 4 | 8 | 80 GB |
| c7i.2xlarge | 8 | 16 | 80 GB |
| c7i.4xlarge | 16 | 32 | 80 GB |
| m7i.xlarge | 4 | 16 | 80 GB |
|
m7i.2xlarge |
8 |
32 |
80 GB |
|
m7i.4xlarge |
16 |
64 |
80 GB |
|
c7i-flex.xlarge |
4 |
8 |
80 GB |
|
c7i-flex.2xlarge |
8 |
16 |
80 GB |
|
c7i-flex.4xlarge |
16 |
32 |
80 GB |
|
m7i-flex.xlarge |
4 |
16 |
80 GB |
|
m7i-flex.2xlarge |
8 |
32 |
80 GB |
|
m7i-flex.4xlarge |
16 |
64 |
80 GB |
Customs Templates
To deploy 2-NIC or 3-NIC in an existing VPC respectively using the links below:
 Ivanti-2nic-existing-vpc.json
{
"AWSTemplateFormatVersion" : "2010-09-09",
"Description" : "Deploy ICS with 2 nic into an existing VPC",
"Metadata" : {
"AWS::CloudFormation::Interface" : {
"ParameterGroups" : [
{
"Label" : { "default" : "Existing VPC details" },
"Parameters" : [ "VpcId", "SubnetIntId", "SubnetExtId"]
},
{
"Label" : { "default":"ICS Configuration" },
"Parameters" : [
"InstanceType",
"AdminUsername",
"AdminPassword",
"ICSConfigData",
"ICSImageAMIId",
"KeyName" ]
}
],
"ParameterLabels" : {
"VpcId" : { "default" : "Existing VPC ID" },
"SubnetIntId" : {"default" : "Internal Subnet ID"},
"SubnetExtId" : {"default" : "External Subnet ID"},
"ICSImageAMIId" : {"default" : "ICS AMI ID"},
"InstanceType" : {"default" : "Instance Type"},
"KeyName" : {"default" : "SSH Key Name"},
"AdminUsername": {"default": "Admin User Name"},
"AdminPassword": {"default": "Admin Password"},
"ICSConfigData": {"default": "Config Data"}
}
}
},
"Parameters" : {
"KeyName": {
"Type": "AWS::EC2::KeyPair::KeyName",
"Default": "",
"AllowedPattern" : "[-_ a-zA-Z0-9]*",
"Description": "Name of an existing EC2 KeyPair. Your ICS will launch with this KeyPair.",
"ConstraintDescription": "Must be the name of an existing EC2 KeyPair."
},
"ICSImageAMIId" : {
"Type" : "String",
"Description" : "AMI ID of your existing ICS image"
},
"InstanceType": {
"Description": "Select ICS instance type",
"Type": "String",
"Default": "c7i.xlarge",
"AllowedValues": [
"c7i.xlarge",
"c7i.2xlarge",
"c7i.4xlarge",
"m7i.xlarge",
"m7i.2xlarge",
"m7i.4xlarge",
"c7i-flex.xlarge",
"c7i-flex.2xlarge",
"c7i-flex.4xlarge",
"m7i-flex.xlarge",
"m7i-flex.2xlarge",
"m7i-flex.4xlarge"
],
"ConstraintDescription": "Must be an allowed EC2 instance type."
},
"AdminUsername": {
"Description": "Ivanti Connect Secure admin user.",
"Type": "String",
"MinLength": "1",
"MaxLength": "30",
"AllowedPattern": ".{1,30}"
},
"AdminPassword": {
"Description": "Password for the Ivanti Connect Secure admin user, should be minimum 10 characters",
"Type": "String",
"MinLength": "10",
"MaxLength": "128",
"AllowedPattern": ".{10,128}",
"NoEcho": "true"
},
"ICSConfigData": {
"Type": "String",
"Description": "Ivanti Connect Secure configuration data.",
"Default": "<wins-server>1.1.1.1</wins-server><dns-domain>psecure.net</dns-domain><cert-common-name>va1.psecure.net</cert-common-name><cert-random-text>fdsfpisonvsfnms</cert-random-text><cert-organisation>Psecure Org</cert-organisation><config-download-url></config-download-url><config-data></config-data><auth-code-license></auth-code-license><enable-license-server>n</enable-license-server><accept-license-agreement>y</accept-license-agreement>",
"AllowedPattern": "^<wins-server>(([2][5][0-5]\\.)|([2][0-4][0-9]\\.)|([0-1]?[0-9]?[0-9]\\.)){3}(([2][5][0-5])|([2][0-4][0-9])|([0-1]?[0-9]?[0-9]))</wins-server><dns-domain>.{1,50}</dns-domain><cert-common-name>.{1,50}</cert-common-name><cert-random-text>.{1,50}</cert-random-text><cert-organisation>.{1,80}</cert-organisation><config-download-url>.*</config-download-url><config-data>.*</config-data><auth-code-license>.*</auth-code-license><enable-license-server>[yn]</enable-license-server><accept-license-agreement>[yn]</accept-license-agreement>$",
"ConstraintDescription": "Invalid configuration. Please refer Ivanti Connect Secure AWS deployment guide for configuration elements and allowed values."
},
"VpcId" : {
"Type" : "String",
"Description" : "ID of existing VPC"
},
"SubnetIntId" : {
"Type" : "String",
"Description" : "ID of the subnet where ICS internal interface connects"
},
"SubnetExtId" : {
"Type" : "String",
"Description" : "ID of the subnet where ICS External interface connects"
}
},
"Resources" : {
"EIP0" : {
"Type" : "AWS::EC2::EIP",
"Properties" : {
"Domain" : "vpc"
}
},
"EIPAssoc0" : {
"Type" : "AWS::EC2::EIPAssociation",
"Properties" : {
"NetworkInterfaceId" : { "Ref" : "Eth0" },
"AllocationId" : { "Fn::GetAtt" : ["EIP0", "AllocationId"] },
"PrivateIpAddress" : { "Fn::GetAtt" : ["Eth0", "PrimaryPrivateIpAddress" ] }
}
},
"EIP1" : {
"Type" : "AWS::EC2::EIP",
"Properties" : {
"Domain" : "vpc"
}
},
"EIPAssoc1" : {
"Type" : "AWS::EC2::EIPAssociation",
"Properties" : {
"NetworkInterfaceId" : { "Ref" : "Eth1" },
"AllocationId" : { "Fn::GetAtt" : ["EIP1", "AllocationId"] },
"PrivateIpAddress" : { "Fn::GetAtt" : ["Eth1", "PrimaryPrivateIpAddress" ] }
}
},
"ICSvExternalSecurityGroup": {
"Type": "AWS::EC2::SecurityGroup",
"Properties": {
"GroupDescription": "Access Rules for ICS external port",
"VpcId": {
"Ref": "VpcId"
},
"SecurityGroupIngress": [
{
"IpProtocol": "icmp",
"FromPort": "-1",
"ToPort": "-1",
"CidrIp": "0.0.0.0/0"
},
{
"IpProtocol": "tcp",
"FromPort": "80",
"ToPort": "80",
"CidrIp": "0.0.0.0/0"
},
{
"IpProtocol": "tcp",
"FromPort": "443",
"ToPort": "443",
"CidrIp": "0.0.0.0/0"
},
{
"IpProtocol": "udp",
"FromPort": "4500",
"ToPort": "4500",
"CidrIp": "0.0.0.0/0"
},
{
"IpProtocol": "tcp",
"FromPort": "11000",
"ToPort": "11099",
"CidrIp": "0.0.0.0/0"
}
],
"SecurityGroupEgress": [
{
"CidrIp": "127.0.0.1/32",
"IpProtocol": "-1"
}],
"Tags": [
{
"Key": "Name",
"Value": { "Fn::Join": [ "-", [ { "Ref": "AWS::StackName" }, "ICSvExtSG" ] ] }
}
]
}
},
"ICSvInternalSecurityGroup": {
"Type": "AWS::EC2::SecurityGroup",
"Properties": {
"GroupDescription": "Access Rules for ICS internal port",
"VpcId": {
"Ref": "VpcId"
},
"SecurityGroupIngress": [
{
"IpProtocol": "icmp",
"FromPort": "-1",
"ToPort": "-1",
"CidrIp": "0.0.0.0/0"
},
{
"IpProtocol": "tcp",
"FromPort": "80",
"ToPort": "80",
"CidrIp": "0.0.0.0/0"
},
{
"IpProtocol": "tcp",
"FromPort": "443",
"ToPort": "443",
"CidrIp": "0.0.0.0/0"
}
],
"Tags": [
{
"Key": "Name",
"Value": { "Fn::Join": [ "-", [ { "Ref": "AWS::StackName" }, "ICSvIntSG" ] ] }
}
]
}
},
"EC2Instance" : {
"Type" : "AWS::EC2::Instance",
"DependsOn" : ["EIPAssoc0", "EIPAssoc1"],
"Properties" : {
"ImageId" : {"Ref" : "ICSImageAMIId"},
"KeyName" : { "Ref" : "KeyName" },
"InstanceType" : { "Ref" : "InstanceType" },
"NetworkInterfaces" : [
{ "NetworkInterfaceId" : {"Ref" : "Eth0" }, "DeviceIndex" : "0" },
{ "NetworkInterfaceId" : {"Ref" : "Eth1" }, "DeviceIndex" : "1" }
],
"Tags" : [
{"Key" : "Name",
"Value" : { "Fn::Join": [ "-", [ { "Ref": "AWS::StackName" }, "ICSvAWS" ] ] }
}
],
"UserData": {
"Fn::Base64": {
"Fn::Join": [
"",
[
"<pulse-config>",
"<admin-password>",
{
"Ref": "AdminPassword"
},
"</admin-password>",
"<admin-username>",
{
"Ref": "AdminUsername"
},
"</admin-username>",
{
"Ref": "ICSConfigData"
},
"</pulse-config>"
]
]
}
},
"MetadataOptions": {
"HttpTokens": "required",
"HttpPutResponseHopLimit": 1
}
}
},
"Eth0" : {
"Type" : "AWS::EC2::NetworkInterface",
"Properties" : {
"Description" : "eth0",
"GroupSet" : [ { "Ref" : "ICSvInternalSecurityGroup" } ],
"SourceDestCheck" : "false",
"SubnetId" : { "Ref" : "SubnetIntId" },
"Tags" : [ {"Key" : "Name", "Value" : "Interface 0"}, {"Key" : "Interface", "Value" : "eth0"} ]
}
},
"Eth1" : {
"Type" : "AWS::EC2::NetworkInterface",
"Properties" : {
"Description" : "eth1",
"GroupSet" : [ { "Ref" : "ICSvExternalSecurityGroup" } ],
"SourceDestCheck" : "false",
"SubnetId" : { "Ref" : "SubnetExtId" },
"Tags" : [ {"Key" : "Name", "Value" : "Interface 1"}, {"Key" : "Interface", "Value" : "eth1"} ]
}
}
},
"Outputs" : {
"InstanceId" : {
"Value" : { "Ref" : "EC2Instance" },
"Description" : "Instance Id of newly created instance"
},
"ExternalAddress" : {
"Value" : { "Fn::Join" : [" ", [ "Public IP address:", { "Ref" : "EIP1" }, "Private IP address:", { "Fn::GetAtt" : ["Eth1", "PrimaryPrivateIpAddress"] }]]},
"Description" : "ICS Extenal Interface details"
},
"InternalAddress" : {
"Value" : { "Fn::Join" : [" ", [ "Public IP address:", { "Ref" : "EIP0" }, "Private IP address:", { "Fn::GetAtt" : ["Eth0", "PrimaryPrivateIpAddress"] }]]},
"Description" : "ICS Internal Interface details"
}
}
}
{
"AWSTemplateFormatVersion" : "2010-09-09",
"Description" : "Deploy ICS with 3 nic into an existing VPC",
"Metadata" : {
"AWS::CloudFormation::Interface" : {
"ParameterGroups" : [
{
"Label" : { "default" : "Existing VPC details" },
"Parameters" : [ "VpcId", "SubnetIntId", "SubnetExtId", "SubnetMgmtId" ]
},
{
"Label" : { "default":"ICS Configuration" },
"Parameters" : [
"ICSImageAMIId",
"InstanceType",
"AdminUsername",
"AdminPassword",
"ICSConfigData",
"KeyName" ]
}
],
"ParameterLabels" : {
"VpcId" : { "default" : "Existing VPC ID" },
"SubnetIntId" : {"default" : "Internal Subnet ID"},
"SubnetExtId" : {"default" : "External Subnet ID"},
"SubnetMgmtId" : {"default" : "Management Subnet ID"},
"ICSImageAMIId" : {"default" : "ICS AMI ID"},
"InstanceType" : {"default" : "Instance Type"},
"KeyName" : {"default" : "SSH Key Name"},
"AdminUsername": {"default": "Admin User Name"},
"AdminPassword": {"default": "Admin Password"},
"ICSConfigData": {"default": "Config Data"}
}
}
},
"Parameters" : {
"KeyName": {
"Type": "AWS::EC2::KeyPair::KeyName",
"AllowedPattern" : "[-_ a-zA-Z0-9]*",
"Description": "Name of an existing EC2 KeyPair. Your ICS will launch with this KeyPair.",
"ConstraintDescription": "Must be the name of an existing EC2 KeyPair."
},
"ICSImageAMIId" : {
"Type" : "String",
"Description" : "AMI ID of your existing ICS image"
},
"InstanceType": {
"Description": "Select ICS instance type",
"Type": "String",
"Default": "c7i.xlarge",
"AllowedValues": [
"c7i.xlarge",
"c7i.2xlarge",
"c7i.4xlarge",
"m7i.xlarge",
"m7i.2xlarge",
"m7i.4xlarge",
"c7i-flex.xlarge",
"c7i-flex.2xlarge",
"c7i-flex.4xlarge",
"m7i-flex.xlarge",
"m7i-flex.2xlarge",
"m7i-flex.4xlarge"
],
"ConstraintDescription": "Must be an allowed EC2 instance type."
},
"AdminUsername": {
"Description": "Ivanti Connect Secure admin user.",
"Type": "String",
"MinLength": "1",
"MaxLength": "30",
"AllowedPattern": ".{1,30}"
},
"AdminPassword": {
"Description": "Password for the Ivanti Connect Secure admin user, should be minimum 10 characters",
"Type": "String",
"MinLength": "10",
"MaxLength": "128",
"AllowedPattern": ".{10,128}",
"NoEcho": "true"
},
"ICSConfigData": {
"Type": "String",
"Description": "Ivanti Connect Secure configuration data.",
"Default": "<wins-server>1.1.1.1</wins-server><dns-domain>psecure.net</dns-domain><cert-common-name>va1.psecure.net</cert-common-name><cert-random-text>fdsfpisonvsfnms</cert-random-text><cert-organisation>Psecure Org</cert-organisation><config-download-url></config-download-url><config-data></config-data><auth-code-license></auth-code-license><enable-license-server>n</enable-license-server><accept-license-agreement>y</accept-license-agreement>",
"AllowedPattern": "^<wins-server>(([2][5][0-5]\\.)|([2][0-4][0-9]\\.)|([0-1]?[0-9]?[0-9]\\.)){3}(([2][5][0-5])|([2][0-4][0-9])|([0-1]?[0-9]?[0-9]))</wins-server><dns-domain>.{1,50}</dns-domain><cert-common-name>.{1,50}</cert-common-name><cert-random-text>.{1,50}</cert-random-text><cert-organisation>.{1,80}</cert-organisation><config-download-url>.*</config-download-url><config-data>.*</config-data><auth-code-license>.*</auth-code-license><enable-license-server>[yn]</enable-license-server><accept-license-agreement>[yn]</accept-license-agreement>$",
"ConstraintDescription": "Invalid configuration. Please refer Ivanti Connect Secure AWS deployment guide for configuration elements and allowed values."
},
"VpcId" : {
"Type" : "String",
"Description" : "ID of existing VPC"
},
"SubnetIntId" : {
"Type" : "String",
"Description" : "ID of the subnet where ICS internal interface connects"
},
"SubnetExtId" : {
"Type" : "String",
"Description" : "ID of the subnet where ICS External interface connects"
},
"SubnetMgmtId" : {
"Type" : "String",
"Description" : "ID of the subnet where ICS Management interface connects"
}
},
"Resources" : {
"EIP0" : {
"Type" : "AWS::EC2::EIP",
"Properties" : {
"Domain" : "vpc"
}
},
"EIPAssoc0" : {
"Type" : "AWS::EC2::EIPAssociation",
"Properties" : {
"NetworkInterfaceId" : { "Ref" : "Eth0" },
"AllocationId" : { "Fn::GetAtt" : ["EIP0", "AllocationId"] },
"PrivateIpAddress" : { "Fn::GetAtt" : ["Eth0", "PrimaryPrivateIpAddress" ] }
}
},
"EIP1" : {
"Type" : "AWS::EC2::EIP",
"Properties" : {
"Domain" : "vpc"
}
},
"EIPAssoc1" : {
"Type" : "AWS::EC2::EIPAssociation",
"Properties" : {
"NetworkInterfaceId" : { "Ref" : "Eth1" },
"AllocationId" : { "Fn::GetAtt" : ["EIP1", "AllocationId"] },
"PrivateIpAddress" : { "Fn::GetAtt" : ["Eth1", "PrimaryPrivateIpAddress" ] }
}
},
"EIP2" : {
"Type" : "AWS::EC2::EIP",
"Properties" : {
"Domain" : "vpc"
}
},
"EIPAssoc2" : {
"Type" : "AWS::EC2::EIPAssociation",
"Properties" : {
"NetworkInterfaceId" : { "Ref" : "Eth2" },
"AllocationId" : { "Fn::GetAtt" : ["EIP2", "AllocationId"] },
"PrivateIpAddress" : { "Fn::GetAtt" : ["Eth2", "PrimaryPrivateIpAddress" ] }
}
},
"ICSvExternalSecurityGroup": {
"Type": "AWS::EC2::SecurityGroup",
"Properties": {
"GroupDescription": "Access Rules for ICS external port",
"VpcId": {
"Ref": "VpcId"
},
"SecurityGroupIngress": [
{
"IpProtocol": "icmp",
"FromPort": "-1",
"ToPort": "-1",
"CidrIp": "0.0.0.0/0"
},
{
"IpProtocol": "tcp",
"FromPort": "80",
"ToPort": "80",
"CidrIp": "0.0.0.0/0"
},
{
"IpProtocol": "tcp",
"FromPort": "443",
"ToPort": "443",
"CidrIp": "0.0.0.0/0"
},
{
"IpProtocol": "udp",
"FromPort": "4500",
"ToPort": "4500",
"CidrIp": "0.0.0.0/0"
},
{
"IpProtocol": "tcp",
"FromPort": "11000",
"ToPort": "11099",
"CidrIp": "0.0.0.0/0"
}
],
"SecurityGroupEgress": [
{
"CidrIp": "127.0.0.1/32",
"IpProtocol": "-1"
}],
"Tags": [
{
"Key": "Name",
"Value": { "Fn::Join": [ "-", [ { "Ref": "AWS::StackName" }, "ICSvExtSG" ] ] }
}
]
}
},
"ICSvInternalSecurityGroup": {
"Type": "AWS::EC2::SecurityGroup",
"Properties": {
"GroupDescription": "Access Rules for ICS internal port",
"VpcId": {
"Ref": "VpcId"
},
"SecurityGroupIngress": [
{
"IpProtocol": "icmp",
"FromPort": "-1",
"ToPort": "-1",
"CidrIp": "0.0.0.0/0"
}
],
"Tags": [
{
"Key": "Name",
"Value": { "Fn::Join": [ "-", [ { "Ref": "AWS::StackName" }, "ICSvIntSG" ] ] }
}
]
}
},
"ICSvManagementSecurityGroup": {
"Type": "AWS::EC2::SecurityGroup",
"Properties": {
"GroupDescription": "Access Rules for ICS Management port",
"VpcId": {
"Ref": "VpcId"
},
"SecurityGroupIngress": [
{
"IpProtocol": "icmp",
"FromPort": "-1",
"ToPort": "-1",
"CidrIp": "0.0.0.0/0"
},
{
"IpProtocol": "tcp",
"FromPort": "80",
"ToPort": "80",
"CidrIp": "0.0.0.0/0"
},
{
"IpProtocol": "tcp",
"FromPort": "443",
"ToPort": "443",
"CidrIp": "0.0.0.0/0"
}
],
"SecurityGroupEgress": [
{
"CidrIp": "127.0.0.1/32",
"IpProtocol": "-1"
}],
"Tags": [
{
"Key": "Name",
"Value": { "Fn::Join": [ "-", [ { "Ref": "AWS::StackName" }, "ICSvMgmtSG" ] ] }
}
]
}
},
"EC2Instance" : {
"Type" : "AWS::EC2::Instance",
"DependsOn" : ["EIPAssoc0", "EIPAssoc1", "EIPAssoc2"],
"Properties" : {
"ImageId" : {"Ref" : "ICSImageAMIId"},
"KeyName" : { "Ref" : "KeyName" },
"InstanceType" : { "Ref" : "InstanceType" },
"NetworkInterfaces" : [
{ "NetworkInterfaceId" : {"Ref" : "Eth0" }, "DeviceIndex" : "0" },
{ "NetworkInterfaceId" : {"Ref" : "Eth1" }, "DeviceIndex" : "1" },
{ "NetworkInterfaceId" : {"Ref" : "Eth2" }, "DeviceIndex" : "2" }
],
"Tags" : [
{"Key" : "Name",
"Value" : { "Fn::Join": [ "-", [ { "Ref": "AWS::StackName" }, "ICSvAWS" ] ] }
}
],
"UserData": {
"Fn::Base64": {
"Fn::Join": [
"",
[
"<pulse-config>",
"<admin-password>",
{
"Ref": "AdminPassword"
},
"</admin-password>",
"<admin-username>",
{
"Ref": "AdminUsername"
},
"</admin-username>",
{
"Ref": "ICSConfigData"
},
"</pulse-config>"
]
]
}
},
"MetadataOptions": {
"HttpTokens": "required",
"HttpPutResponseHopLimit": 1
}
}
},
"Eth0" : {
"Type" : "AWS::EC2::NetworkInterface",
"Properties" : {
"Description" : "eth0",
"GroupSet" : [ { "Ref" : "ICSvInternalSecurityGroup" } ],
"SourceDestCheck" : "false",
"SubnetId" : { "Ref" : "SubnetIntId" },
"Tags" : [ {"Key" : "Name", "Value" : "Interface 0"}, {"Key" : "Interface", "Value" : "eth0"} ]
}
},
"Eth1" : {
"Type" : "AWS::EC2::NetworkInterface",
"Properties" : {
"Description" : "eth1",
"GroupSet" : [ { "Ref" : "ICSvExternalSecurityGroup" } ],
"SourceDestCheck" : "false",
"SubnetId" : { "Ref" : "SubnetExtId" },
"Tags" : [ {"Key" : "Name", "Value" : "Interface 1"}, {"Key" : "Interface", "Value" : "eth1"} ]
}
},
"Eth2" : {
"Type" : "AWS::EC2::NetworkInterface",
"Properties" : {
"Description" : "eth2",
"GroupSet" : [ { "Ref" : "ICSvManagementSecurityGroup" } ],
"SourceDestCheck" : "false",
"SubnetId" : { "Ref" : "SubnetMgmtId" },
"Tags" : [ {"Key" : "Name", "Value" : "Interface 2"}, {"Key" : "Interface", "Value" : "eth2"} ]
}
}
},
"Outputs" : {
"InstanceId" : {
"Value" : { "Ref" : "EC2Instance" },
"Description" : "Instance Id of newly created instance"
},
"ManagementAddress" : {
"Value" : { "Fn::Join" : [" ", [ "Public IP address:", { "Ref" : "EIP2" }, "Private IP address:", { "Fn::GetAtt" : ["Eth2", "PrimaryPrivateIpAddress"] }]]},
"Description" : "ICS Management Interface details"
},
"ExternalAddress" : {
"Value" : { "Fn::Join" : [" ", [ "Public IP address:", { "Ref" : "EIP1" }, "Private IP address:", { "Fn::GetAtt" : ["Eth1", "PrimaryPrivateIpAddress"] }]]},
"Description" : "ICS External Interface details"
},
"InternalAddress" : {
"Value" : { "Fn::Join" : [" ", [ "Public IP address:", { "Ref" : "EIP0" }, "Private IP address:", { "Fn::GetAtt" : ["Eth0", "PrimaryPrivateIpAddress"] }]]},
"Description" : "ICS Internal Interface details"
}
}
}
To deploy 2-NIC or 3-NIC in a new VPC respectively using the links below:
Ivanti-2nic-new-vpc.json
{
"AWSTemplateFormatVersion" : "2010-09-09",
"Description" : "Deploy ICS with 2 nic into a new VPC",
"Metadata" : {
"AWS::CloudFormation::Interface" : {
"ParameterGroups" : [
{
"Label" : { "default" : "New VPC Configuration" },
"Parameters" : [ "VPCCIDR", "InternalSubnetCIDR", "ExternalSubnetCIDR", "TunnelSubnetCIDR" ]
},
{
"Label" : { "default":"ICS Configuration" },
"Parameters" : [
"InstanceType",
"AdminUsername",
"AdminPassword",
"ICSConfigData",
"ICSImageAMIId",
"KeyName"
]
}
],
"ParameterLabels" : {
"VPCCIDR" : { "default" : "New VPC address space" },
"InternalSubnetCIDR" : {"default" : "Internal Subnet address space"},
"ExternalSubnetCIDR" : {"default" : "External Subnet address space"},
"TunnelSubnetCIDR" : {"default" : "Tunnel Subnet address space"},
"ICSImageAMIId" : {"default" : "ICS AMI ID"},
"InstanceType" : {"default" : "Instance Type"},
"KeyName" : {"default" : "SSH Key Name"},
"AdminUsername": {"default": "Admin User Name"},
"AdminPassword": {"default": "Admin Password"},
"ICSConfigData": {"default": "Config Data"}
}
}
},
"Parameters" : {
"KeyName": {
"Type": "AWS::EC2::KeyPair::KeyName",
"Default": "",
"AllowedPattern" : "[-_ a-zA-Z0-9]*",
"Description": "Name of an existing EC2 KeyPair. Your ICS will launch with this KeyPair.",
"ConstraintDescription": "Must be the name of an existing EC2 KeyPair."
},
"ICSImageAMIId" : {
"Type" : "String",
"Description" : "AMI ID of your existing ICS image"
},
"InstanceType": {
"Description": "Select ICS instance type",
"Type": "String",
"Default": "m7i-flex.xlarge",
"AllowedValues": [
"m7i-flex.xlarge",
"m7i-flex.2xlarge",
"m7i-flex.4xlarge",
"m7i.xlarge",
"m7i.2xlarge",
"m7i.4xlarge",
"c7i-flex.xlarge",
"c7i-flex.2xlarge",
"c7i-flex.4xlarge",
"c7i.xlarge",
"c7i.2xlarge",
"c7i.4xlarge"
],
"ConstraintDescription": "Must be an allowed EC2 instance type."
},
"AdminUsername": {
"Description": "Ivanti Connect Secure admin user.",
"Type": "String",
"MinLength": "1",
"MaxLength": "30",
"AllowedPattern": ".{1,30}"
},
"AdminPassword": {
"Description": "Password for the Ivanti Connect Secure admin user, should be minimum 10 characters",
"Type": "String",
"MinLength": "10",
"MaxLength": "128",
"AllowedPattern": ".{10,128}",
"NoEcho": "true"
},
"ICSConfigData": {
"Type": "String",
"Description": "Ivanti Connect Secure configuration data.",
"Default": "<wins-server>1.1.1.1</wins-server><dns-domain>psecure.net</dns-domain><cert-common-name>va1.psecure.net</cert-common-name><cert-random-text>fdsfpisonvsfnms</cert-random-text><cert-organisation>Psecure Org</cert-organisation><config-download-url></config-download-url><config-data></config-data><auth-code-license></auth-code-license><enable-license-server>n</enable-license-server><accept-license-agreement>y</accept-license-agreement>",
"AllowedPattern": "^<wins-server>(([2][5][0-5]\\.)|([2][0-4][0-9]\\.)|([0-1]?[0-9]?[0-9]\\.)){3}(([2][5][0-5])|([2][0-4][0-9])|([0-1]?[0-9]?[0-9]))</wins-server><dns-domain>.{1,50}</dns-domain><cert-common-name>.{1,50}</cert-common-name><cert-random-text>.{1,50}</cert-random-text><cert-organisation>.{1,80}</cert-organisation><config-download-url>.*</config-download-url><config-data>.*</config-data><auth-code-license>.*</auth-code-license><enable-license-server>[yn]</enable-license-server><accept-license-agreement>[yn]</accept-license-agreement>$",
"ConstraintDescription": "Invalid configuration. Please refer Ivanti Connect Secure AWS deployment guide for configuration elements and allowed values."
},
"VPCCIDR": {
"Description": "CIDR block for entire VPC.",
"Type": "String",
"Default": "10.20.0.0/16",
"AllowedPattern": "^(([0-9]|[1-9][0-9]|1[0-9]{2}|2[0-4][0-9]|25[0-5])\\.){3}([0-9]|[1-9][0-9]|1[0-9]{2}|2[0-4][0-9]|25[0-5])(\\/([0-9]|[1-2][0-9]|3[0-2]))$",
"ConstraintDescription": "Must be a valid CIDR range of the form x.x.x.x/x."
},
"InternalSubnetCIDR": {
"Description": "ICS internal interface connects to this subnet",
"Type": "String",
"Default": "10.20.1.0/24",
"AllowedPattern": "^(([0-9]|[1-9][0-9]|1[0-9]{2}|2[0-4][0-9]|25[0-5])\\.){3}([0-9]|[1-9][0-9]|1[0-9]{2}|2[0-4][0-9]|25[0-5])(\\/([0-9]|[1-2][0-9]|3[0-2]))$",
"ConstraintDescription": "CIDR block parameter must be in the form x.x.x.x/x"
},
"ExternalSubnetCIDR": {
"Description": "ICS external interface connects to this subnet",
"Type": "String",
"Default": "10.20.2.0/24",
"AllowedPattern": "^(([0-9]|[1-9][0-9]|1[0-9]{2}|2[0-4][0-9]|25[0-5])\\.){3}([0-9]|[1-9][0-9]|1[0-9]{2}|2[0-4][0-9]|25[0-5])(\\/([0-9]|[1-2][0-9]|3[0-2]))$",
"ConstraintDescription": "CIDR block parameter must be in the form x.x.x.x/x"
},
"TunnelSubnetCIDR": {
"Description": "For L3 VPN connections ICS hands over IP to the clients from this subnet",
"Type": "String",
"Default": "10.20.3.0/24",
"AllowedPattern": "^(([0-9]|[1-9][0-9]|1[0-9]{2}|2[0-4][0-9]|25[0-5])\\.){3}([0-9]|[1-9][0-9]|1[0-9]{2}|2[0-4][0-9]|25[0-5])(\\/([0-9]|[1-2][0-9]|3[0-2]))$",
"ConstraintDescription": "CIDR block parameter must be in the form x.x.x.x/x"
}
},
"Resources" : {
"VPC" : {
"Type" : "AWS::EC2::VPC",
"Properties" : {
"CidrBlock" : {"Ref": "VPCCIDR"},
"EnableDnsHostnames": "true",
"EnableDnsSupport": "true",
"Tags" : [ {"Key" : "Application", "Value" : { "Ref" : "AWS::StackId"} },
{"Key" : "Name", "Value" : { "Fn::Join": [ "-", [ { "Ref": "AWS::StackName" }, "ICSVPC" ] ] } }
]
}
},
"IntSubnet" : {
"Type" : "AWS::EC2::Subnet",
"Properties" : {
"VpcId" : { "Ref" : "VPC" },
"CidrBlock" : {"Ref" : "InternalSubnetCIDR"},
"AvailabilityZone" : {
"Fn::Select" : [ "0", { "Fn::GetAZs" : "" } ]
},
"Tags" : [ {"Key" : "Application", "Value" : { "Ref" : "AWS::StackId"} },
{"Key" : "Name", "Value" : { "Fn::Join": [ "-", [ { "Ref": "AWS::StackName" }, "ICSVPCIntSubnet" ] ] } }
]
}
},
"ExtSubnet" : {
"Type" : "AWS::EC2::Subnet",
"Properties" : {
"VpcId" : { "Ref" : "VPC" },
"CidrBlock" : {"Ref" : "ExternalSubnetCIDR"},
"AvailabilityZone" : {
"Fn::Select" : [ "0", { "Fn::GetAZs" : "" } ]
},
"Tags" : [ {"Key" : "Application", "Value" : { "Ref" : "AWS::StackId"} },
{"Key" : "Name", "Value" : { "Fn::Join": [ "-", [ { "Ref": "AWS::StackName" }, "ICSVPCExtSubnet" ] ] } }
]
}
},
"TunnelSubnet" : {
"Type" : "AWS::EC2::Subnet",
"Properties" : {
"VpcId" : { "Ref" : "VPC" },
"CidrBlock" : {"Ref" : "TunnelSubnetCIDR"},
"AvailabilityZone" : {
"Fn::Select" : [ "0", { "Fn::GetAZs" : "" } ]
},
"Tags" : [ {"Key" : "Application", "Value" : { "Ref" : "AWS::StackId"} },
{"Key" : "Name", "Value" : { "Fn::Join": [ "-", [ { "Ref": "AWS::StackName" }, "ICSVPCTunnelSubnet" ] ] } }
]
}
},
"InternetGateway" : {
"Type" : "AWS::EC2::InternetGateway",
"Properties" : {
"Tags" : [ {"Key" : "Application", "Value" : { "Ref" : "AWS::StackId"} },
{"Key" : "Name", "Value" : { "Fn::Join": [ "-", [ { "Ref": "AWS::StackName" }, "ICSVPC" ] ] } }
]
}
},
"AttachGateway" : {
"Type" : "AWS::EC2::VPCGatewayAttachment",
"Properties" : {
"VpcId" : { "Ref" : "VPC" },
"InternetGatewayId" : { "Ref" : "InternetGateway" }
}
},
"PublicSubnetRouteTable" : {
"Type" : "AWS::EC2::RouteTable",
"Properties" : {
"VpcId" : {"Ref" : "VPC"},
"Tags" : [ {"Key" : "Application", "Value" : { "Ref" : "AWS::StackId"} },
{"Key" : "Name", "Value" : { "Fn::Join": [ "-", [ { "Ref": "AWS::StackName" }, "ICSVPC" ] ] } }
]
}
},
"PublicSubnetRoute" : {
"Type" : "AWS::EC2::Route",
"DependsOn" : "AttachGateway",
"Properties" : {
"RouteTableId" : { "Ref" : "PublicSubnetRouteTable" },
"DestinationCidrBlock" : "0.0.0.0/0",
"GatewayId" : { "Ref" : "InternetGateway" }
}
},
"ExtSubnetRouteTableAssociation" : {
"Type" : "AWS::EC2::SubnetRouteTableAssociation",
"Properties" : {
"SubnetId" : { "Ref" : "ExtSubnet" },
"RouteTableId" : { "Ref" : "PublicSubnetRouteTable" }
}
},
"IntSubnetRouteTableAssociation" : {
"Type" : "AWS::EC2::SubnetRouteTableAssociation",
"Properties" : {
"SubnetId" : { "Ref" : "IntSubnet" },
"RouteTableId" : { "Ref" : "PublicSubnetRouteTable" }
}
},
"EIP0" : {
"Type" : "AWS::EC2::EIP",
"Properties" : {
"Domain" : "vpc"
}
},
"EIPAssoc0" : {
"Type" : "AWS::EC2::EIPAssociation",
"Properties" : {
"NetworkInterfaceId" : { "Ref" : "Eth0" },
"AllocationId" : { "Fn::GetAtt" : ["EIP0", "AllocationId"] },
"PrivateIpAddress" : { "Fn::GetAtt" : ["Eth0", "PrimaryPrivateIpAddress" ] }
}
},
"EIP1" : {
"Type" : "AWS::EC2::EIP",
"Properties" : {
"Domain" : "vpc"
}
},
"EIPAssoc1" : {
"Type" : "AWS::EC2::EIPAssociation",
"Properties" : {
"NetworkInterfaceId" : { "Ref" : "Eth1" },
"AllocationId" : { "Fn::GetAtt" : ["EIP1", "AllocationId"] },
"PrivateIpAddress" : { "Fn::GetAtt" : ["Eth1", "PrimaryPrivateIpAddress" ] }
}
},
"ICSvExternalSecurityGroup": {
"Type": "AWS::EC2::SecurityGroup",
"Properties": {
"GroupDescription": "Access Rules for ICS external port",
"VpcId": {
"Ref": "VPC"
},
"SecurityGroupIngress": [
{
"IpProtocol": "icmp",
"FromPort": "-1",
"ToPort": "-1",
"CidrIp": "0.0.0.0/0"
},
{
"IpProtocol": "tcp",
"FromPort": "80",
"ToPort": "80",
"CidrIp": "0.0.0.0/0"
},
{
"IpProtocol": "tcp",
"FromPort": "443",
"ToPort": "443",
"CidrIp": "0.0.0.0/0"
},
{
"IpProtocol": "udp",
"FromPort": "4500",
"ToPort": "4500",
"CidrIp": "0.0.0.0/0"
},
{
"IpProtocol": "tcp",
"FromPort": "11000",
"ToPort": "11099",
"CidrIp": "0.0.0.0/0"
}
],
"SecurityGroupEgress": [
{
"CidrIp": "127.0.0.1/32",
"IpProtocol": "-1"
}],
"Tags": [
{
"Key": "Name",
"Value": { "Fn::Join": [ "-", [ { "Ref": "AWS::StackName" }, "ICSvExtSG" ] ] }
}
]
}
},
"ICSvInternalSecurityGroup": {
"Type": "AWS::EC2::SecurityGroup",
"Properties": {
"GroupDescription": "Access Rules for ICS internal port",
"VpcId": {
"Ref": "VPC"
},
"SecurityGroupIngress": [
{
"IpProtocol": "icmp",
"FromPort": "-1",
"ToPort": "-1",
"CidrIp": "0.0.0.0/0"
},
{
"IpProtocol": "tcp",
"FromPort": "443",
"ToPort": "443",
"CidrIp": "0.0.0.0/0"
}
],
"Tags": [
{
"Key": "Name",
"Value": { "Fn::Join": [ "-", [ { "Ref": "AWS::StackName" }, "ICSvIntSG" ] ] }
}
]
}
},
"EC2Instance" : {
"Type" : "AWS::EC2::Instance",
"DependsOn" : ["EIPAssoc0", "EIPAssoc1"],
"Properties" : {
"ImageId" : {"Ref" : "ICSImageAMIId"},
"KeyName" : { "Ref" : "KeyName" },
"InstanceType" : { "Ref" : "InstanceType" },
"NetworkInterfaces" : [
{ "NetworkInterfaceId" : {"Ref" : "Eth0" }, "DeviceIndex" : "0" },
{ "NetworkInterfaceId" : {"Ref" : "Eth1" }, "DeviceIndex" : "1" }
],
"Tags" : [
{"Key" : "Name",
"Value" : { "Fn::Join": [ "-", [ { "Ref": "AWS::StackName" }, "ICSvAWS" ] ] }
}
],
"UserData": {
"Fn::Base64": {
"Fn::Join": [
"",
[
"<pulse-config>",
"<admin-password>",
{
"Ref": "AdminPassword"
},
"</admin-password>",
"<admin-username>",
{
"Ref": "AdminUsername"
},
"</admin-username>",
{
"Ref": "ICSConfigData"
},
"</pulse-config>"
]
]
}
},
"MetadataOptions": {
"HttpTokens": "required",
"HttpPutResponseHopLimit": 1
}
}
},
"Eth0" : {
"Type" : "AWS::EC2::NetworkInterface",
"Properties" : {
"Description" : "eth0",
"GroupSet" : [ { "Ref" : "ICSvInternalSecurityGroup" } ],
"SourceDestCheck" : "false",
"SubnetId" : { "Ref" : "IntSubnet" },
"Tags" : [ {"Key" : "Name", "Value" : "Interface 0"}, {"Key" : "Interface", "Value" : "eth0"} ]
}
},
"Eth1" : {
"Type" : "AWS::EC2::NetworkInterface",
"Properties" : {
"Description" : "eth1",
"GroupSet" : [ { "Ref" : "ICSvExternalSecurityGroup" } ],
"SourceDestCheck" : "false",
"SubnetId" : { "Ref" : "ExtSubnet" },
"Tags" : [ {"Key" : "Name", "Value" : "Interface 1"}, {"Key" : "Interface", "Value" : "eth1"} ]
}
}
},
"Outputs" : {
"InstanceId" : {
"Value" : { "Ref" : "EC2Instance" },
"Description" : "Instance Id of newly created instance"
},
"ExternalAddress" : {
"Value" : { "Fn::Join" : [" ", [ "Public IP address:", { "Ref" : "EIP1" }, "Private IP address:", { "Fn::GetAtt" : ["Eth1", "PrimaryPrivateIpAddress"] }]]},
"Description" : "ICS Extenal Interface details"
},
"InternalAddress" : {
"Value" : { "Fn::Join" : [" ", [ "Public IP address:", { "Ref" : "EIP0" }, "Private IP address:", { "Fn::GetAtt" : ["Eth0", "PrimaryPrivateIpAddress"] }]]},
"Description" : "ICS Internal Interface details"
}
}
}
{
"AWSTemplateFormatVersion" : "2010-09-09",
"Description" : "Deploy ICS with 3 nic into a new VPC",
"Metadata" : {
"AWS::CloudFormation::Interface" : {
"ParameterGroups" : [
{
"Label" : { "default" : "New VPC Configuration" },
"Parameters" : [ "VPCCIDR", "InternalSubnetCIDR", "ExternalSubnetCIDR", "ManagementSubnetCIDR", "TunnelSubnetCIDR" ]
},
{
"Label" : { "default":"ICS Configuration" },
"Parameters" : [
"ICSImageAMIId",
"InstanceType",
"AdminUsername",
"AdminPassword",
"ICSConfigData",
"KeyName"
]
}
],
"ParameterLabels" : {
"VPCCIDR" : { "default" : "New VPC address space" },
"InternalSubnetCIDR" : {"default" : "Internal Subnet address space"},
"ExternalSubnetCIDR" : {"default" : "External Subnet address space"},
"ManagementSubnetCIDR" : {"default" : "Management Subnet address space"},
"TunnelSubnetCIDR" : {"default" : "Tunnel Subnet address space"},
"ICSImageAMIId" : {"default" : "ICS AMI ID"},
"InstanceType" : {"default" : "Instance Type"},
"KeyName" : {"default" : "SSH Key Name"},
"AdminUsername": {"default": "Admin User Name"},
"AdminPassword": {"default": "Admin Password"},
"ICSConfigData": {"default": "Config Data"}
}
}
},
"Parameters" : {
"KeyName": {
"Type": "AWS::EC2::KeyPair::KeyName",
"Default": "",
"AllowedPattern" : "[-_ a-zA-Z0-9]*",
"Description": "Name of an existing EC2 KeyPair. Your ICS will launch with this KeyPair.",
"ConstraintDescription": "Must be the name of an existing EC2 KeyPair."
},
"ICSImageAMIId" : {
"Type" : "String",
"Description" : "AMI ID of your existing ICS image"
},
"InstanceType": {
"Description": "Select ICS instance type",
"Type": "String",
"Default": "c7i.xlarge",
"AllowedValues": [
"c7i.xlarge",
"c7i.2xlarge",
"c7i.4xlarge",
"m7i.xlarge",
"m7i.2xlarge",
"m7i.4xlarge",
"c7i-flex.xlarge",
"c7i-flex.2xlarge",
"c7i-flex.4xlarge",
"m7i-flex.xlarge",
"m7i-flex.2xlarge",
"m7i-flex.4xlarge"
],
"ConstraintDescription": "Must be an allowed EC2 instance type."
},
"AdminUsername": {
"Description": "Ivanti Connect Secure admin user.",
"Type": "String",
"MinLength": "1",
"MaxLength": "30",
"AllowedPattern": ".{1,30}"
},
"AdminPassword": {
"Description": "Password for the Ivanti Connect Secure admin user, should be minimum 10 characters",
"Type": "String",
"MinLength": "10",
"MaxLength": "128",
"AllowedPattern": ".{10,128}",
"NoEcho": "true"
},
"ICSConfigData": {
"Type": "String",
"Description": "Ivanti Connect Secure configuration data.",
"Default": "<wins-server>1.1.1.1</wins-server><dns-domain>psecure.net</dns-domain><cert-common-name>va1.psecure.net</cert-common-name><cert-random-text>fdsfpisonvsfnms</cert-random-text><cert-organisation>Psecure Org</cert-organisation><config-download-url></config-download-url><config-data></config-data><auth-code-license></auth-code-license><enable-license-server>n</enable-license-server><accept-license-agreement>y</accept-license-agreement>",
"AllowedPattern": "^<wins-server>(([2][5][0-5]\\.)|([2][0-4][0-9]\\.)|([0-1]?[0-9]?[0-9]\\.)){3}(([2][5][0-5])|([2][0-4][0-9])|([0-1]?[0-9]?[0-9]))</wins-server><dns-domain>.{1,50}</dns-domain><cert-common-name>.{1,50}</cert-common-name><cert-random-text>.{1,50}</cert-random-text><cert-organisation>.{1,80}</cert-organisation><config-download-url>.*</config-download-url><config-data>.*</config-data><auth-code-license>.*</auth-code-license><enable-license-server>[yn]</enable-license-server><accept-license-agreement>[yn]</accept-license-agreement>$",
"ConstraintDescription": "Invalid configuration. Please refer Ivanti Connect Secure AWS deployment guide for configuration elements and allowed values."
},
"VPCCIDR": {
"Description": "CIDR block for entire VPC.",
"Type": "String",
"Default": "10.20.0.0/16",
"AllowedPattern": "^(([0-9]|[1-9][0-9]|1[0-9]{2}|2[0-4][0-9]|25[0-5])\\.){3}([0-9]|[1-9][0-9]|1[0-9]{2}|2[0-4][0-9]|25[0-5])(\\/([0-9]|[1-2][0-9]|3[0-2]))$",
"ConstraintDescription": "Must be a valid CIDR range of the form x.x.x.x/x."
},
"InternalSubnetCIDR": {
"Description": "ICS internal interface connects to this subnet",
"Type": "String",
"Default": "10.20.1.0/24",
"AllowedPattern": "^(([0-9]|[1-9][0-9]|1[0-9]{2}|2[0-4][0-9]|25[0-5])\\.){3}([0-9]|[1-9][0-9]|1[0-9]{2}|2[0-4][0-9]|25[0-5])(\\/([0-9]|[1-2][0-9]|3[0-2]))$",
"ConstraintDescription": "CIDR block parameter must be in the form x.x.x.x/x"
},
"ExternalSubnetCIDR": {
"Description": "ICS external interface connects to this subnet",
"Type": "String",
"Default": "10.20.2.0/24",
"AllowedPattern": "^(([0-9]|[1-9][0-9]|1[0-9]{2}|2[0-4][0-9]|25[0-5])\\.){3}([0-9]|[1-9][0-9]|1[0-9]{2}|2[0-4][0-9]|25[0-5])(\\/([0-9]|[1-2][0-9]|3[0-2]))$",
"ConstraintDescription": "CIDR block parameter must be in the form x.x.x.x/x"
},
"ManagementSubnetCIDR": {
"Description": "ICS management interface connects to this subnet",
"Type": "String",
"Default": "10.20.3.0/24",
"AllowedPattern": "^(([0-9]|[1-9][0-9]|1[0-9]{2}|2[0-4][0-9]|25[0-5])\\.){3}([0-9]|[1-9][0-9]|1[0-9]{2}|2[0-4][0-9]|25[0-5])(\\/([0-9]|[1-2][0-9]|3[0-2]))$",
"ConstraintDescription": "CIDR block parameter must be in the form x.x.x.x/x"
},
"TunnelSubnetCIDR": {
"Description": "For L3 VPN connections ICS hands over IP to the clients from this subnet",
"Type": "String",
"Default": "10.20.4.0/24",
"AllowedPattern": "^(([0-9]|[1-9][0-9]|1[0-9]{2}|2[0-4][0-9]|25[0-5])\\.){3}([0-9]|[1-9][0-9]|1[0-9]{2}|2[0-4][0-9]|25[0-5])(\\/([0-9]|[1-2][0-9]|3[0-2]))$",
"ConstraintDescription": "CIDR block parameter must be in the form x.x.x.x/x"
}
},
"Resources" : {
"VPC" : {
"Type" : "AWS::EC2::VPC",
"Properties" : {
"CidrBlock" : {"Ref": "VPCCIDR"},
"EnableDnsHostnames": "true",
"EnableDnsSupport": "true",
"Tags" : [ {"Key" : "Application", "Value" : { "Ref" : "AWS::StackId"} },
{"Key" : "Name", "Value" : { "Fn::Join": [ "-", [ { "Ref": "AWS::StackName" }, "ICSVPC" ] ] } }
]
}
},
"IntSubnet" : {
"Type" : "AWS::EC2::Subnet",
"Properties" : {
"VpcId" : { "Ref" : "VPC" },
"CidrBlock" : {"Ref" : "InternalSubnetCIDR"},
"AvailabilityZone" : {
"Fn::Select" : [ "0", { "Fn::GetAZs" : "" } ]
},
"Tags" : [ {"Key" : "Application", "Value" : { "Ref" : "AWS::StackId"} },
{"Key" : "Name", "Value" : { "Fn::Join": [ "-", [ { "Ref": "AWS::StackName" }, "ICSVPCIntSubnet" ] ] } }
]
}
},
"ExtSubnet" : {
"Type" : "AWS::EC2::Subnet",
"Properties" : {
"VpcId" : { "Ref" : "VPC" },
"CidrBlock" : {"Ref" : "ExternalSubnetCIDR"},
"AvailabilityZone" : {
"Fn::Select" : [ "0", { "Fn::GetAZs" : "" } ]
},
"Tags" : [ {"Key" : "Application", "Value" : { "Ref" : "AWS::StackId"} },
{"Key" : "Name", "Value" : { "Fn::Join": [ "-", [ { "Ref": "AWS::StackName" }, "ICSVPCExtSubnet" ] ] } }
]
}
},
"MgmtSubnet" : {
"Type" : "AWS::EC2::Subnet",
"Properties" : {
"VpcId" : { "Ref" : "VPC" },
"CidrBlock" : {"Ref" : "ManagementSubnetCIDR"},
"AvailabilityZone" : {
"Fn::Select" : [ "0", { "Fn::GetAZs" : "" } ]
},
"Tags" : [ {"Key" : "Application", "Value" : { "Ref" : "AWS::StackId"} },
{"Key" : "Name", "Value" : { "Fn::Join": [ "-", [ { "Ref": "AWS::StackName" }, "ICSVPCMgmtSubnet" ] ] } }
]
}
},
"TunnelSubnet" : {
"Type" : "AWS::EC2::Subnet",
"Properties" : {
"VpcId" : { "Ref" : "VPC" },
"CidrBlock" : {"Ref" : "TunnelSubnetCIDR"},
"AvailabilityZone" : {
"Fn::Select" : [ "0", { "Fn::GetAZs" : "" } ]
},
"Tags" : [ {"Key" : "Application", "Value" : { "Ref" : "AWS::StackId"} },
{"Key" : "Name", "Value" : { "Fn::Join": [ "-", [ { "Ref": "AWS::StackName" }, "ICSVPCTunnelSubnet" ] ] } }
]
}
},
"InternetGateway" : {
"Type" : "AWS::EC2::InternetGateway",
"Properties" : {
"Tags" : [ {"Key" : "Application", "Value" : { "Ref" : "AWS::StackId"} },
{"Key" : "Name", "Value" : { "Fn::Join": [ "-", [ { "Ref": "AWS::StackName" }, "ICSVPC" ] ] } }
]
}
},
"AttachGateway" : {
"Type" : "AWS::EC2::VPCGatewayAttachment",
"Properties" : {
"VpcId" : { "Ref" : "VPC" },
"InternetGatewayId" : { "Ref" : "InternetGateway" }
}
},
"PublicSubnetRouteTable" : {
"Type" : "AWS::EC2::RouteTable",
"Properties" : {
"VpcId" : {"Ref" : "VPC"},
"Tags" : [ {"Key" : "Application", "Value" : { "Ref" : "AWS::StackId"} },
{"Key" : "Name", "Value" : { "Fn::Join": [ "-", [ { "Ref": "AWS::StackName" }, "ICSVPC" ] ] } }
]
}
},
"PublicSubnetRoute" : {
"Type" : "AWS::EC2::Route",
"DependsOn" : "AttachGateway",
"Properties" : {
"RouteTableId" : { "Ref" : "PublicSubnetRouteTable" },
"DestinationCidrBlock" : "0.0.0.0/0",
"GatewayId" : { "Ref" : "InternetGateway" }
}
},
"ExtSubnetRouteTableAssociation" : {
"Type" : "AWS::EC2::SubnetRouteTableAssociation",
"Properties" : {
"SubnetId" : { "Ref" : "ExtSubnet" },
"RouteTableId" : { "Ref" : "PublicSubnetRouteTable" }
}
},
"MgmtSubnetRouteTableAssociation" : {
"Type" : "AWS::EC2::SubnetRouteTableAssociation",
"Properties" : {
"SubnetId" : { "Ref" : "MgmtSubnet" },
"RouteTableId" : { "Ref" : "PublicSubnetRouteTable" }
}
},
"IntSubnetRouteTableAssociation" : {
"Type" : "AWS::EC2::SubnetRouteTableAssociation",
"Properties" : {
"SubnetId" : { "Ref" : "IntSubnet" },
"RouteTableId" : { "Ref" : "PublicSubnetRouteTable" }
}
},
"EIP0" : {
"Type" : "AWS::EC2::EIP",
"Properties" : {
"Domain" : "vpc"
}
},
"EIPAssoc0" : {
"Type" : "AWS::EC2::EIPAssociation",
"Properties" : {
"NetworkInterfaceId" : { "Ref" : "Eth0" },
"AllocationId" : { "Fn::GetAtt" : ["EIP0", "AllocationId"] },
"PrivateIpAddress" : { "Fn::GetAtt" : ["Eth0", "PrimaryPrivateIpAddress" ] }
}
},
"EIP1" : {
"Type" : "AWS::EC2::EIP",
"Properties" : {
"Domain" : "vpc"
}
},
"EIPAssoc1" : {
"Type" : "AWS::EC2::EIPAssociation",
"Properties" : {
"NetworkInterfaceId" : { "Ref" : "Eth1" },
"AllocationId" : { "Fn::GetAtt" : ["EIP1", "AllocationId"] },
"PrivateIpAddress" : { "Fn::GetAtt" : ["Eth1", "PrimaryPrivateIpAddress" ] }
}
},
"EIP2" : {
"Type" : "AWS::EC2::EIP",
"Properties" : {
"Domain" : "vpc"
}
},
"EIPAssoc2" : {
"Type" : "AWS::EC2::EIPAssociation",
"Properties" : {
"NetworkInterfaceId" : { "Ref" : "Eth2" },
"AllocationId" : { "Fn::GetAtt" : ["EIP2", "AllocationId"] },
"PrivateIpAddress" : { "Fn::GetAtt" : ["Eth2", "PrimaryPrivateIpAddress" ] }
}
},
"ICSvExternalSecurityGroup": {
"Type": "AWS::EC2::SecurityGroup",
"Properties": {
"GroupDescription": "Access Rules for ICS external port",
"VpcId": {
"Ref": "VPC"
},
"SecurityGroupIngress": [
{
"IpProtocol": "icmp",
"FromPort": "-1",
"ToPort": "-1",
"CidrIp": "0.0.0.0/0"
},
{
"IpProtocol": "tcp",
"FromPort": "80",
"ToPort": "80",
"CidrIp": "0.0.0.0/0"
},
{
"IpProtocol": "tcp",
"FromPort": "443",
"ToPort": "443",
"CidrIp": "0.0.0.0/0"
},
{
"IpProtocol": "udp",
"FromPort": "4500",
"ToPort": "4500",
"CidrIp": "0.0.0.0/0"
},
{
"IpProtocol": "tcp",
"FromPort": "11000",
"ToPort": "11099",
"CidrIp": "0.0.0.0/0"
}
],
"SecurityGroupEgress": [
{
"CidrIp": "127.0.0.1/32",
"IpProtocol": "-1"
}],
"Tags": [
{
"Key": "Name",
"Value": { "Fn::Join": [ "-", [ { "Ref": "AWS::StackName" }, "ICSvExtSG" ] ] }
}
]
}
},
"ICSvInternalSecurityGroup": {
"Type": "AWS::EC2::SecurityGroup",
"Properties": {
"GroupDescription": "Access Rules for ICS internal port",
"VpcId": {
"Ref": "VPC"
},
"SecurityGroupIngress": [
{
"IpProtocol": "icmp",
"FromPort": "-1",
"ToPort": "-1",
"CidrIp": "0.0.0.0/0"
}
],
"Tags": [
{
"Key": "Name",
"Value": { "Fn::Join": [ "-", [ { "Ref": "AWS::StackName" }, "ICSvIntSG" ] ] }
}
]
}
},
"ICSvManagementSecurityGroup": {
"Type": "AWS::EC2::SecurityGroup",
"Properties": {
"GroupDescription": "Access Rules for ICS Management port",
"VpcId": {
"Ref": "VPC"
},
"SecurityGroupIngress": [
{
"IpProtocol": "icmp",
"FromPort": "-1",
"ToPort": "-1",
"CidrIp": "0.0.0.0/0"
},
{
"IpProtocol": "tcp",
"FromPort": "80",
"ToPort": "80",
"CidrIp": "0.0.0.0/0"
},
{
"IpProtocol": "tcp",
"FromPort": "443",
"ToPort": "443",
"CidrIp": "0.0.0.0/0"
}
],
"SecurityGroupEgress": [
{
"CidrIp": "127.0.0.1/32",
"IpProtocol": "-1"
}],
"Tags": [
{
"Key": "Name",
"Value": { "Fn::Join": [ "-", [ { "Ref": "AWS::StackName" }, "ICSvMgmtSG" ] ] }
}
]
}
},
"EC2Instance" : {
"Type" : "AWS::EC2::Instance",
"DependsOn" : ["EIPAssoc0", "EIPAssoc1", "EIPAssoc2"],
"Properties" : {
"ImageId" : {"Ref" : "ICSImageAMIId"},
"KeyName" : { "Ref" : "KeyName" },
"InstanceType" : { "Ref" : "InstanceType" },
"NetworkInterfaces" : [
{ "NetworkInterfaceId" : {"Ref" : "Eth0" }, "DeviceIndex" : "0" },
{ "NetworkInterfaceId" : {"Ref" : "Eth1" }, "DeviceIndex" : "1" },
{ "NetworkInterfaceId" : {"Ref" : "Eth2" }, "DeviceIndex" : "2" }
],
"Tags" : [
{"Key" : "Name",
"Value" : { "Fn::Join": [ "-", [ { "Ref": "AWS::StackName" }, "ICSvAWS" ] ] }
}
],
"UserData": {
"Fn::Base64": {
"Fn::Join": [
"",
[
"<pulse-config>",
"<admin-password>",
{
"Ref": "AdminPassword"
},
"</admin-password>",
"<admin-username>",
{
"Ref": "AdminUsername"
},
"</admin-username>",
{
"Ref": "ICSConfigData"
},
"</pulse-config>"
]
]
}
},
"MetadataOptions": {
"HttpTokens": "required",
"HttpPutResponseHopLimit": 1
}
}
},
"Eth0" : {
"Type" : "AWS::EC2::NetworkInterface",
"Properties" : {
"Description" : "eth0",
"GroupSet" : [ { "Ref" : "ICSvInternalSecurityGroup" } ],
"SourceDestCheck" : "false",
"SubnetId" : { "Ref" : "IntSubnet" },
"Tags" : [ {"Key" : "Name", "Value" : "Interface 0"}, {"Key" : "Interface", "Value" : "eth0"} ]
}
},
"Eth1" : {
"Type" : "AWS::EC2::NetworkInterface",
"Properties" : {
"Description" : "eth1",
"GroupSet" : [ { "Ref" : "ICSvExternalSecurityGroup" } ],
"SourceDestCheck" : "false",
"SubnetId" : { "Ref" : "ExtSubnet" },
"Tags" : [ {"Key" : "Name", "Value" : "Interface 1"}, {"Key" : "Interface", "Value" : "eth1"} ]
}
},
"Eth2" : {
"Type" : "AWS::EC2::NetworkInterface",
"Properties" : {
"Description" : "eth2",
"GroupSet" : [ { "Ref" : "ICSvManagementSecurityGroup" } ],
"SourceDestCheck" : "false",
"SubnetId" : { "Ref" : "MgmtSubnet" },
"Tags" : [ {"Key" : "Name", "Value" : "Interface 2"}, {"Key" : "Interface", "Value" : "eth2"} ]
}
}
},
"Outputs" : {
"InstanceId" : {
"Value" : { "Ref" : "EC2Instance" },
"Description" : "Instance Id of newly created instance"
},
"ManagementAddress" : {
"Value" : { "Fn::Join" : [" ", [ "Public IP address:", { "Ref" : "EIP2" }, "Private IP address:", { "Fn::GetAtt" : ["Eth2", "PrimaryPrivateIpAddress"] }]]},
"Description" : "ICS Management Interface details"
},
"ExternalAddress" : {
"Value" : { "Fn::Join" : [" ", [ "Public IP address:", { "Ref" : "EIP1" }, "Private IP address:", { "Fn::GetAtt" : ["Eth1", "PrimaryPrivateIpAddress"] }]]},
"Description" : "ICS Extenal Interface details"
},
"InternalAddress" : {
"Value" : { "Fn::Join" : [" ", [ "Public IP address:", { "Ref" : "EIP0" }, "Private IP address:", { "Fn::GetAtt" : ["Eth0", "PrimaryPrivateIpAddress"] }]]},
"Description" : "ICS Internal Interface details"
}
}
} Registering the AMI
This section describes the steps to register the AMI. This is the one-time activity to be followed to deploy Ivanti Connect Secure on AWS.
To register AMI, do the following:
1.Login to AWS Portal.
2.Search for the AMI name in the Public images: ISA-V-NITRO-ICS-22.2R1-657.1-SERIAL-nitro.img. Images can be searched under public AMI section and copy AMI ID for custom deployment using custom templates. To determine AMI for 2 NIC and 3 NIC based on the AMI name or AMI ID, refer to the KB article.
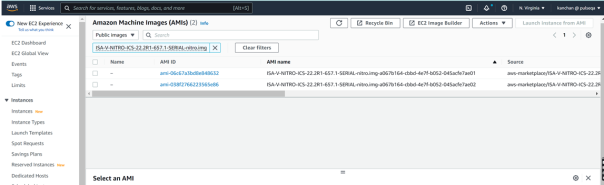
To deploy 2-NIC or 3-NIC in an existing VPC and new VPC respectively using the links above.
ICS gateway AMIs are available in all AWS regions (except China).
Deploying AWS Cloud ICS using Terraform Template
This section describes how to install terraform template, and deploy ICS on aws with 2 NICs and 3 NICs.
Installing Terraform Template
1.Go to the Terraform website and install Terraform on a Linux VM of your choice at usr/local/bin.
2.Install AWS CLI.
3.Configure AWS Access key and AWS Secret key under .bashrc directory.
Example: AWS_ACCESS_KEY="XXXXXXXX"; export AWS_ACCESS_KEY
AWS_SECRET_KEY="YYYYYYYY"; export AWS_SECRET_KEY
4.Deploy the ICS using the Terraform Template. To download the Cloud Templates, see product-downloads.
To configure the required password:
1.Locate pulse-config within the .tf file.
2.Assign the desired value to the admin-password field.
Configuring Base Setup
1.Customize and set the variables in variables.tf file based on the requirement.
Example: Region, AMI-id, VPC name, subnet IP address details, instance name etc.
2.Create a directory base_setup.
3.Copy the files variables.tf and base_setup.tf into the base_setup directory.
4.Change the key based on your requirement.
5.Change the files permission with +x .
linux# chmod +x *.*
6.Run the following commands creating base setup.:
linux# terraform init
linux# terraform apply
7.When prompted for admin input for deployment, type "yes".
The Base setup will create VPC, Subnets, Security Groups, Internet Gateway and Route Table.
Deploying ICS with 2 NICs
1.Customize and set the variables in variables.tf file based on the requirement.
2.Change directory to ics_2_nics.
3.Copy the files variables.tf and ics_2_nics.tf into the ics-2nic directory.
4.Run the following commands:
linux# terraform init
linux# terraform apply
This terraform will deploy 2 NIC ICS.
Deploying ICS with 3 NICs
1.Customize and set the variables in variables.tf file based on the requirement.
2.Change directory to ics_3_nics.
3.Copy the files variables.tf and ics_3_nics.tf into the ics-3nic directory.
4.Run the following commands:
linux# terraform init
linux# terraform apply
This terraform will deploy 3 NIC ICS.
Ivanti Connect Secure Provisioning Parameters
Provisioning parameters are those parameters which are required during the deployment of a virtual appliance. Ivanti Connect Secure accepts the following parameters as provisioning parameters in the XML format.
<pulse-config>
<primary-dns><value></primary-dns>
<secondary-dns><value></secondary-dns>
<wins-server><value></wins-server>
<dns-domain><value></dns-domain>
<admin-username><value></admin-username>
<admin-password><value></admin-password>
<cert-common-name><value></cert-common-name>
<cert-random-text><value></cert-random-text>
<cert-organisation><value></cert-organisation>
<config-download-url><value></config-download-url>
<config-data><value></config-data>
<auth-code-license><value></auth-code-license>
<enable-license-server><value></enable-license-server>
<accept-license-agreement><value></accept-license-agreement >
<enable-rest><value></enable-rest>
<registration-code> 1grkL2Xbr </registration-code>
<registration-fqdn>auto.toad.pzt.dev.perfsec.com</registration-fqdn>
<enable-proxy>n</enable-proxy>
<proxy-host></proxy-host>
<proxy-port></proxy-port>
<proxy-username></proxy-username>
<proxy-password></proxy-password>
<register-network-interface>external</register-network-interface>
</pulse-config>
The below table depicts the details of the xml file.
|
# |
Parameter Name |
Type |
Description |
|
1 |
wins-server |
IP address |
Wins server for Ivanti Connect Secure |
|
2 |
dns-domain |
string |
DNS domain of Ivanti Connect Secure |
|
3 |
cert-common-name |
string |
Common name for the self-signed certificate generation. This certificate is used as the device certificate of Ivanti Connect Secure Random text for the self-certificate generation Organization name for the self-signed certificate generation |
|
4 |
cert-random-text |
string |
|
|
5 |
cert-organization |
string |
|
|
6 |
config-download-url |
String URL |
Http based URL where XML based Ivanti Connect Secure configuration can be found. During provisioning, Ivanti Connect Secure fetches this file and comes up with preloaded configuration. XML based configuration can be present in another VM in AWS cloud or at corporate network which is accessible for Ivanti Connect Secure through site to site VPN between AWS and corporate data center |
|
7 |
config-data |
string |
base64 encoded XML based Ivanti Connect Secure configuration |
|
8 |
auth-code-license |
string |
Authentication code that needs to be obtained from Ivanti |
|
9 |
enable-license-server |
string |
If set to ‘y’, ICS will be deployed as a License server. If set to ‘n’, ICS will be deployed as a normal server. |
|
10 |
accept-license-agreement |
string |
This value is passed to the instance for configuration at the boot time. By default, this value is set to “n”. This value must be set to “y”. |
|
11 |
enable-rest |
string |
If set to ‘y’, REST API access for the administrator user is enabled. |
- In the above list of parameters, primary dns, dns domain, admin username, admin password, cert-random name, cert-random text, cert-organization and accept-license-agreement are mandatory parameters. The other parameters are optional parameters.
- The XML parsing fails if the following characters are used in the strings:
- "
- ’
- <
- >
- &
- Ivanti Connect Secure supports zero touch provisioning. This feature can detect and assign DHCP networking settings automatically at the Ivanti Connect Secure boot up. The Ivanti Connect Secure parameters should be set to null in order to fetch the networking configuration automatically from the DHCP server.
The below table describes the new parameters that are added in the XML file and these are applicable only for nSA-managed 9.x and ICS 21.x versions.
|
Parameter |
Type |
Description |
|---|---|---|
|
registrationCode |
string |
The registration code, which is generated during the ICS gateway registration on nSA. Example: KyZR6YDL8 |
|
registrationFQDN |
string |
The registration FQDN name, which is generated during the ICS gateway registration on nSA. Example: sample.domain.com |
|
enableproxy |
string |
Default is set to n. |
|
proxyHost |
string |
The proxy server name. |
|
proxyPort |
integer |
The port number of the proxy server. Example: 8080 |
|
proxyUsername |
string |
The username of the proxy server. Example,:usr |
|
proxyPassword |
string |
The password of the proxy server. Example: pxx124 |
|
registerNetworkInterface |
string |
The interface through which the gateway registers with nSA. Example: external |
Provisioning Ivanti Connect Secure with Predefined Configuration
The Ivanti Connect Secure Virtual Appliance can be provisioned on AWS with a predefined Ivanti Connect Secure configuration. The provisioning can be done in the following two ways:
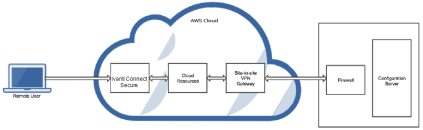
•Ivanti Connect Secure administrator needs to provide the location of the XML-based configuration as a provisioning parameter. Refer Ivanti Connect Secure Provisioning Parameters for details about the Ivanti Connect Secure specific provisioning parameters.
•Ivanti Connect Secureconfiguration can be kept on AWS or on a machine located in the corporate network. If it is in the corporate network, the Ivanti Connect Secure administrator needs to ensure that site-to-site VPN between AWS to corporate network is already established so that Ivanti Connect Secure can access the machine located in the corporate network.
•Ivanti Connect Secure administrator provides the configuration data encoded in the base64 encoded xml in the CloudFormation template.
Configuring Licenses on the Ivanti Connect Secure Appliance
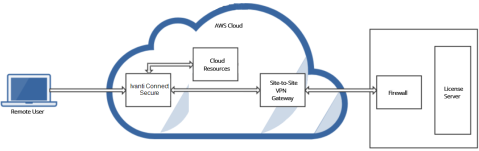
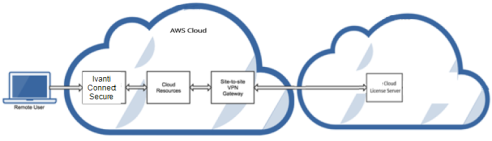
Evaluation licenses are provided, to add more licenses, the Ivanti Connect Secure administrator needs to leverage the Ivanti License server.
Ivanti License Server in Corporate Network
Ivanti License Server in Cloud Network
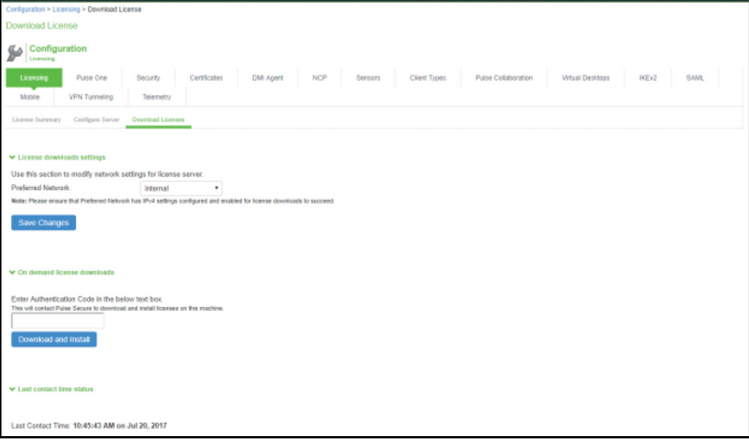
Ivanti Connect Secure virtual machines (VM) are enabled to provision licenses through the Ivanti Cloud Licensing Service. For this, administrator needs to obtain an Authentication code from Ivanti Support and apply it in Download Licenses page of ICS admin console. The ICS also periodically sends heartbeat messages to CLS for auditing purposes.

The Authentication code can also be specified in the CloudFormation template. When ICS comes up, it automatically fetches the Authentication code.
•Adding Authentication Code in ICS Admin Console
•Including Authentication Code in CloudFormation Template
Adding Authentication Code in ICS Admin Console
To add Authentication code:
5.Go to System > Configuration > Licensing > Download Licenses.
6.Under On demand license downloads, enter the Authentication code in the text box.
7.Click on Download and Install. For more info see Gateway Licensing.
Including Authentication Code in CloudFormation Template
To include Authentication code in the CloudFormation template:
•In the CloudFormation template, go to the ICSConfig section.
•For the element <auth-code-license>, enter the Authentication code as the content.
•Save the template.
For details about the license configuration, refer to License Configuration Guide.
System Operations
The AWS portal provides Start, Restart Stop and Terminate operations to control the Virtual Appliance connection.
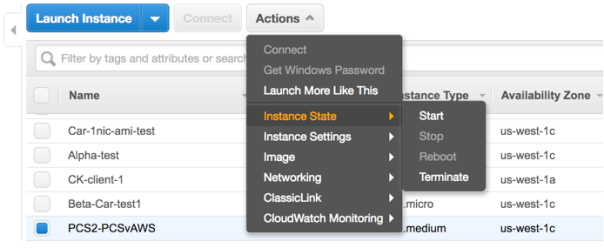
On the AWS portal, select AWS Services > Launch Instance. From the Actions menu, select Instance State.
•Click Start to start a VM
•Click Stop to stop the VM
•Click Restart to restart the VM
•Click Terminate to terminate the VM
Network Configuration
IP Address Assignment for Internal, External and Management Interfaces
Each interface in AWS can have private and public IP addresses. Sample CloudFormation Templates provided by Ivanti Connect Secure creates the Ivanti Connect Secure Virtual Appliance with public and private IP addresses for external and management interfaces and only private IP address for internal interface. More details about IP address types on AWS can be seen at: https://docs.aws.amazon.com/AmazonVPC/latest/UserGuide/vpc-ip-addressing.html
IP Addressing Modes
When Ivanti Connect Secure gets deployed by using the sample templates provided by Ivanti, Ivanti Connect Secure comes up with multiple interfaces. If you take an example of a template “pulsesecure-ICS-3-nics.zip” provided by Ivanti, you notice the following things.
ICS external interface and ICS management interface have both Elastic and Private IP addresses.
Modifying Network Parameters After Deployment
Since Networking Infrastructure is provided by AWS, a ICS admin cannot change Networking configuration after deployment. Hence, both admin UI and ssh do not support changing network configuration.
Controlling the Selection of Internal, External and Management Interfaces
Sample CloudFormation template, provided by Ivanti, requests AWS fabric to create three Network Interfaces. While running this template, AWS fabric creates interfaces named eth0, eth1 and eth2 and attaches them to ICS Virtual Interface.
So, the question is, among eth0, eth1 and eth2 which network interface will become external, internal or management interface? Below table answers this question.
|
Interface Name |
ICS Interface |
|
eth0 |
internal interface |
|
eth1 |
external interface |
|
eth2 |
management interface |
Then, question is how you can control the order of network interfaces named eth0, eth1 and eth2 created through CloudFormation template?
The Ivanti Connect Secure Virtual Appliance is qualified with internal interface as primary and other two are secondary. In the following code snippet, three network interfaces get assigned to VM. These three NICs with ID “nic1”, “nic2” and “nic3” are internally mapped to ‘eth0’, ‘eth1’, and ‘eth2’ respectively.
"EC2Instance": {
"Type": "AWS::EC2::Instance",
"DependsOn": [
"EIPAssoc0",
"EIPAssoc1"
],
"Properties": {
"ImageId": {
"Fn::FindInMap": [
"ICSAMI",
{
"Ref": "AWS::Region"
},
"img"
]
},
"KeyName": {
"Ref": "KeyName"
},
"InstanceType": {
"Ref": "InstanceType"
},
"NetworkInterfaces": [
{
"NetworkInterfaceId": {
"Ref": "Eth0"
},
"DeviceIndex": "0"
},
{
"NetworkInterfaceId": {
"Ref": "Eth1"
},
"DeviceIndex": "1"
}
],
ICS converts eth0 to int0, eth1 to ext0 and eth2 to mgmt0. This means, the network interface with ID nic1 will be internal interface, nic2 will be external interface and nic3 will be management interface.
The below table depicts this scenario well:
|
Interface Name |
ICS Interface |
Network ID |
|
eth0 |
internal interface |
nic1 |
|
eth1 |
external interface |
nic2 |
|
eth2 |
management interface |
nic3 |
Accessing the Ivanti Connect Secure Virtual Appliance
Accessing the Ivanti Connect Secure Virtual Appliance as an Administrator
In the AWS portal, navigate to CloudFormation section. Select the stack where ICS is deployed and then click on the ‘Outputs’ tab. Note down the ICS management, internal and external address from the table as shown in figure.
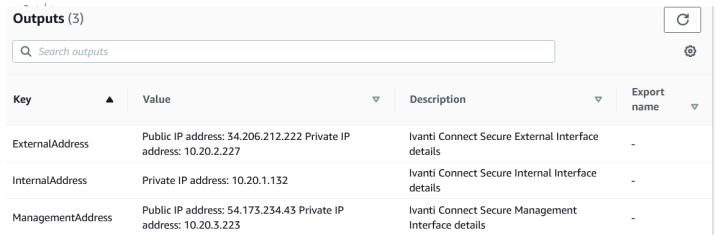
Use the credentials provided in the provisioning parameters to log in as the administrator in the ICS Admin interface with URL https://<PCS-IP>/admin. The default ICS Admin UI user configured in the CloudFormation config file is: user ‘admin’ and password ‘password1234’.
The administrator can configure Active Directory located in the corporate network for user authentication. The Ivanti Connect Secure Virtual Appliance administrator can check troubleshooting tools provided in the Ivanti Connect Secure admin UI (System > Maintenance > Troubleshooting), to verify whether Ivanti Connect Secure is able to reach other cloud resources as well as corporate resources. For this, AWS network administrator needs to ensure that all other resources have Ivanti Connect Secure Internal interface as its default gateway.
Accessing the Ivanti Connect Secure Virtual Appliance as an End User
After successfully deploying ICS on AWS, go to the Outputs section and copy the Ivanti External Interface details.
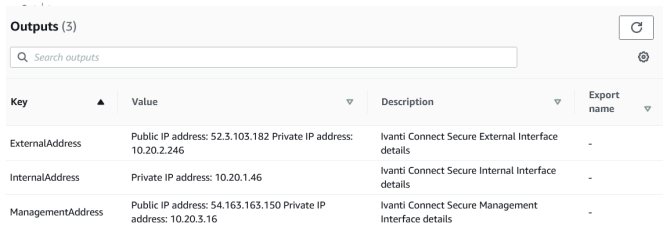
Seamless Migration of ICS configuration on AWS
Overview
This section describes the seamless migration of the ICS configuration on Amazon Web Services.
Process
The process for seamless migration of the ICS configuration on AWS marketplace is as follows:
1.Setting up and deploying a new VM, refer Custom Ivanti Connect Secure Deployment on AWS Portal.
2.ICS configuration migration, refer Provisioning Ivanti Connect Secure with Predefined Configuration.
3.License migration, refer Configuring Licenses on the Ivanti Connect Secure Appliance.
4.Network IP address migration.
Before You Begin
1.Deploy a ICS in AWS environment with new software version, possibly with existing Virtual Private Cloud instance. Note down the private and public IP addresses.
2.Check the reachability of the ICS using public IP address for newly deployed ICS.
3.Perform a cleanup of the appliance before exporting the user.cfg to reduce the size of the user configuration file.
•Disable any debug logging
•Delete logs
•Delete any old snapshots
•Clear event logs
•Delete old ESAP
•Delete old Ivanti Clients
•Clean up external user records
Network IP address Migration
To change IP address of the ICS instance on AWS for internal and external ports:
1.In the AWS environment, navigate to Elastic IP dashboard of port network settings. Select the public IP address entry and select Disassociate Elastic IP address under Actions.
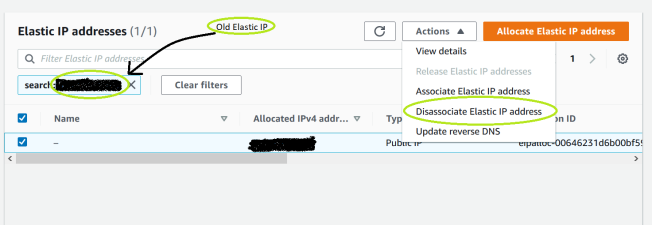
2.Select the private IP address entry and select Disassociate address under Actions.
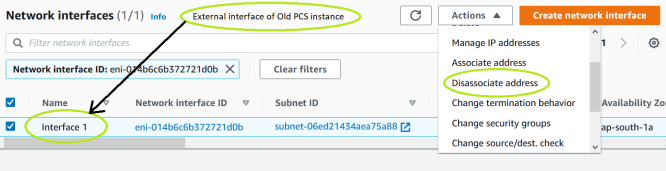
3.For external port interface, select the entry and select Delete under Actions.
Internal port is associated as primary interface of the ICS deployed earlier. For internal port IP address migration, AWS console does not allow to delete the specific interface. Admin needs to delete the instance and then associate the internal port.
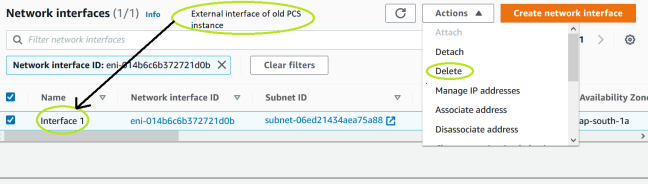
4.Navigate to the port interface of the newly deployed ICS, click Actions and select Manage IP addresses.
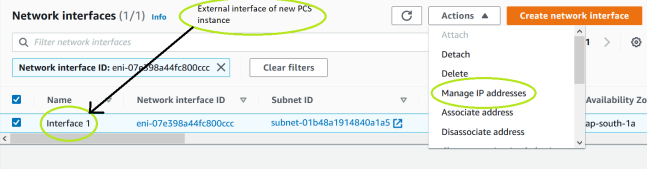
5.Enter the IP address of the ICS instance and select Assign new IP address.
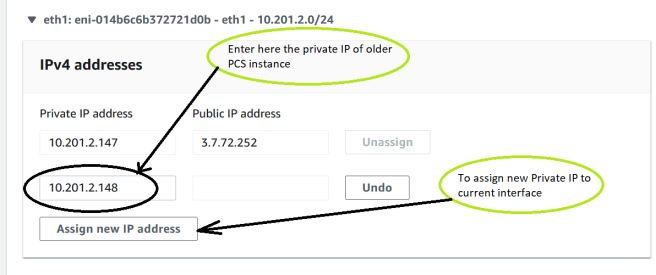
6.Select the public IP entry again and select Associate Elastic IP address under Actions.
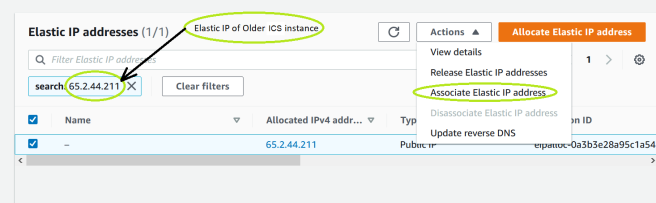
7.Select the private IP address of the newly deployed ICS. Select Network interface, enter the interface ID in Network Interface field.
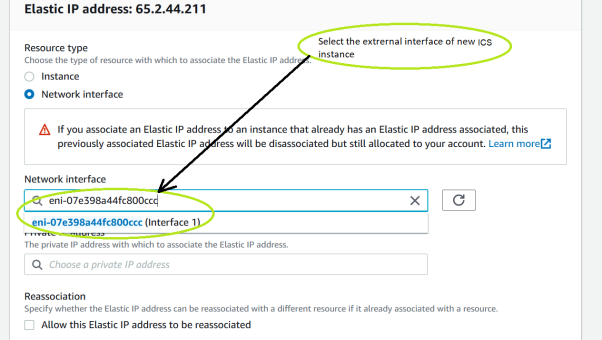
8.The list of configured IPs automatically populates under Private IP address field. Select the IP address as configured in ICS and click Associate.
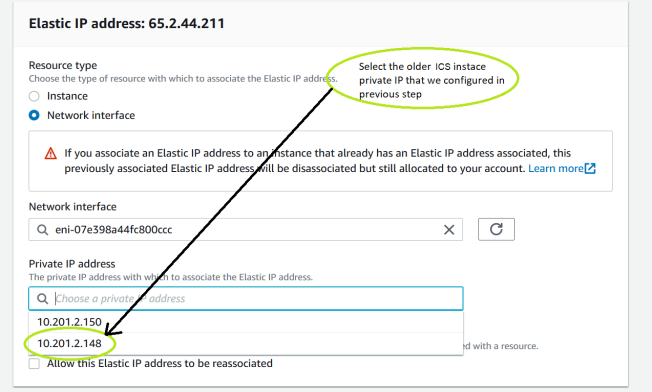
9.In the port network interface for the newly deployed ICS, select the Elastic IP address and navigate to Actions View Details. View and verify the elastic IP address associated to the secondary IP address.
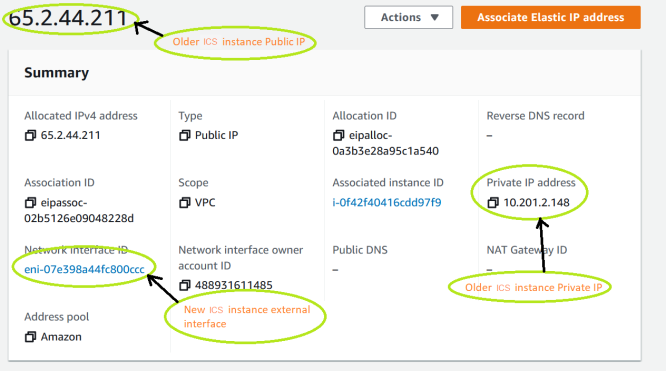
10. Login to newly deployed ICS and modify the external port IP address to older ICS external port address.
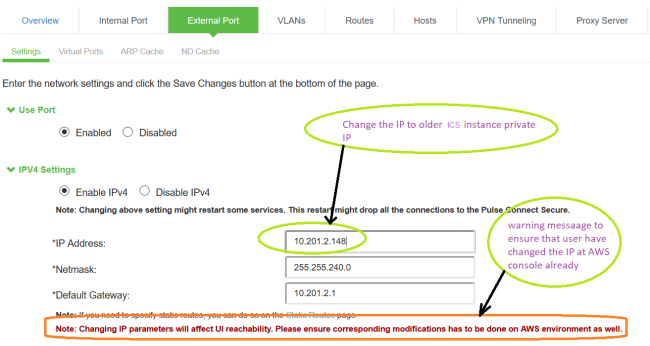
11.Login as end user using the elastic IP address (assigned for secondary private IP address) and verify that end user login is successful.
Troubleshooting
Ivanti Connect Secure emits booting logs at a specified storage. You can check the storage details of the boot diagnostic logs as shown below:
1.Select AWS Services > Instances > Launch Instance.
2.From the list displayed, select Instance Settings > Get System Log.
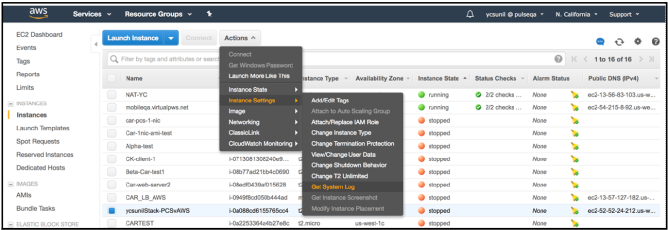
The system logs window is displayed.