Ivanti Policy Secure on Microsoft Azure Cloud
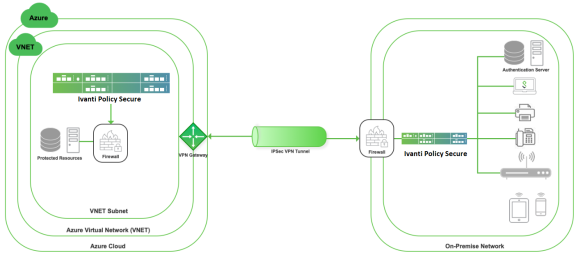
As depicted in the below diagram, an On-premise user can use Ivanti Policy Secure to securely access cloud resources as well as corporate resources. To access Ivanti Policy Secure or cloud resources there should be site-to-site VPN between Azure and corporate network.
Prerequisites and System Requirements on Azure
To deploy the Ivanti Policy Secure Virtual Appliance on Azure, you need the following:
- A Microsoft Azure account
- Access to the Microsoft Azure portal (https://portal.azure.com)*
- Ivanti Policy Secure Virtual Appliance Image (.vhd file)
- Azure Resource Manager template (ARM template)
- Ivanti Policy Secure licenses **
- Site-to-Site VPN between Azure and the corporate network since end users are in corporate network.
- Ivanti License Server (optional)**
- Located at corporate network, accessible through site-to-site VPN
- Ivanti Policy Secure configuration in XML format (optional)
- The following systems are qualified in 9.1R4 release:
- DS2 – 2-core
- DS3 – 4-core
- DS4 – 8-core
- * Ivanti Policy Secure Virtual Appliance can be deployed only through Azure Resource Manager (ARM) style. It does not support deployment in classic style.
- ** Ivanti Policy Secure Virtual Appliance, by default, has two-users license. This release supports licensing with License server located at corporate network and licensing through Ivanti Cloud Licensing Service server. For licensing through Ivanti Cloud Licensing Service server, administrator needs to obtain Authentication Code from Ivanti Secure Support and apply it in the Ivanti Policy Secure admin console.
Steps to Deploy Ivanti Policy Secure on Azure
Below are the one-time activities to be followed to deploy Ivanti Policy Secure on Azure.
- Upload Ivanti Policy Secure Virtual Appliance Image to Azure Web Portal
- Upload Azure Resource Manager Template to Azure Account
Below are the steps to be followed for each deployment of Ivanti Policy Secure.
- Deploying Ivanti Policy Secure on Azure using Azure Portal
- Deploying Ivanti Policy Secure on Azure using Azure CLI
Upload Ivanti Policy Secure Virtual Appliance Image to Azure Web Portal
This section shows the steps to upload the Ivanti Policy Secure Virtual Appliance image to Azure web portal.
To upload Ivanti Policy Secure Virtual Appliance image to Azure web portal, do the following:
-
Visit the Ivanti Secure support site https://www.ivanti.com and download the Azure Ivanti Policy Secure image file (ps-pps-azure-psa-v-<releaseno>-<buildno>-package.zip) which is in the zipped format.
-
Unzip the file and look for the Ivanti Policy Secure Virtual Appliance vhd image.
-
Log in to the Azure portal.
-
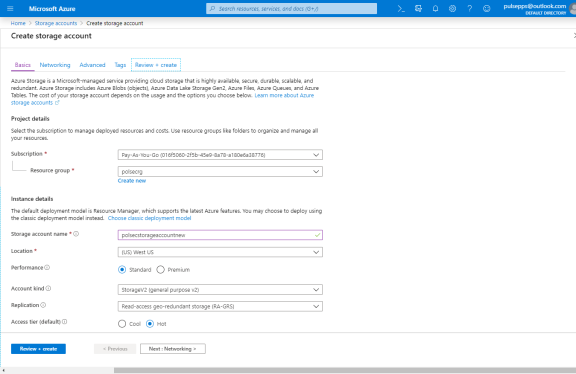
Click New and create a storage account named ‘polsecstorageaccountnew’ under the resource group named ‘polsecrg’.
-
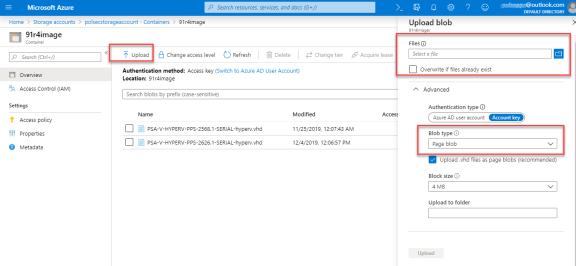
Inside the ‘polsecstorageaccountnew’ storage account, create a container named ‘91r4’ as shown below -

-
Inside the ‘91r4’ container, click on upload to upload the Ivanti Policy Secure Virtual Appliance image. Inside the ‘Upload blob’, select the Blob type as Page blob and click on Upload.
Upload Azure Resource Manager Template to Azure Account
The Azure Resource Manager (ARM) template is a JSON-based file, which has instructions for Azure Fabric on all the resources that need to be created on Azure while running this script. More details on the ARM template can be found at https://docs.microsoft.com/en-us/azure/azure-resource-manager/resource-manager-create-first-template.
Ivanti provides sample Azure template file for three NIC card, namely “pulsesecure-pps-3-nics.zip” and “pulsesecure-pps-3-nics-existing-vnet.zip”. Users can modify the template to make it suitable for their need. Here are the steps to upload the template to Azure Portal.
-
Unzip the pulsesecure-pps-3-nics.zip file to get azuredeploy.json.
-
Log in to the Azure portal.
-
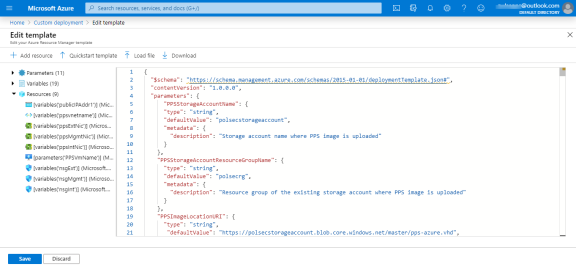
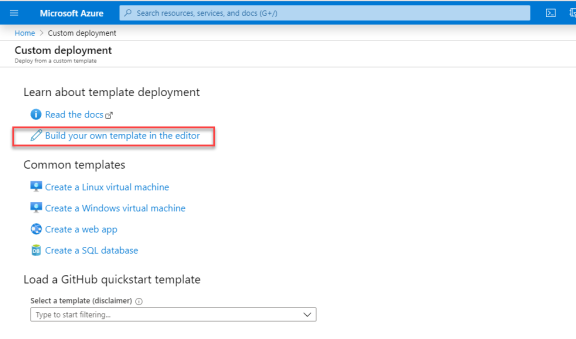
In the search bar type ‘Deploy from a custom template’. Click on ‘Build your own template in the editor’.
-
Copy the contents of azuredeploy.json and paste it in the template section. Click on ‘Save’ Button.