Working with High Availability
Overview: High Availability on Services Director
High Availability (HA) is a Services Director configuration.
An HA configuration enables two Services Director nodes to operate as a synchronized HA pair, with an Active Services Director being backed up by a Standby Services Director.
The Services Director HA pair and its Service Endpoint Address can be in a private network behind a NAT device.
Each node in the HA pair maintains a database that stores management metadata for various components, including all registered/deployed Virtual Traffic Managers (vTMs) in the network.
The metadata is synchronized from the Active node to the Standby node.
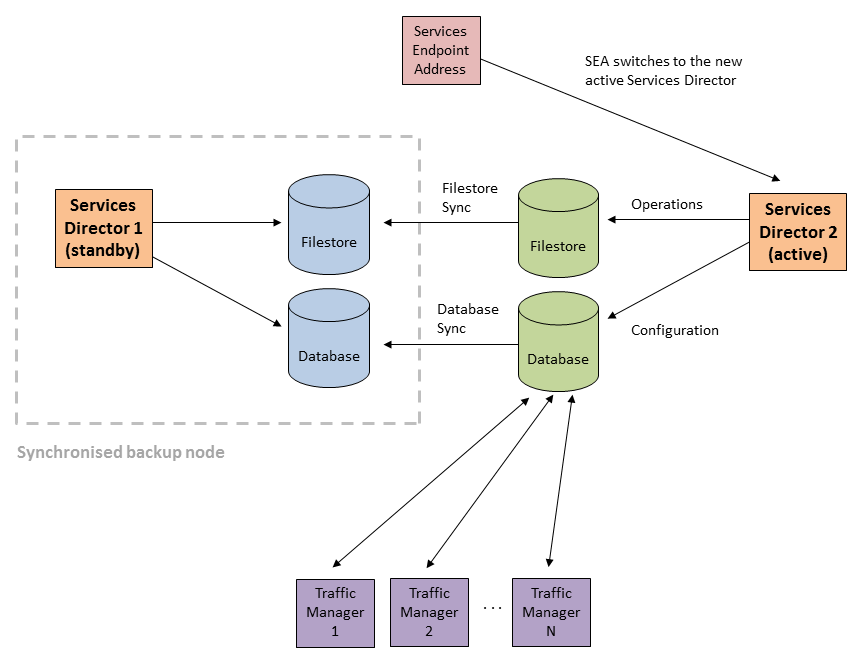
The HA pair has a Service Endpoint Address (SEA), which points to whichever of the Services Directors is currently the Active node. This enables users to always access the Services Director VA using the same hostname/IP address at all times.
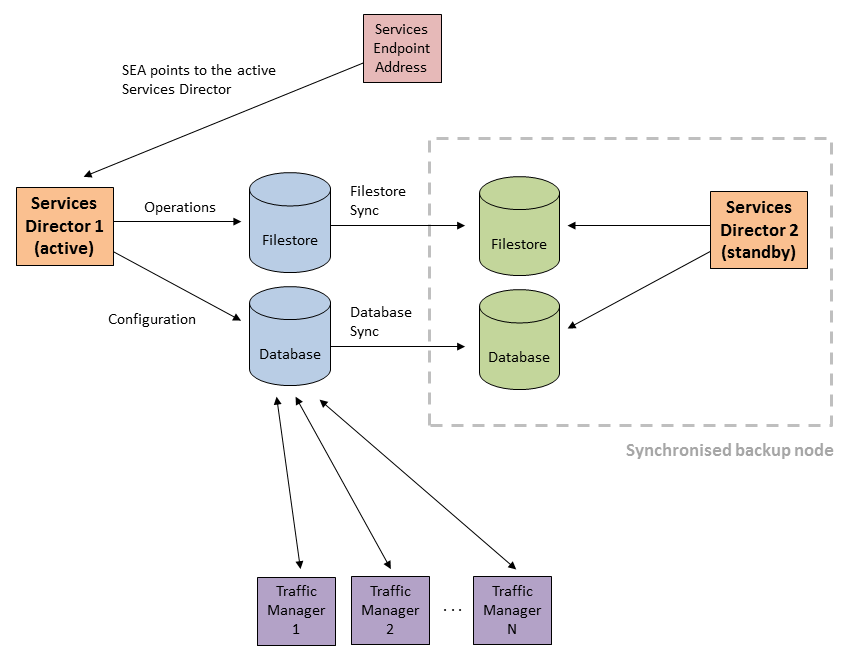
In the event of failure of the Active node, the Standby node contains a synchronized copy of the current configuration for the Services Director, and can take over as the Active node. The former Active node becomes the Standby node, and the direction of all synchronization reverses.
The switching process, called failover, is triggered manually by the administrator.
Creating a High Availability Pair in the Services Director VA
In the Services Director VA, an HA pair is formed by joining a Secondary Services Director to an existing Primary Services Director.
This process happens during the Setup Wizard for a Secondary Services Director. See Installing and Configuring a Secondary Services Director.
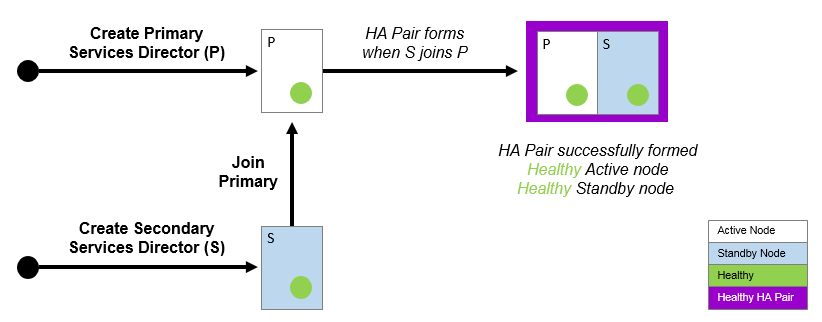
Once the HA pair is formed, the concepts of Primary and Secondary Services Directors are largely put aside; these represent the virtual machine implementations of the Services Directors, each of which can be uniquely identified by an IP address or a DNS hostname.
The Services Director HA pair and its Service Endpoint Address can be in a private network behind a NAT device.
The concepts of Primary and Secondary are less important than the role that each Services Director performs in the HA pair. The supported roles are:
•The Active role - the Services Director controls the HA pair for:
•Web Service. That is, it controls use of the REST API and licensing.
•Database and Database Synchronization. The system configuration is contained in a database on the Active node, and synchronizes to the Standby node.
•File System and File System Synchronization. The file system of the Active node is synchronized to the Standby node.
•The Standby role - the Services Director receives system information from the Active node:
•The synchronized database.
•The synchronized file system.
The Active and Standby roles can be changed using software operations, without regard for whether each node is operating on the Primary or Secondary Services Director. See Swapping the Roles of the HA Nodes.
The Service Endpoint Address is the management address for the Services Director as a whole, and always points to the Active Services Director node.
Viewing High Availability Status
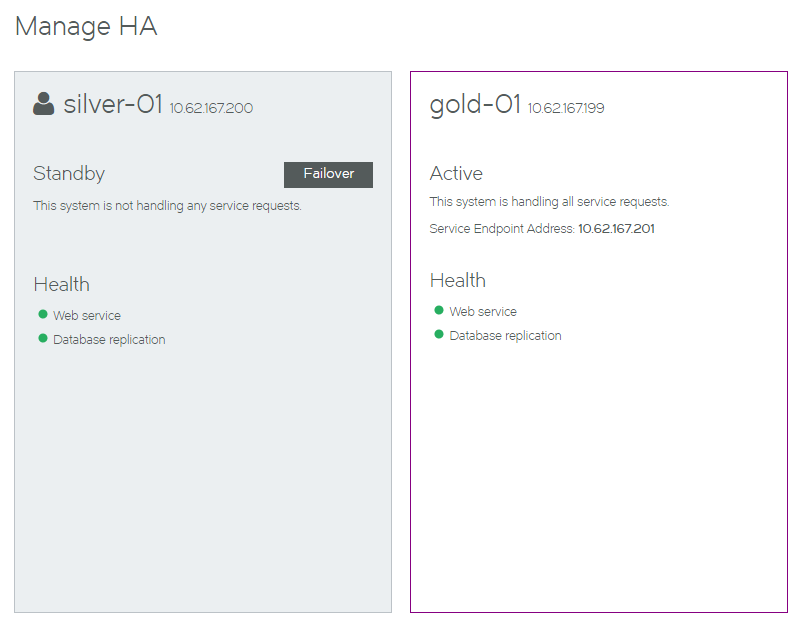
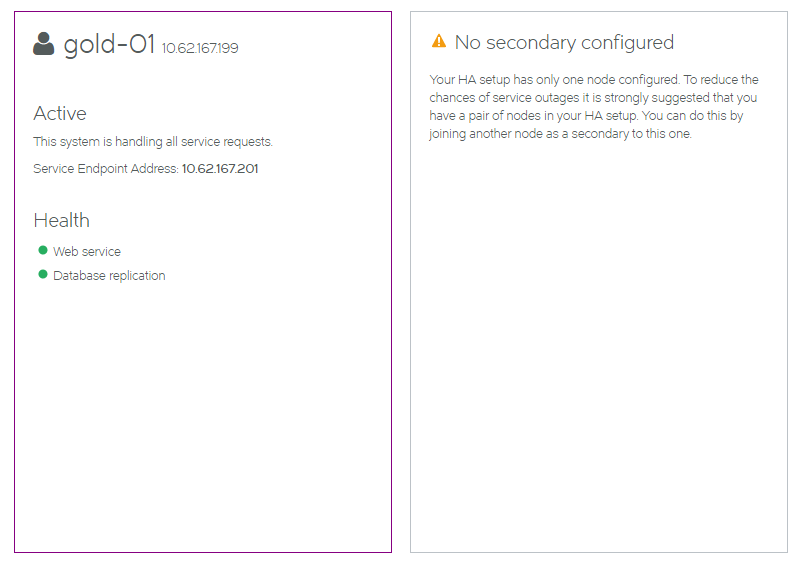
The current HA status for the Services Director HA pair is shown on the Services > Manage HA page of the Services Director VA.
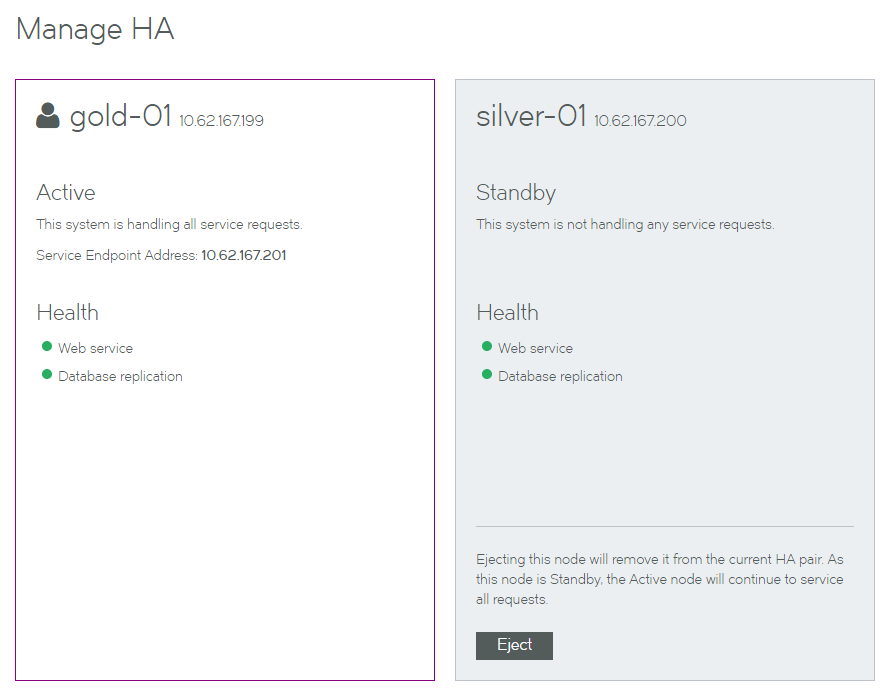
The HA pair is represented by a pair of panels on the Manage HA page. Each panel shows information for either the Active or the Standby node.
•The node you are logged in to is always presented on the left.
In this example, you are logged in to the gold-01 node.
•The Active node is always presented in a white panel.
In this example, gold-01 is the Active node.
•The Standby node is always presented in a blue/gray panel.
In this example, silver-01 is the Standby node.
•Where additional actions are supported, a button is shown.
In this example, the Eject button is present on the Standby node.
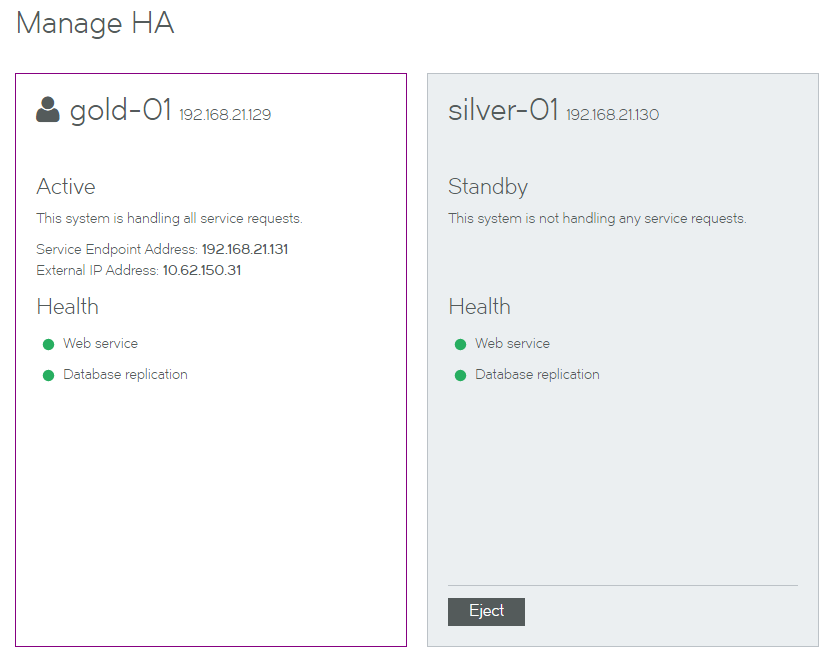
If you are logged in to the Standby node, your view will be similar to the following:
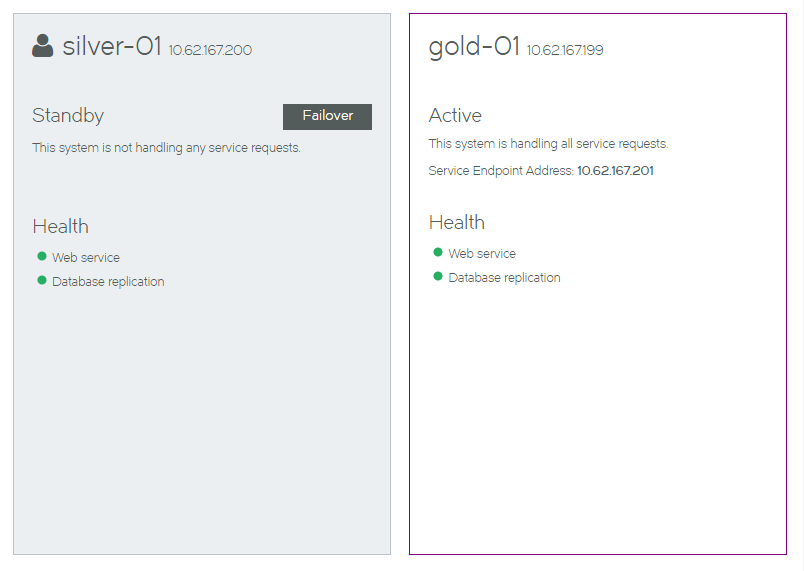
Each panel includes health indicators for the node. These indicate the health of:
•Web Services. That is, the REST API services and vTM licensing.
•Database replication.
While an indicator is green, it is healthy.
When one or more of these operations is unhealthy, it is orange. See Responding to Reported Health Issues.
If the Services Director HA pair is in a private network behind a NAT device, the internal Service Endpoint Address and the external IP Address for the HA pair are displayed. For example:
Taking a Backup of Your Services Director
When your Services Director system is fully configured, you can preserve its configuration by taking regular scheduled backups. This serves two purposes:
•In the event of a failure of a node’s configuration, you can use a backup to recover the configuration.
•In the event of a failure of a Services Director node, you can use a backup to create a new Services Director. This is achieved by using a backup configuration during the Setup Wizard.
See Recovering from a Services Director Failure for full details of both scenarios.
Responding to Reported Health Issues
When a node is in an unhealthy state, an orange health indicator is used. For example:
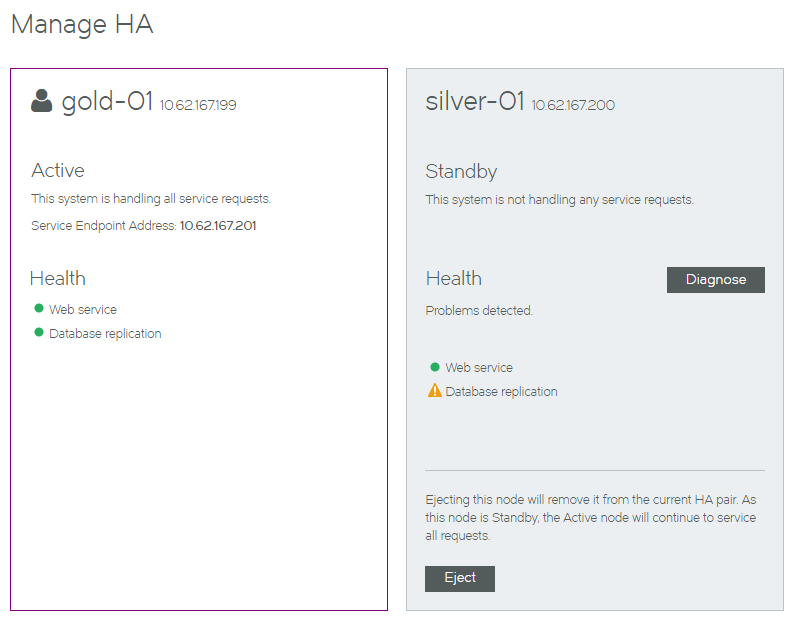
Click the Diagnose button to understand more about the problem. For example:

Several kinds of errors can be reported:
•Some errors are caused by transient issues in your network, and will clear once the network recovers.
If an error does not clear in a few minutes, further investigation may be required.
![]()
•Some errors may require an Administrator to log in to the affected node directly to analyze and fix a reported issue using a reboot, the REST API or the Command-Line User Interface (CLI). Refer to the Pulse Services Director Advanced User Guide and the Pulse Secure Services Director Command Reference for details.
•Some errors are caused by the failure of one of the nodes. To respond to this, you can change the Active and Standby roles using software operations:
- The Standby node can perform a failover. This operation swaps the roles performed by the paired Services Director. Both nodes must be healthy to do this, you must repair the unhealthy node first. Failover is commonly used before performing maintenance on an Active node. (see Swapping the Roles of the HA Nodes).
- The Active node can eject an unhealthy Standby node in the event of failure. This creates an Active standalone Services Director and an unpaired Standby Services Director. See Ejecting a Node from an HA Pair.
- The Standby node can perform a forced failover. This operation attempts to swap the roles performed by the paired Services Director while the Active node is unhealthy. (see Recovering from a Failed Active Node).
- An Active node can perform a forced standby on itself. This operation is used to recover from an exceptional circumstance where both nodes in an HA pair believes itself to be the Active node. See Recovering from a Split Brain Scenario.
Swapping the Roles of the HA Nodes
When you swap the roles of the Active and Standby nodes, the process is called failover.
Both nodes must be healthy to perform a failover.
Failover is useful in a number of scenarios:
•Before performing scheduled maintenance on the Active node.
•Before performing additional repairs to a recently-repaired Active node.
•To enable the current Active node to be subsequently ejected.
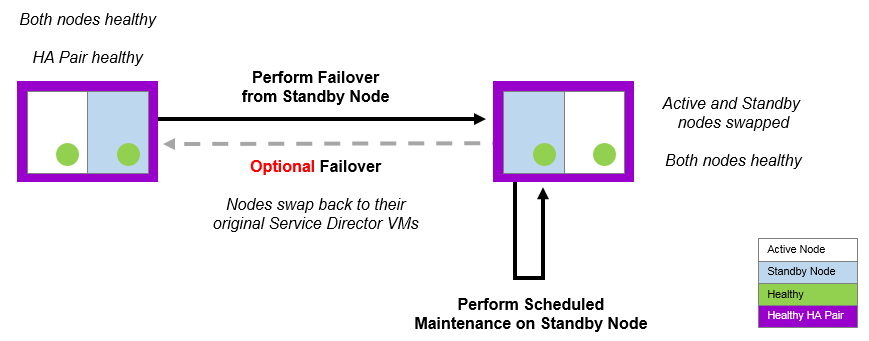
After a failover completes, the Services Endpoint Address points to the new Active node.
If either of the nodes is unhealthy, you must repair the unhealthy node first, or use a different operation such as an ejection (see Ejecting a Node from an HA Pair) or a forced failover (see Recovering from a Failed Active Node).
Performing a Failover from the Standby Node
1.Access your Standby Services Director VA from a browser, using either the IP address or hostname of your Standby node.
2.Log in as the administration user. The Home page appears.
3.Click the Services menu, and then click High Availability: Manage HA. The Manage HA page appears.
In this example:
•The Standby node (silver-01) is displayed on the left in a blue/gray panel.
•The Active node (gold-01) is displayed on the right in a white panel.
•A Failover button is available for the Standby node.
4.Ensure that all healthy indicators are green.
5.In the Standby panel, click Failover. An information panel appears.
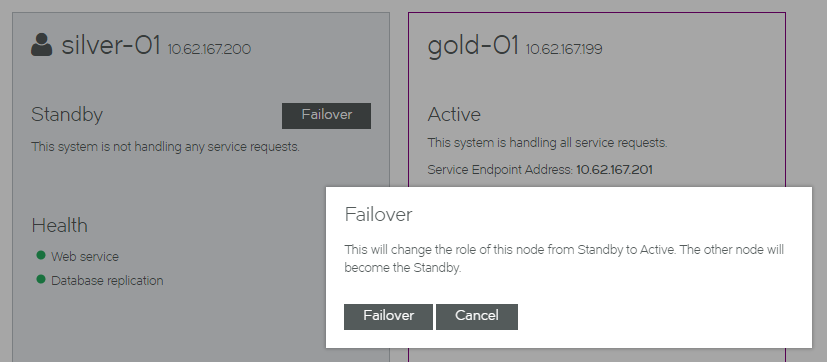
6.Click Failover. The failover starts.
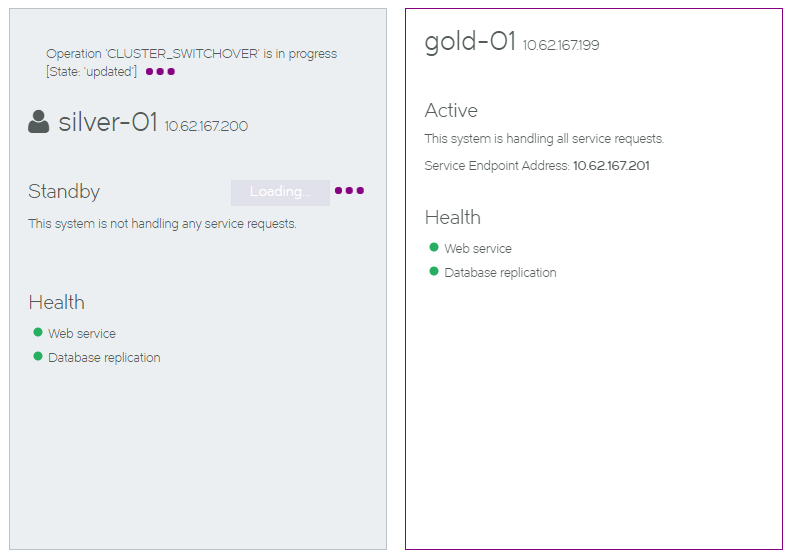
The failover process reports an error and stops if the Active node goes down as the failover is started. A retry of the failover will become a forced failover. See Recovering from a Failed Active Node.
7.Wait for the process to complete. The health indicators may become orange during the transition, but these will clear.
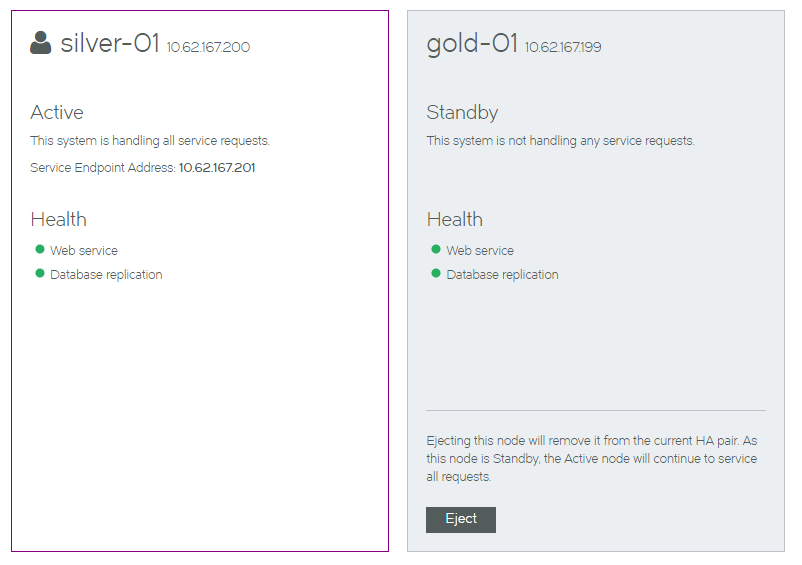
After the failover completes, the Manage HA page updates:
•the original Standby node (silver-01) is now the Active node.
•the original Active node (gold-01) is now the Standby node.
•All health indicators are green.
8.(Optional) Perform the following actions
•Perform maintenance on the new Standby node.
•Perform another failover to return the Primary Services Director and Secondary Services Director to their original roles.
•Eject the Standby node. See Ejecting a Node from an HA Pair.
Ejecting a Node from an HA Pair
A healthy Active node can eject the other member of an HA pair. This is useful in a number of scenarios:
•Ejecting an unhealthy Standby node in the event of failure. This creates a standalone Active node and an unpaired unhealthy Standby node.
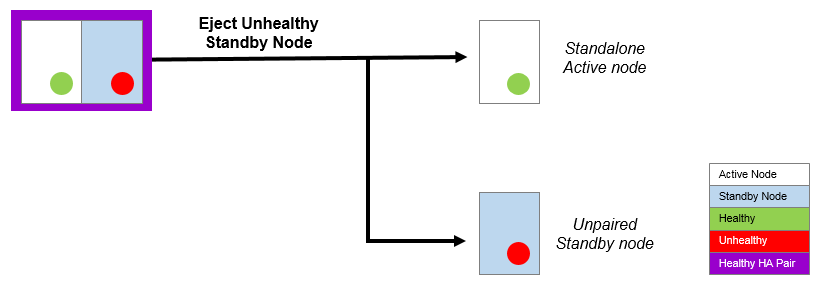
Once the Standby node is repaired, it can be joined to any standalone node to form an HA pair.
•Ejecting an unhealthy node after a forced failover operation fails.
In this instance, both nodes are Active, but one is unhealthy. The unhealthy Active node can be ejected from the healthy Active node.

•You can also eject a healthy Standby node if required. This results in a healthy standalone node and a healthy unpaired node.
Ejecting a Standby Node from the Active Node
1.Access your Active Services Director VA from a browser, using the Service Endpoint Address of your Services Director.
2.Log in as the administration user. The Home page appears.
3.Click the Services menu, and then click High Availability: Manage HA. The Manage HA page appears.
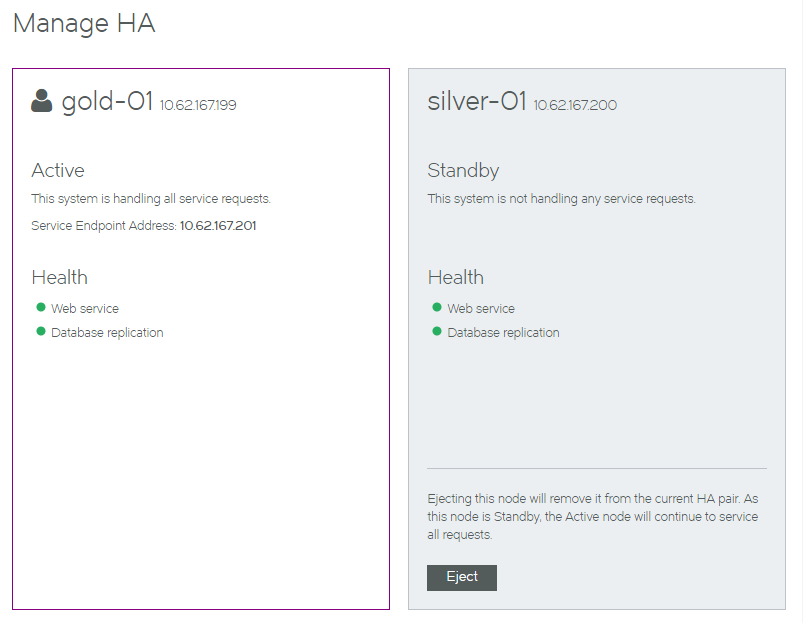
In this example:
•The Active node (gold-01) is displayed on the left in a white panel.
•The Standby node (silver-01) is displayed on the right in a blue/gray panel.
•An Eject button is available for the Standby node.
4.Ensure that all healthy indicators are green.
5.In the Standby panel, click Eject. An information panel appears.
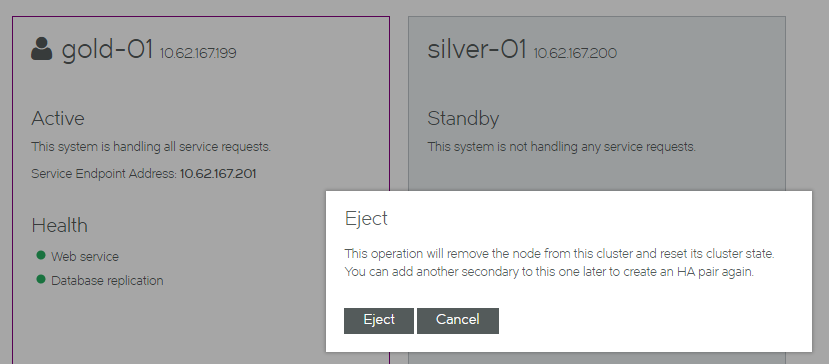
6.Click Eject. The ejection starts, and reports progress.
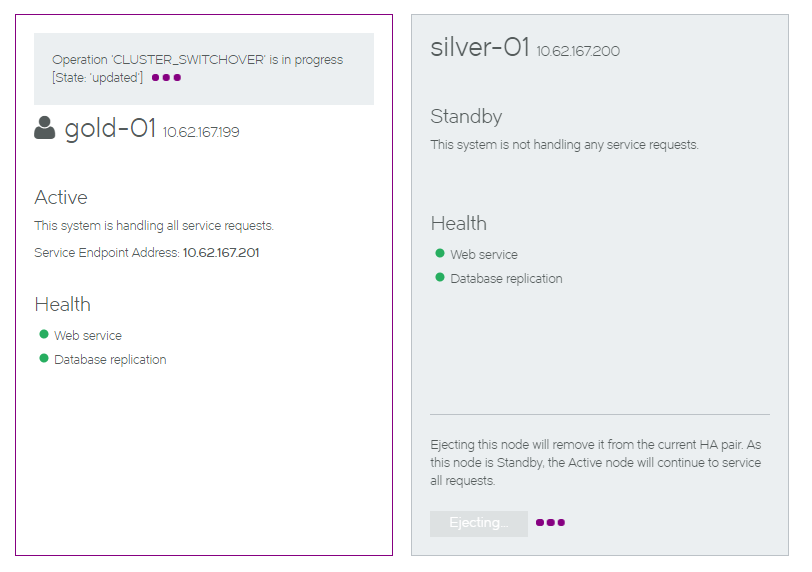
7.Wait for the process to complete. The health indicators may become orange during the transition, but these will clear.
After the ejection completes, the Manage HA page updates:
•The original Active node (gold-01) remains in place as a standalone node.
•No Standby node is configured.
The original Standby node still exists, but it is now an unpaired Services Director node.
•All health indicators are green.
8.(Optional) Confirm the state of the original Standby node. To do this, start its Services Director VA using its IP address or hostname and access its Manage HA page.

From this screen, you can convert this ejected Standby node into a standalone Active node, see Converting an Ejected Node into a Standalone Active Node.
Recovering from a Failed Active Node
If your Active node becomes unhealthy, it must be repaired.
Maintenance is typically performed on a Standby node. However, you cannot perform a failover to swap the Active and Standby nodes, because a failover requires both nodes to be healthy.
To resolve a failed Active node, you must attempt a forced failover from the healthy Standby node.
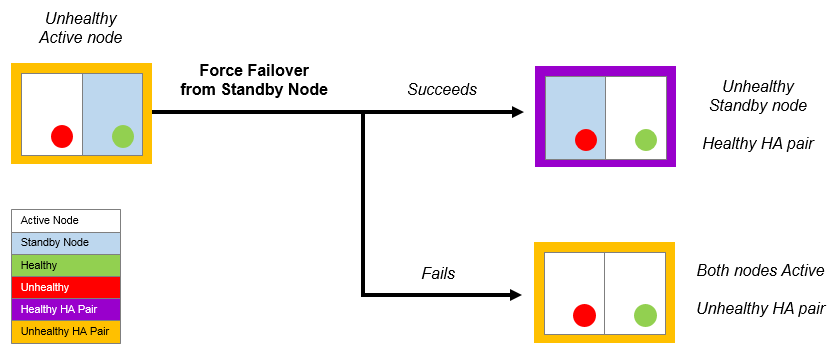
If the forced failover succeeds:
•The healthy Standby node becomes the healthy Active node.
•The unhealthy Active node becomes a Standby node.
•You can then perform maintenance on the Standby node. Alternatively, you can eject the unhealthy Standby node if required (see Ejecting a Node from an HA Pair).
•The Services Endpoint Address points to the new Active node.
If the forced failover fails:
•The healthy Standby node becomes a healthy Active node.
•The unhealthy Active node may remain as an Active node. To resolve this you can:
- Eject the unhealthy Active node from the healthy Active node (see Ejecting a Node from an HA Pair).
- Repair the unhealthy Active node. In this case, a "split brain" scenario develops (see Recovering from a Split Brain Scenario).
To Perform a Forced Failover from the Standby Node
1.Access your Active Services Director VA from a browser, using either the IP address or hostname of the healthy Active node.
2.Log in as the administration user. The Home page appears.
3.Click the Services menu, and then click High Availability: Manage HA. The Manage HA page appears.

In this example:
•The Standby node (silver-01) is healthy.
•The Active node (gold-01, identified as 10.62.167.199) is unhealthy.
•The Failover button is available for the Standby node.
4.Click the Failover button.
A warning is displayed. This indicates that a forced failover is required, as the Active node is not in a healthy state.
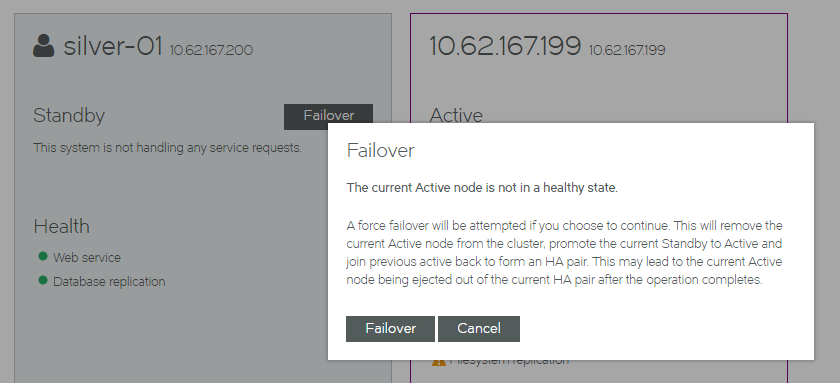
5.Click Failover to confirm the forced failover. The process starts, and displays progress.
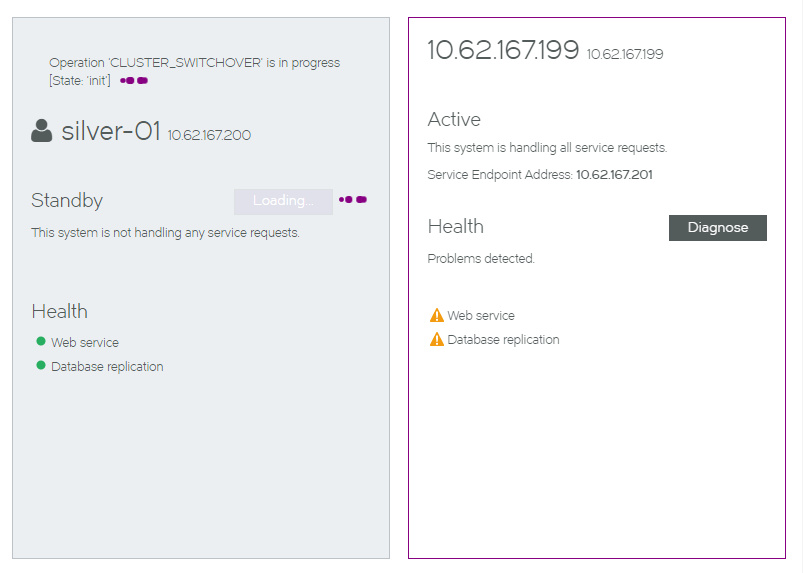
6.Wait for the process to complete.
After the ejection completes, the Manage HA page updates.

It may be difficult to assess the success of this operation from the new Active node.
7.To assess the success/failure of the forced failover, start the Services Director VA for the unhealthy Standby node and access its Manage HA page.
If the process has completed successfully:
•The unhealthy Standby node is shown on the left
•The healthy Active node is shown on the right.
If the process has completed unsuccessfully:
•The unhealthy Standby node is shown on the left
•A "split brain" scenario is reported. See Recovering from a Split Brain Scenario for details.
Recovering from a Split Brain Scenario
The "split brain" scenario is an exceptional circumstance where two healthy nodes in an HA pair both believe themselves to be the Active node, and that the other node is the Standby.
This scenario represents an unhealthy HA pair, and must be resolved.
Understanding How the Split Brain Scenario Arises
The "split brain" scenario can occur after a failed forced failover operation. Specifically:
1.The healthy Standby node becomes an Active node.
2.The unhealthy Active node fails to become the Standby node.
3.The unhealthy Active node is repaired. Both nodes are now healthy and Active, and each also believes the other node in the HA pair to be the Standby node. This is the "split brain" scenario.
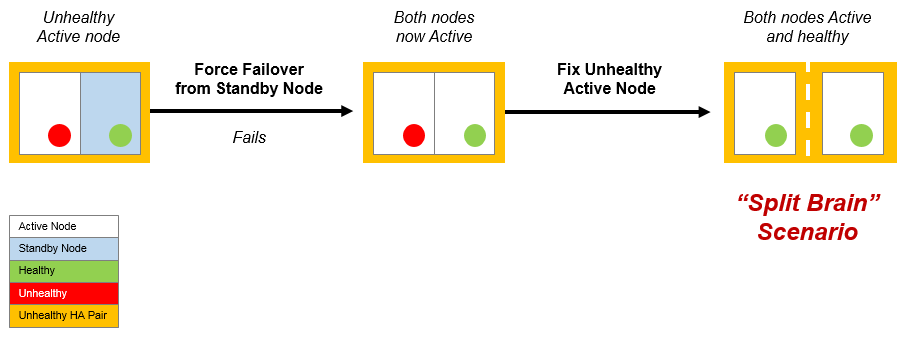
See Recovering from a Failed Active Node for details of the Forced Failover operation.
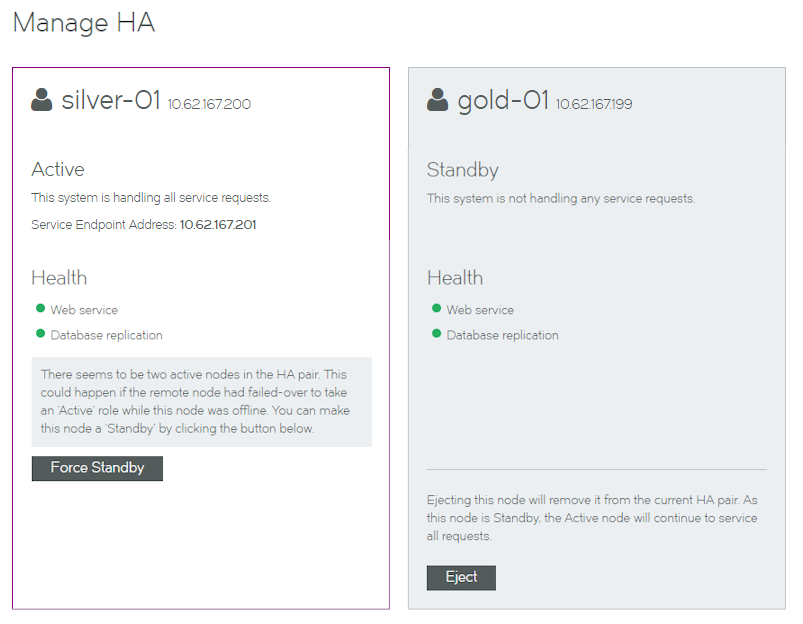
Viewing the Split Brain Scenario
A notification of a "split brain" scenario is included in the Manage HA page. It is shown in the panel for the Active node, along with a Force Standby button.
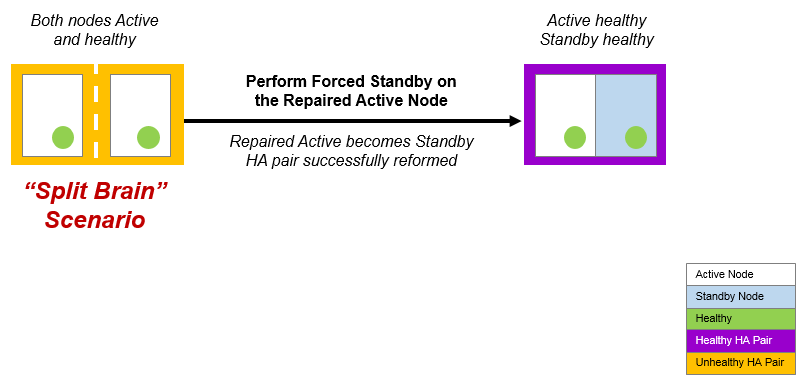
Resolving a Split Brain Scenario
To resolve the "split brain" scenario, perform a forced standby operation from the repaired Active node. This forces the repaired Active node to become the Standby node in the HA pair.
1.Access the Services Director VA for the repaired Active node from a browser, using either the IP address or hostname of your repaired Active node.
Do not access the Services Director VA using the Service Endpoint Address.
2.Log in as the administration user. The Home page appears.
3.Click the Services menu, and then click High Availability: Manage HA. The Manage HA page appears.
A notification of a split brain is included in the panel for the Active node, along with a Force Standby button.

4.Click Force Standby. The forced standby starts, and progress is reported. During this process:
•The repaired Active (in this case, silver-01) becomes the Standby node.
•The other Active node becomes correctly identified and colored.

5.Wait for the process to complete. The health indicators may become orange during the transition, but these will clear.
After the forced standby completes, the Manage HA page updates:
•The new Standby node (silver-01) is on the left.
•The Active node (gold-01) is on the right.
•All health indicators are green.

6.(Optional) Log out of the Standby node and start the Services Director VA for the Active node. The Manage HA page for this node confirms the correct configuration of nodes following this operation.

Converting an Ejected Node into a Standalone Active Node
After you have ejected a node, it becomes an unpaired Services Director node. This node contains no configuration or licenses.
You can convert this unpaired node to be a Primary Services Director node if required.
To do this, you must choose how you want the IP address of the node to be used:
•The current management IP address of the node can be used as its new Service Endpoint Address. This requires you to enter a new management IP address for the node.
•The current management IP address of the node will be retained. This requires you to enter a new Service Endpoint Address for the node.
If the Service Endpoint Address is in a private network behind a NAT device, you must also specify the external IP address for the Service Endpoint Address.
1.Access the Services Director VA for the Standby node from a browser, using either the IP address or hostname of the Standby node.
2.Log in as the administration user. The Home page appears.
3.Click the Services menu, and then click High Availability: Manage HA. The Manage HA page appears.
This page confirms the unpaired state of this Services Director node.

4.Click Create Primary.
The Manage HA page updates to collect the required information.
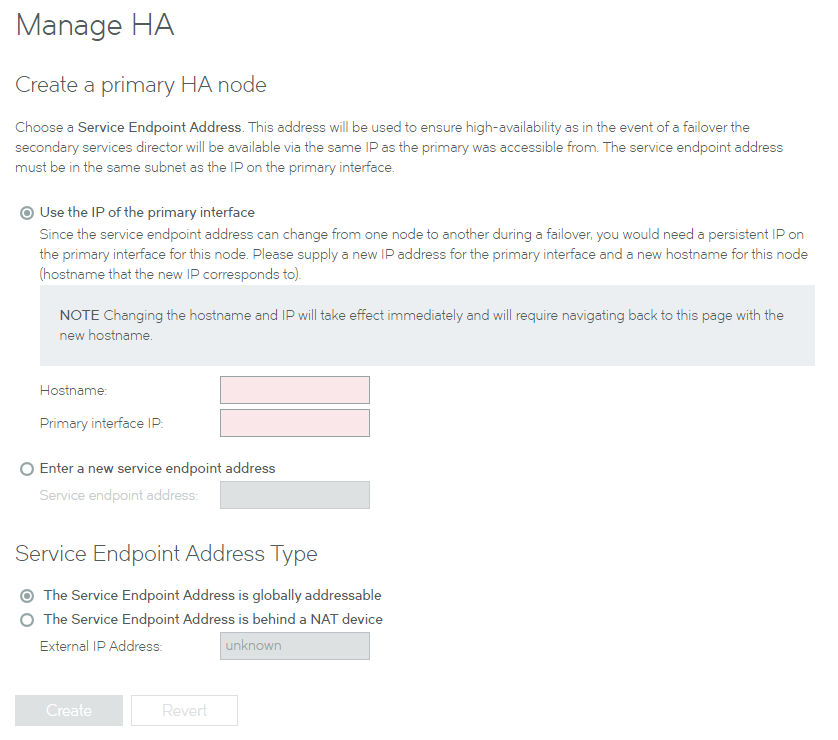
5.If you want the current management IP address of the node to be used as its new Service Endpoint Address:
•Select Use the IP of the Primary Interface.
•Enter a Hostname for the new Primary management IP address.
•Enter the new Primary interface IP of the node.
This will replace the current management IP address of the node.
6.If you want the current management IP address of the node to be retained:
•Select Enter a new service endpoint address.
•Enter a new Service endpoint address for the node.
The current management IP address for the node is retained.
7.If the specified Service Endpoint Address for the Services Director HA pair is globally addressable, select The Service Endpoint Address is globally addressable.
8.If the specified Service Endpoint Address for the Services Director HA pair is in a private network behind a NAT device:
•Select The Service Endpoint Address is behind a NAT device.
The available properties update to include an External IP Address property.
•Enter the external NAT address for your Services Director HA pair as the External IP Address.
9.Click Create. The process starts and reports progress.
When the process completes, the original node is now a standalone Primary Services Director.
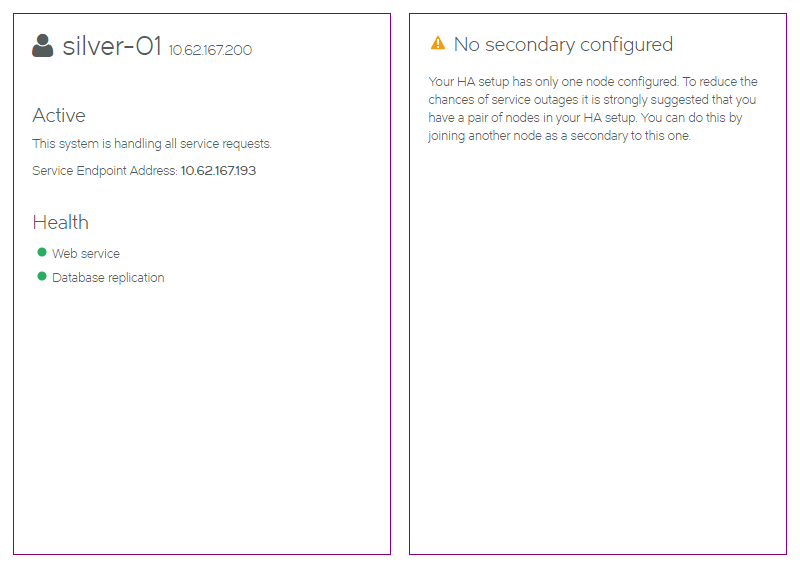
In this example:
•silver-01 retains its originally IP address (10.62.167.200)
•silver-01 has a new Service Endpoint Address defined (10.62.167.193).
•silver-01 is now a standalone Primary Services Director.
•silver-01 is not behind a NAT device.
Converting an Upgraded Node into a Standalone Active Node
After you have upgraded your Services Director from an earlier release, it exists as an unpaired Services Director node. This node contains the configuration from the upgraded system.
You can convert this unpaired node to be an Primary Services Director node if required. This enables you to subsequently establish your upgraded node as part of an HA pair.
To do this, you will provide the following IP addresses:
•The IP address of your upgraded node becomes the Service Endpoint Address for a standalone Primary Services Director. This ensures that the Legacy FLA licenses that are in use (which must now point to the Service Endpoint Address) will not become invalid during the process.
•Your upgraded node will then require a new IP address for its management interface.
•If the Service Endpoint Address is in a private network behind a NAT device, you must also specify the external IP address for the Service Endpoint Address.
1.Access your Services Director VA for the upgraded node from a browser, using either the IP address or hostname of your Standby node.
2.Log in as the administration user. The Home page appears.
3.Click the Services menu, and then click High Availability: Manage HA. The Manage HA page appears.
This page confirms the unpaired state of this Services Director node.

4.Click Create Primary.
The Manage HA page updates to collect the required information.

5.Select Use the IP of the Primary Interface.
6.Enter a Hostname for the new Primary management IP address.
This ensures that the current management IP address of your upgraded node becomes its Service Endpoint Address.
7.Enter the new Primary interface IP for your upgraded node.
This will replace the current management IP address of your upgraded node.
8.If the Service Endpoint Address for the Services Director HA pair is globally addressable, select The Service Endpoint Address is globally addressable.
9.If the Service Endpoint Address for the Services Director HA pair is in a private network behind a NAT device:
•Select The Service Endpoint Address is behind a NAT device.
The available properties update to include an External IP Address.
•Enter the external NAT address for your Services Director HA pair as the External IP Address.
10.Click Create. The process starts and reports progress.
When the process completes, the original node is now a standalone Primary Services Director.

In this example:
•silver-01 changes its IP address from 10.62.167.200 to 10.62.167.193.
•silver-01 now has a Service Endpoint Address. This is its original IP address (10.62.167.200).
•silver-01 is now a standalone Primary Services Director. It retains its configuration.
•silver-01 is not behind a NAT device.
When a new Secondary Services Director is created subsequently, it can be joined to silver-01 to form an HA pair. This completes the upgrade process.