Global IP Blacklisting
Purpose
Global IP blacklisting provides a means to temporarily block all traffic for specific IP addresses or specific ranges of IP addresses.
How global IP blacklisting works
The global IP blacklisting mechanism involves several components. This approach allows you to customize the behavior for each application separately.
The IP blacklist is provided globally, which means that it’s available to all applications. You can view and edit the global IP blacklist via the menu item Administration > IP Blacklist .
ATTENTION
The global IP blacklist by itself has no effect whatsoever on applications. The fact that an IP address is on the global IP blacklist doesn’t mean that traffic from this IP address is automatically blocked.
You can apply the global IP blacklist locally on application level. While some applications may use the list, others may not.
If you want to exercise the global IP blacklist on an application, you must configure the Valid Client IP Handler or the Client IP Selector, and you must enable the option gbl (global blacklist) there. This is a key principle: Even if there’s a blacklist of IP addresses that’s available globally, each application administrator can decide locally whether or not to actually apply the blacklist.
If the "global ip blacklist" is not configured in the WAF, then while configuring other handlers (Which has the option to use "global ip blacklist") ensure to uncheck "global ip blacklist" option, reason being, if "global ip blacklist" is not configured, WAF will not have a parameter to match with, and thereby will consider incoming IP to be a whitelisted IP address.
How IPs get blacklisted
IP addresses are added to the global IP blacklist by either of the following:
- You configure vWAF to add IP addresses to the global IP blacklist automatically, based on events and alerts (for general information on alerting, see Configuring Alerts).
- You add IP addresses to the global IP blacklist manually.
Configuring vWAF to add IP addresses to the IP blacklist
It is recommended that you use the IP Blacklist Wizard to configure IP blacklisting. The wizard guides you through the process to set up IP blacklisting and ensures efficient and accurate configuration of global and application level options.
After you have set up IP blacklisting, using the IP Blacklist wizard (or manually as detailed below), the following happens at runtime:
The first action takes place on application level. When there are events on applications for which you didn’t configure the Blacklist IP Event Destination, nothing happens. If there’s an event on an application to which you’ve added the Blacklist IP Event Destination, however, vWAF sends the event to the Blacklist IP Event Destination.
In the next step, the Blacklist IP Event Destination triggers a second event. This event is available globally. As you’ve configured the Global Blacklist IP Event Source and linked it to the Global Blacklist IP Event Destination, the event now ends up in the Global Blacklist IP Event Destination, which writes the IP address (or a range of IP addresses) of the request to the global IP blacklist.
Even if some IP addresses are on the global IP blacklist now, this still does not have any effect. If there’s a request coming from one of the blacklisted IP addresses, vWAF still accepts this request. To have vWAF deny requests from IP addresses that are on the global IP blacklist, you must next add the Valid Client IP Handler (with option gbl enabled) to each application, for which you want to enable the mechanism.
Manually configuring vWAF to add IP addresses to the IP blacklist
The IP Blacklist wizard guides you through the process of configuring IP blacklisting. However, it is possible to set up and review IP blacklisting manually.
If you aren’t familiar with the configuration of event sources and event destinations, first read Configuring Alerts, Editing Event Sources, and Editing Event Destinations).
To manually configure vWAF so that it adds IP addresses to the global IP blacklist automatically:
- On application level, add the event destination Blacklist IP Event Destination (see Event Destinations) to a new or to an existing event destination group.
- On global level, add the event destination Global Blacklist IP Event Destination (see Event Destinations) to a new or to an existing event destination group.
- On global level, add the event source Global Blacklist IP Added Event Source and for this event source, select the event destination group to which you’ve previously added the Global Blacklist IP Event Destination.
- Commit and activate the ruleset (see Committing and Activating Ruleset Changes).
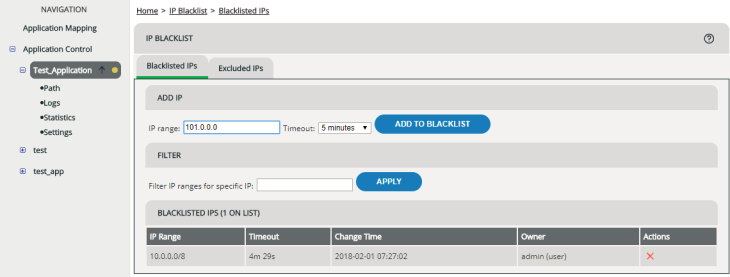
Adding an IP address range to the global IP blacklist manually
To manually add a specific IP address or a range of IP addresses to the global IP blacklist:
Filtering the view
If there are a large number of entries in the IP Blacklist View, it can be helpful to filter the list. When you apply a filter, the list only shows those IP address ranges that include the specific IP address that you’ve filtered for.
To apply a filter:
- In the Filter IP ranges for specific IP field, enter the IP address for which you want to filter the list.
- Click the Apply button.
To remove a filter, delete the IP address from the Filter IP ranges for specific IP field.
Excluding ranges of IP addresses from the global IP blacklist
You can prevent particular ranges of IP addresses from getting onto the global IP blacklist. This can be useful, for example, if you use external scanners that check your web application at regular intervals.
ATTENTION
Note that excluding ranges of IP addresses doesn’t set up a whitelist. It does not mean that all requests from these IP addresses are accepted. It just prevents the specified IP addresses from being written onto the global IP blacklist.
To exclude a single IP address or a range of IP addresses from the global IP blacklist:
- If you haven’t already done so: Select the menu item Administration > IP Blacklist to open the global IP blacklist.
- Click the Excluded IPs tab.
- Enter the IPv4 or IPv6 address and netmask into the IP range field. For the syntax used, see Specifying IP Addresses.
- Click the Add to excluded IPs button.
The excluded IP address range now appears on the list. By clicking the delete icon in the Action column, you can remove it at any time.
Once you’ve set up excluded IP address ranges, if an IP address range appears on the global IP blacklist and if this IP address range is fully or partially covered by one of the excluded IP address ranges, the entry is marked with a red exclamation point.